Page 3159 of 5883
FRONT DRIVE SHAFT
FAX-25
< DISASSEMBLY AND ASSEMBLY >
C
E
F
G
H
I
J
K
L
MA
B
FA X
N
O
P Support Bearing
1. Install new dust shield on drive shaft
CAUTION:
Do not reuse dust shield.
2. Press support bearing onto drive shaft.
3. Install new snap ring.
CAUTION:
Do not reuse snap ring.
4. Install new dust shield
CAUTION:
Do not reuse dust shield.
Damper
1. Secure damper with new damper bands.
CAUTION:
Do not reuse damper bands.
YA X 0 0 7
YA X 0 0 8
“A” : 230 – 236 mm (9.06 – 9.29 in)
“B” : 70 mm (2.76 in)
FAC0156D
Page 3162 of 5883
FL-2
< PRECAUTION >
PRECAUTIONS
PRECAUTION
PRECAUTIONS
Precaution for Supplemental Restraint System (SRS) "AIR BAG" and "SEAT BELT
PRE-TENSIONER"
INFOID:0000000001722973
The Supplemental Restraint System such as “AIR BAG” and “SEAT BELT PRE-TENSIONER”, used along
with a front seat belt, helps to reduce the risk or severity of injury to the driver and front passenger for certain
types of collision. This system includes seat belt switch inputs and dual stage front air bag modules. The SRS
system uses the seat belt switches to determine the front air bag deployment, and may only deploy one front
air bag, depending on the severity of a collision and whether the front occupants are belted or unbelted.
Information necessary to service the system safely is included in the SR and SB section of this Service Man-
ual.
WARNING:
• To avoid rendering the SR inoperative, which could increase the risk of personal injury or death in
the event of a collision which would result in air bag inflation, all maintenance must be performed by
an authorized NISSAN/INFINITI dealer.
Improper maintenance, including incorrect removal and installation of the SRS, can lead to personal
injury caused by unintentional activation of the system. For removal of Spiral Cable and Air Bag
Module, see the SRS section.
Do not use electrical test equipment on any circuit related to the SRS unless instructed to in this
Service Manual. SRS wiring harnesses can be identified by yellow and/or orange harnesses or har-
ness connectors.
Page 3165 of 5883
FUEL LEVEL SENSOR UNIT, FUEL FILTER AND FUEL PUMP ASSEMBLY
FL-5
< ON-VEHICLE REPAIR >
C
D
E
F
G
H
I
J
K
L
MA
FL
N
P O
ON-VEHICLE REPAIR
FUEL LEVEL SENSOR UNIT, FUEL FILTER AND FUEL PUMP ASSEMBLY
HR16DE, HR18DEINFOID:0000000001723038
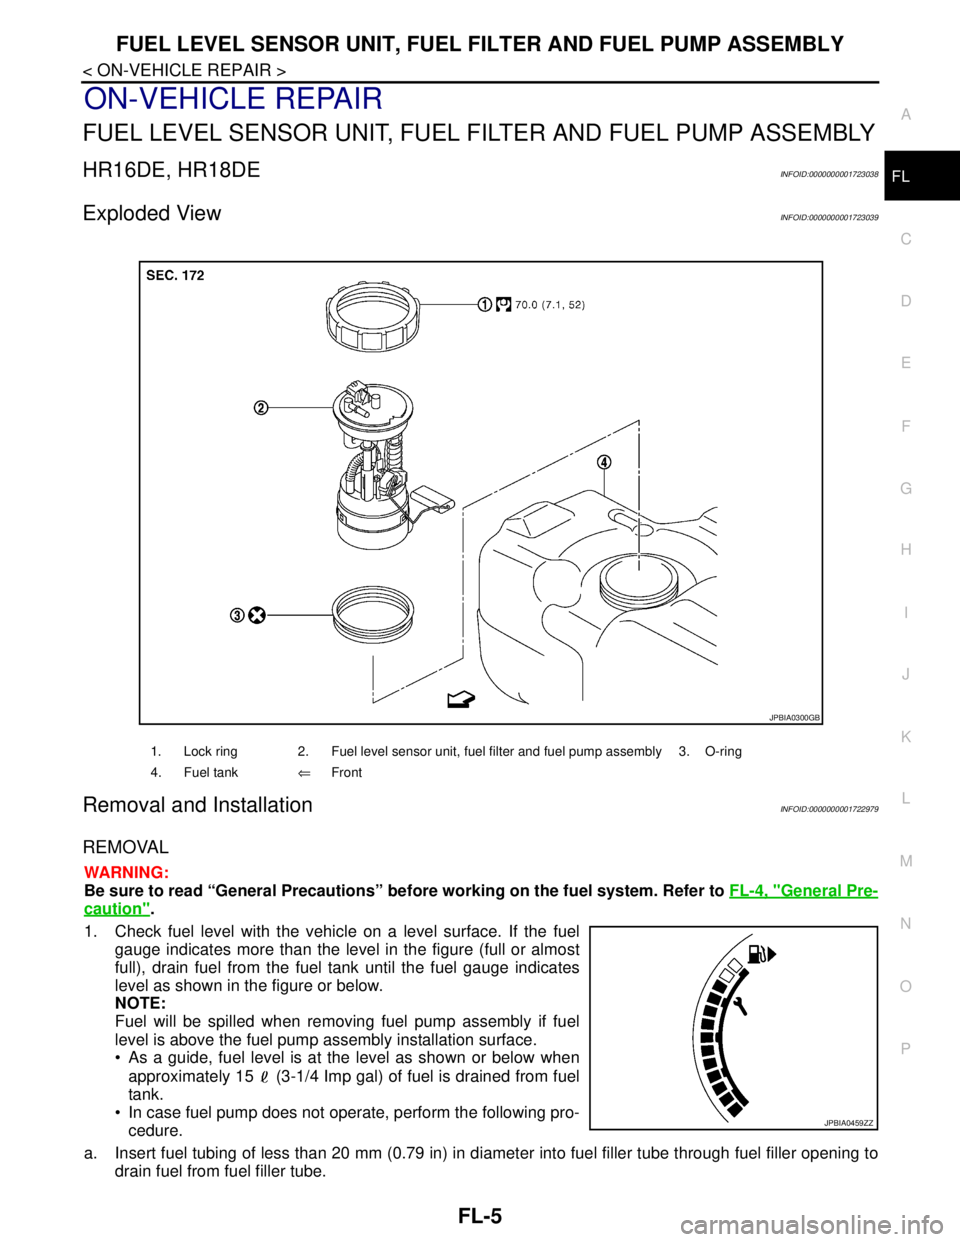
Exploded ViewINFOID:0000000001723039
Removal and InstallationINFOID:0000000001722979
REMOVAL
WARNING:
Be sure to read “General Precautions” before working on the fuel system. Refer to FL-4, "
General Pre-
caution".
1. Check fuel level with the vehicle on a level surface. If the fuel
gauge indicates more than the level in the figure (full or almost
full), drain fuel from the fuel tank until the fuel gauge indicates
level as shown in the figure or below.
NOTE:
Fuel will be spilled when removing fuel pump assembly if fuel
level is above the fuel pump assembly installation surface.
As a guide, fuel level is at the level as shown or below when
approximately 15 (3-1/4 Imp gal) of fuel is drained from fuel
tank.
In case fuel pump does not operate, perform the following pro-
cedure.
a. Insert fuel tubing of less than 20 mm (0.79 in) in diameter into fuel filler tube through fuel filler opening to
drain fuel from fuel filler tube.
1. Lock ring 2. Fuel level sensor unit, fuel filter and fuel pump assembly 3. O-ring
4. Fuel tank⇐Front
JPBIA0300GB
JPBIA0459ZZ
Page 3166 of 5883
FL-6
< ON-VEHICLE REPAIR >
FUEL LEVEL SENSOR UNIT, FUEL FILTER AND FUEL PUMP ASSEMBLY
b. Disconnect fuel filler hose from fuel filler tube. Refer to FL-10, "HR16DE, HR18DE".
c. Insert fuel tubing into fuel tank through fuel filler hose to drain fuel from fuel tank.
2. Release the fuel pressure from the fuel lines. Refer to EC-377, "
Inspection" (HR16DE with EURO-OBD),
EC-681, "
Inspection" (HR16DE without EURO-OBD), EC-1035, "Inspection" (MR18DE).
3. Open fuel filler lid.
4. Open fuel door and unscrew the fuel filler cap to release the pressure inside the fuel tank.
5. Remove rear seat bottom. Refer to SE-18, "
Removal and Installation".
6. Turn the four retainers 90° in a clockwise direction and remove the fuel pump inspection hole cover.
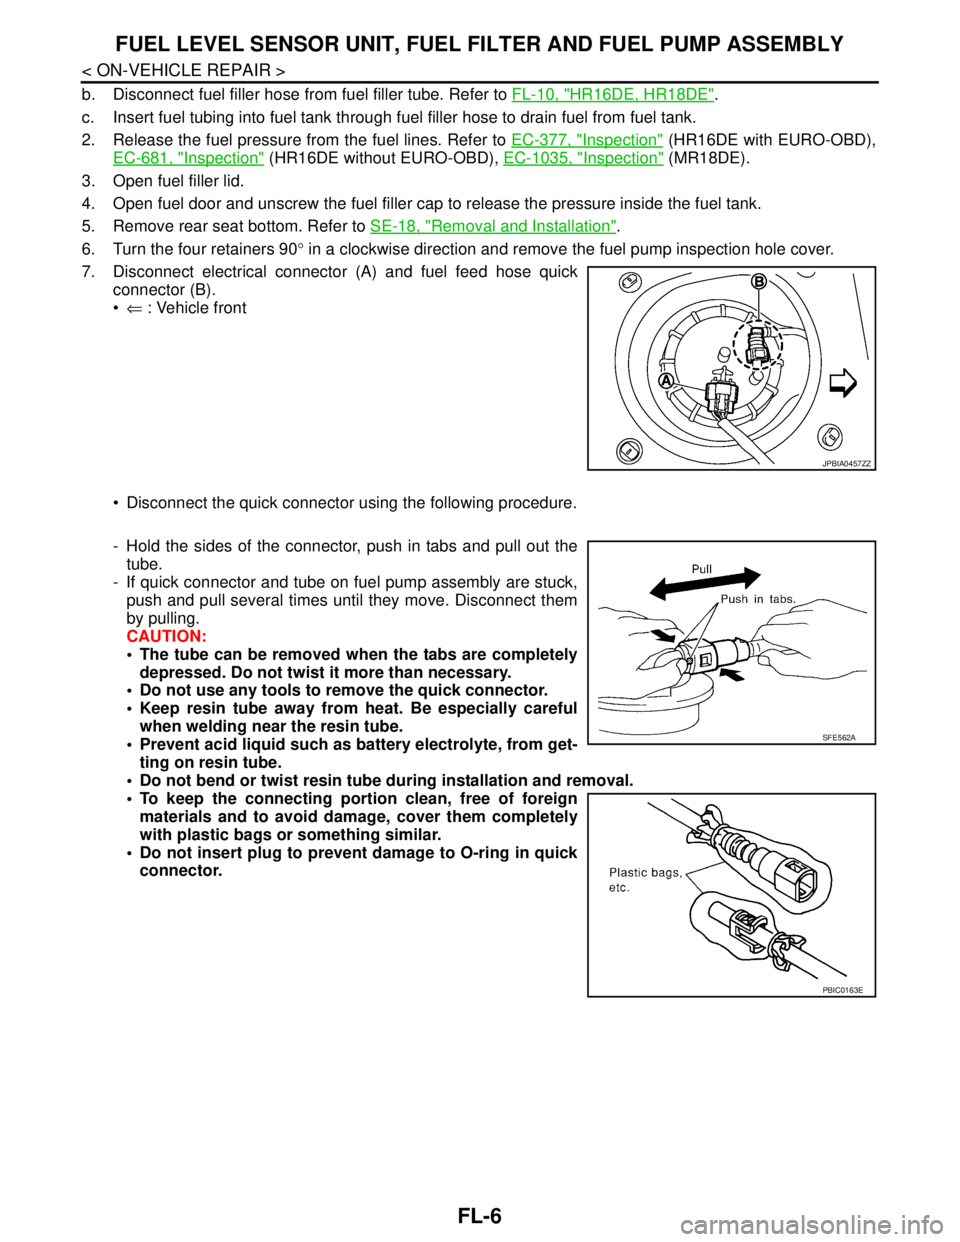
7. Disconnect electrical connector (A) and fuel feed hose quick
connector (B).
⇐ : Vehicle front
Disconnect the quick connector using the following procedure.
- Hold the sides of the connector, push in tabs and pull out the
tube.
- If quick connector and tube on fuel pump assembly are stuck,
push and pull several times until they move. Disconnect them
by pulling.
CAUTION:
The tube can be removed when the tabs are completely
depressed. Do not twist it more than necessary.
Do not use any tools to remove the quick connector.
Keep resin tube away from heat. Be especially careful
when welding near the resin tube.
Prevent acid liquid such as battery electrolyte, from get-
ting on resin tube.
Do not bend or twist resin tube during installation and removal.
To keep the connecting portion clean, free of foreign
materials and to avoid damage, cover them completely
with plastic bags or something similar.
Do not insert plug to prevent damage to O-ring in quick
connector.
JPBIA0457ZZ
SFE562A
PBIC0163E
Page 3167 of 5883
FUEL LEVEL SENSOR UNIT, FUEL FILTER AND FUEL PUMP ASSEMBLY
FL-7
< ON-VEHICLE REPAIR >
C
D
E
F
G
H
I
J
K
L
MA
FL
N
P O
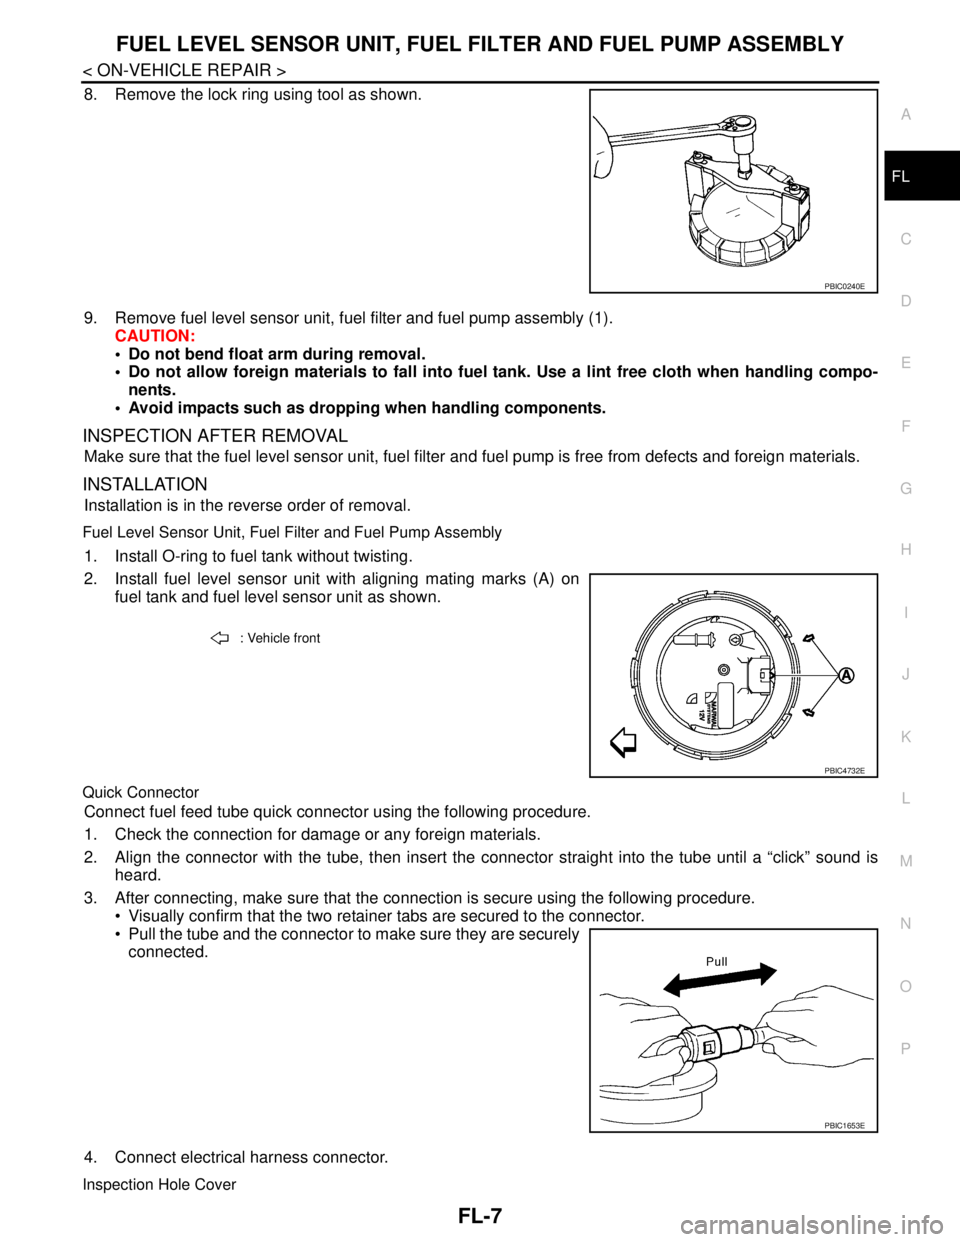
8. Remove the lock ring using tool as shown.
9. Remove fuel level sensor unit, fuel filter and fuel pump assembly (1).
CAUTION:
Do not bend float arm during removal.
Do not allow foreign materials to fall into fuel tank. Use a lint free cloth when handling compo-
nents.
Avoid impacts such as dropping when handling components.
INSPECTION AFTER REMOVAL
Make sure that the fuel level sensor unit, fuel filter and fuel pump is free from defects and foreign materials.
INSTALLATION
Installation is in the reverse order of removal.
Fuel Level Sensor Unit, Fuel Filter and Fuel Pump Assembly
1. Install O-ring to fuel tank without twisting.
2. Install fuel level sensor unit with aligning mating marks (A) on
fuel tank and fuel level sensor unit as shown.
Quick Connector
Connect fuel feed tube quick connector using the following procedure.
1. Check the connection for damage or any foreign materials.
2. Align the connector with the tube, then insert the connector straight into the tube until a “click” sound is
heard.
3. After connecting, make sure that the connection is secure using the following procedure.
Visually confirm that the two retainer tabs are secured to the connector.
Pull the tube and the connector to make sure they are securely
connected.
4. Connect electrical harness connector.
Inspection Hole Cover
PBIC0240E
: Vehicle front
PBIC4732E
PBIC1653E
Page 3168 of 5883
FL-8
< ON-VEHICLE REPAIR >
FUEL LEVEL SENSOR UNIT, FUEL FILTER AND FUEL PUMP ASSEMBLY
Before installing inspection hole cover, confirm that there are no fuel leaks. Refer to "INSPECTION AFTER
INSTALLATION".
1. Install inspection hole cover with the front mark (arrow) facing front of vehicle.
2. Lock clips by turning counterclockwise.
K9KINFOID:0000000001723040
Exploded ViewINFOID:0000000001723041
Fuel Filter
Fuel Level Sensor Unit
Removal and InstallationINFOID:0000000001723059
REMOVAL
WARNING:
Be sure to read “General Precautions” before working on the fuel system. Refer to FL-4, "
General Pre-
caution".
E1BIA0030ZZ
1. Fuel filter 2. Fuel filter bracket 3. Fuel filter protector
E1BIA0015GB
1. Lock ring 2. Fuel level sensor unit 3. O-ring
A. To fuel tank
Page 3171 of 5883
FUEL TANK
FL-11
< ON-VEHICLE REPAIR >
C
D
E
F
G
H
I
J
K
L
MA
FL
N
P O
6. Disconnect EVAP tube (2) at rear side of fuel tank.
Vent hose (1)
⇐ : Vehicle front
7. Remove fuel filler hose (3) at fuel filler tube side.
8. If necessary, remove mounting screw and quick connectors and
slide the EVAP canister rearward to remove it from the fuel tank.
9. Support center of fuel tank (1) with transmission jack (A).
10. Remove fuel tank straps (RH and LH).
11. Lower transmission jack carefully to remove fuel tank while sup-
porting it by hand.
CAUTION:
Fuel tank may be in an unstable position because of the
shape of fuel tank bottom. Be sure to support tank securely.
INSTALLATION
Note the following, and install in the reverse order of removal.
Fuel Filler Hose
Install fuel filler hose to fuel tank, paying attention to install
mark.Marking faces downward
JPBIA0456ZZ
MBIB9040E
PBIC3792E
MBIB9043E
Page 3174 of 5883
FL-14
< ON-VEHICLE REPAIR >
FUEL TANK
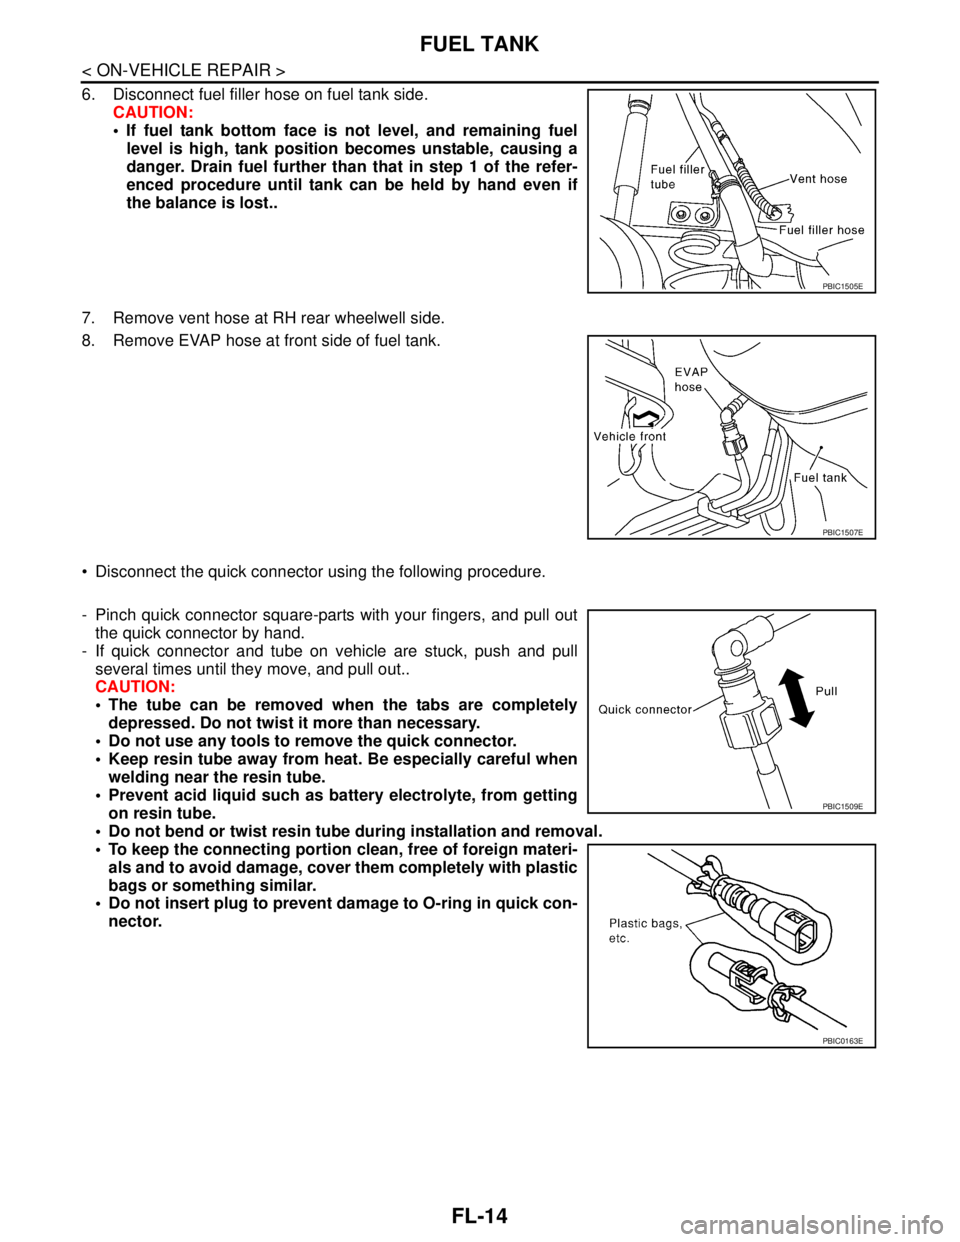
6. Disconnect fuel filler hose on fuel tank side.
CAUTION:
If fuel tank bottom face is not level, and remaining fuel
level is high, tank position becomes unstable, causing a
danger. Drain fuel further than that in step 1 of the refer-
enced procedure until tank can be held by hand even if
the balance is lost..
7. Remove vent hose at RH rear wheelwell side.
8. Remove EVAP hose at front side of fuel tank.
Disconnect the quick connector using the following procedure.
- Pinch quick connector square-parts with your fingers, and pull out
the quick connector by hand.
- If quick connector and tube on vehicle are stuck, push and pull
several times until they move, and pull out..
CAUTION:
The tube can be removed when the tabs are completely
depressed. Do not twist it more than necessary.
Do not use any tools to remove the quick connector.
Keep resin tube away from heat. Be especially careful when
welding near the resin tube.
Prevent acid liquid such as battery electrolyte, from getting
on resin tube.
Do not bend or twist resin tube during installation and removal.
To keep the connecting portion clean, free of foreign materi-
als and to avoid damage, cover them completely with plastic
bags or something similar.
Do not insert plug to prevent damage to O-ring in quick con-
nector.
PBIC1505E
PBIC1507E
PBIC1509E
PBIC0163E