2007 NISSAN TIIDA Body
[x] Cancel search: BodyPage 3233 of 5883
IDENTIFICATION INFORMATION
GI-39
< FEATURES OF NEW MODEL >
C
D
E
F
G
H
I
J
K
L
MB
GI
N
O
P
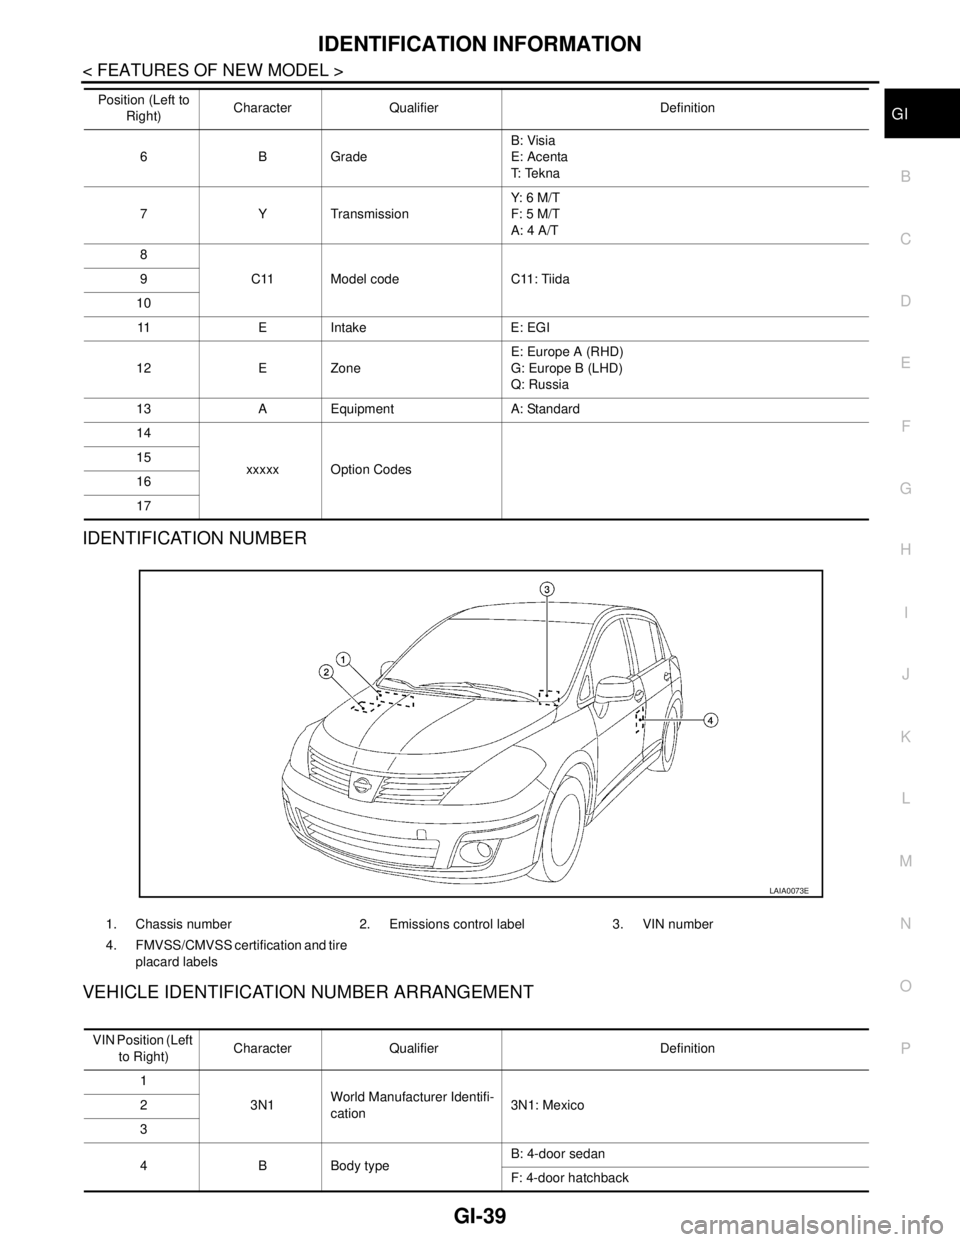
IDENTIFICATION NUMBER
VEHICLE IDENTIFICATION NUMBER ARRANGEMENT
6BGradeB: Visia
E: Acenta
T: Te k n a
7 Y TransmissionY: 6 M/ T
F: 5 M/T
A: 4 A/T
8
C11 Model code C11: Tiida 9
10
11 E Intake E: EGI
12 E ZoneE: Europe A (RHD)
G: Europe B (LHD)
Q: Russia
13 A Equipment A: Standard
14
xxxxx Option Codes 15
16
17 Position (Left to
Right)Character Qualifier Definition
1. Chassis number 2. Emissions control label 3. VIN number
4. FMVSS/CMVSS certification and tire
placard labels
LAIA0073E
VIN Position (Left
to Right)Character Qualifier Definition
1
3N1World Manufacturer Identifi-
cation3N1: Mexico 2
3
4 B Body typeB: 4-door sedan
F: 4-door hatchback
Page 3256 of 5883
GI-62
< BASIC INSPECTION >
SERVICE INFORMATION FOR ELECTRICAL INCIDENT
INPUT-OUTPUT VOLTAGE CHART
The voltage value is based on the body ground.
*: If high resistance exists in the switch side circuit (caused by a single strand), terminal 1 does not detect battery voltage. Control unit
does not detect the switch is ON even if the switch does not turn ON. Therefore, the control unit does not supply power to light up the
lamp.
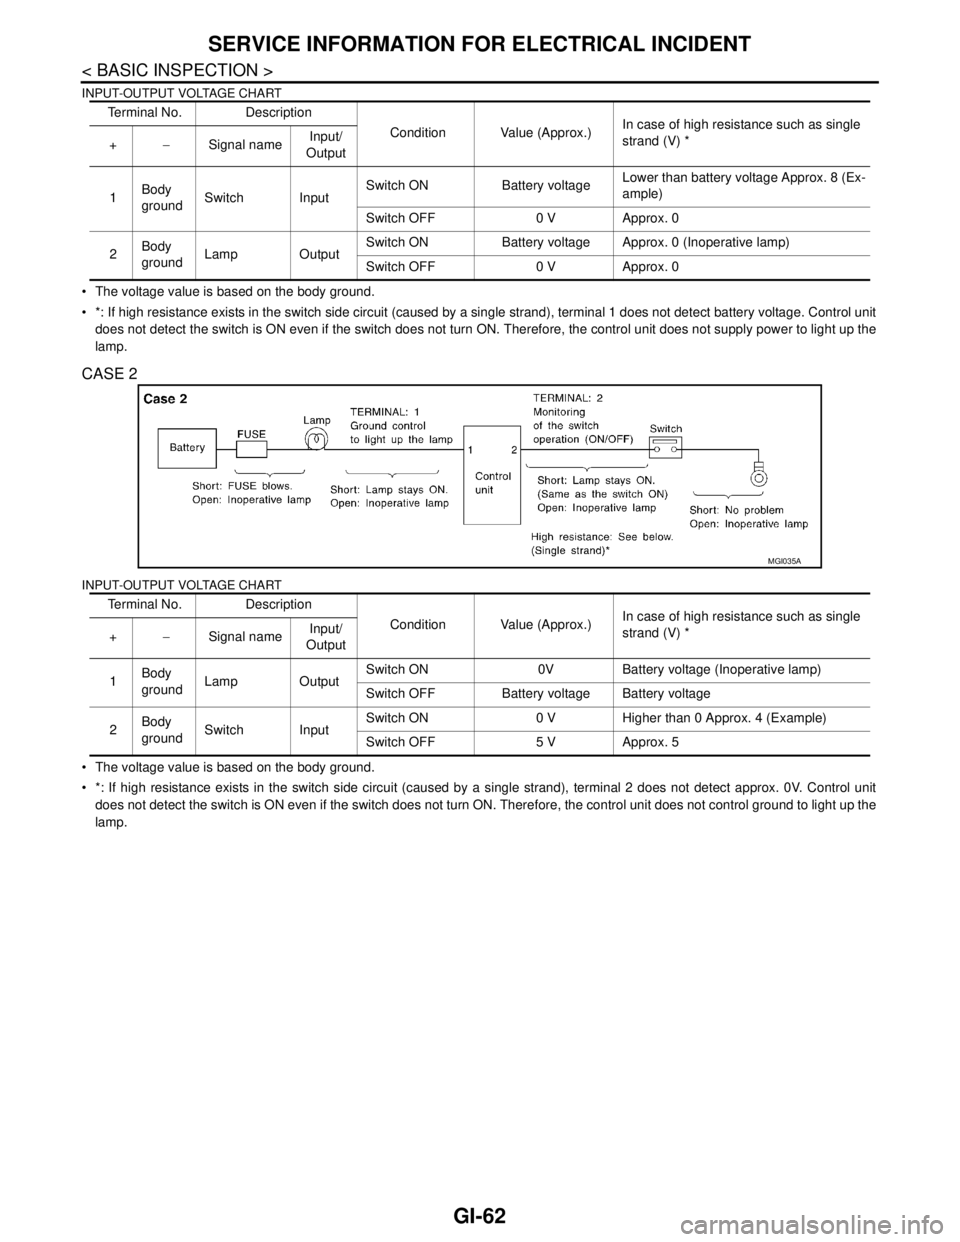
CASE 2
INPUT-OUTPUT VOLTAGE CHART
The voltage value is based on the body ground.
*: If high resistance exists in the switch side circuit (caused by a single strand), terminal 2 does not detect approx. 0V. Control unit
does not detect the switch is ON even if the switch does not turn ON. Therefore, the control unit does not control ground to light up the
lamp.Terminal No. Description
Condition Value (Approx.)In case of high resistance such as single
strand (V) *
+−Signal nameInput/
Output
1Body
groundSwitch InputSwitch ON Battery voltageLower than battery voltage Approx. 8 (Ex-
ample)
Switch OFF 0 V Approx. 0
2Body
groundLamp OutputSwitch ON Battery voltage Approx. 0 (Inoperative lamp)
Switch OFF 0 V Approx. 0
Terminal No. Description
Condition Value (Approx.)In case of high resistance such as single
strand (V) *
+−Signal nameInput/
Output
1Body
groundLamp OutputSwitch ON 0V Battery voltage (Inoperative lamp)
Switch OFF Battery voltage Battery voltage
2Body
groundSwitch InputSwitch ON 0 V Higher than 0 Approx. 4 (Example)
Switch OFF 5 V Approx. 5
MGI035A
Page 3260 of 5883

GW-1
BODY EXTERIOR, DOORS, ROOF & VEHICLE SECURITY
C
D
E
F
G
H
I
J
L
M
SECTION GW
A
B
GW
N
O
P
CONTENTS
GLASS & WINDOW SYSTEM
SYMPTOM DIAGNOSIS ...............................2
SQUEAK AND RATTLE TROUBLE DIAG-
NOSES ................................................................
2
Work Flow .................................................................2
Generic Squeak and Rattle Troubleshooting ............4
Diagnostic Worksheet ...............................................6
PRECAUTION ...............................................8
PRECAUTIONS ...................................................8
Precaution for Supplemental Restraint System
(SRS) "AIR BAG" and "SEAT BELT PRE-TEN-
SIONER" ...................................................................
8
Precaution for Procedure without Cowl Top Cover ......8
Handling for Adhesive and Primer ............................8
PREPARATION ............................................9
PREPARATION ...................................................9
Commercial Service Tool ..........................................9
ON-VEHICLE REPAIR .................................10
WINDSHIELD GLASS .......................................10
Removal and Installation .........................................10
OPERA WINDOW GLASS ................................12
Removal and Installation .........................................12
FRONT DOOR GLASS AND REGULATOR .....14
Removal and Installation .........................................14
Disassembly and Assembly .....................................16
Inspection after Installation ......................................16
REAR WINDOW GLASS AND MOLDING ........18
Removal and Installation .........................................18
REAR DOOR GLASS AND REGULATOR .......21
Removal and Installation .........................................21
Disassembly and Assembly .....................................23
Inspection after Installation ......................................23
Page 3262 of 5883

SQUEAK AND RATTLE TROUBLE DIAGNOSES
GW-3
< SYMPTOM DIAGNOSIS >
C
D
E
F
G
H
I
J
L
MA
B
GW
N
O
P
If possible, drive the vehicle with the customer until the noise is duplicated. Note any additional information on
the Diagnostic Worksheet regarding the conditions or location of the noise. This information can be used to
duplicate the same conditions when you confirm the repair.
If the noise can be duplicated easily during the test drive, to help identify the source of the noise, try to dupli-
cate the noise with the vehicle stopped by doing one or all of the following:
1) Close a door.
2) Tap or push/pull around the area where the noise appears to be coming from.
3) Rev the engine.
4) Use a floor jack to recreate vehicle “twist”.
5) At idle, apply engine load (electrical load, half-clutch on M/T model, drive position on A/T model).
6) Raise the vehicle on a hoist and hit a tire with a rubber hammer.
Drive the vehicle and attempt to duplicate the conditions the customer states exist when the noise occurs.
If it is difficult to duplicate the noise, drive the vehicle slowly on an undulating or rough road to stress the
vehicle body.
CHECK RELATED SERVICE BULLETINS
After verifying the customer concern or symptom, check ASIST for Technical Service Bulletins (TSBs) related
to that concern or symptom.
If a TSB relates to the symptom, follow the procedure to repair the noise.
LOCATE THE NOISE AND IDENTIFY THE ROOT CAUSE
1. Narrow down the noise to a general area.To help pinpoint the source of the noise, use a listening tool
(Chassis Ear: J-39570, Engine Ear: J-39565 and mechanic's stethoscope).
2. Narrow down the noise to a more specific area and identify the cause of the noise by:
removing the components in the area that you suspect the noise is coming from.
Do not use too much force when removing clips and fasteners, otherwise clips and fasteners can be broken
or lost during the repair, resulting in the creation of new noise.
tapping or pushing/pulling the component that you suspect is causing the noise.
Do not tap or push/pull the component with excessive force, otherwise the noise will be eliminated only tem-
porarily.
feeling for a vibration with your hand by touching the component(s) that you suspect is (are) causing the
noise.
placing a piece of paper between components that you suspect are causing the noise.
looking for loose components and contact marks.
Refer to GW-4, "
Generic Squeak and Rattle Troubleshooting".
REPAIR THE CAUSE
If the cause is a loose component, tighten the component securely.
If the cause is insufficient clearance between components:
- separate components by repositioning or loosening and retightening the component, if possible.
- insulate components with a suitable insulator such as urethane pads, foam blocks, felt cloth tape or urethane
tape. A NISSAN Squeak and Rattle Kit (J-43980) is available through your authorized NISSAN Parts Depart-
ment.
CAUTION:
Do not use excessive force as many components are constructed of plastic and may be damaged.
Always check with the Parts Department for the latest parts information.
The following materials are contained in the NISSAN Squeak and Rattle Kit (J-43980). Each item can be
ordered separately as needed.
URETHANE PADS [1.5 mm (0.059 in) thick]
Insulates connectors, harness, etc.
76268-9E005: 100×135 mm (3.94×5.31 in)/76884-71L01: 60×85 mm (2.36×3.35 in)/76884-71L02: 15×25
mm (0.59×0.98 in)
INSULATOR (Foam blocks)
Insulates components from contact. Can be used to fill space behind a panel.
73982-9E000: 45 mm (1.77 in) thick, 50×50 mm (1.97×1.97 in)/73982-50Y00: 10 mm (0.39 in) thick,
50×50 mm (1.97×1.97 in)
INSULATOR (Light foam block)
80845-71L00: 30 mm (1.18 in) thick, 30×50 mm (1.18×1.97 in)
FELT CLOTH TAPE
Used to insulate where movement does not occur. Ideal for instrument panel applications.
Page 3270 of 5883
WINDSHIELD GLASS
GW-11
< ON-VEHICLE REPAIR >
C
D
E
F
G
H
I
J
L
MA
B
GW
N
O
P
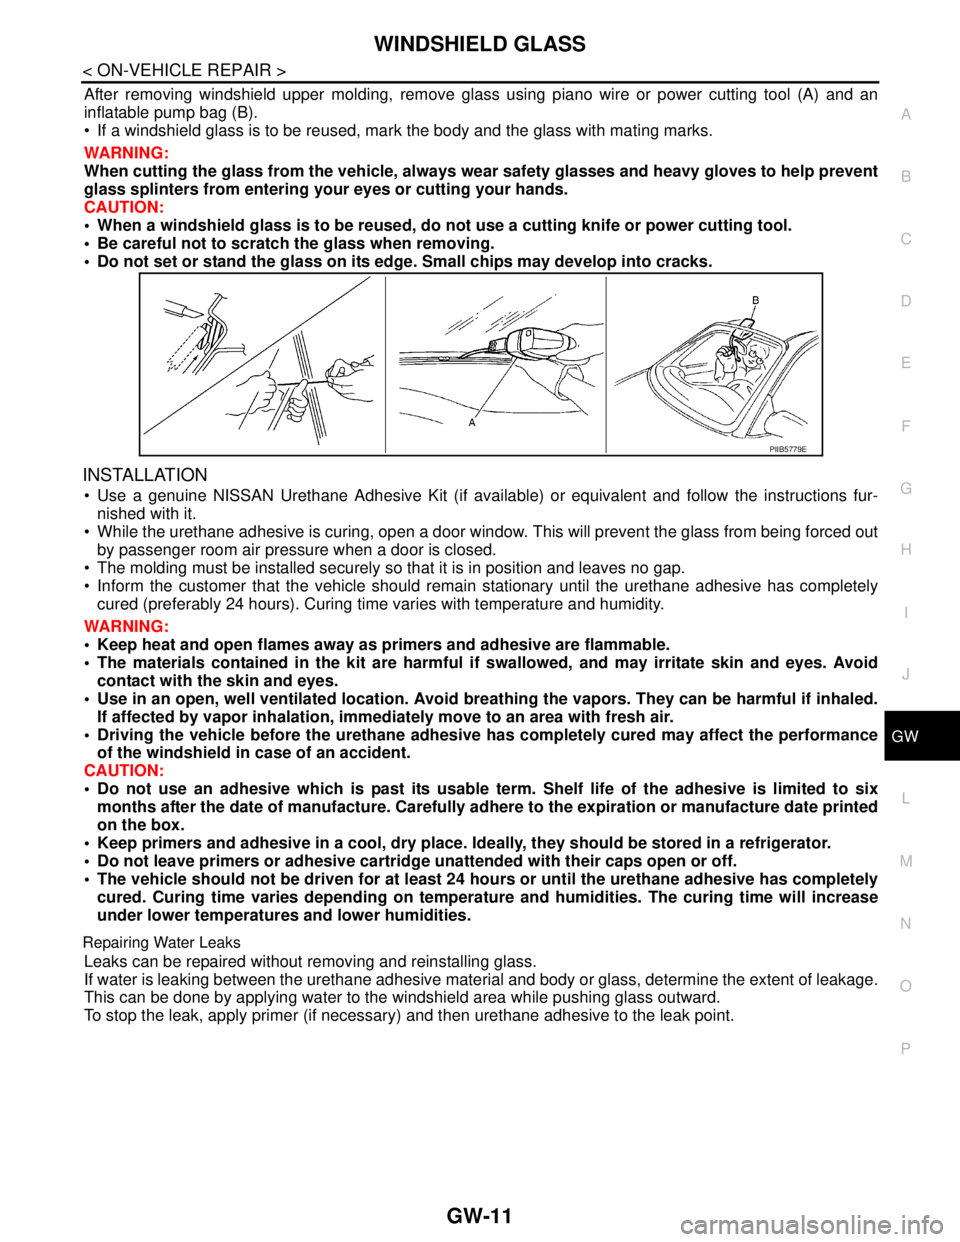
After removing windshield upper molding, remove glass using piano wire or power cutting tool (A) and an
inflatable pump bag (B).
If a windshield glass is to be reused, mark the body and the glass with mating marks.
WARNING:
When cutting the glass from the vehicle, always wear safety glasses and heavy gloves to help prevent
glass splinters from entering your eyes or cutting your hands.
CAUTION:
When a windshield glass is to be reused, do not use a cutting knife or power cutting tool.
Be careful not to scratch the glass when removing.
Do not set or stand the glass on its edge. Small chips may develop into cracks.
INSTALLATION
Use a genuine NISSAN Urethane Adhesive Kit (if available) or equivalent and follow the instructions fur-
nished with it.
While the urethane adhesive is curing, open a door window. This will prevent the glass from being forced out
by passenger room air pressure when a door is closed.
The molding must be installed securely so that it is in position and leaves no gap.
Inform the customer that the vehicle should remain stationary until the urethane adhesive has completely
cured (preferably 24 hours). Curing time varies with temperature and humidity.
WARNING:
Keep heat and open flames away as primers and adhesive are flammable.
The materials contained in the kit are harmful if swallowed, and may irritate skin and eyes. Avoid
contact with the skin and eyes.
Use in an open, well ventilated location. Avoid breathing the vapors. They can be harmful if inhaled.
If affected by vapor inhalation, immediately move to an area with fresh air.
Driving the vehicle before the urethane adhesive has completely cured may affect the performance
of the windshield in case of an accident.
CAUTION:
Do not use an adhesive which is past its usable term. Shelf life of the adhesive is limited to six
months after the date of manufacture. Carefully adhere to the expiration or manufacture date printed
on the box.
Keep primers and adhesive in a cool, dry place. Ideally, they should be stored in a refrigerator.
Do not leave primers or adhesive cartridge unattended with their caps open or off.
The vehicle should not be driven for at least 24 hours or until the urethane adhesive has completely
cured. Curing time varies depending on temperature and humidities. The curing time will increase
under lower temperatures and lower humidities.
Repairing Water Leaks
Leaks can be repaired without removing and reinstalling glass.
If water is leaking between the urethane adhesive material and body or glass, determine the extent of leakage.
This can be done by applying water to the windshield area while pushing glass outward.
To stop the leak, apply primer (if necessary) and then urethane adhesive to the leak point.
PIIB5779E
Page 3271 of 5883
GW-12
< ON-VEHICLE REPAIR >
OPERA WINDOW GLASS
OPERA WINDOW GLASS
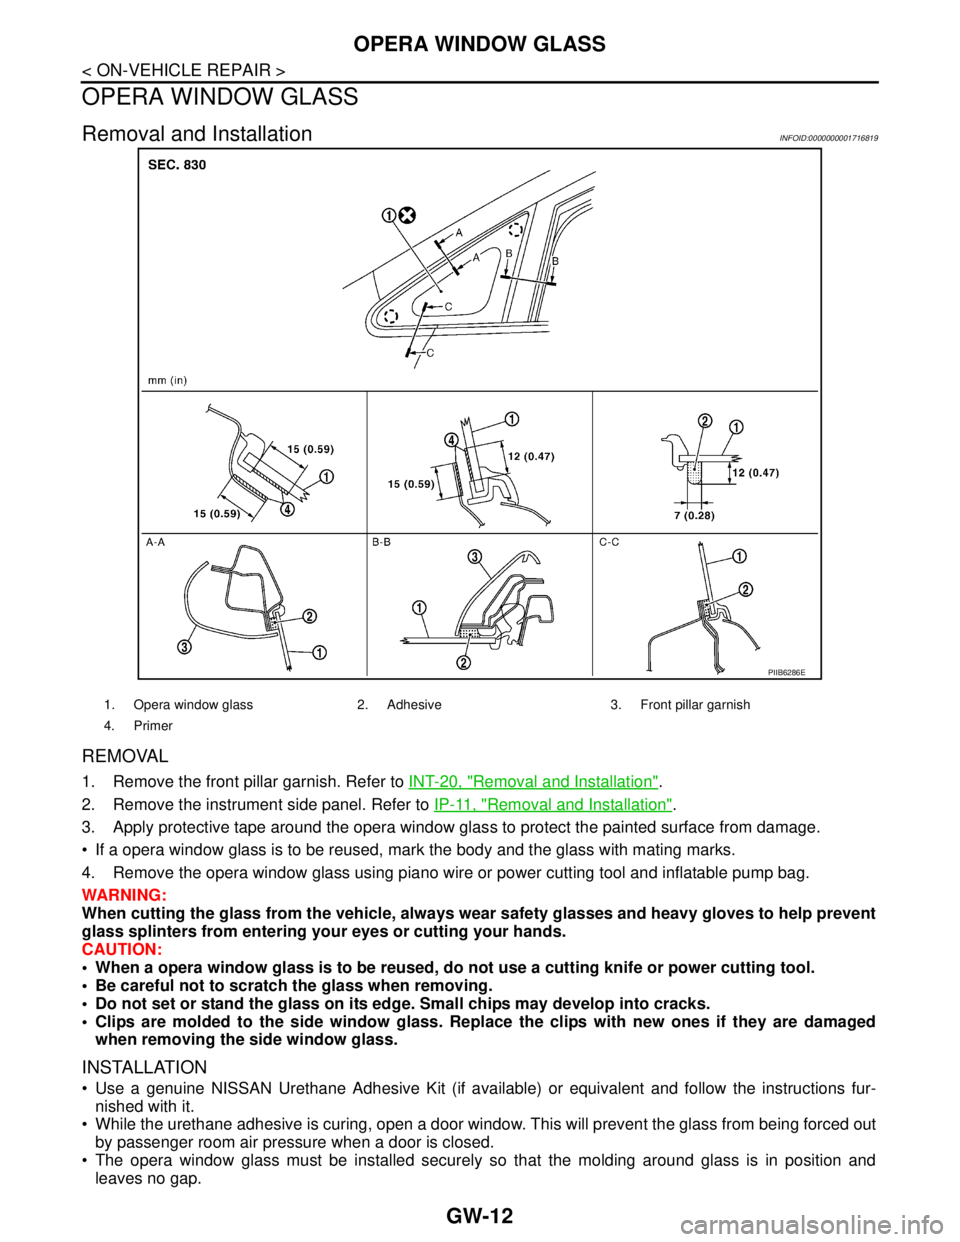
Removal and InstallationINFOID:0000000001716819
REMOVAL
1. Remove the front pillar garnish. Refer to INT-20, "Removal and Installation".
2. Remove the instrument side panel. Refer to IP-11, "
Removal and Installation".
3. Apply protective tape around the opera window glass to protect the painted surface from damage.
If a opera window glass is to be reused, mark the body and the glass with mating marks.
4. Remove the opera window glass using piano wire or power cutting tool and inflatable pump bag.
WARNING:
When cutting the glass from the vehicle, always wear safety glasses and heavy gloves to help prevent
glass splinters from entering your eyes or cutting your hands.
CAUTION:
When a opera window glass is to be reused, do not use a cutting knife or power cutting tool.
Be careful not to scratch the glass when removing.
Do not set or stand the glass on its edge. Small chips may develop into cracks.
Clips are molded to the side window glass. Replace the clips with new ones if they are damaged
when removing the side window glass.
INSTALLATION
Use a genuine NISSAN Urethane Adhesive Kit (if available) or equivalent and follow the instructions fur-
nished with it.
While the urethane adhesive is curing, open a door window. This will prevent the glass from being forced out
by passenger room air pressure when a door is closed.
The opera window glass must be installed securely so that the molding around glass is in position and
leaves no gap.
PIIB6286E
1. Opera window glass 2. Adhesive 3. Front pillar garnish
4. Primer
Page 3272 of 5883

OPERA WINDOW GLASS
GW-13
< ON-VEHICLE REPAIR >
C
D
E
F
G
H
I
J
L
MA
B
GW
N
O
P
Inform the customer that the vehicle should remain stationary until the urethane adhesive has completely
cured (preferably 24 hours). Curing time varies with temperature and humidity.
WARNING:
Keep heat and open flames away as primers and adhesive are flammable.
The materials contained in the kit are harmful if swallowed, and may irritate skin and eyes. Avoid
contact with the skin and eyes.
Use in an open, well ventilated location. Avoid breathing the vapors. They can be harmful if inhaled.
If affected by vapor inhalation, immediately move to an area with fresh air.
Driving the vehicle before the urethane adhesive has completely cured may affect the performance
of the side window in case of an accident.
CAUTION:
Do not use an adhesive which is past its usable term. Shelf life of the adhesive is limited to six
months after the date of manufacture. Carefully adhere to the expiration or manufacture date printed
on the box.
Keep primers and adhesive in a cool, dry place. Ideally, they should be stored in a refrigerator.
Do not leave primers or adhesive cartridge unattended with their caps open or off.
The vehicle should not be driven for at least 24 hours or until the urethane adhesive has completely
cured. Curing time varies depending on temperature and humidities. The curing time will increase
under lower temperature and lower humidity.
Repairing Water Leaks
Leaks can be repaired without removing and reinstalling glass.
If water is leaking between the urethane adhesive material and body or glass, determine the extent of leakage.
This can be done by applying water to the side window area while pushing glass outward.
To stop the leak, apply primer (if necessary) and then urethane adhesive to the leak point.
Page 3278 of 5883
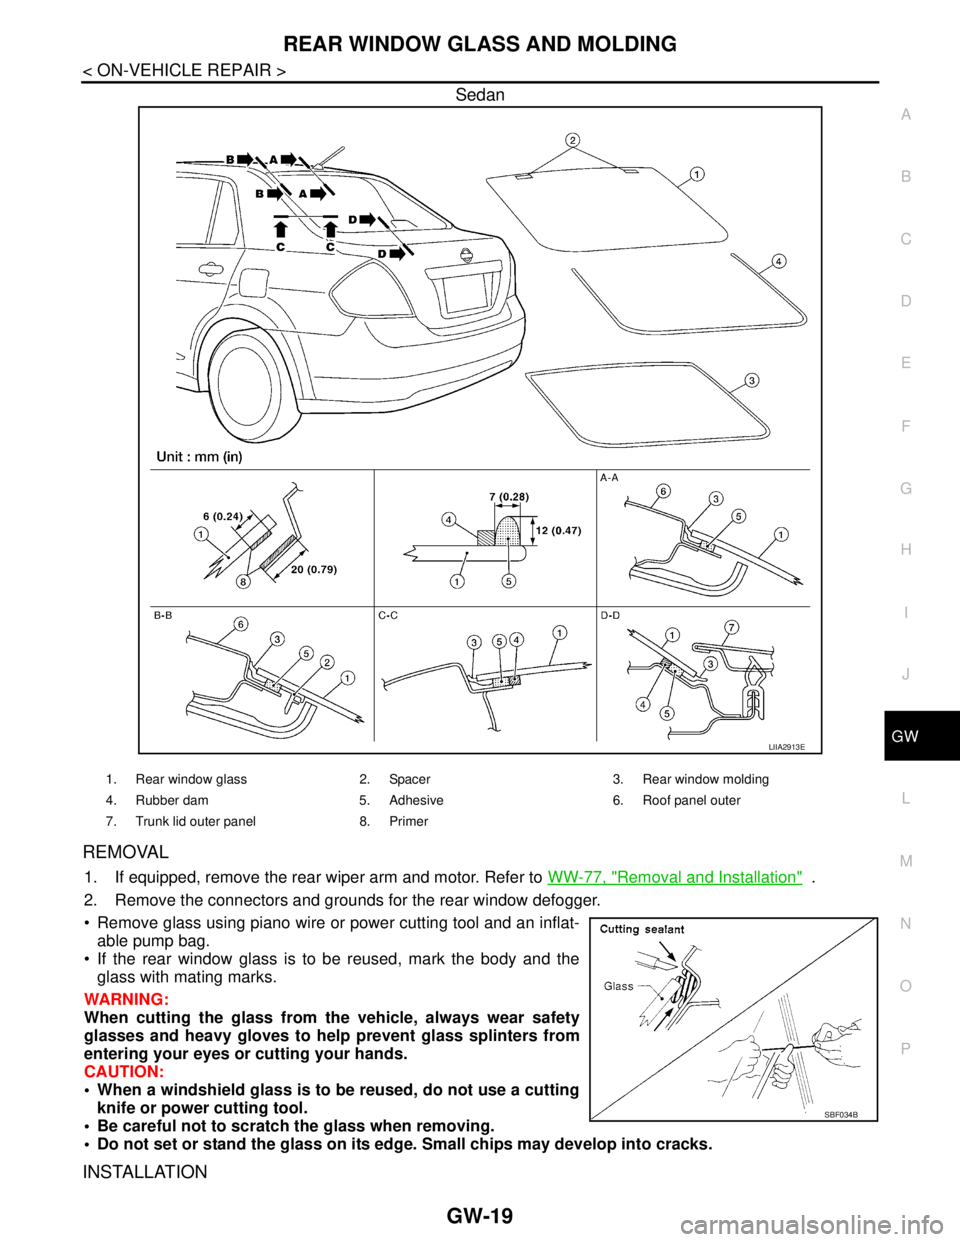
REAR WINDOW GLASS AND MOLDING
GW-19
< ON-VEHICLE REPAIR >
C
D
E
F
G
H
I
J
L
MA
B
GW
N
O
P
Sedan
REMOVAL
1. If equipped, remove the rear wiper arm and motor. Refer to WW-77, "Removal and Installation" .
2. Remove the connectors and grounds for the rear window defogger.
Remove glass using piano wire or power cutting tool and an inflat-
able pump bag.
If the rear window glass is to be reused, mark the body and the
glass with mating marks.
WARNING:
When cutting the glass from the vehicle, always wear safety
glasses and heavy gloves to help prevent glass splinters from
entering your eyes or cutting your hands.
CAUTION:
When a windshield glass is to be reused, do not use a cutting
knife or power cutting tool.
Be careful not to scratch the glass when removing.
Do not set or stand the glass on its edge. Small chips may develop into cracks.
INSTALLATION
LIIA2913E
1. Rear window glass 2. Spacer 3. Rear window molding
4. Rubber dam 5. Adhesive 6. Roof panel outer
7. Trunk lid outer panel 8. Primer
SBF034B