Page 2058 of 2896
POWER WINDOW SYSTEM
GW-33
C
D
E
F
G
H
J
K
L
MA
B
GW
Revision: June 20062007 Versa
Front Power Window RH Circuit Check (Power Window and Door Lock/Unlock
Switch RH Operation)
EIS0099F
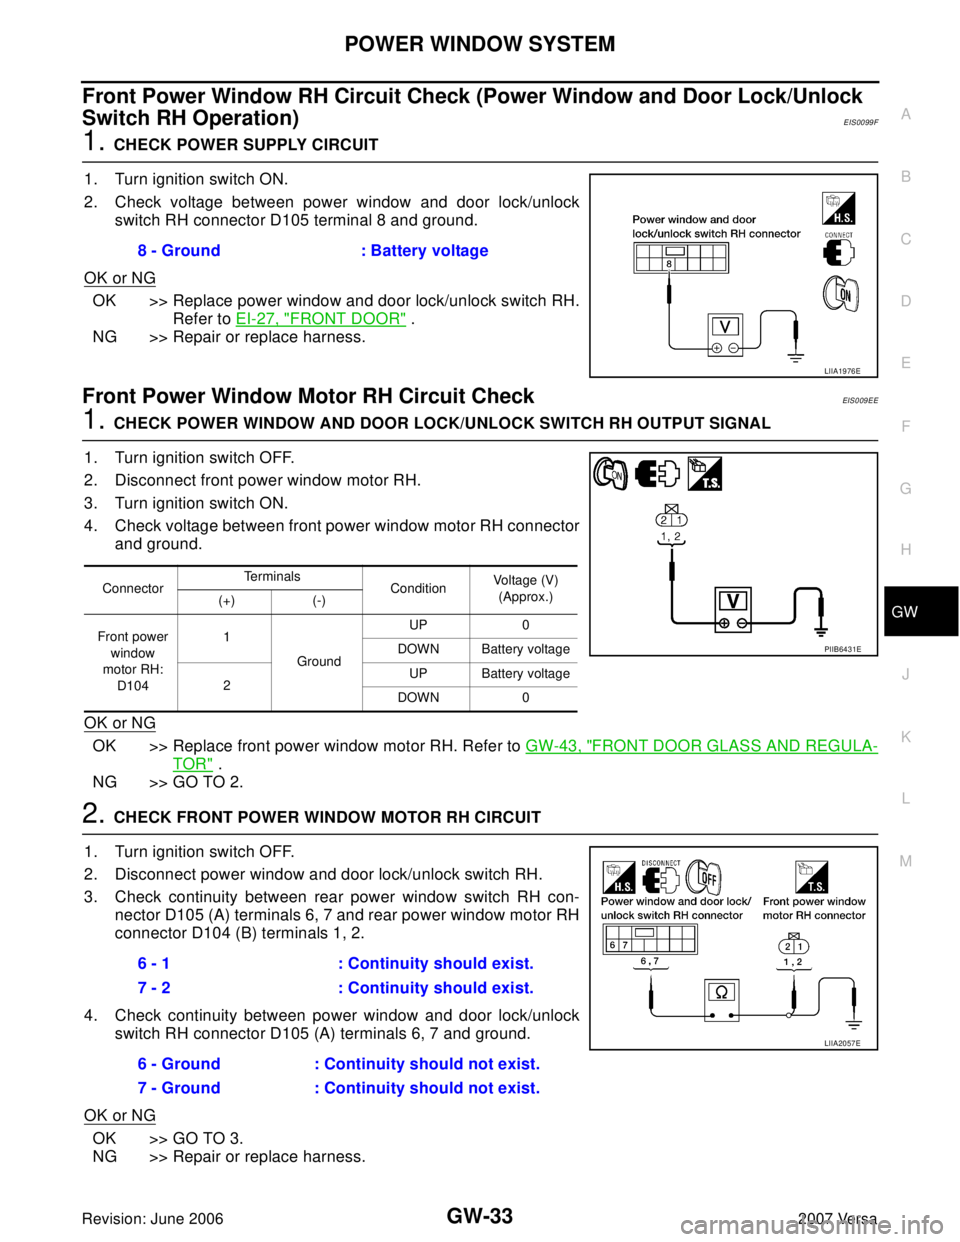
1. CHECK POWER SUPPLY CIRCUIT
1. Turn ignition switch ON.
2. Check voltage between power window and door lock/unlock
switch RH connector D105 terminal 8 and ground.
OK or NG
OK >> Replace power window and door lock/unlock switch RH.
Refer to EI-27, "
FRONT DOOR" .
NG >> Repair or replace harness.
Front Power Window Motor RH Circuit CheckEIS009EE
1. CHECK POWER WINDOW AND DOOR LOCK/UNLOCK SWITCH RH OUTPUT SIGNAL
1. Turn ignition switch OFF.
2. Disconnect front power window motor RH.
3. Turn ignition switch ON.
4. Check voltage between front power window motor RH connector
and ground.
OK or NG
OK >> Replace front power window motor RH. Refer to GW-43, "FRONT DOOR GLASS AND REGULA-
TOR" .
NG >> GO TO 2.
2. CHECK FRONT POWER WINDOW MOTOR RH CIRCUIT
1. Turn ignition switch OFF.
2. Disconnect power window and door lock/unlock switch RH.
3. Check continuity between rear power window switch RH con-
nector D105 (A) terminals 6, 7 and rear power window motor RH
connector D104 (B) terminals 1, 2.
4. Check continuity between power window and door lock/unlock
switch RH connector D105 (A) terminals 6, 7 and ground.
OK or NG
OK >> GO TO 3.
NG >> Repair or replace harness.8 - Ground : Battery voltage
LIIA1976E
ConnectorTe r m i n a l s
ConditionVoltage (V)
(Approx.)
(+) (-)
Front power
window
motor RH:
D1041
GroundUP 0
DOWN Battery voltage
2UP Battery voltage
DOWN 0
PIIB6431E
6 - 1 : Continuity should exist.
7 - 2 : Continuity should exist.
6 - Ground : Continuity should not exist.
7 - Ground : Continuity should not exist.
LIIA2057E
Page 2059 of 2896
GW-34
POWER WINDOW SYSTEM
Revision: June 20062007 Versa
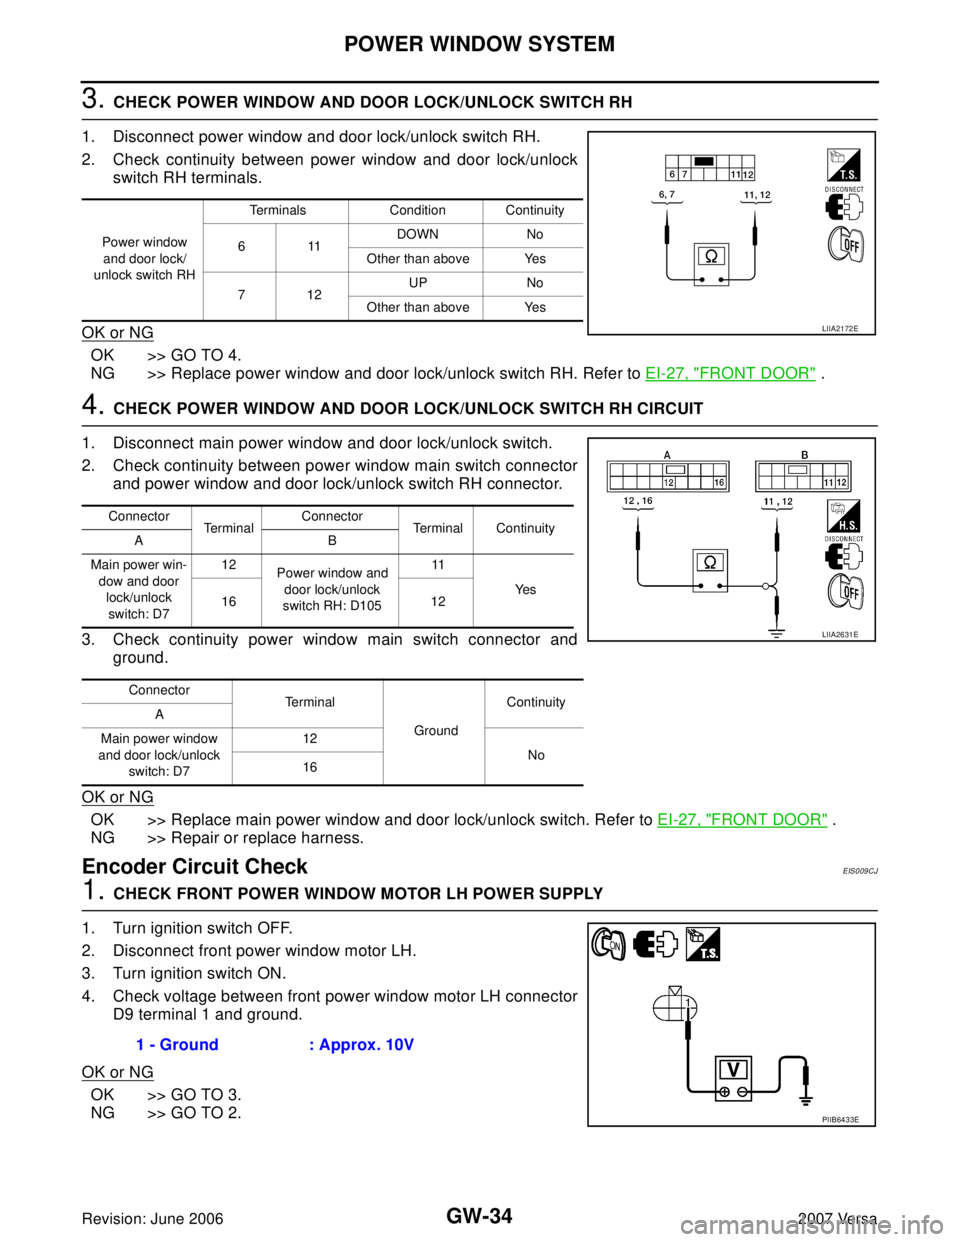
3. CHECK POWER WINDOW AND DOOR LOCK/UNLOCK SWITCH RH
1. Disconnect power window and door lock/unlock switch RH.
2. Check continuity between power window and door lock/unlock
switch RH terminals.
OK or NG
OK >> GO TO 4.
NG >> Replace power window and door lock/unlock switch RH. Refer to EI-27, "
FRONT DOOR" .
4. CHECK POWER WINDOW AND DOOR LOCK/UNLOCK SWITCH RH CIRCUIT
1. Disconnect main power window and door lock/unlock switch.
2. Check continuity between power window main switch connector
and power window and door lock/unlock switch RH connector.
3. Check continuity power window main switch connector and
ground.
OK or NG
OK >> Replace main power window and door lock/unlock switch. Refer to EI-27, "FRONT DOOR" .
NG >> Repair or replace harness.
Encoder Circuit CheckEIS009CJ
1. CHECK FRONT POWER WINDOW MOTOR LH POWER SUPPLY
1. Turn ignition switch OFF.
2. Disconnect front power window motor LH.
3. Turn ignition switch ON.
4. Check voltage between front power window motor LH connector
D9 terminal 1 and ground.
OK or NG
OK >> GO TO 3.
NG >> GO TO 2.
Power window
and door lock/
unlock switch RHTerminals Condition Continuity
611DOWN No
Other than above Yes
712UP No
Other than above Yes
LIIA2172E
Connector
TerminalConnector
Terminal Continuity
AB
Main power win-
dow and door
lock/unlock
switch: D712
Power window and
door lock/unlock
switch RH: D10511
Ye s
16 12
Connector
Te r m i n a l
GroundContinuity
A
Main power window
and door lock/unlock
switch: D712
No
16
LIIA2631E
1 - Ground : Approx. 10V
PIIB6433E
Page 2060 of 2896
POWER WINDOW SYSTEM
GW-35
C
D
E
F
G
H
J
K
L
MA
B
GW
Revision: June 20062007 Versa
2. CHECK HARNESS CONTINUITY
1. Turn ignition switch OFF.
2. Disconnect main power window and door lock/unlock switch.
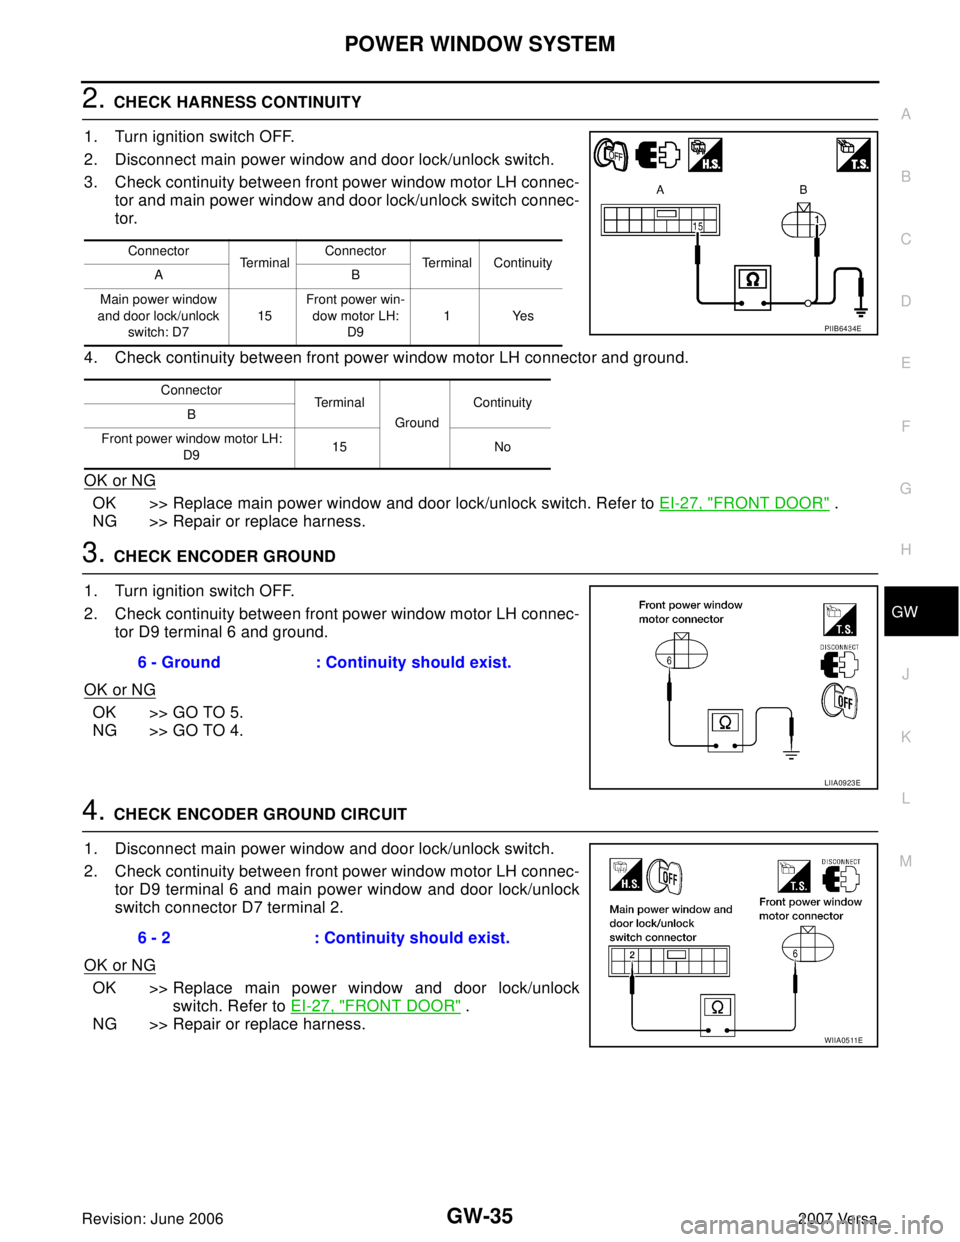
3. Check continuity between front power window motor LH connec-
tor and main power window and door lock/unlock switch connec-
tor.
4. Check continuity between front power window motor LH connector and ground.
OK or NG
OK >> Replace main power window and door lock/unlock switch. Refer to EI-27, "FRONT DOOR" .
NG >> Repair or replace harness.
3. CHECK ENCODER GROUND
1. Turn ignition switch OFF.
2. Check continuity between front power window motor LH connec-
tor D9 terminal 6 and ground.
OK or NG
OK >> GO TO 5.
NG >> GO TO 4.
4. CHECK ENCODER GROUND CIRCUIT
1. Disconnect main power window and door lock/unlock switch.
2. Check continuity between front power window motor LH connec-
tor D9 terminal 6 and main power window and door lock/unlock
switch connector D7 terminal 2.
OK or NG
OK >> Replace main power window and door lock/unlock
switch. Refer to EI-27, "
FRONT DOOR" .
NG >> Repair or replace harness.
Connector
Te r m i n a lConnector
Terminal Continuity
AB
Main power window
and door lock/unlock
switch: D715Front power win-
dow motor LH:
D91Yes
Connector
Terminal
GroundContinuity
B
Front power window motor LH:
D915 No
PIIB6434E
6 - Ground : Continuity should exist.
LIIA0923E
6 - 2 : Continuity should exist.
WIIA0511E
Page 2061 of 2896
GW-36
POWER WINDOW SYSTEM
Revision: June 20062007 Versa
5. CHECK ENCODER PULSE A SIGNAL
1. Connect front power window motor LH.
2. Turn ignition switch ON.
3. Check the signal between main power window and door lock/
unlock switch connector and ground with oscilloscope.
OK or NG
OK >> Replace main power window and door lock/unlock switch. Refer to EI-27, "FRONT DOOR" .
NG >> GO TO 6.
6. CHECK ENCODER PULSE B SIGNAL
Check the signal between main power window and door lock/unlock
switch connector and ground with oscilloscope.
OK or NG
OK >> Replace main power window and door lock/unlock switch. Refer to EI-27, "FRONT DOOR" .
NG >> GO TO 7.
Connec-
torTe r m i n a l s
Condition Signal
(+) (-)
D7 13 Ground Opening
LIIA0364E
OCC3383D
Connec-
torTe r m i n a l s
Condition Signal
(+) (-)
D7 9 Ground Opening
LIIA2633E
OCC3383D
Page 2062 of 2896
POWER WINDOW SYSTEM
GW-37
C
D
E
F
G
H
J
K
L
MA
B
GW
Revision: June 20062007 Versa
7. CHECK ENCODER CIRCUIT
1. Turn ignition switch OFF.
2. Disconnect front power window motor LH and main power win-
dow and door lock/unlock switch.
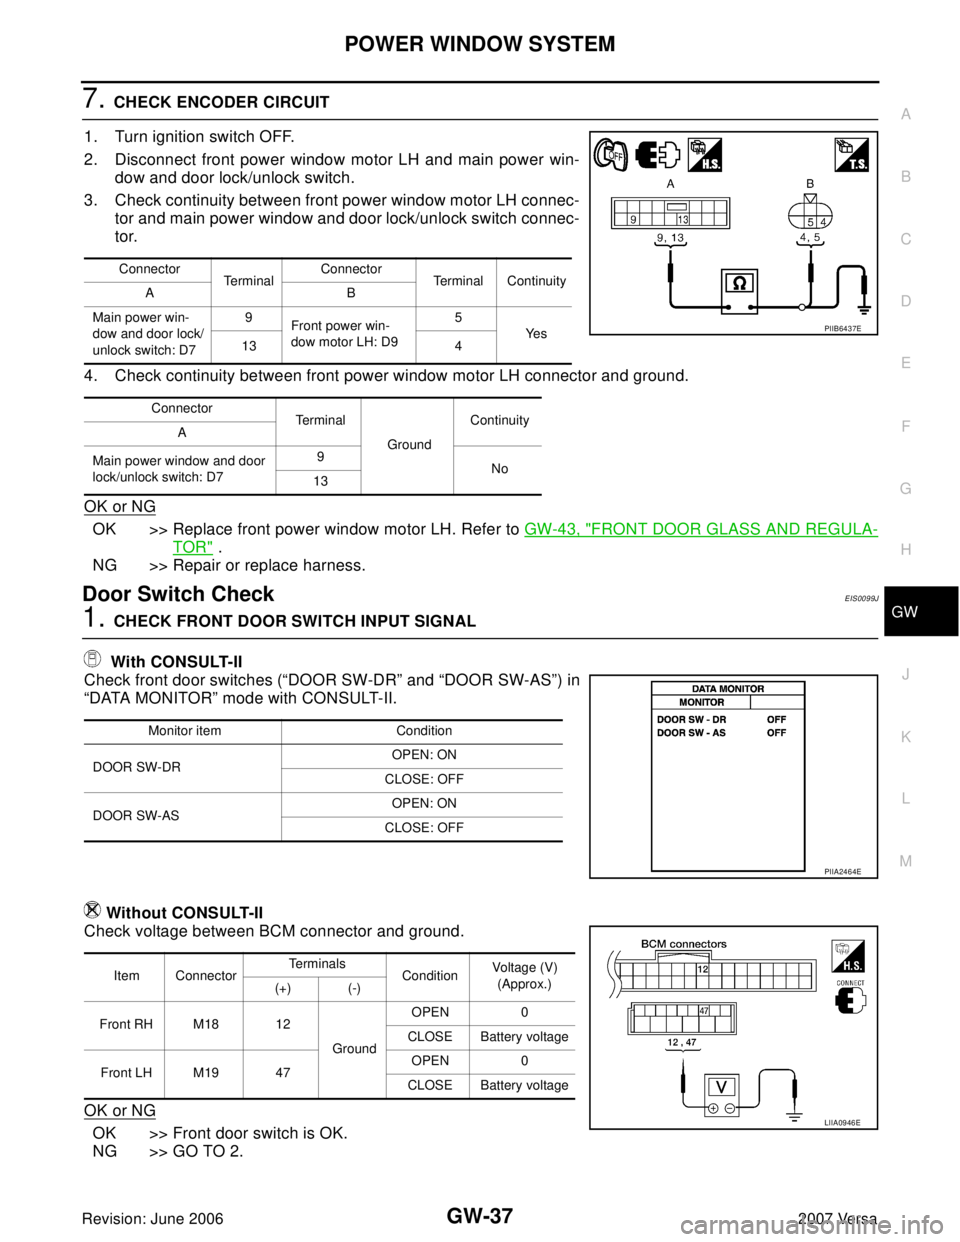
3. Check continuity between front power window motor LH connec-
tor and main power window and door lock/unlock switch connec-
tor.
4. Check continuity between front power window motor LH connector and ground.
OK or NG
OK >> Replace front power window motor LH. Refer to GW-43, "FRONT DOOR GLASS AND REGULA-
TOR" .
NG >> Repair or replace harness.
Door Switch CheckEIS0099J
1. CHECK FRONT DOOR SWITCH INPUT SIGNAL
With CONSULT-II
Check front door switches (“DOOR SW-DR” and “DOOR SW-AS”) in
“DATA MONITOR” mode with CONSULT-II.
Without CONSULT-II
Check voltage between BCM connector and ground.
OK or NG
OK >> Front door switch is OK.
NG >> GO TO 2.
Connector
Te r m i n a lConnector
Terminal Continuity
AB
Main power win-
dow and door lock/
unlock switch: D79
Front power win-
dow motor LH: D95
Ye s
13 4
Connector
Te r m i n a l
GroundContinuity
A
Main power window and door
lock/unlock switch: D79
No
13
PIIB6437E
Monitor item Condition
DOOR SW-DROPEN: ON
CLOSE: OFF
DOOR SW-ASOPEN: ON
CLOSE: OFF
PIIA2464E
Item ConnectorTe r m i n a l s
ConditionVoltage (V)
(Approx.)
(+) (-)
Front RH M18 12
GroundOPEN 0
CLOSE Battery voltage
Front LH M19 47OPEN 0
CLOSE Battery voltage
LIIA0946E
Page 2065 of 2896
GW-40
POWER WINDOW SYSTEM
Revision: June 20062007 Versa
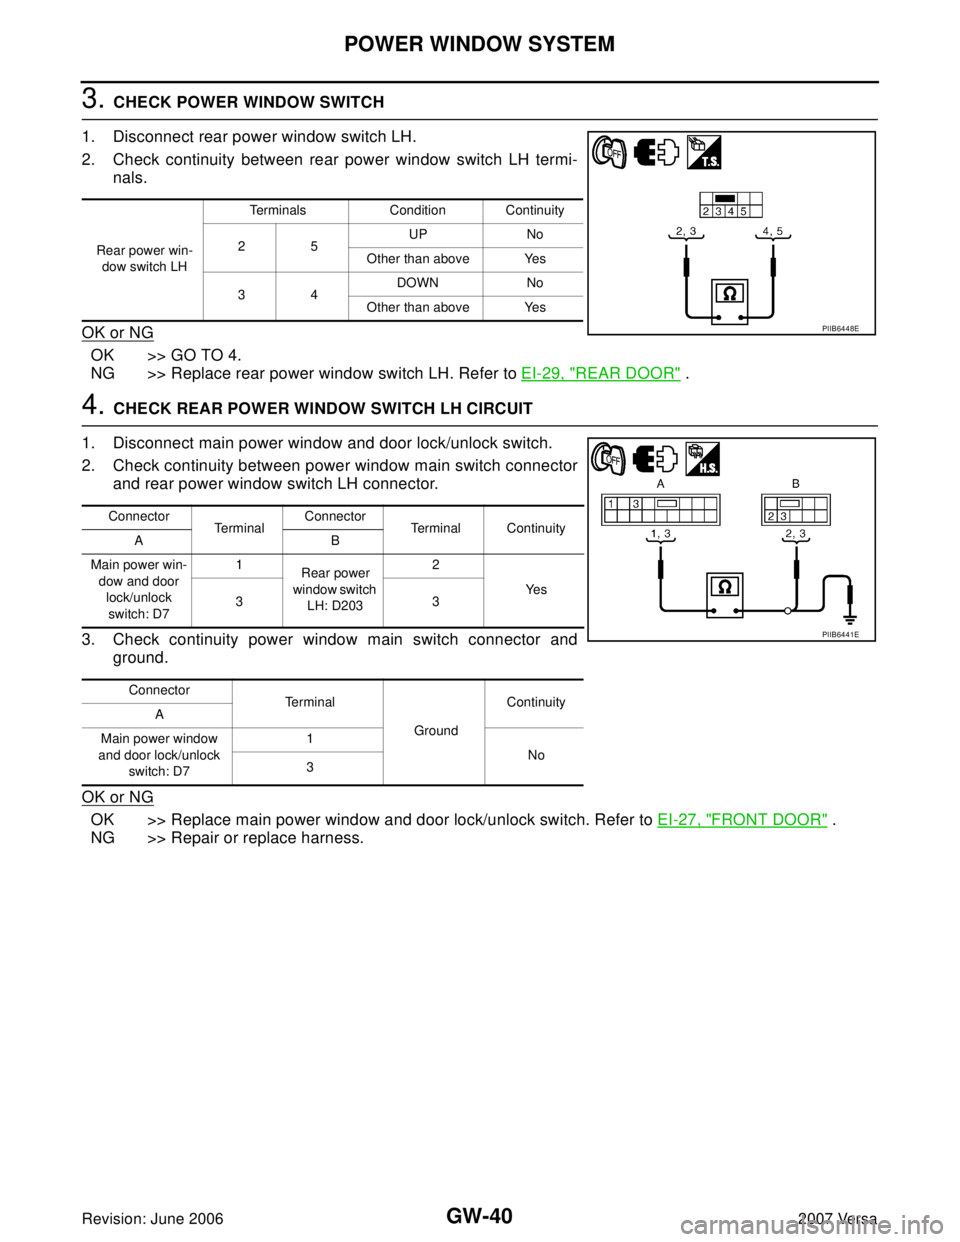
3. CHECK POWER WINDOW SWITCH
1. Disconnect rear power window switch LH.
2. Check continuity between rear power window switch LH termi-
nals.
OK or NG
OK >> GO TO 4.
NG >> Replace rear power window switch LH. Refer to EI-29, "
REAR DOOR" .
4. CHECK REAR POWER WINDOW SWITCH LH CIRCUIT
1. Disconnect main power window and door lock/unlock switch.
2. Check continuity between power window main switch connector
and rear power window switch LH connector.
3. Check continuity power window main switch connector and
ground.
OK or NG
OK >> Replace main power window and door lock/unlock switch. Refer to EI-27, "FRONT DOOR" .
NG >> Repair or replace harness.
Rear power win-
dow switch LHTerminals Condition Continuity
25UP No
Other than above Yes
34DOWN No
Other than above Yes
PIIB6448E
Connector
Te r m i n a lConnector
Terminal Continuity
AB
Main power win-
dow and door
lock/unlock
switch: D71
Rear power
window switch
LH: D2032
Ye s
33
Connector
Te r m i n a l
GroundContinuity
A
Main power window
and door lock/unlock
switch: D71
No
3
PIIB6441E
Page 2067 of 2896
GW-42
POWER WINDOW SYSTEM
Revision: June 20062007 Versa
4. CHECK REAR POWER WINDOW SWITCH RH CIRCUIT
1. Disconnect main power window and door lock/unlock switch.
2. Check continuity between power window main switch connector
and rear power window switch RH connector.
3. Check continuity power window main switch connector and
ground.
OK or NG
OK >> Replace main power window and door lock/unlock switch. Refer to EI-27, "FRONT DOOR" .
NG >> Repair or replace harness.
Connector
Te r m i n a lConnector
Terminal Continuity
AB
Main power win-
dow and door
lock/unlock
switch D75
Rear power
window switch
RH D3033
Ye s
72
Connector
Te r m i n a l
GroundContinuity
A
Main power window
and door lock/unlock
switch D75
No
7
PIIB6443E
Page 2075 of 2896
GW-50
REAR WINDOW DEFOGGER
Revision: June 20062007 Versa
REAR WINDOW DEFOGGERPFP:25350
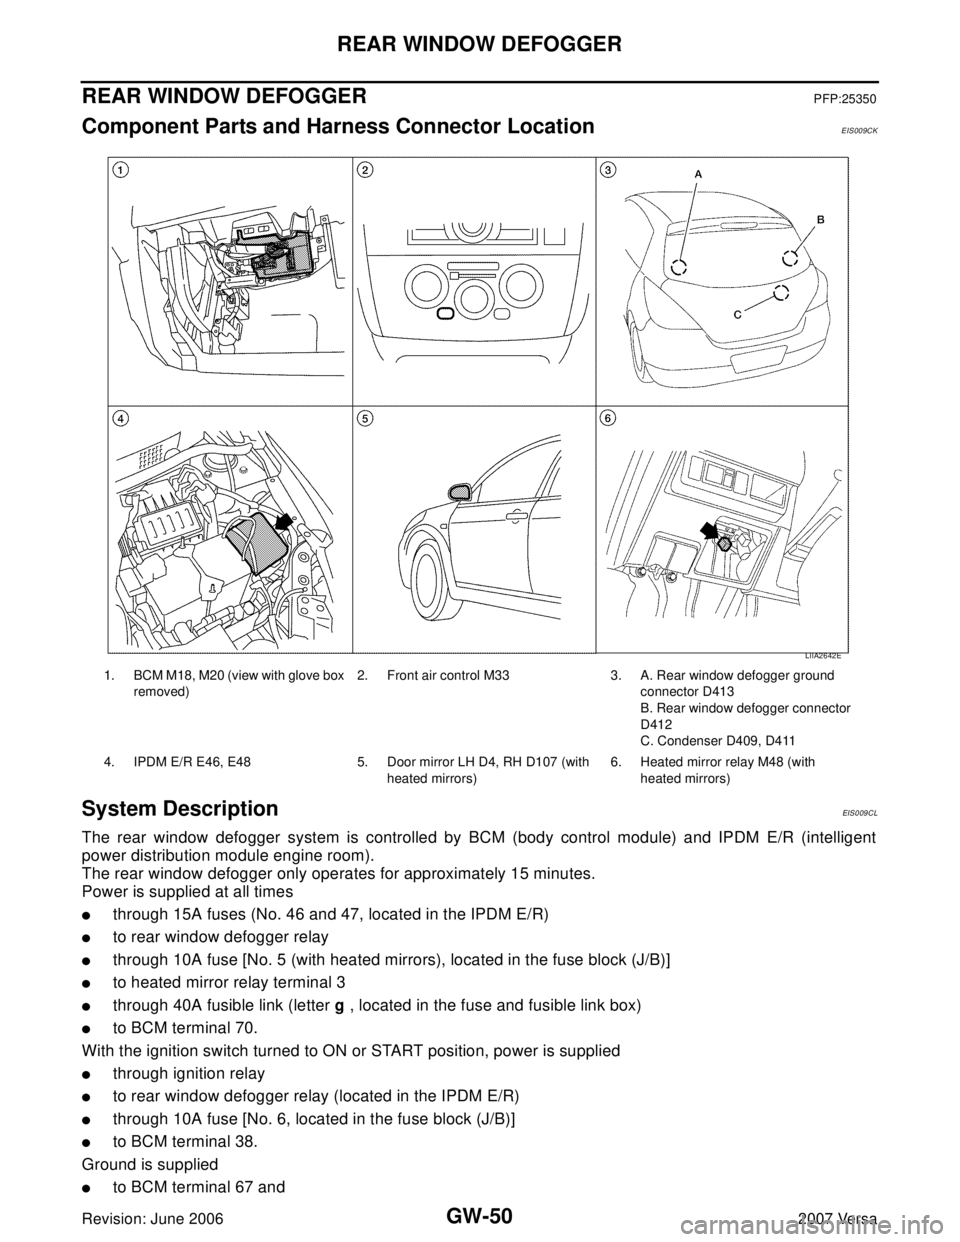
Component Parts and Harness Connector LocationEIS009CK
System DescriptionEIS0 09 CL
The rear window defogger system is controlled by BCM (body control module) and IPDM E/R (intelligent
power distribution module engine room).
The rear window defogger only operates for approximately 15 minutes.
Power is supplied at all times
�through 15A fuses (No. 46 and 47, located in the IPDM E/R)
�to rear window defogger relay
�through 10A fuse [No. 5 (with heated mirrors), located in the fuse block (J/B)]
�to heated mirror relay terminal 3
�through 40A fusible link (letter g , located in the fuse and fusible link box)
�to BCM terminal 70.
With the ignition switch turned to ON or START position, power is supplied
�through ignition relay
�to rear window defogger relay (located in the IPDM E/R)
�through 10A fuse [No. 6, located in the fuse block (J/B)]
�to BCM terminal 38.
Ground is supplied
�to BCM terminal 67 and
1. BCM M18, M20 (view with glove box
removed)2. Front air control M33 3. A. Rear window defogger ground
connector D413
B. Rear window defogger connector
D412
C. Condenser D409, D411
4. IPDM E/R E46, E48 5. Door mirror LH D4, RH D107 (with
heated mirrors)6. Heated mirror relay M48 (with
heated mirrors)
LIIA2642E