Page 122 of 130

RF-122
SOFT TOP
Revision: 2006 November2007 350Z
4. Open The Soft Top 5th Bow
�Remove both shock absorber of soft top 5th bow.
�Open the soft top 5th bow (approximate 90 degrees)
5. Open The Trunk Lid
�Pull the emergency cable.
�Open the trunk lid.
6. Open The Storage Lid
�Remove floorboard inside of the trunk.
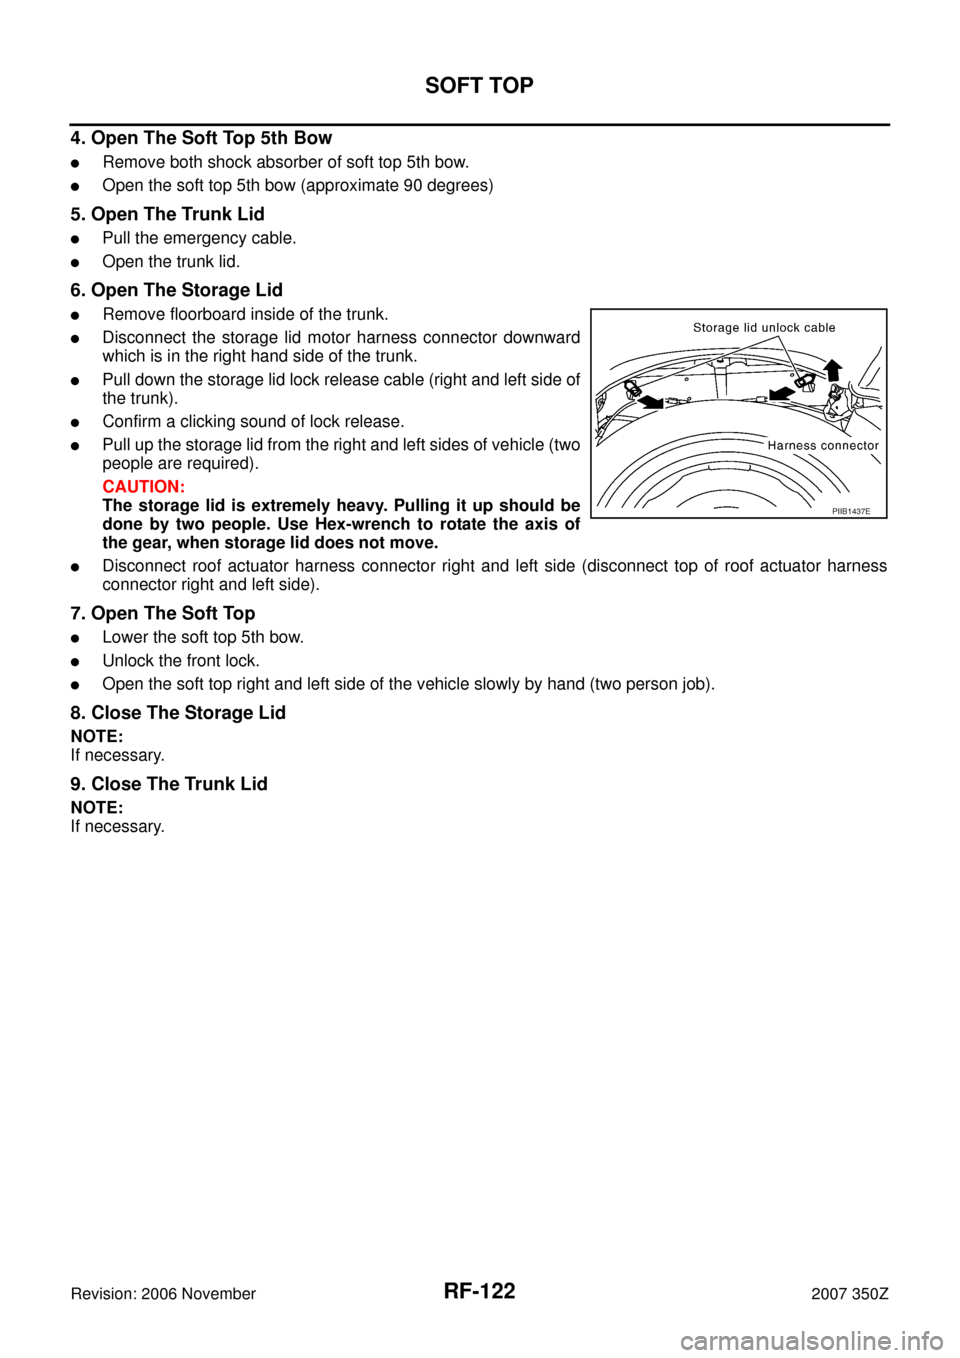
�Disconnect the storage lid motor harness connector downward
which is in the right hand side of the trunk.
�Pull down the storage lid lock release cable (right and left side of
the trunk).
�Confirm a clicking sound of lock release.
�Pull up the storage lid from the right and left sides of vehicle (two
people are required).
CAUTION:
The storage lid is extremely heavy. Pulling it up should be
done by two people. Use Hex-wrench to rotate the axis of
the gear, when storage lid does not move.
�Disconnect roof actuator harness connector right and left side (disconnect top of roof actuator harness
connector right and left side).
7. Open The Soft Top
�Lower the soft top 5th bow.
�Unlock the front lock.
�Open the soft top right and left side of the vehicle slowly by hand (two person job).
8. Close The Storage Lid
NOTE:
If necessary.
9. Close The Trunk Lid
NOTE:
If necessary.
PIIB1437E
Page 123 of 130
STORAGE LID
RF-123
C
D
E
F
G
H
J
K
L
MA
B
RF
Revision: 2006 November2007 350Z
STORAGE LIDPFP:97002
Removal and Installation of Storage Lid AssemblyNIS0007Z
REMOVAL
1. Disconnect storage lid actuator connector.
2. Remove bolts, and then remove storage lid striker.
NOTE:
�2 or more workers are required.
�Paint matching marks to check location for installation.
3. Remove nuts which is connecting the storage lid upper bracket
and the storage lid lower bracket.
NOTE:
Paint matching marks to check location for installation.
4. Remove nuts of storage lid hinge, and then remove storage lid,
spacers and shims.
INSTALLATION
1. Install in the reverse order of removal.
2. Install storage lid, and then adjust fitting of lid.
1. Storage lid 2. Storage outer protector 3. Spacer
4. Shim 5. Storage lid hinge 6. Storage lid striker
7. Storage lid upper bracket 8. Storage lid lower bracket 9. 5th bow lock
10. 5th bow unlock actuator 11. 5th bow closure motor
PIIA8284E
PIIA7953E
Page 124 of 130

RF-124
STORAGE LID
Revision: 2006 November2007 350Z
Removal and Installation of Storage Lid Inside UnitNIS00080
REMOVAL
NOTE:
After installing Storage lid on the vehicle, an adjustment of Storage lid position is required in both closed and
opened condition.
Put the removed storage lid on the floor or a work bench covered by waste clothes to prevent any scratches.
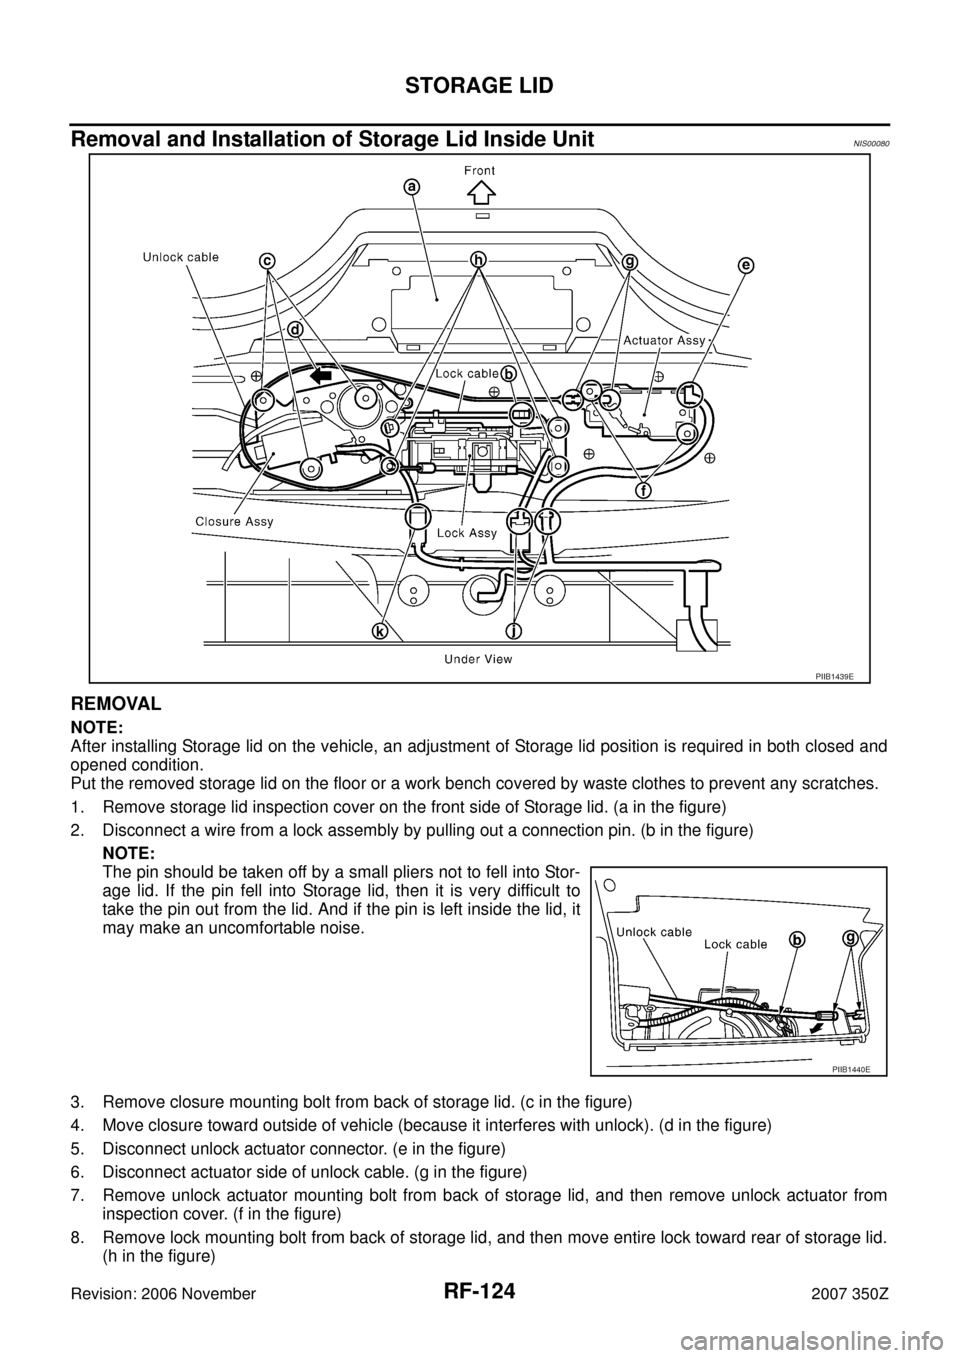
1. Remove storage lid inspection cover on the front side of Storage lid. (a in the figure)
2. Disconnect a wire from a lock assembly by pulling out a connection pin. (b in the figure)
NOTE:
The pin should be taken off by a small pliers not to fell into Stor-
age lid. If the pin fell into Storage lid, then it is very difficult to
take the pin out from the lid. And if the pin is left inside the lid, it
may make an uncomfortable noise.
3. Remove closure mounting bolt from back of storage lid. (c in the figure)
4. Move closure toward outside of vehicle (because it interferes with unlock). (d in the figure)
5. Disconnect unlock actuator connector. (e in the figure)
6. Disconnect actuator side of unlock cable. (g in the figure)
7. Remove unlock actuator mounting bolt from back of storage lid, and then remove unlock actuator from
inspection cover. (f in the figure)
8. Remove lock mounting bolt from back of storage lid, and then move entire lock toward rear of storage lid.
(h in the figure)
PIIB1439E
PIIB1440E
Page 125 of 130
STORAGE LID
RF-125
C
D
E
F
G
H
J
K
L
MA
B
RF
Revision: 2006 November2007 350Z
9. Disconnect lock harness connector, and then remove lock from inspection cover. (j in the figure)
NOTE:
Turn lock catcher counterclockwise, and then face it to storage lid inspection hole side to remove because
it interferes with storage lid when removing.
10. Disconnect closure harness connector, and then remove closure from inspection cover. (k in the figure)
11. Disconnect unlock actuator, lock, and closure harness connectors from inspection cover.
(Push in harness connector clip tabs from back of storage lid using a screwdriver so as to remove.)
INSTALLATION
Install in the reverse order of removal.
Page 126 of 130
RF-126
STORAGE LID
Revision: 2006 November2007 350Z
Removal and Installation of Storage Lid ActuatorNIS00081
REMOVAL
1. Remove trank room trim.
2. Remove nuts and bolts, and then remove storage lid lower
bracket.
3. Disconnect storage lid actuator harness connector.
4. Remove nuts and remove storage lid actuator from storage lid
bracket, lower.
INSTALLATION
Install in the reverse order of removal.
Removal and Installation of Storage Room FinisherNIS00082
REMOVAL
1. Remove rear side finisher. Refer to EI-37, "REAR SIDE FINISHER" .
2. Remove bolts, and then soft top mounting bracket (front).
3. Remove bolts, and then soft top mounting bracket (rear).
4. Lift up soft top mounting bracket using a lever, and then remove storage room finisher clips.
5. Remove storage room finisher clips, and then remove rear side of storage room finisher.
PIIA7972E
PIIA8625E
PIIA7627E
Page 127 of 130

STORAGE LID
RF-127
C
D
E
F
G
H
J
K
L
MA
B
RF
Revision: 2006 November2007 350Z
6. Lift up back panel finisher clips using remover tools, and then remove front side of storage room finisher.
INSTALLATION
Install in the reverse order of removal.
Removal and Installation of Storage Outer Protector NIS00083
Note the following, and install in the reverse order of removal.
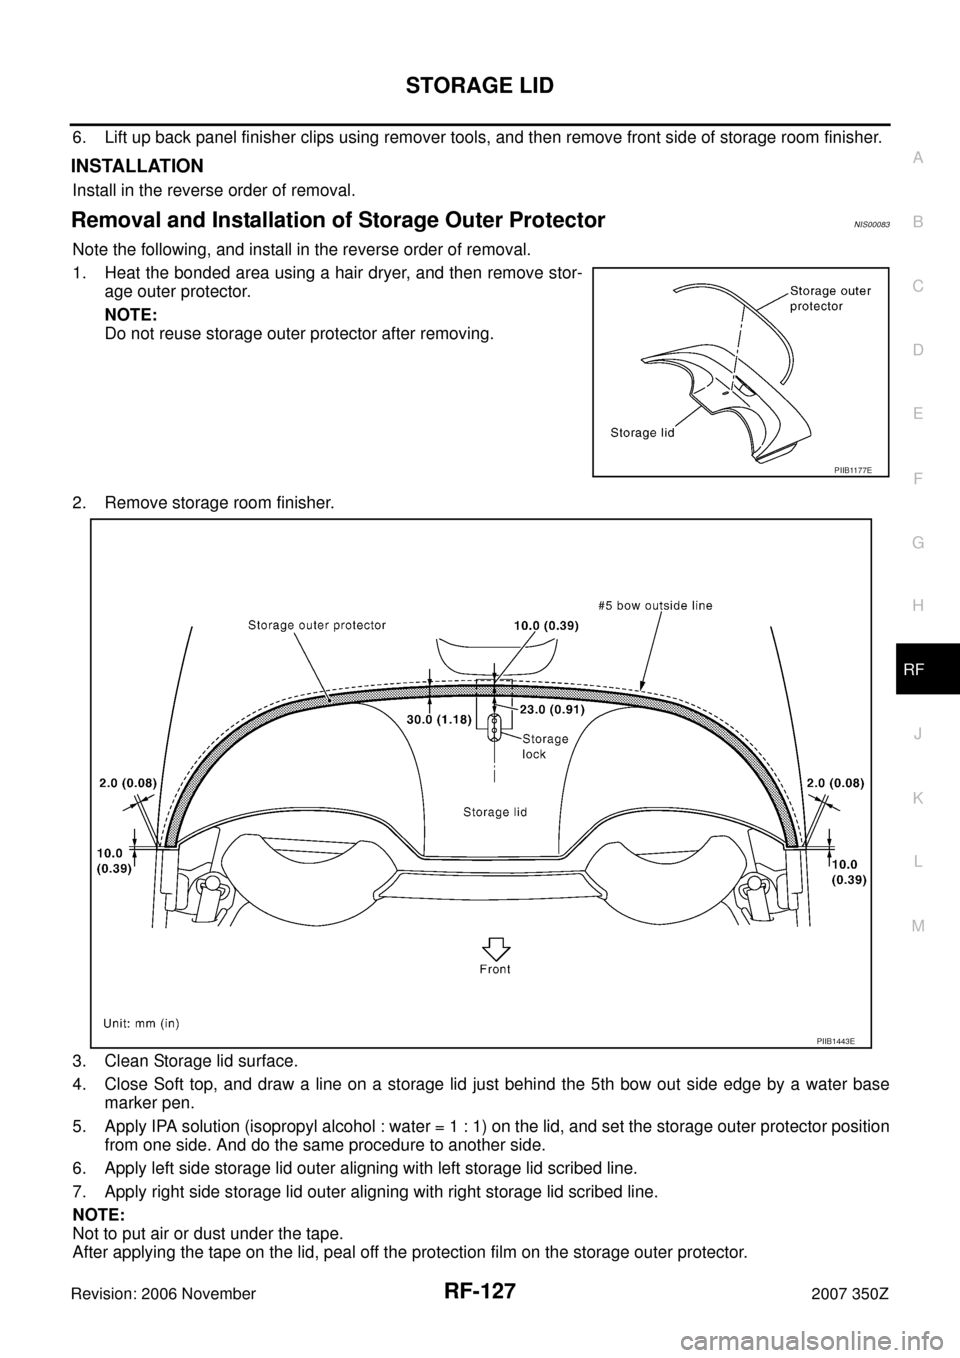
1. Heat the bonded area using a hair dryer, and then remove stor-
age outer protector.
NOTE:
Do not reuse storage outer protector after removing.
2. Remove storage room finisher.
3. Clean Storage lid surface.
4. Close Soft top, and draw a line on a storage lid just behind the 5th bow out side edge by a water base
marker pen.
5. Apply IPA solution (isopropyl alcohol : water = 1 : 1) on the lid, and set the storage outer protector position
from one side. And do the same procedure to another side.
6. Apply left side storage lid outer aligning with left storage lid scribed line.
7. Apply right side storage lid outer aligning with right storage lid scribed line.
NOTE:
Not to put air or dust under the tape.
After applying the tape on the lid, peal off the protection film on the storage outer protector.
PIIB1177E
PIIB1443E
Page 130 of 130
RF-130
STORAGE LID
Revision: 2006 November2007 350Z
Removal and Installation of Storage Lid Striker Lock & Storage Lid Emergency
Opener Cable
NIS00085
REMOVAL
1. Remove storage room finisher. Refer to RF-126, "Removal and Installation of Storage Room Finisher" .
2. Remove trunk front finisher. Refer to EI-49, "
TRUNK ROOM TRIM & TRUNK LID FINISHER" .
3. Disconnect each clamp of storage lid emergency opener cable.
4. Disconnect each harness connector of storage lid lock assembly.
5. Remove storage lid lock mounting bolts, and then remove storage lid lock assembly.
INSTALLATION
Install in the reverse order of removal.
1. Storage lid striker lock assembly 2. Nut 3. Bolt
4. Storage lid emergency opener cable 5. Storage lid emergency opener hook
PIIB1492E