Page 108 of 130

RF-108
SOFT TOP
Revision: 2006 November2007 350Z
Removal and Installation of Roof ActuatorNIS0007U
REMOVAL
1. Remove soft top assembly. Refer to RF-88, "Removal and Installation of Soft Top Assembly" .
2. Remove nuts and then remove roof actuator (RH/LH).
NOTE:
If removal is difficult, rotate motor axis to remove them.
3. Disconnect soft top actuator harness connector.
INSTALLATION
Install in the reverse order of removal.
Removal and Installation of 5th Bow Drive UnitNIS0007V
REMOVAL
1. Uninstall soft top assembly from the vehicle.
2. Remove roof actuator (RH/LH) from the soft top.
NOTE:
If removal is difficult, rotate motor axis to remove them.
3. Disconnect 5th bow operating rod (RH/LH) at the frame side by
pulling out the holder.
NOTE:
This step will make the 5th bow up and down motion easier.
4. Make sure that the limit switch contact around the rotation axis of the 5th bow on the left side of soft top is
protected with tape.
5. Open the soft top manually, and put a stand under the 1st bow. Then fix the soft top not to move during
this procedure.
NOTE:
Put a waste cloth between the front lock and the stand not to make any scratches to the soft top.
6. Remove the C link and 5th bow weather strip.
PIIB1167E
PIIB1167E
PIIA9755E
Page 109 of 130
SOFT TOP
RF-109
C
D
E
F
G
H
J
K
L
MA
B
RF
Revision: 2006 November2007 350Z
7. Remove the soft top cover retainer (5th bow retainer) from 5th
bow by taking out screws.
8. Drilling rivets attaching the soft top cover to 5th bow, then pull up the soft top cover bottom edge.
NOTE:
Use 4 mm (0.16 in) diameter drill bit to remove the rivet head. When drilling rivets, be careful not to dam-
age the soft top cover.
9. Drilling rivets with retainers attaching with tags from the soft top
cover, 5th bow finisher and the 5th bow.
NOTE:
Use 4 mm (0.16 in) diameter drill bit to remove the rivet head.
The soft top cover is separated from 5th bow.
10. Drilling rivets under retainers by using 4 mm (0.16 in) diameter
drill bit.
11. Remove pads from 5th bow finisher.
PIIB1010E
PIIA9854E
PIIA9855E
PIIA9853E
Page 110 of 130
RF-110
SOFT TOP
Revision: 2006 November2007 350Z
12. Roll the soft top cover bottom edge up, and disconnect defogger
harness connector from the rear window glass.
13. Pull out glass stays from sleeves on each side of the rear win-
dow glass.
14. Remove 5th bow side finisher (RH/LH) by removing screws.
15. Remove 5th bow finisher by pulling the finisher up.
16. Remove glass stays from 5th bow by removing screws from the
bottom of the 5th bow.
NOTE:
�When removing glass stays, support 5th bow to avoid a bend
of glass stay. This bend may happen by the weight of the 5th
bow and the tensile force of the tether from the soft top cover.
�Be careful not to damage the 5th bow nor to be hurt by the
falling 5th bow, because the 5th bow is heavy and moves
freely after removing glass stays.
17. Disconnect 5th bow drive unit harness connector.
PIIA9858E
PIIA9754E
PIIA9852E
PIIA9857E
PIIA9753E
Page 111 of 130
SOFT TOP
RF-111
C
D
E
F
G
H
J
K
L
MA
B
RF
Revision: 2006 November2007 350Z
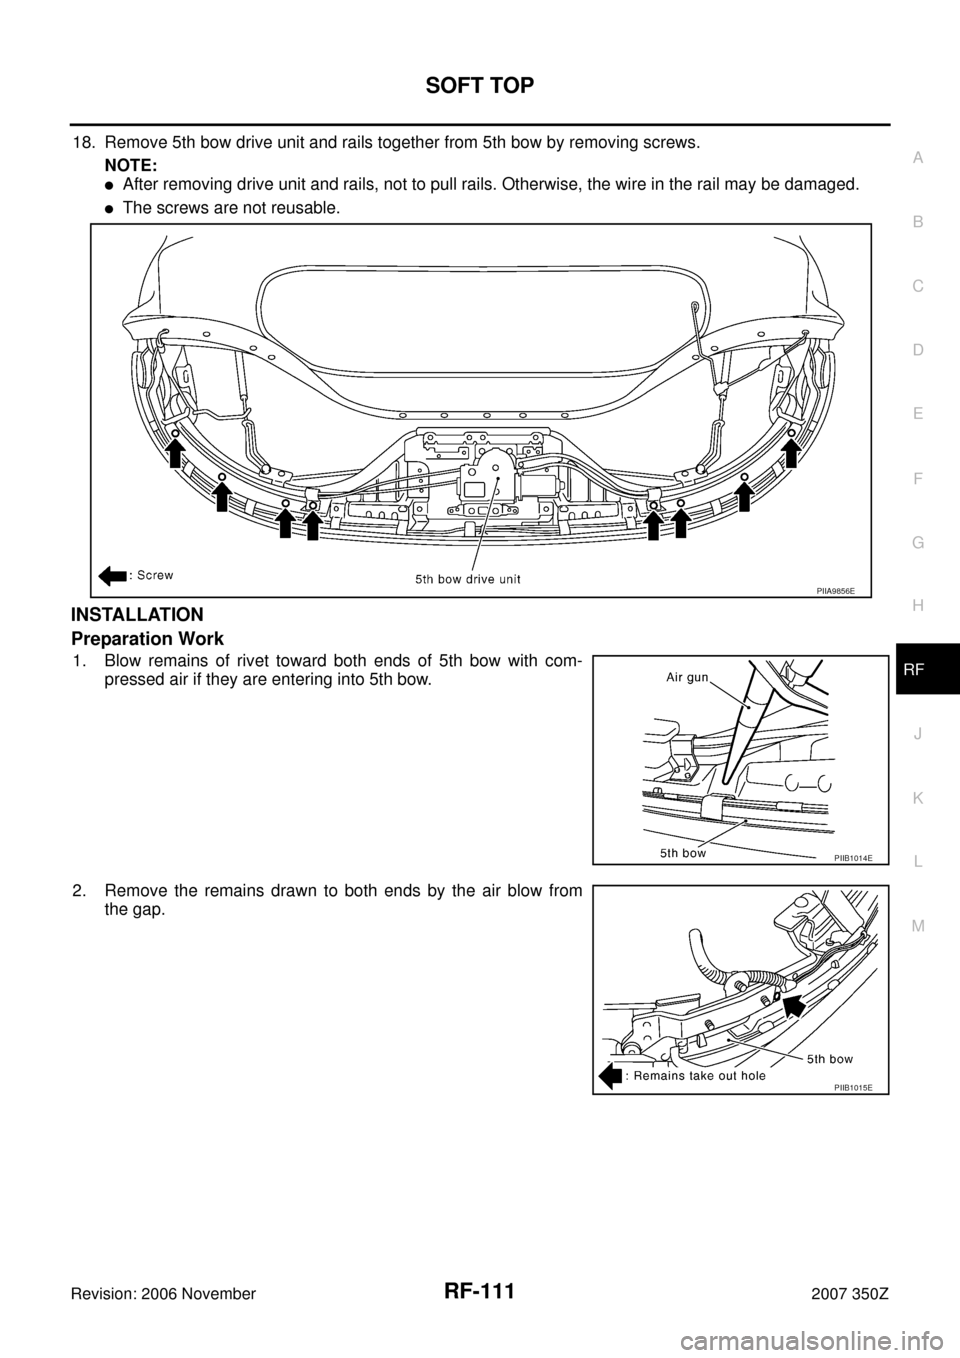
18. Remove 5th bow drive unit and rails together from 5th bow by removing screws.
NOTE:
�After removing drive unit and rails, not to pull rails. Otherwise, the wire in the rail may be damaged.
�The screws are not reusable.
INSTALLATION
Preparation Work
1. Blow remains of rivet toward both ends of 5th bow with com-
pressed air if they are entering into 5th bow.
2. Remove the remains drawn to both ends by the air blow from
the gap.
PIIA9856E
PIIB1014E
PIIB1015E
Page 115 of 130

SOFT TOP
RF-115
C
D
E
F
G
H
J
K
L
MA
B
RF
Revision: 2006 November2007 350Z
Removal and Installation of Front LockNIS0007W
REMOVAL
1. Remove welt and front finisher.
2. Remove bolts, and then remove front lock rod.
CAUTION:
Do not remove front lock hook, center bolts.
3. Remove bolts, and then remove front lock striker, LH, center, and RH.
NOTE:
Paint matching marks for front lock assembly to check location for installation.
INSTALLATION
Install in the reverse order of removal.
Always adjust before installation. Refer to RF-115, "
INSPECTION AND ADJUSTMENT" .
INSPECTION AND ADJUSTMENT
1. Apply super-check spray on a contact surface of 3 hooks which may touch with rods on the body. Fully
close soft top, and then engage front lock.
2. Open soft top, and then make sure that the part, from which iron
material is visible by peeling off super-check mark, exceeds “L”
line.
3. Adjust hook contact length by adjusting front lock rod length
using front lock rod adjust bolt if “L” line is not exceeded in front
lock hook, RH and LH.
4. There is a part malfunction, if “L” line is not exceeded in front lock center hook. Replace front lock assem-
bly.
5. Make sure that the super check mark exceeds the “L” line, and then measure the fully closed operating
force while contacting push-pull gauge to the handle. Make sure that the operating force is 68.6 N (7 kg,
15.4 lb) or less, and then install it.
NOTE:
�Replace front lock assembly if the operating force is over the specified value.
�Make sure that operating force when replacing front weather strip, center weather strip, and rear
weather strip is 107.8 N (11 kg, 24.2 lb) or less.
PIIA8181E
PIIA7862E
PIIA7861E
Page 118 of 130

RF-118
SOFT TOP
Revision: 2006 November2007 350Z
Repair Procedure 5
�Loosen retainer screws.
�Make fine upward/downward position adjustments to the B link
retainer.
(Move the B link retainer of a protruded weather strip downward
for the adjustment.)
�Insert approximately 0.5 mm (0.02 in) washer into the back of
the subsiding weather strip retainer, if the step is not eliminated
after adjustment.
WATER LEAKAGE FROM D
Water may be entering through inside door glass rear.
Cause: There may be poor contact between Clink and 5th bow weather strip of soft top and door glass.
Repair Procedure 6
�Adjust door glass position frontward/backward or upward/down-
ward against soft top.
�Adjust door glass tilt contact by rotating adjusting bolt on regula-
tor lower edge.
CAUTION:
Soft top assembly position may be incorrect in the case of
glass upper position is low even if door glass adjustment is per-
formed. Perform soft top assembly adjustment if necessary.
Refer to GW-51, "
FRONT DOOR GLASS AND REGULATOR" .
WATER LEAKAGE FROM E
Water may be entering passenger room through weather strip joint.
Cause: There may be a step or a gap between C link and 5th bow weather strip side and body side of weath-
erstrip.
Repair Procedure 7
�Remove C link weather strip.
�Remove C link retainer.
PIIB1170E
PIIB1171E
PIIB1172E
PIIB1436E
Page 120 of 130

RF-120
SOFT TOP
Revision: 2006 November2007 350Z
Correspondence in EmergencyNIS0007Y
If the soft top cannot be operated electrically in the event of a discharged battery or any other system malfunc-
tion, the soft top needs to be closed manually or opened manually according to the following procedures.
MANUAL OPERATION (SOFT TOP FULLY OPEN � FULLY CLOSE)
1. Open The Trunk Lid
�Open the lid behind the passenger's seat (rear floor box).
�Remove cap of the emergency cable.
�Pull the emergency cable upper surface in the box.
�Open trunk lid.
2. Open The Storage Lid
�Remove floorboard inside of the trunk.
�Disconnect the storage lid motor harness connector upperward,
which is located at the right hand side of the trunk.
�Pull down the storage lid lock release cable (right and left sides
in the trunk).
�Confirm a clicking sound of lock release.
�Pull up the storage lid from the right and left sides of vehicle (two
people are required).
CAUTION:
The storage lid is extremely heavy. Pulling it up should be
done by two people. Use Hex-wrench to rotate the axis of
the gear, when the lid does not move.
3. Close The Soft Top
�Disconnect roof actuator harness connector right and left sides.
CAUTION:
2nd disconnect top of roof actuator harness connector
right and first disconnect top of roof actuator harness con-
nectors left sides.
�Pull up the soft top right and left sides of the vehicle slowly by
hand (two people are required).
�Lock soft top front lock.
4. Close The Storage Lid
Push down soft top to body panel.
PIIA7591E
PIIB1437E
PIIA7593E
Page 121 of 130

SOFT TOP
RF-121
C
D
E
F
G
H
J
K
L
MA
B
RF
Revision: 2006 November2007 350Z
5. Lower The Soft Top 5th Bow
�Remove both operating rod of soft top 5th bow.
CAUTION:
Remove a holder of operating rod end.
Simultaneously hold soft top 5th bow by hand when remov-
ing the holder.
�Push in 5th bow to storage lid (do half lock).
CAUTION:
After closing the soft top manually according to the above pro-
cedures, have the soft top operation system checked and/or
repaired by a NISSAN dealer as soon as possible.
Avoid leaving the vehicle outside for long periods or driving at
high speed. As the rear of the soft top is not locked completely,
this may allow wind and rain get into the vehicle.
MANUAL OPERATION (SOFT TOP FULLY CLOSE � FULLY OPEN)
1. Remove The Luggage Floor Trim
Remove the rear floor box and luggage floor finisher upper. Refer to EI-41, "Removal and Installation (for
Roadster Models)" .
2. Cutting Storage Room Finisher
Cut storage room finisher from seat side.
3. Unlock The Storage Lid
�Remove clip of inspection cover.
�Remove the storage lid inspection cover.
�Pull the unlock wire then unlock the soft top 5th bow.
PIIA7594E
PIIA8845E
PIIA8844E
PIIB1438E
 from 5th
bow by taking out screws.
8. Drilling rivets attaching the")