2007 MITSUBISHI LANCER EVOLUTION ignition
[x] Cancel search: ignitionPage 1349 of 1449
CHASSIS ELECTRICAL -Headlamp AssemblyCHASSIS ELECTRICAL -Headlamp AssemblyCHASSIS ELECTRICAL -Headlamp Assembly54A-29
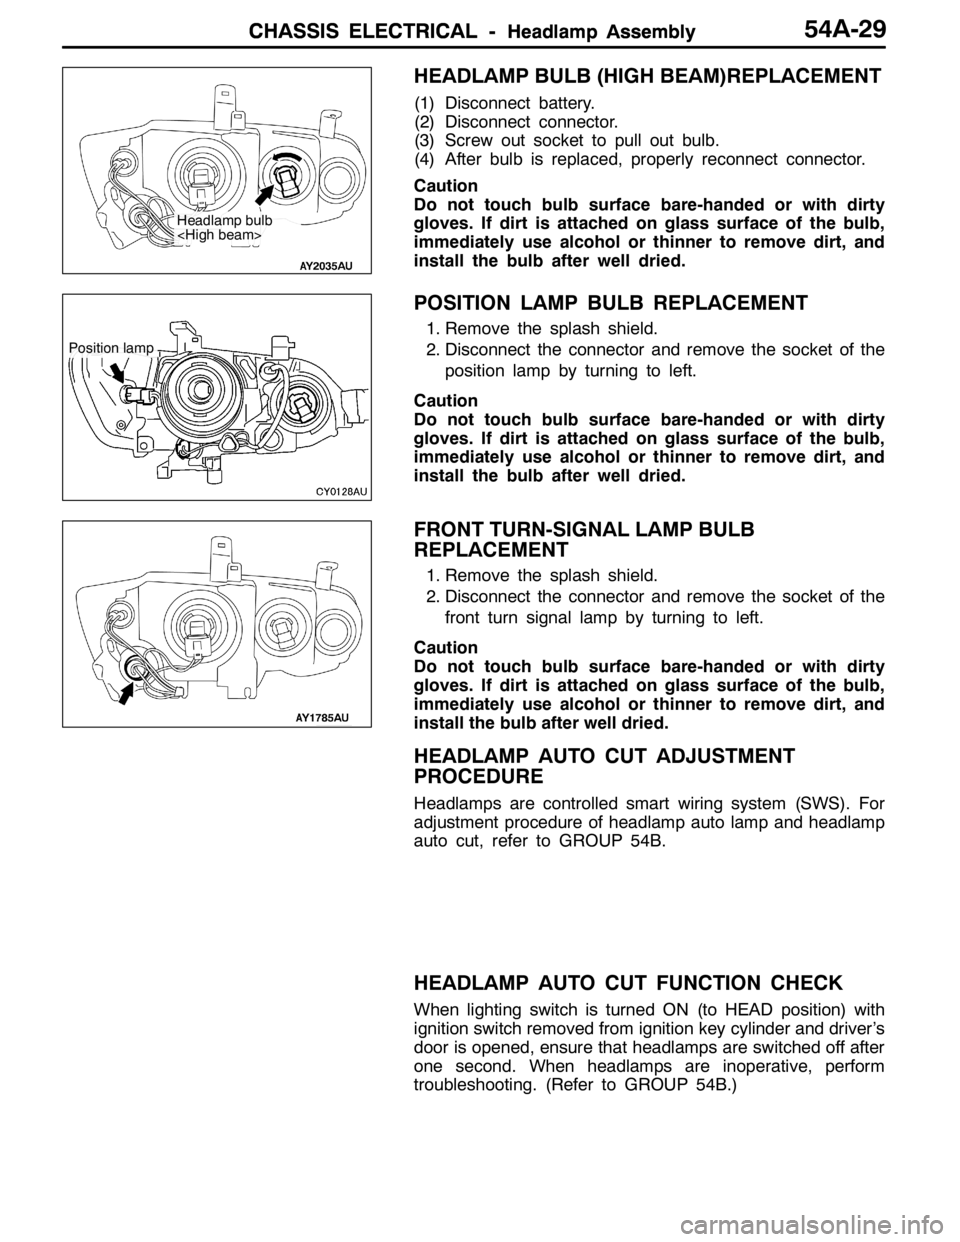
HEADLAMP BULB (HIGH BEAM)REPLACEMENT
(1) Disconnect battery.
(2) Disconnect connector.
(3) Screw out socket to pull out bulb.
(4) After bulb is replaced, properly reconnect connector.
Caution
Do not touch bulb surface bare-handed or with dirty
gloves. If dirt is attached on glass surface of the bulb,
immediately use alcohol or thinner to remove dirt, and
install the bulb after well dried.
POSITION LAMP BULB REPLACEMENT
1. Remove the splash shield.
2. Disconnect the connector and remove the socket of the
position lamp by turning to left.
Caution
Do not touch bulb surface bare-handed or with dirty
gloves. If dirt is attached on glass surface of the bulb,
immediately use alcohol or thinner to remove dirt, and
install the bulb after well dried.
FRONT TURN-SIGNAL LAMP BULB
REPLACEMENT
1. Remove the splash shield.
2. Disconnect the connector and remove the socket of the
front turn signal lamp by turning to left.
Caution
Do not touch bulb surface bare-handed or with dirty
gloves. If dirt is attached on glass surface of the bulb,
immediately use alcohol or thinner to remove dirt, and
install the bulb after well dried.
HEADLAMP AUTO CUT ADJUSTMENT
PROCEDURE
Headlamps are controlled smart wiring system (SWS). For
adjustment procedure of headlamp auto lamp and headlamp
auto cut, refer to GROUP 54B.
HEADLAMP AUTO CUT FUNCTION CHECK
When lighting switch is turned ON (to HEAD position) with
ignition switch removed from ignition key cylinder and driver’s
door is opened, ensure that headlamps are switched off after
one second. When headlamps are inoperative, perform
troubleshooting. (Refer to GROUP 54B.)
Headlamp bulb
Position lamp
Page 1367 of 1449

SWS -Troubleshooting54B-3
INPUT SIGNAL CHECK
1. Check the inputs using MUT-II or a voltmeter. (Refer to GROUP 00 - How to Use
Troubleshooting/Inspection Service Points.)
2. The following input signals can be checked using MUT-II or a voltmeter connected to the diagnosis
connector.
NOTE
When fault is detected during input signal inspection, refer to Trouble Symptom Chart to perform
troubleshooting. (Refer to P.54B-7).
Input Signal Check Function
Input signalBuzzer operation condition
Ignition switch (ACC)When ignition switch turned from “LOCK” (OFF)
to ACC.
Ignition switch (IG1)When ignition switch turned from “ACC” to “ON”.
Hazard warning lamp switchWhen switch turned from OFF to ON.
Rear fog lamp switch
Driver’s door switchWhen driver’s door opened from closed
All door switchesWhen any door opened when all doors were
closed.
Driver’s door lock actuatorWhen the driver’s side key cylinder or inside lock
knob is moved from the locked to unlocked
position or vice versa.
Vehicle speed signalVehicle speed changes from less than 10 km/h to
10 km/h or more.
Column switchesTail lamp switchWhen lighting switch turned from automatic
lighting to tail lamp position.
Headlamp switchWhen lighting switch turned from tail lamp to
headlamp position.
Dimmer switchWhen switch turned from OFF to ON.
Passing switch
Left-hand turn signal lamp switch
Right-hand turn signal lamp switch
Windshield mist wiper switch
Windshield wiper intermittent timing switch
Windshield wiper LO speed switch
Windshield wiper HI speed switch
Windshield washer switchWhen switch turned from OFF to ON.
Power window
main switchAll switchesWhen switch turned from OFF to ON.
DIAGNOSIS CODE CHART
Code No.Diagnosis itemReference page
11ETACS-ECU-related failure54B-4
12Column switch-related failure or fault in connecting to ETACS-ECU54B-4
13Front-ECU-related failure or fault in connecting to ETACS-ECU54B-5
21Short circuit in communication lines54B-6
Page 1368 of 1449
SWS -Troubleshooting54B-4
DIAGNOSIS CODE INSPECTION PROCEDURES
Code No. 11 ETACS-ECU-related failureProbable cause
The ETACS-ECU monitors its own communication data, outputting this diagnosis
code when data error occurs 15 consecutive times (for 0.6 seconds). The
diagnosis code output stops when the ETACS-ECU confirms that its data was
transmitted normally 15 consecutive times (for 0.6 seconds).DETACS-ECU fault
Replace ETACS-ECU.
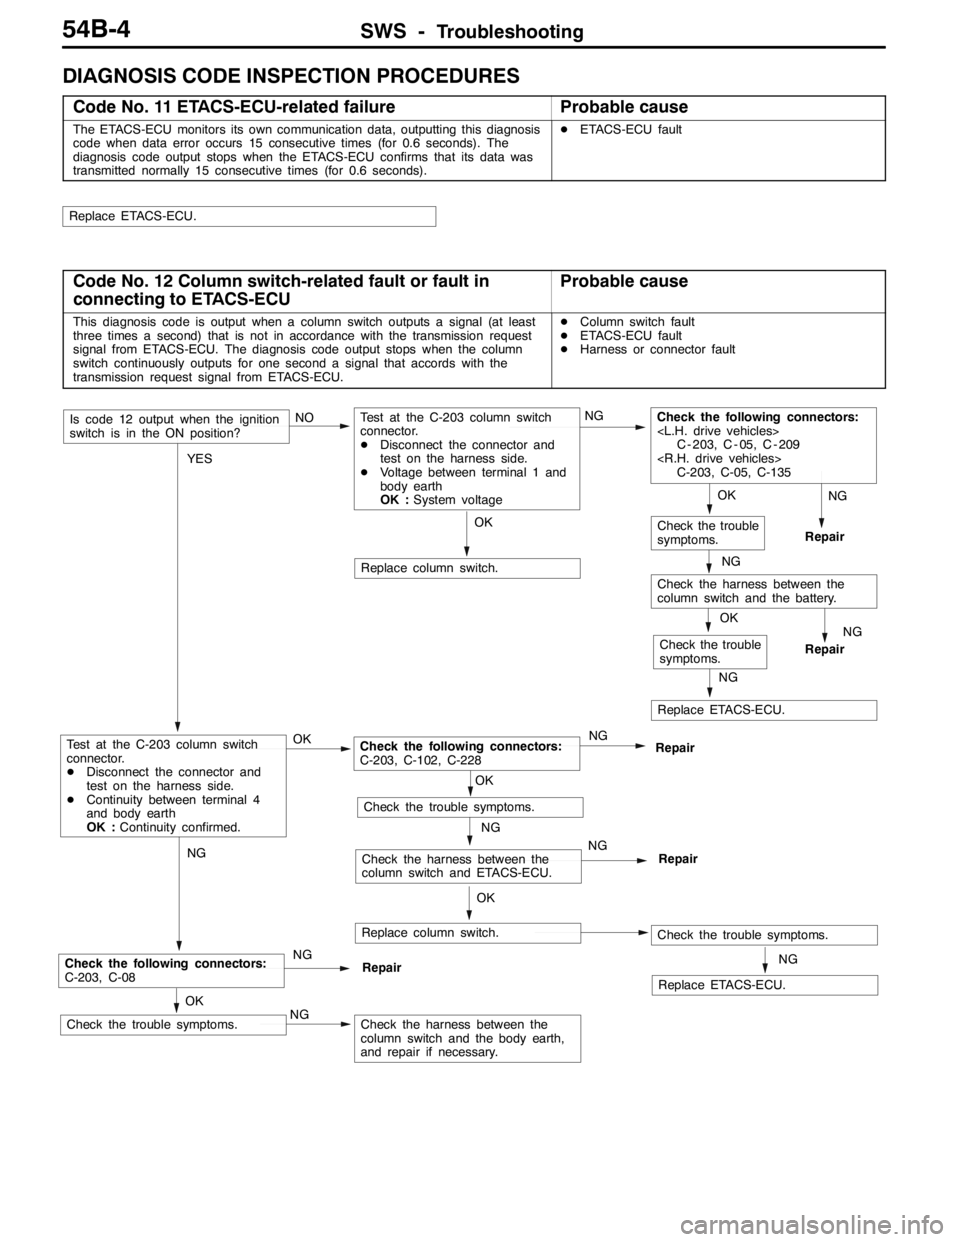
Code No. 12 Column switch-related fault or fault in
connecting to ETACS-ECUProbable cause
This diagnosis code is output when a column switch outputs a signal (at least
three times a second) that is not in accordance with the transmission request
signal from ETACS-ECU. The diagnosis code output stops when the column
switch continuously outputs for one second a signal that accords with the
transmission request signal from ETACS-ECU.DColumn switch fault
DETACS-ECU fault
DHarness or connector fault
OK
Replace column switch.
NG
Replace ETACS-ECU.
OK
Check the trouble
symptoms.
OK
Check the trouble symptoms.NGCheck the harness between the
column switch and the body earth,
and repair if necessary.
NG
Check the following connectors:
C-203, C-08NG
Repair
NG
Repair
NG
Check the harness between the
column switch and the battery.
OK
Check the trouble
symptoms.
NG
Replace ETACS-ECU.
OK
Replace column switch.Check the trouble symptoms.
NG
Check the harness between the
column switch and ETACS-ECU.NG
Repair
OK
Check the trouble symptoms.
YES
Test at the C-203 column switch
connector.
DDisconnect the connector and
test on the harness side.
DContinuity between terminal 4
and body earth
OK :Continuity confirmed.OKCheck the following connectors:
C-203, C-102, C-228NG
Repair
Is code 12 output when the ignition
switch is in the ON position?NOTest at the C-203 column switch
connector.
DDisconnect the connector and
test on the harness side.
DVoltage between terminal 1 and
body earth
OK :System voltageNGCheck the following connectors:
C - 203, C - 05, C - 209
C-203, C-05, C-135
NG
Repair
Page 1369 of 1449
SWS -Troubleshooting54B-5
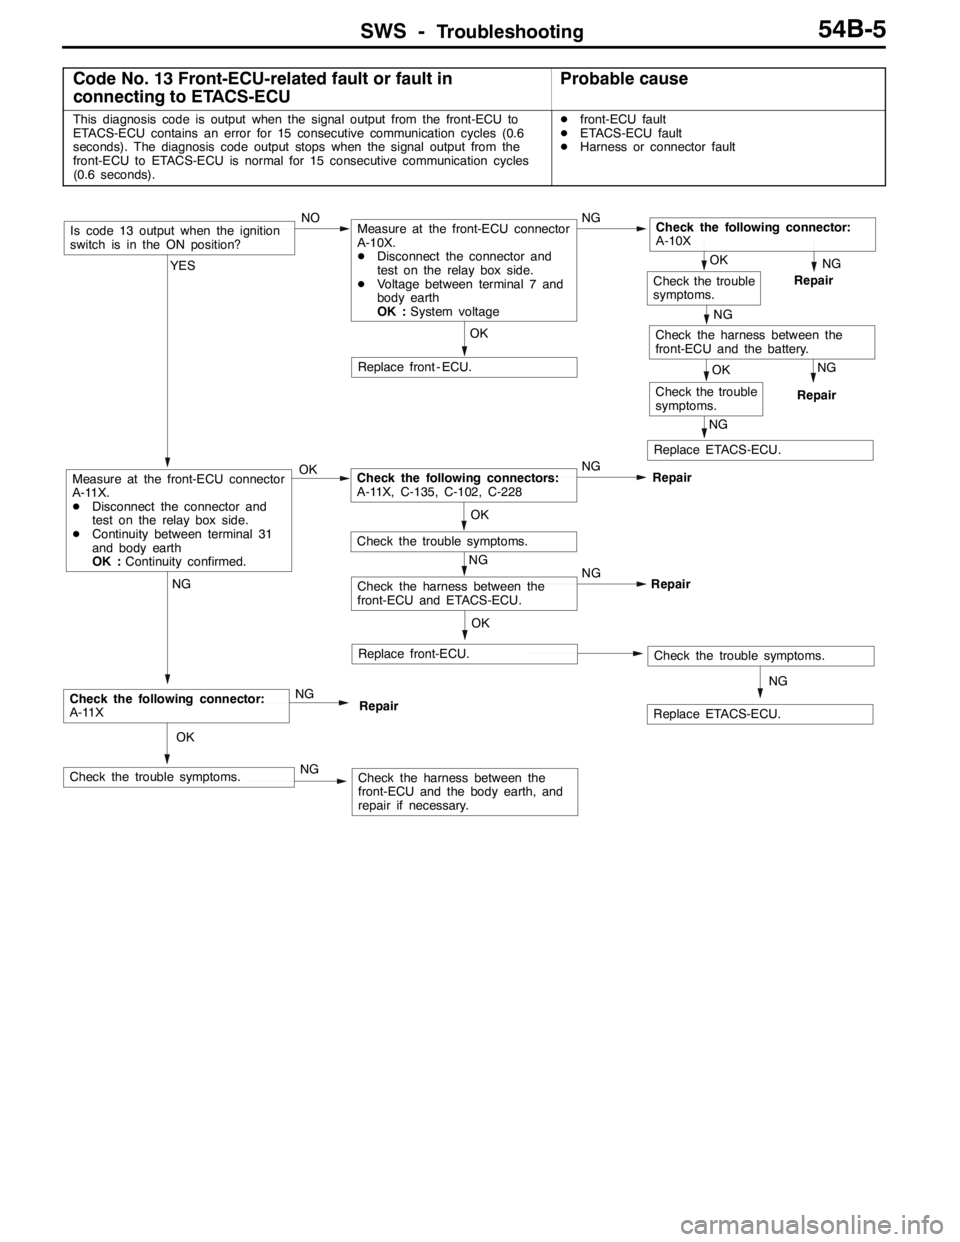
Code No. 13 Front-ECU-related fault or fault in
connecting to ETACS-ECUProbable cause
This diagnosis code is output when the signal output from the front-ECU to
ETACS-ECU contains an error for 15 consecutive communication cycles (0.6
seconds). The diagnosis code output stops when the signal output from the
front-ECU to ETACS-ECU is normal for 15 consecutive communication cycles
(0.6 seconds).Dfront-ECU fault
DETACS-ECU fault
DHarness or connector fault
NG
Repair
NG
Replace ETACS-ECU.
OK
Check the trouble
symptoms.
NG
Repair
NG
Check the harness between the
front-ECU and the battery.
OK
Check the trouble
symptoms.
NG
Replace ETACS-ECU.
OK
Replace front-ECU.Check the trouble symptoms.
NG
Check the harness between the
front-ECU and ETACS-ECU.NG
Repair
OK
Check the trouble symptoms.
OK
Replace front - ECU.
OK
Check the trouble symptoms.NGCheck the harness between the
front-ECU and the body earth, and
repair if necessary.
NG
Check the following connector:
A-11XNG
Repair
YES
Measure at the front-ECU connector
A-11X.
DDisconnect the connector and
test on the relay box side.
DContinuity between terminal 31
and body earth
OK :Continuity confirmed.OKCheck the following connectors:
A-11X, C-135, C-102, C-228NG
Repair
Is code 13 output when the ignition
switch is in the ON position?NOMeasure at the front-ECU connector
A-10X.
DDisconnect the connector and
test on the relay box side.
DVoltage between terminal 7 and
body earth
OK :System voltageNGCheck the following connector:
A-10X
Page 1372 of 1449

SWS -TroubleshootingSWS -Troubleshooting54B-8
DEFECTS FOUND BY INPUT SIGNAL CHECK
When a fault is identified in an input signal check, use the following table to investigate the fault.
Trouble symptomInspection
procedureReference
page
No ignition switch (ACC) signal input to ETACS-ECU.J-154B-26
No ignition switch (IG1) signal input to ETACS-ECU.J-254B-26
No hazard warning lamp switch signal input to ETACS-ECU.J-354B-27
No rear fog lamp switch signal input to ETACS-ECU.J-454B-28
No driver’s door switch signal input to ETACS-ECU.J-554B-29
No door switch signals input to ETACS-ECU.
No driver’s door lock actuator signal input to ETACS-ECU.J-654B-30
Column switchesNo tail lamp switch signal input to ETACS-ECU.J-754B-31
No headlamp switch signal input to ETACS-ECU.
No dimmer switch signal input to ETACS-ECU.
No passing switch signal input to ETACS-ECU.
No turn signal lamp left-hand switch signal input to
ETACS-ECU.
No turn signal lamp right-hand switch signal input to
ETACS-ECU.
Column switchesNo windshield mist wiper switch signal input to ETACS-ECU.J-854B-31
No windshield wiper intermittent switch signal input to
ETACS-ECU.
No windshield low-speed wiper switch signal input to
ETACS-ECU.
No windshield high-speed wiper switch signal input to
ETACS-ECU.
No windshield washer switch signal input to ETACS-ECU.
Power window main switchNo power window main switch signal input to ETACS-ECU.J-954B-32
When the ignition switch is in the LOCK (OFF) position, no functions work normally.K-154B-33
ETACS-ECU battery power supply circuit control check.
NOTE
A diagnosis code is output for front-ECU and column switch battery power supply circuit control abnormalities.
Apply the diagnosis code inspection procedures to address these abnormalities.
Page 1374 of 1449
SWS -Troubleshooting54B-10
INSPECTION PROCEDURE FOR TROUBLE SYMPTOMS
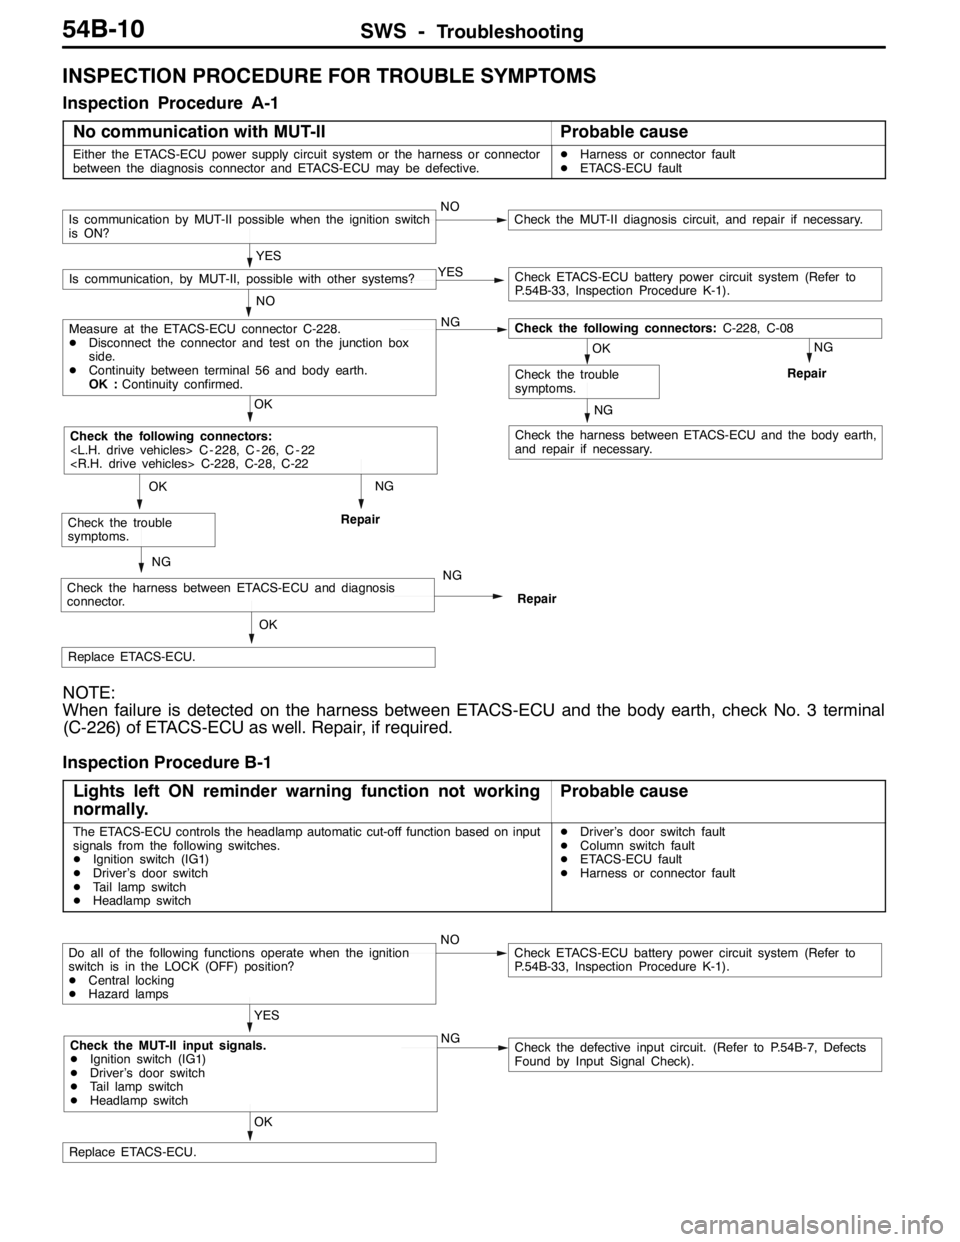
Inspection Procedure A-1
No communication with MUT-II
Probable cause
Either the ETACS-ECU power supply circuit system or the harness or connector
between the diagnosis connector and ETACS-ECU may be defective.DHarness or connector fault
DETACS-ECU fault
NG
Check the harness between ETACS-ECU and the body earth,
and repair if necessary.
NG
Repair
NG
Repair
OK
Replace ETACS-ECU.
NG
Check the harness between ETACS-ECU and diagnosis
connector.NG
Repair
OK
Check the trouble
symptoms.
OK
Check the following connectors:
OK
Check the trouble
symptoms.
NO
Measure at the ETACS-ECU connector C-228.
DDisconnect the connector and test on the junction box
side.
DContinuity between terminal 56 and body earth.
OK :Continuity confirmed.NGCheck the following connectors:C-228, C-08
YES
Is communication, by MUT-II, possible with other systems?YESCheck ETACS-ECU battery power circuit system (Refer to
P.54B-33, Inspection Procedure K-1).
Is communication by MUT-II possible when the ignition switch
is ON?NOCheck the MUT-II diagnosis circuit, and repair if necessary.
NOTE:
When failure is detected on the harness between ETACS-ECU and the body earth, check No. 3 terminal
(C-226) of ETACS-ECU as well. Repair, if required.
Inspection Procedure B-1
Lights left ON reminder warning function not working
normally.
Probable cause
The ETACS-ECU controls the headlamp automatic cut-off function based on input
signals from the following switches.
DIgnition switch (IG1)
DDriver’s door switch
DTail lamp switch
DHeadlamp switchDDriver’s door switch fault
DColumn switch fault
DETACS-ECU fault
DHarness or connector fault
OK
Replace ETACS-ECU.
YES
Check the MUT-II input signals.
DIgnition switch (IG1)
DDriver’s door switch
DTail lamp switch
DHeadlamp switchNGCheck the defective input circuit. (Refer to P.54B-7, Defects
Found by Input Signal Check).
Do all of the following functions operate when the ignition
switch is in the LOCK (OFF) position?
DCentral locking
DHazard lampsNOCheck ETACS-ECU battery power circuit system (Refer to
P.54B-33, Inspection Procedure K-1).
Page 1375 of 1449
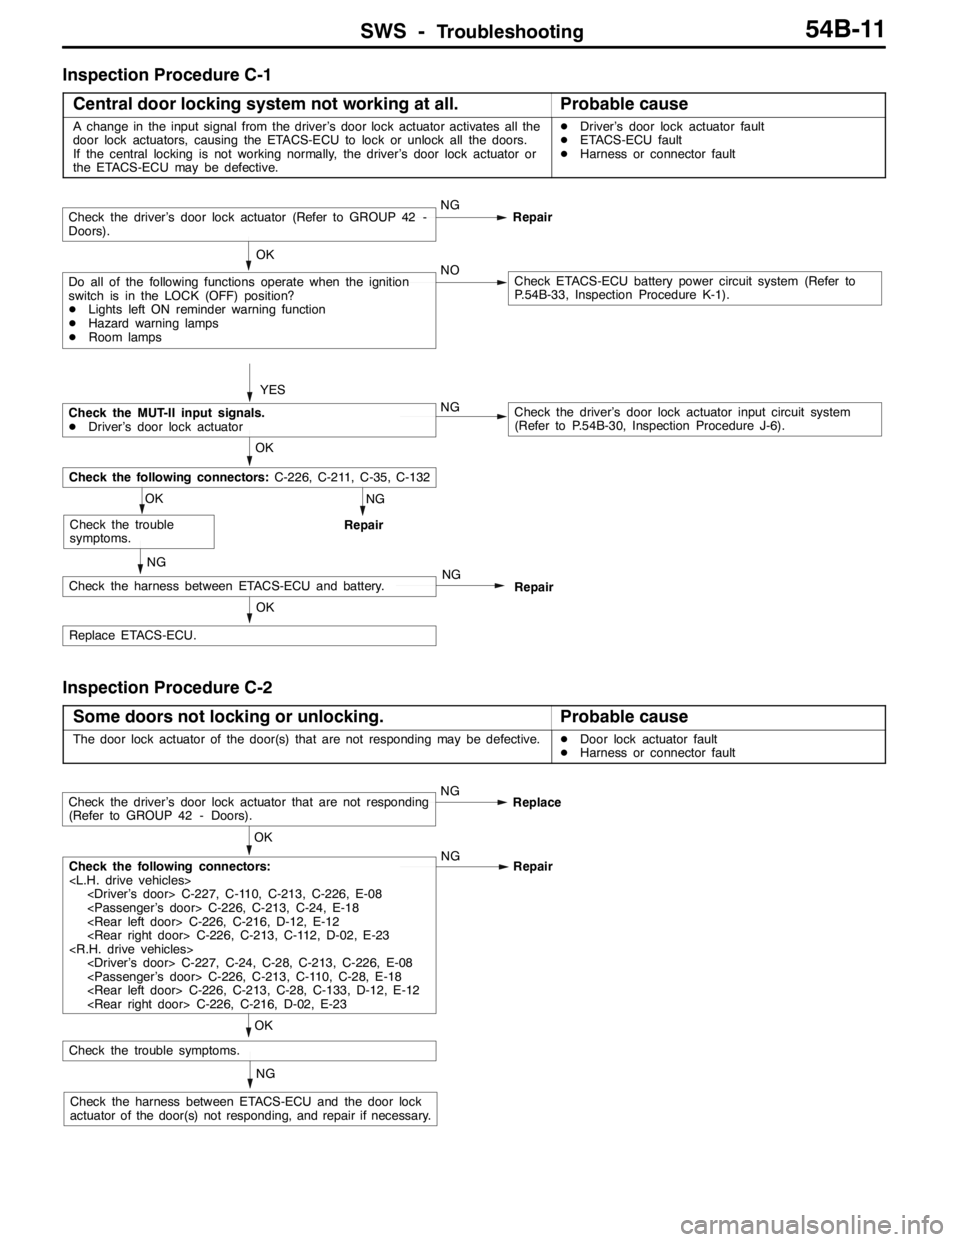
SWS -Troubleshooting54B-11
Inspection Procedure C-1
Central door locking system not working at all.
Probable cause
A change in the input signal from the driver’s door lock actuator activates all the
door lock actuators, causing the ETACS-ECU to lock or unlock all the doors.
If the central locking is not working normally, the driver’s door lock actuator or
the ETACS-ECU may be defective.DDriver’s door lock actuator fault
DETACS-ECU fault
DHarness or connector fault
NG
Repair
OK
Replace ETACS-ECU.
NG
Check the harness between ETACS-ECU and battery.NG
Repair
OK
Check the trouble
symptoms.
OK
Check the following connectors:C-226, C-211, C-35, C-132
YES
Check the driver’s door lock actuator (Refer to GROUP 42 -
Doors).NG
Repair
Do all of the following functions operate when the ignition
switch is in the LOCK (OFF) position?
DLights left ON reminder warning function
DHazard warning lamps
DRoom lampsNOCheck ETACS-ECU battery power circuit system (Refer to
P.54B-33, Inspection Procedure K-1). OK
Check the MUT-II input signals.
DDriver’s door lock actuatorNGCheck the driver’s door lock actuator input circuit system
(Refer to P.54B-30, Inspection Procedure J-6).
Inspection Procedure C-2
Some doors not locking or unlocking.
Probable cause
The door lock actuator of the door(s) that are not responding may be defective.DDoor lock actuator fault
DHarness or connector fault
NG
Check the harness between ETACS-ECU and the door lock
actuator of the door(s) not responding, and repair if necessary.
OK
Check the trouble symptoms.
OK
Check the following connectors:
Repair
Check the driver’s door lock actuator that are not responding
(Refer to GROUP 42 - Doors).NG
Replace
Page 1376 of 1449
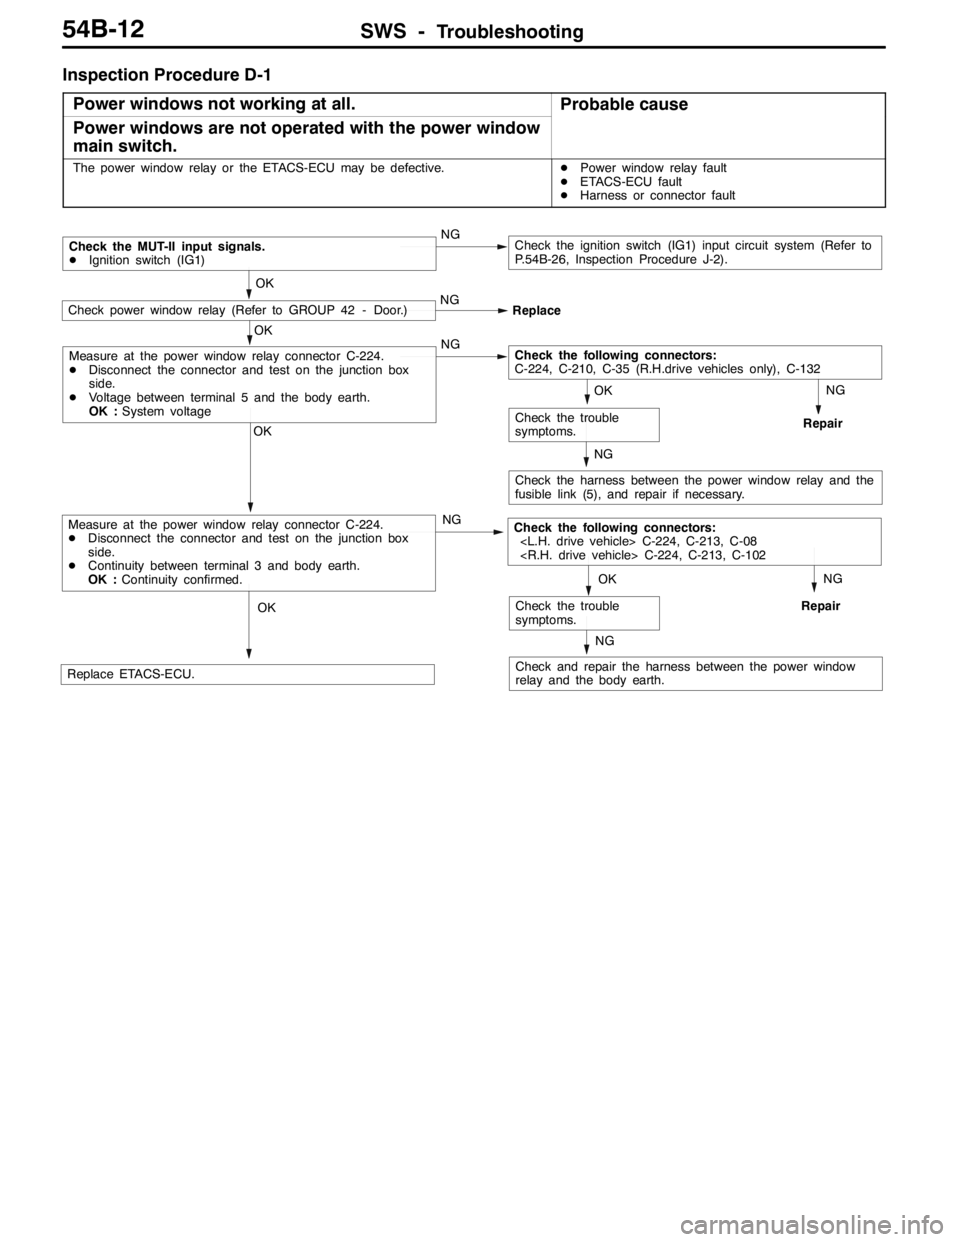
SWS -Troubleshooting54B-12
Inspection Procedure D-1
Power windows not working at all.
Probable cause
Power windows are not operated with the power window
main switch.
The power window relay or the ETACS-ECU may be defective.DPower window relay fault
DETACS-ECU fault
DHarness or connector fault
NG
Check the harness between the power window relay and the
fusible link (5), and repair if necessary.
NG
Repair
OK
Check the trouble
symptoms.
OK
NG
Check the following connectors:
C-224, C-210, C-35 (R.H.drive vehicles only), C-132
OK
Check power window relay (Refer to GROUP 42 - Door.)NG
Replace
Check the MUT-II input signals.
DIgnition switch (IG1)NGCheck the ignition switch (IG1) input circuit system (Refer to
P.54B-26, Inspection Procedure J-2).
NG
Check and repair the harness between the power window
relay and the body earth.
NG
RepairOK
Replace ETACS-ECU.
OK
Check the trouble
symptoms.
OK
Measure at the power window relay connector C-224.
DDisconnect the connector and test on the junction box
side.
DContinuity between terminal 3 and body earth.
OK :Continuity confirmed.NGCheck the following connectors:
Measure at the power window relay connector C-224.
DDisconnect the connector and test on the junction box
side.
DVoltage between terminal 5 and the body earth.
OK :System voltage