Page 1008 of 1449

REAR AXLE- Hydraulic Unit REAR AXLE- Hydraulic Unit 27B-62
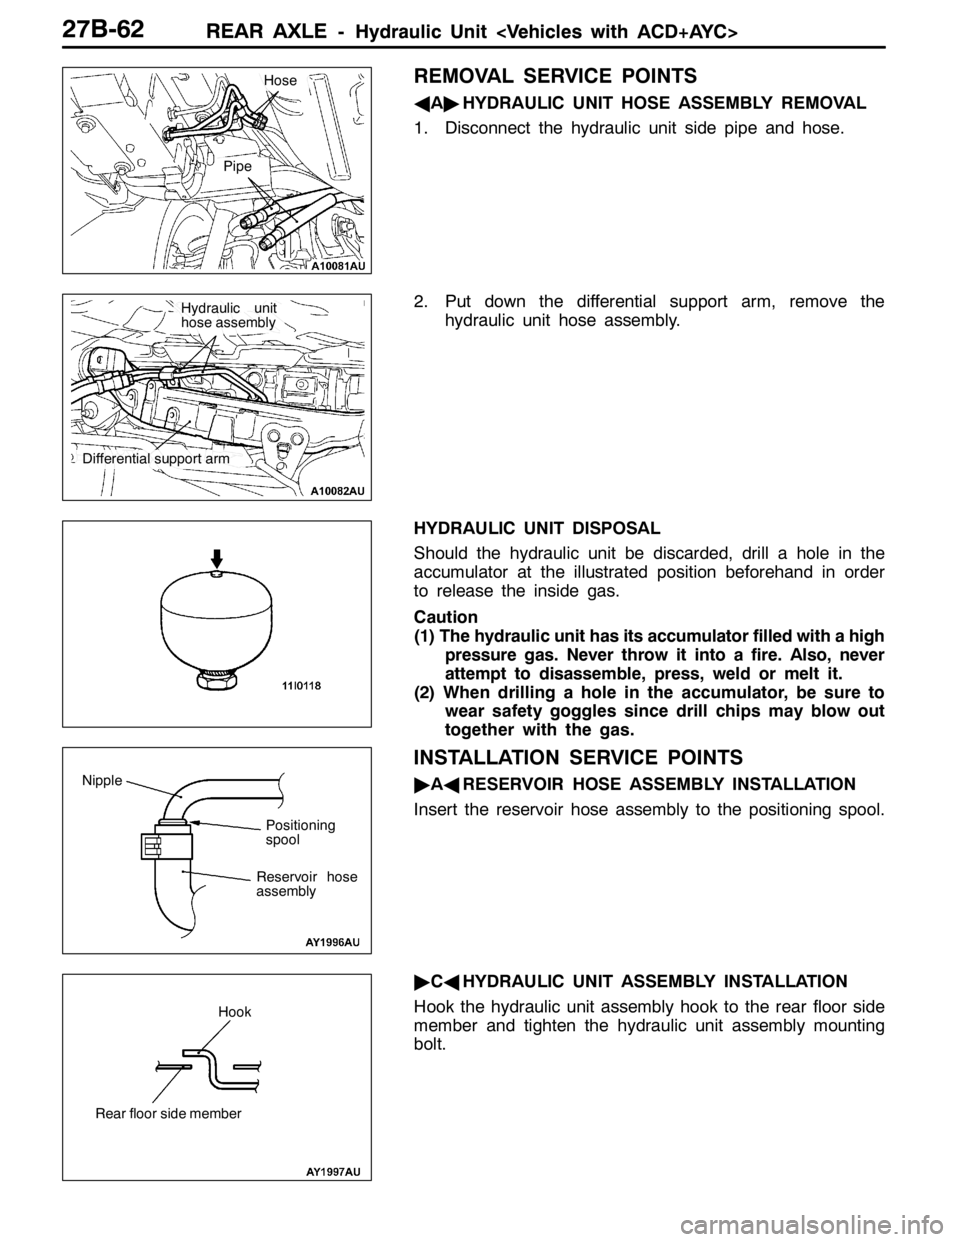
REMOVAL SERVICE POINTS
AA"HYDRAULIC UNIT HOSE ASSEMBLY REMOVAL
1. Disconnect the hydraulic unit side pipe and hose.
2. Put down the differential support arm, remove the
hydraulic unit hose assembly.
HYDRAULIC UNIT DISPOSAL
Should the hydraulic unit be discarded, drill a hole in the
accumulator at the illustrated position beforehand in order
to release the inside gas.
Caution
(1) The hydraulic unit has its accumulator filled with a high
pressure gas. Never throw it into a fire. Also, never
attempt to disassemble, press, weld or melt it.
(2) When drilling a hole in the accumulator, be sure to
wear safety goggles since drill chips may blow out
together with the gas.
INSTALLATION SERVICE POINTS
"AARESERVOIR HOSE ASSEMBLY INSTALLATION
Insert the reservoir hose assembly to the positioning spool.
"CAHYDRAULIC UNIT ASSEMBLY INSTALLATION
Hook the hydraulic unit assembly hook to the rear floor side
member and tighten the hydraulic unit assembly mounting
bolt.
Hose
Pipe
Hydraulic unit
hose assembly
Differential support arm
Positioning
spool Nipple
Reservoir hose
assembly
Hook
Rear floor side member
Page 1016 of 1449
POWER PLANT MOUNT - General Information32-2
GENERAL INFORMATION
Inertia principal axes system is incorporated into
the engine mount system.Upper installation of roll mount reduces engine
rolling, and increase of insulator bore also reduces
idle vibration.
CONSTRUCTION DIAGRAM
Transmission mount Engine mount
Rear roll rod bracket
Front roll stopper
Front roll mount bracketRear roll mount bracket
Crossmember
Crossmember bar
CentermemberRear roll rod assembly
Page 1017 of 1449
POWER PLANT MOUNT - General Information/Special Tool32-3
Front roll stopper Front roll mount bracketRear roll stopper Rear roll mount bracket
Crossmember
Crossmember bar
Centermember
SPECIAL TOOL
ToolNumberNameUse
MB990635,
MB991113 or
MB991406
Steering linkage
pullerTie rod end disconnection
Page 1018 of 1449
POWER PLANT MOUNT - Engine Mounting32-4
ENGINE MOUNTING
REMOVAL AND INSTALLATION
Caution
*: Indicates parts which should be initially tightened, and then fully tightened after placing the
vehicle horizontally and loading the full weight of the engine on the vehicle body.
Pre-removal and Post-installation Operation
DUnder Cover Removal and Installation (Refer to
GROUP 51 - Front Bumper.)DRaise the engine and transmission assembly until
its weight is not applied to the insulator, and support
it securely.
98±10 N·m*
67±7 N·m*
1
2
12±2 N·m
3 44
Removal steps
1. Power steering pressure hose as-
sembly
2. Engine mounting connecting bolt3. Engine mounting bracket
"AA4. Engine mounting insulator
INSTALLATION SERVICE POINT
"AAENGINE MOUNTING INSULATOR INSTALLATION
Arrow marks on the engine mount insulator should face the
shown direction.
NOTE
Disregard F and R stamped as a shared part.
Engine sideEngine side
Engine mounting insulator
>
Page 1019 of 1449

POWER PLANT MOUNT - Transmission Mounting32-5
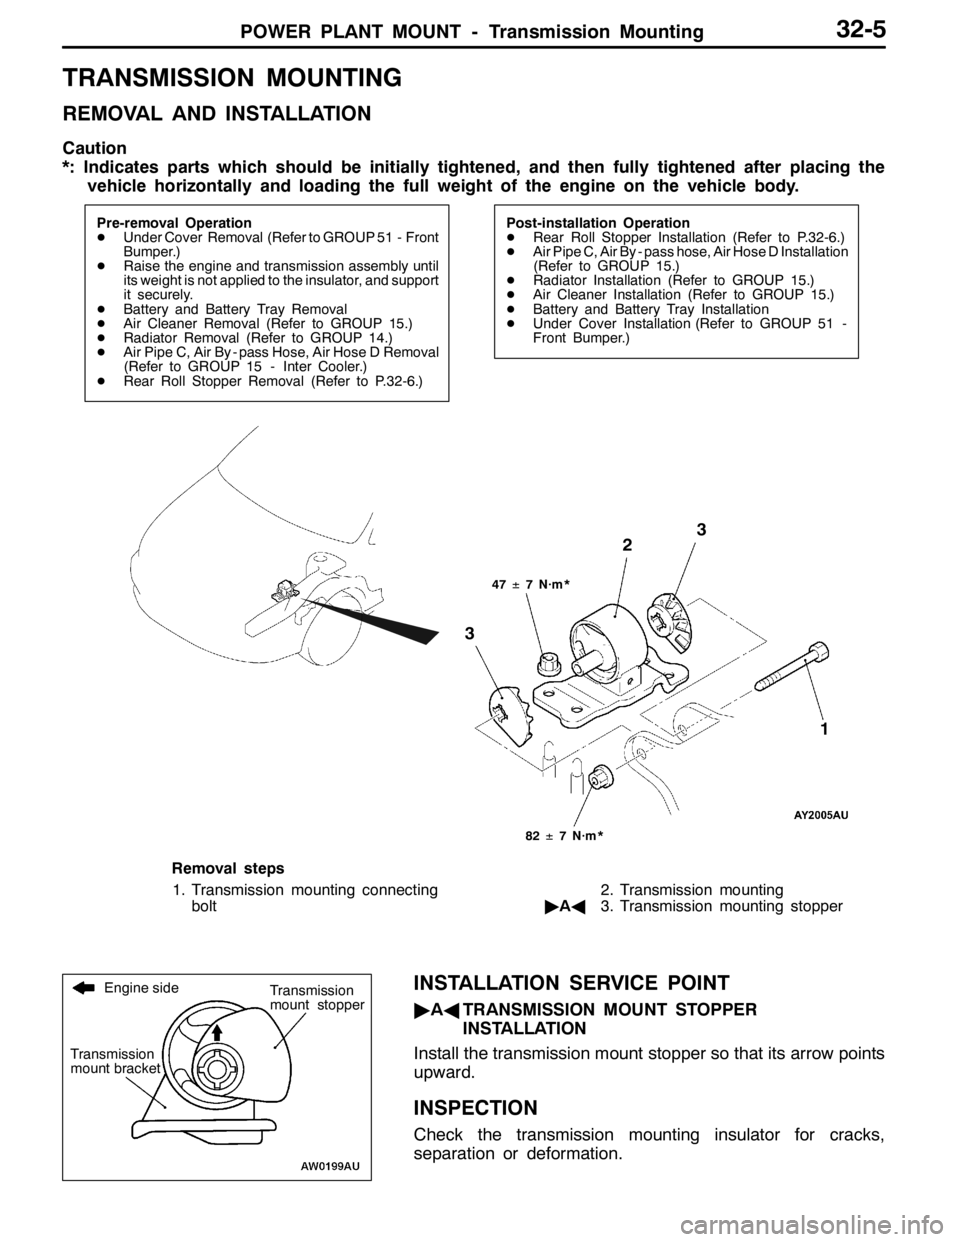
TRANSMISSION MOUNTING
REMOVAL AND INSTALLATION
Caution
*: Indicates parts which should be initially tightened, and then fully tightened after placing the
vehicle horizontally and loading the full weight of the engine on the vehicle body.
Pre-removal Operation
DUnder Cover Removal (Refer to GROUP 51 - Front
Bumper.)
DRaise the engine and transmission assembly until
its weight is not applied to the insulator, and support
it securely.
DBattery and Battery Tray Removal
DAir Cleaner Removal (Refer to GROUP 15.)
DRadiator Removal (Refer to GROUP 14.)
DAir Pipe C, Air By - pass Hose, Air Hose D Removal
(Refer to GROUP 15 - Inter Cooler.)
DRear Roll Stopper Removal (Refer to P.32-6.)Post-installation Operation
DRear Roll Stopper Installation (Refer to P.32-6.)
DAir Pipe C, Air By - pass hose, Air Hose D Installation
(Refer to GROUP 15.)
DRadiator Installation (Refer to GROUP 15.)
DAir Cleaner Installation (Refer to GROUP 15.)
DBattery and Battery Tray Installation
DUnder Cover Installation (Refer to GROUP 51 -
Front Bumper.)
47±7 N·m*
3
3
82±7 N·m*
2
1
Removal steps
1. Transmission mounting connecting
bolt2. Transmission mounting
"AA3. Transmission mounting stopper
INSTALLATION SERVICE POINT
"AATRANSMISSION MOUNT STOPPER
INSTALLATION
Install the transmission mount stopper so that its arrow points
upward.
INSPECTION
Check the transmission mounting insulator for cracks,
separation or deformation.
Engine side
Transmission
mount bracketTransmission
mount stopper
Page 1020 of 1449
POWER PLANT MOUNT - Engine Roll Stopper, Centermember32-6
ENGINE ROLL STOPPER, CENTERMEMBER
REMOVAL AND INSTALLATION
Caution
*: Indicates parts which should be initially tightened, and then fully tightened after placing the
vehicle horizontally and loading the full weight of the engine on the vehicle body.
Pre-removal and Post-installation Operation
Under Cover Removal and Installation (Refer to GROUP 51 - Front Bumper.)
52±7 N·m*
69±10 N·m
52±7 N·m*
52±7 N·m*
70±10 N·m
1 2
3 45 6
1 78
70±10 N·m
49±10 N·m
69±10 N·m
49±10 N·m
9
35±5 N·m*
10
35±5 N·m*
Front roll stopper and centermember
removal steps
1. Crossmember bar
2. Front roll stopper connecting bolt
3. Centermember
"AA4. Front roll stopper
5. Front roll mount bracketRear roll rod removal steps
6. Rear roll rod connecting bolt
7. Rear roll mount bracket
8. Rear roll rod connecting bolt
9. Rear roll rod bracket
10. Rear roll rod assembly
Page 1021 of 1449
POWER PLANT MOUNT - Engine Roll Stopper, Centermember32-7
52±7 N·m*35±5 N·m*
69±10 N·m
49±10 N·m
52±7 N·m*
35±5 N·m*
70±10 N·m
1 2
3 456
1 78
70±10 N·m
69±10 N·m
49±10 N·m
Front roll stopper and centermember
removal steps
1. Crossmember bar
2. Front roll stopper connecting bolt
3. Centermember
"AA4. Front roll stopper
5. Front roll mount bracketRear roll stopper removal steps
6. Rear roll stopper connecting bolt
7. Rear roll mount bracket
8. Rear roll stopper
INSTALLATION SERVICE POINT
"AAFRONT ROLL STOPPER INSTALLATION
Install the front roll stopper so that its hole points towards
the front side of the vehicle.
Hole
Front of vehicle
Page 1023 of 1449
POWER PLANT MOUNT - Crossmember32-9
35±5 N·m*1
108±10 N·m 52
±7 N·m*1
18±2 N·m70±10 N·m
25
±4 N·m
21±4 N·m
49
±10 N·m
167±9 N·m
14
58
67186±10 N·m*2
57±7 N·m
9 1112
13
21±4 N·m15
±3 N·m
10
39±5 N·m 39
±5 N·m
2
3
Removal steps
1. Lower arm and knuckle connection
2. Stabilizer link
AA"3. Lower arm assembly
4. Steering shaft assembly and gear
box connecting bolt
5. Rear roll stopper connection bolt
6. Rear roll rod assembly and rear
roll rod bracket7. Return hose and return pipe
8. Pressure hose connection
AB"9. Tie rod end and knuckle connec-
tion
AC"10. Crossmember assembly
"AA11. Stabilizer bar
12. Steering gear and linkage
13. Crossmember