2007 MITSUBISHI LANCER EVOLUTION check oil
[x] Cancel search: check oilPage 810 of 1449

22A-2
MANUAL
TRANSMISSION
CONTENTS
GENERAL 3.................................
Outline of Changes 3...........................
GENERAL INFORMATION 3..................
SERVICE SPECIFICATION 3..................
LUBRICANTS 3..............................
SPECIAL TOOLS 4...........................
TROUBLESHOOTING
ON-VEHICLE SERVICE 40....................
Transmission Oil Check 40......................
Transmission Oil Replacement 40................
Transfer Oil Check 40..........................
Transfer Oil Replacement 40....................
Fluid Check
Bleeding
Hydraulic Pressure Check
Wheel Speed Sensor Output Voltage
Measurement
TRANSMISSION CONTROL* 46...............
TRANSFER ASSEMBLY 49...................
TRANSMISSION ASSEMBLY 52...............
4WD-ECU
SENSOR, SWITCH AND RELAY
AYC> 56.....................................
HYDRAULIC UNIT Refer to GROUP27B.......
WARNING REGARDING SERVICING OF SUPPLEMENTAL RESTRAINT SYSTEM (SRS) EQUIPPED VEHICLES
WARNING!
(1) Improper service or maintenance of any component of the SRS, or any SRS-related component, can lead to personal
injury or death to service personnel (from inadvertent firing of the air bag) or to driver and passenger (from rendering
the SRS inoperative).
(2) Service or maintenance of any SRS component or SRS-related component must be performed only at an authorized
MITSUBISHI dealer.
(3) MITSUBISHI dealer personnel must thoroughly review this manual, and especially its GROUP 52B - Supplemental
Restraint System (SRS) before beginning any service or maintenance of any component of the SRS or any SRS-related
component.
NOTE
The SRS includes the following components: SRS-ECU, SRS warning lamp, air bag module, clock spring, and interconnecting
wiring. Other SRS-related components (that may have to be removed/installed in connection with SRS service or maintenance) are
indicated in the table of contents by an asterisk (*).
Page 812 of 1449

MANUAL TRANSMISSION - Special Tools22A-4
SPECIAL TOOLS
ToolNumberNameUse
MB991502MUT-IISub as-
semblyDiagnosis code checking
MB991529Diagnosis code
checking harness
MB991348Test harness setGsensor check
MD998330
(including
MD998331)Oil pressure gauge
(3.0 MPa)Hydraulic pressure measurement
MB991705Adapter
MB990635,
MB991113 or
MB991406
Steering linkage
pullerTie rod end and lower disconnection
GENERAL
SERVICE
TOOL
MZ203827Engine lifterSupporting the engine assembly during
removal and installation of the transmission
MB991453Engine hangerat-
tachment set
MB991721Slide hammerOutput shaft removal
Page 837 of 1449

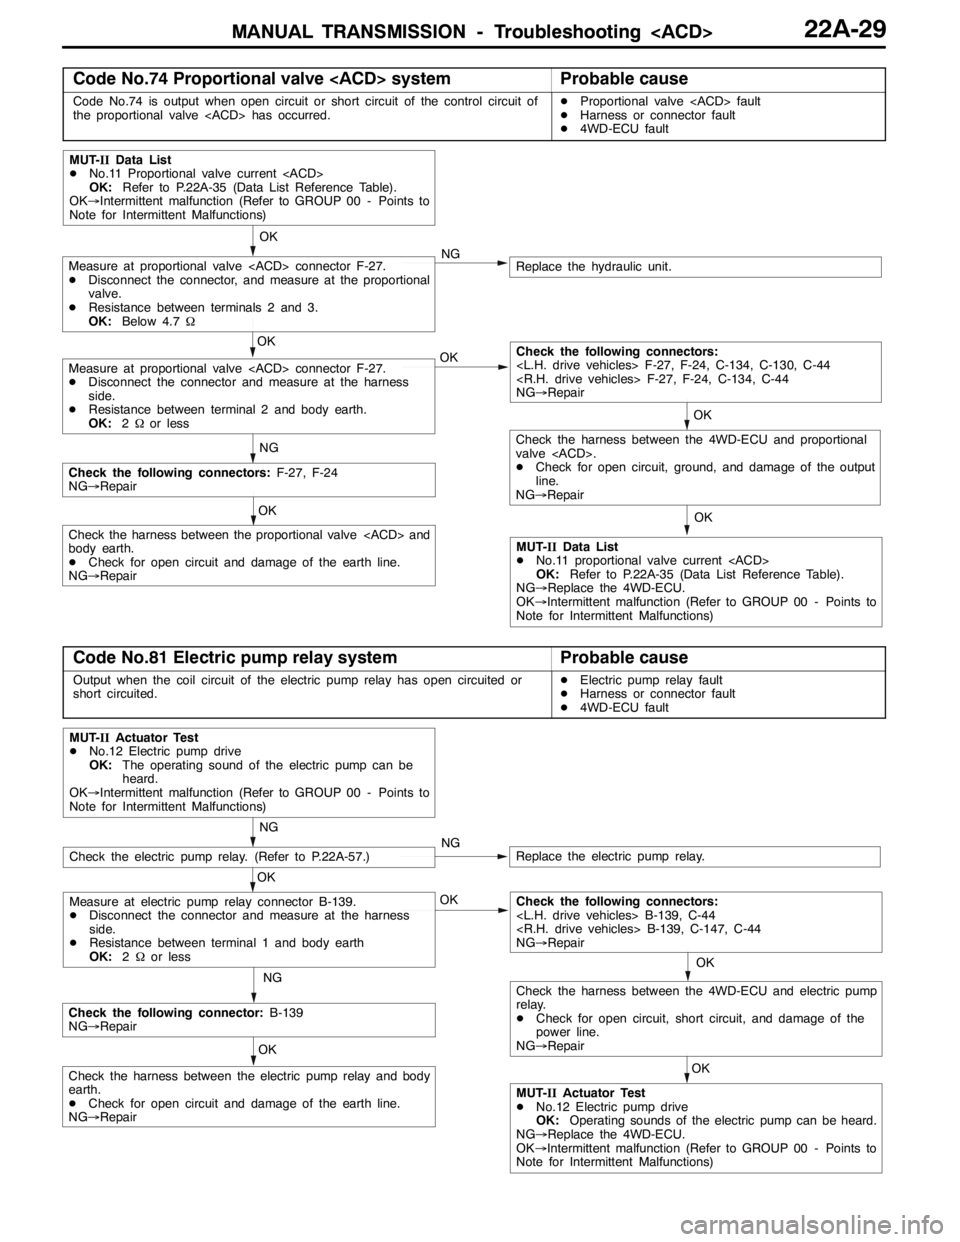
MANUAL TRANSMISSION - Troubleshooting
Code No.74 Proportional valve
Code No.74 is output when open circuit or short circuit of the control circuit of
the proportional valve
DHarness or connector fault
D4WD-ECU fault
OK
OK
OK
Replace the hydraulic unit.NG
NG
MUT-IIData List
DNo.11 Proportional valve current
OK:Refer to P.22A-35 (Data List Reference Table).
OK→Intermittent malfunction (Refer to GROUP 00 - Points to
Note for Intermittent Malfunctions)
MUT-IIData List
DNo.11 proportional valve current
OK:Refer to P.22A-35 (Data List Reference Table).
NG→Replace the 4WD-ECU.
OK→Intermittent malfunction (Refer to GROUP 00 - Points to
Note for Intermittent Malfunctions)
OK
Measure at proportional valve
DDisconnect the connector, and measure at the proportional
valve.
DResistance between terminals 2 and 3.
OK:Below 4.7Ω
Measure at proportional valve
DDisconnect the connector and measure at the harness
side.
DResistance between terminal 2 and body earth.
OK:2Ωor less
Check the harness between the proportional valve
body earth.
DCheck for open circuit and damage of the earth line.
NG→Repair
Check the following connectors:F-27, F-24
NG→Repair
OK
Check the following connectors:
NG→Repair
OK
Check the harness between the 4WD-ECU and proportional
valve
DCheck for open circuit, ground, and damage of the output
line.
NG→Repair
Code No.81 Electric pump relay systemProbable cause
Output when the coil circuit of the electric pump relay has open circuited or
short circuited.DElectric pump relay fault
DHarness or connector fault
D4WD-ECU fault
OK
OK
NG
Replace the electric pump relay.NG
NG
MUT-IIActuator Test
DNo.12 Electric pump drive
OK:The operating sound of the electric pump can be
heard.
OK→Intermittent malfunction (Refer to GROUP 00 - Points to
Note for Intermittent Malfunctions)
OK
Check the harness between the electric pump relay and body
earth.
DCheck for open circuit and damage of the earth line.
NG→Repair
Check the following connector:B-139
NG→Repair
OK
Check the following connectors:
NG→Repair
Check the electric pump relay. (Refer to P.22A-57.)
Measure at electric pump relay connector B-139.
DDisconnect the connector and measure at the harness
side.
DResistance between terminal 1 and body earth
OK:2Ωor less
MUT-IIActuator Test
DNo.12 Electric pump drive
OK:Operating sounds of the electric pump can be heard.
NG→Replace the 4WD-ECU.
OK→Intermittent malfunction (Refer to GROUP 00 - Points to
Note for Intermittent Malfunctions)
OK
Check the harness between the 4WD-ECU and electric pump
relay.
DCheck for open circuit, short circuit, and damage of the
power line.
NG→Repair
Page 842 of 1449

MANUAL TRANSMISSION - Troubleshooting
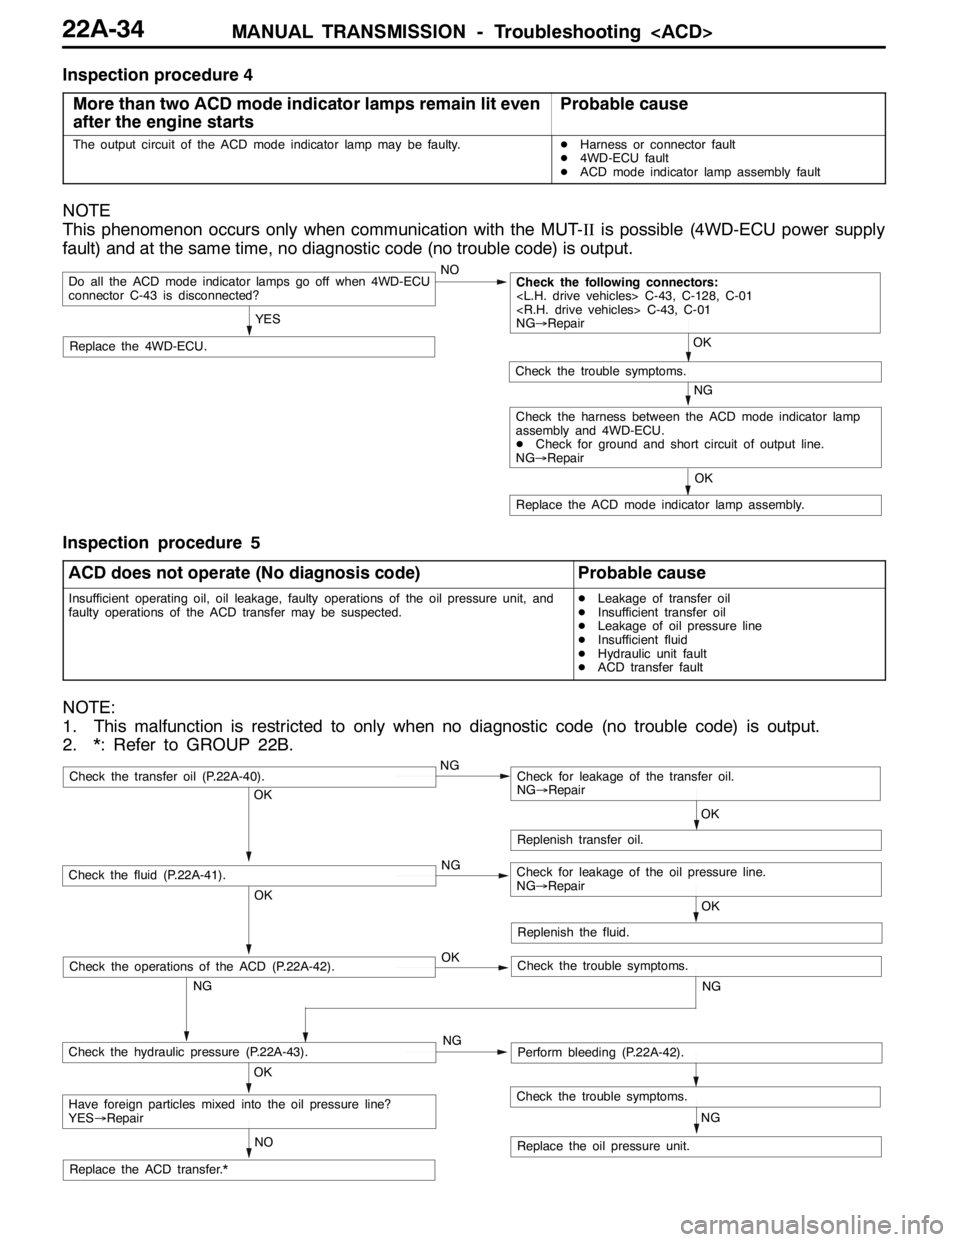
Inspection procedure 4
More than two ACD mode indicator lamps remain lit even
after the engine starts
Probable cause
The output circuit of the ACD mode indicator lamp may be faulty.DHarness or connector fault
D4WD-ECU fault
DACD mode indicator lamp assembly fault
NOTE
This phenomenon occurs only when communication with the MUT-IIis possible (4WD-ECU power supply
fault) and at the same time, no diagnostic code (no trouble code) is output.
NO
Replace the 4WD-ECU.
Do all the ACD mode indicator lamps go off when 4WD-ECU
connector C-43 is disconnected?
YES
Replace the ACD mode indicator lamp assembly.OK
NG
Check the trouble symptoms.
Check the following connectors:
NG→Repair
OK
Check the harness between the ACD mode indicator lamp
assembly and 4WD-ECU.
DCheck for ground and short circuit of output line.
NG→Repair
Inspection procedure 5
ACD does not operate (No diagnosis code)
Probable cause
Insufficient operating oil, oil leakage, faulty operations of the oil pressure unit, and
faulty operations of the ACD transfer may be suspected.DLeakage of transfer oil
DInsufficient transfer oil
DLeakage of oil pressure line
DInsufficient fluid
DHydraulic unit fault
DACD transfer fault
NOTE:
1. This malfunction is restricted to only when no diagnostic code (no trouble code) is output.
2. *: Refer to GROUP 22B.
OK
NG OKNG OKNG
NG
NO
NG
OK
Replenish transfer oil.
Replace the oil pressure unit.
Have foreign particles mixed into the oil pressure line?
YES→Repair
Check the hydraulic pressure (P.22A-43).Perform bleeding (P.22A-42).
Check the fluid (P.22A-41).Check for leakage of the oil pressure line.
NG→Repair
Check the transfer oil (P.22A-40).Check for leakage of the transfer oil.
NG→Repair
Check the trouble symptoms.
Replace the ACD transfer.*OK
Replenish the fluid.
OK
NG
Check the operations of the ACD (P.22A-42).Check the trouble symptoms.
Page 844 of 1449

MANUAL TRANSMISSION - Troubleshooting
Item
no.Normal conditions Check condition Check item
19Pressure sensor power
supplyIgnition switch: ONApprox.5 V
20Valve power supplyIgnition switch: ONSystem voltage
21Steering wheel sensor
voltage
are displayed alter-
nately.
22Steering wheel sensor
voltage
are displayed alter-
nately.
23Steering wheel sensor
ltSTN
Ignition switch: ONSteering wheel: Neutral1-2Vg
voltage
g
Steering wheel: Turn2.5 - 4.5 V
51Idle switchIgnition switch: ONAccelerator pedal: Full
closedON
Accelerator pedal: PressOFF
52Steering wheel sensor
STN
Ignition switch: ONsteering wheel: NeutralONg
g
Steering wheel: Turn from
the neutral positionOFF
53Steering wheel sensor
played alternaltely.
54Steering wheel sensor
played alternately
55Steering wheel sensor
learning
tral position learning exe-
cutedON
Steering wheel sensor neu-
tral position learning unex-
ecutedOFF
56Stop lamp switchIgnition switch: ONBrake pedal: DepressONppg
Engine: StoppedBrake pedal: ReleaseOFF
57Motor monitorElectric pump motor is currently operatingON
Electric pump motor is currently not operatingOFF
58Oil pressure stateElectric pump motor is currently operatingLOWp
Electric pump motor is currently not operatingHIGH
59Directional valve
Ri ht
AYC clutch right side is currently operatingON
60Directional valve
Lft
AYC clutch left side is currently operatingON
61ABS monitorABS is currently operatingON
ABS is currently not operatingOFF
62Parking brake switchIgnition switch: ONParking brake lever: PullONgg
Engine:StoppedParking brake lever: Re-
leaseOFF
63ACD mode switchIgnition switch: ONACD mode switch: PressONg
Engine:StoppedACD mode switch: ReleaseOFF
Page 845 of 1449

MANUAL TRANSMISSION - Troubleshooting
ACTUATOR TEST JUDGEMENT VALUE
Item
no.Check itemTest descriptionNormal state
01Bleeding
according to the steering angle, and operate
the Proportional valve for five minutes.Make sure no air leaks from the bleeder
screw on the transfer.
02Bleeding
according to the steering angle, and operate
the directional valve for five minutes.Make sure no air leaks from the bleeder
screw on the torque transfer differential.
03Check the oil vol-
umeOperate the directional valve to the left and
right for 20 seconds.Check that the oil volume of the reservoir
tank is appropriate.
04Electric pump
driveOperate the electric pump for 5 seconds.Operation sounds of the electric pump
can be heard.
05Check the opera-
tions of the ACDOperate the Proportional valve
supply the maximum oil pressure to the multi
plate clutch.9Generate the tight corner braking
phenomenon.
06Check clutch op-
erations
maximum oil pressure to the left clutch.When the wheels are lifted, speed
difference will occur between the rear
left and right wheels.
07Check clutch op-
erations
maximum oil pressure to the right clutch.When the wheels are lifted, speed
difference will occur between the rear
left and right wheels.
08Control OFFTurn OFF the electric pump relay, and turn
OFF the control of the ACD and AYC.In actual driving, there is difference
between control ON and OFF.
(1) The actuator test can be executed only when all the following conditions are satisfied.
DAll wheel speed sensor inputs below 20 km/h
DNo system malfunction detected
DSteering angle is within±30 degrees from the neutral position
(2) When the actuator test corresponds to one of the following conditions, forced driving will be cleared.
DWhen any one of the wheel speed sensor input is detected to be above 20 km/h (excluding
Item No.08 “Control OFF”.)
DWhen system malfunction is detected (excluding diagnostic code No.82, 84, and 85)
DWhen the forced drive time is exceeded
DWhen the MUT-IIis removed
DWhen the Clear key of the MUT-IIis operated
Page 848 of 1449

MANUAL TRANSMISSION - On-vehicle Service MANUAL TRANSMISSION - On-vehicle Service22A-40
ON-VEHICLE SERVICE
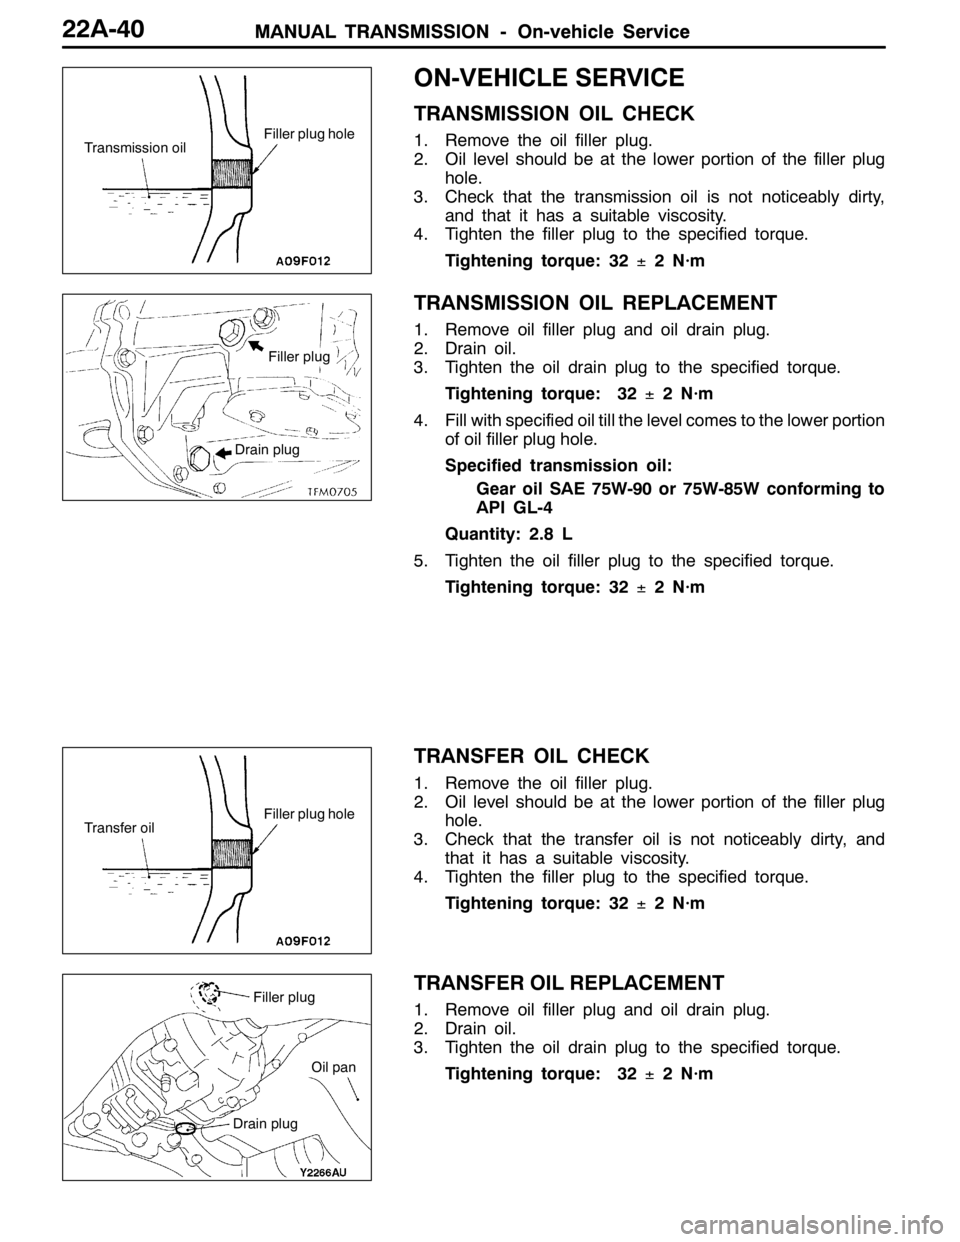
TRANSMISSION OIL CHECK
1. Remove the oil filler plug.
2. Oil level should be at the lower portion of the filler plug
hole.
3. Check that the transmission oil is not noticeably dirty,
and that it has a suitable viscosity.
4. Tighten the filler plug to the specified torque.
Tightening torque: 32±2 N·m
TRANSMISSION OIL REPLACEMENT
1. Remove oil filler plug and oil drain plug.
2. Drain oil.
3. Tighten the oil drain plug to the specified torque.
Tightening torque: 32±2 N·m
4. Fill with specified oil till the level comes to the lower portion
of oil filler plug hole.
Specified transmission oil:
Gear oil SAE 75W-90 or 75W-85W conforming to
API GL-4
Quantity: 2.8 L
5. Tighten the oil filler plug to the specified torque.
Tightening torque: 32±2 N·m
TRANSFER OIL CHECK
1. Remove the oil filler plug.
2. Oil level should be at the lower portion of the filler plug
hole.
3. Check that the transfer oil is not noticeably dirty, and
that it has a suitable viscosity.
4. Tighten the filler plug to the specified torque.
Tightening torque: 32±2 N·m
TRANSFER OIL REPLACEMENT
1. Remove oil filler plug and oil drain plug.
2. Drain oil.
3. Tighten the oil drain plug to the specified torque.
Tightening torque: 32±2 N·m
Transmission oilFiller plug hole
Filler plug
Drain plug
Transfer oilFiller plug hole
Filler plug
Drain plug
Oil pan
Page 849 of 1449

MANUAL TRANSMISSION - On-vehicle Service22A-41
4. Fill with specified oil till the level comes to the lower portion
of oil filler plug hole.
Specified transfer oil:
MITSUBISHI Genuine Gear Oil Part No.8149630
EX, CASTROL HYPOY LS (GL-5, SAE 90),
SHELL-LSD (GL-5, SAE 80W - 90) or equivalent
Quantity:
0.55 L
0.6 L
5. Tighten the oil filler plug to the specified torque.
Tightening torque: 32±2 N·m
FLUID CHECK
1. Remove the maintenance lid located in the luggage
compartment.
2.
If the vehicle has been run, leave it for 90 min. or more
in an ordinary temperature (10_C–30_C) to allow the
accumulator internal pressure to drop.
NOTE
If the ambient temperature is 10_C or less, allow more
time to leave the vehicle to stand idle.
Set the MUT-IIto the 16-pin diagnosis connector. Turn ON
the ignition switch, perform MUT-IIactuator test (Item
No.03), forcibly drive the hydraulic unit and remove the
pressure in the accumulator.
Caution
Turn the ignition switch to the “LOCK”(OFF) position
before connecting or disconnecting the MUT-II.
NOTE
(1) In the actuator test (Item No. 03: Oil Level Check
Mode), the directional valve of the hydraulic unit is
moved to the left and right for 20 times, and then
the differential is cleared automatically. Drive can also
be cleared forcibly using the Clear key of the MUT-II.
(2) If the function has been stopped by fail-safe, the
hydraulic unit cannot be cleared forcibly.
3. Check that the fluid level in the oil reservoir is in the
range between MAX and MIN.
4. If the fluid level is lower than MIN, add the specified
fluid.
Specified fluid: Dia Queen ATF SP III
5. Reinstall the maintenance lid.