Page 1002 of 1575
2.Installation is the reverse of removal.
a.Replace any damaged clips.
HOOD LIFT REPLACEMENT
1.Using a screwdriver (A), lift up slightly the socket clips (B) of both ends on the lifter (D), and then remove the lifter
from the bracket (C).
2.Push the socket of the lifter into the bracket for installation.
HOOD RELEASE HANDLE REPLACEMENT
1.Remove the mounting bolt, then remove the hood release handle (A).
Page 1013 of 1575
5.Installation is the reverse of removal.
a.Make sure the tailgate opens properly and locks securely.
LIFTER REPLACEMENT
1.Using a screwdriver (A), lift up slightly the socket clips (B) of both ends on the lifter (D), and then remove the lifter
from the bracket (C).
Page 1031 of 1575

5.Installation is the reverse the removal.
ADJUSTMENT
GLASS ADJUSTMENT
a. Check the glass run channel for damage or deterioration, and replace them necessary.
1. Remove the following parts.
a. Quadrant cover.
b. Door trim.
2. Carefully move the glass until you can see the glass mounting bolts, then loosen them.
3. Check that the glass moves smoothly.
4. Raise the glass fully, and check for gaps.
Check that the glass contacts the glass run channel evenly.
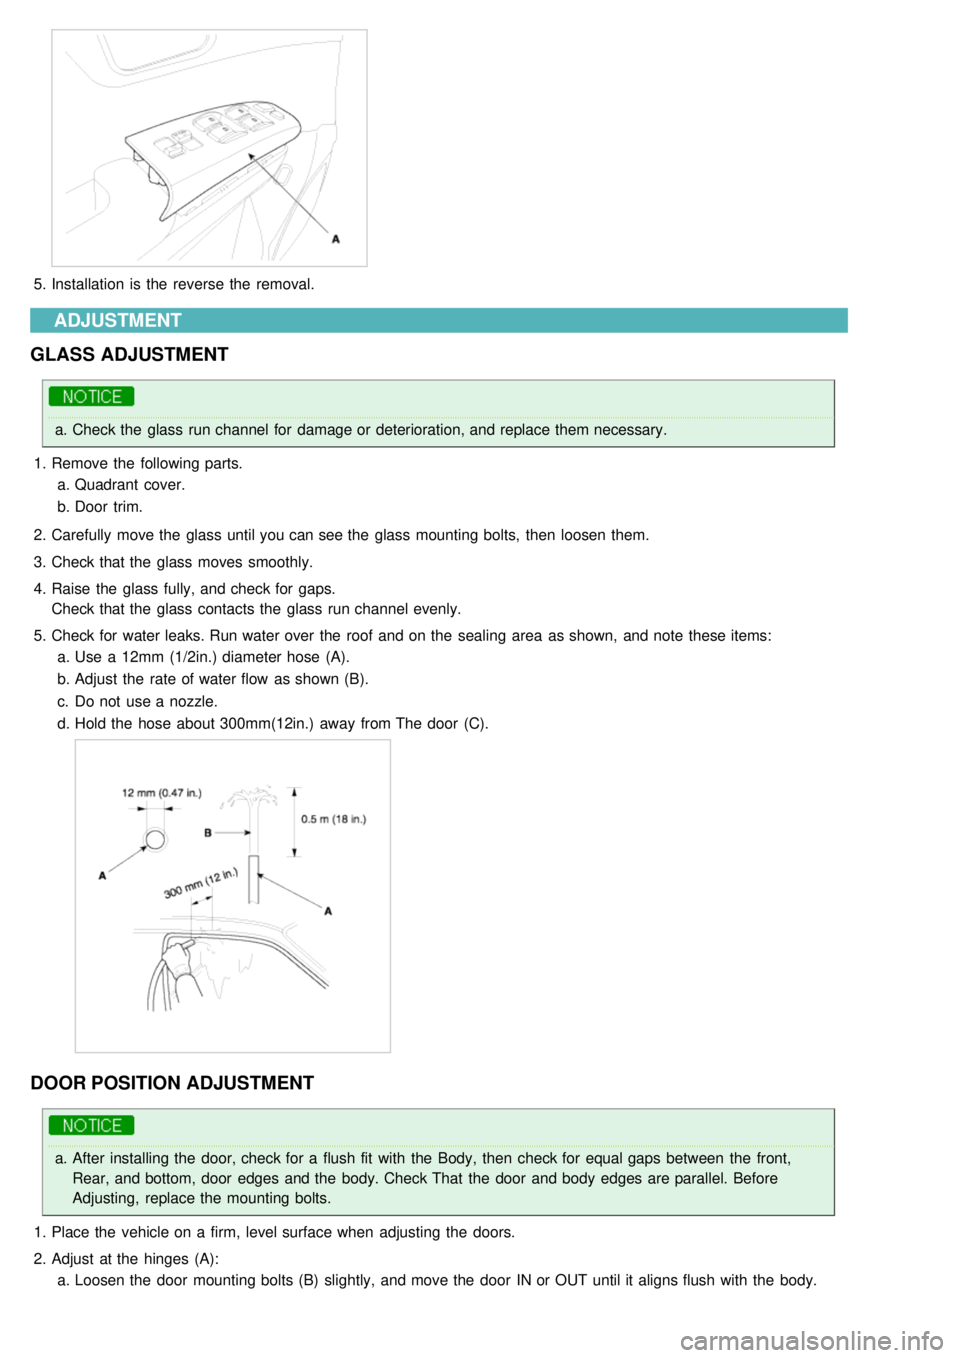
5. Check for water leaks. Run water over the roof and on the sealing area as shown, and note these items:
a. Use a 12mm (1/2in.) diameter hose (A).
b. Adjust the rate of water flow as shown (B).
c. Do not use a nozzle.
d. Hold the hose about 300mm(12in.) away from The door (C).
DOOR POSITION ADJUSTMENT
a.After installing the door, check for a flush fit with the Body, then check for equal gaps between the front,
Rear, and bottom, door edges and the body. Check That the door and body edges are parallel. Before
Adjusting, replace the mounting bolts.
1. Place the vehicle on a firm, level surface when adjusting the doors.
2. Adjust at the hinges (A):
a. Loosen the door mounting bolts (B) slightly, and move the door IN or OUT until it aligns flush with the body.
Page 1032 of 1575
b.Loosen the hinge mounting bolts (C) slightly, and move the door BACKWARD or FORWARD, UP or DOWN as
necessary to equalize the gaps.
c. Place a shop towel (D) on the jack (E) to prevent damage to the door when adjusting the door.
3.Check that the door and body edges are parallel.
4.Grease the pivot portions of the hinges indicated by the arrows.
5.Check for water leaks.
DOOR STRIKER ADJUSTMENT
Make sure the door latches securely without slamming It.
If necessary, adjust the striker (A): The striker nuts Are fixed. The strike can be fine adjusted up or down, and in or
out. striker ceater to be adjusted max ± 1.5mm
1. Loosen the screws (B), then insert a shop towel between the body and striker(A).
Page 1033 of 1575
2.Lightly tighten the screws.
3. Wrap the striker with a shop towel, then adjust the striker by tapping it with a plastic hammer.
Do not tap the striker too hard.
4. Loosen the screws and remove the shop towel.
5. Lightly tighten the screws.
6. Hold the outer handle out, and push the door against the body to be sure the striker allows a flush fit. If the door
latches properly, tighten the screws and recheck.
Page 1045 of 1575
DOOR STRIKER ADJUSTMENT
Make sure the door latches securely without slamming It.
If necessary, adjust the striker (A): The strike nuts Are fixed. The strike can be fine adjusted up or down, and in or out.
striker ceater to be adjusted max ± 1.5mm1. Loosen the screws (B), then insert a shop towel between the body and striker(A).
2.Lightly tighten the screws.
3. Wrap the striker with a shop towel, then adjust the striker by tapping it with a plastic hammer.
Do not tap the striker too hard.
4. Loosen the screws and remove the shop towel.
5. Lightly tighten the screws.
6. Hold the outer handle out, and push the door against the body to be sure the striker allows a flush fit. If the door
latches properly, tighten the screws and recheck.
Page 1098 of 1575
4.Install the spacer (A) install the windshield glass (B) temporarily with making sure to position them on the center,
and then place the alignment mark (C).
5. Remove the windshield.
6.With a sponge, apply a light coat of body primer to the original adhesive remaining around the windshield opening
flange. Let the body primer dry for at least 10 minutes.
a. Do not apply glass primer to the body, and be careful not to mix up glass and body primer sponges.
b. Never touch the primed surfaces with your hands.
c. Mask off the dashboard before painting the flange.
Page 1099 of 1575
7.Apply a light coat of glass primer to the outside of the fasteners.
a.Never touch the primed surface with your hand.
If you do, the adhesive may not bond to the glass Properly, causing a leak after the windshield glass is
installed.
b. Do not apply body primer to the glass.
c. Keep water, dust, and abrasive materials away from the primer.
8.Pack adhesive into the cartridge without air pockets to ensure continuous delivery. Put the cartridge in a caulking
gun, and run a bead of adhesive (A) around the edge of the windshield (B) between the fastener and molding as
shown. Apply the adhesive within 30 minutes after applying the glass primer.
Make a slightly thicker bead at each corner.