Page 1335 of 1575

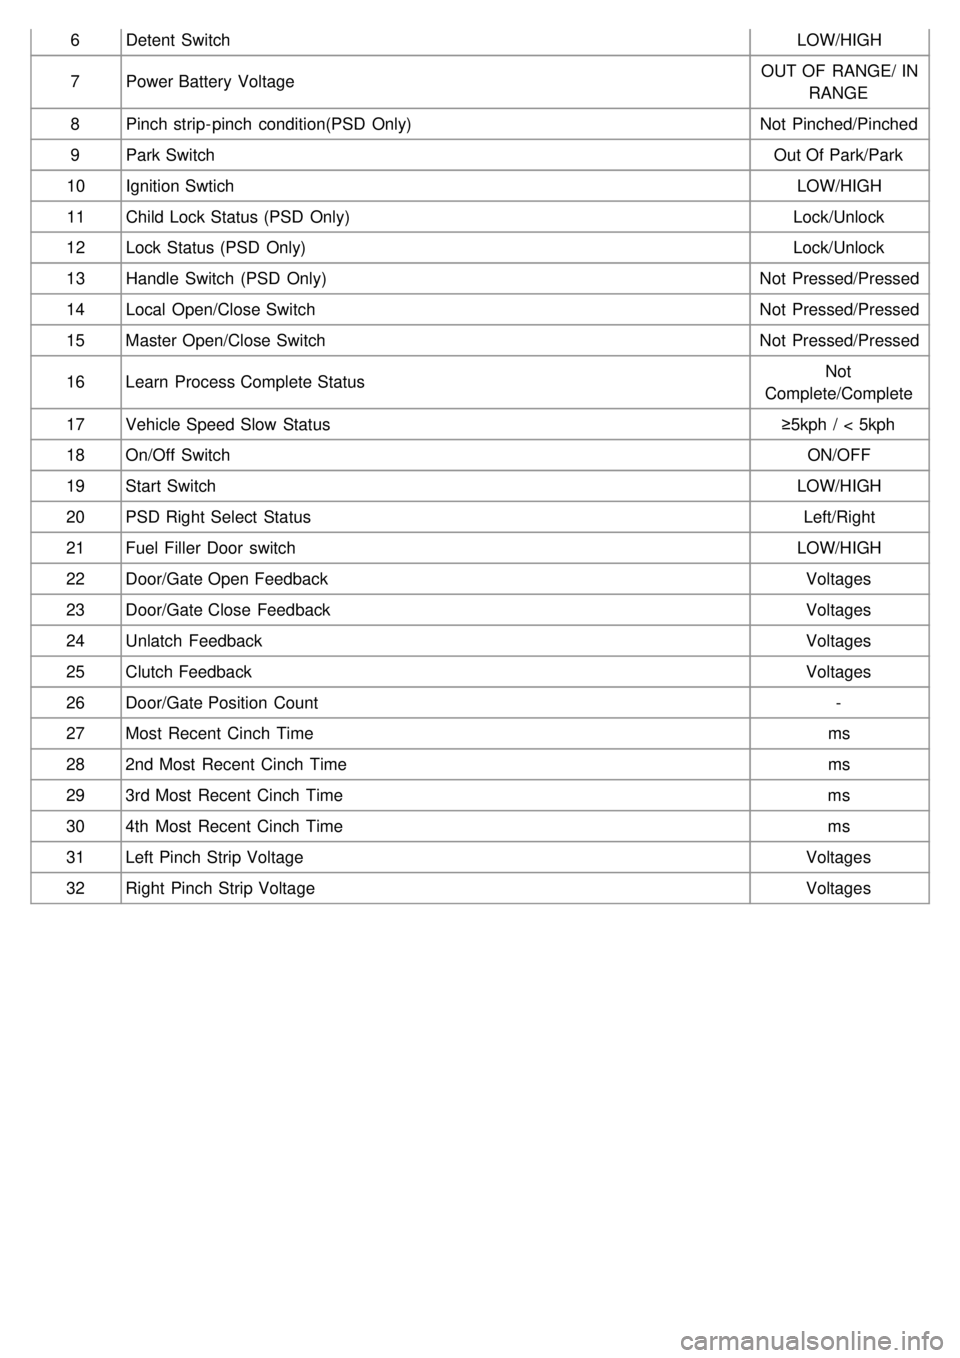
6Detent Switch LOW/HIGH
7 Power Battery Voltage OUT OF RANGE/ IN
RANGE
8 Pinch strip- pinch condition(PSD Only) Not Pinched/Pinched
9 Park Switch Out Of Park/Park
10 Ignition Swtich LOW/HIGH
11 Child Lock Status (PSD Only) Lock/Unlock
12 Lock Status (PSD Only) Lock/Unlock
13 Handle Switch (PSD Only) Not Pressed/Pressed
14 Local Open/Close Switch Not Pressed/Pressed
15 Master Open/Close Switch Not Pressed/Pressed
16 Learn Process Complete Status Not
Complete/Complete
17 Vehicle Speed Slow Status ≥5kph / < 5kph
18 On/Off Switch ON/OFF
19 Start Switch LOW/HIGH
20 PSD Right Select Status Left/Right
21 Fuel Filler Door switch LOW/HIGH
22 Door/Gate Open Feedback Voltages
23 Door/Gate Close Feedback Voltages
24 Unlatch Feedback Voltages
25 Clutch Feedback Voltages
26 Door/Gate Position Count -
27 Most Recent Cinch Time ms
28 2nd Most Recent Cinch Time ms
29 3rd Most Recent Cinch Time ms
30 4th Most Recent Cinch Time ms
31 Left Pinch Strip Voltage Voltages
32 Right Pinch Strip Voltage Voltages
Page 1338 of 1575
2007 > 2.7L V6 GASOLINE >
INSPECTION
SLIDING DOOR MOTOR INSPECTION
1. It will be able to diagnose defects of PSD motor with scan tool quickly.
2. Select model and menu(BCM).
3.Select "rear area module(RAM)".
4.Select the "Actuation test" and "PSD open/close" to operate tailgate motor.
5.Replace the drive unit, if actuator operates abnormal.
DRIVE UNIT CLUTCH INSPECTION
1.Check the power sliding door control module input/output value by using the diagnostic tool. If the operation of
power sliding control module is abnormal, replace power sliding door drive unit.
2. When checking the clutch operation, select a vehicle type and "POWER SLIDING/TAILGATE" menu.
Page 1339 of 1575
3.Select the "POWER SLIDING DOOR" to check.
4.Select the sensor output. And then check the clutch feedback sensor output while operating power sliding door in
power mode.
※ Above voltage and numerical value may be different from the real value.
5. Change the drive unit, if there is no change during operation.
OPTICAL SENSOR INSPECTION
1.Check the power sliding door control module input/output value by using the diagnostic tool.
2. When checking the optical sensor, select a vehicle type and "Power sliding/tailgate" menu.
Page 1367 of 1575

2007 > 2.7L V6 GASOLINE >
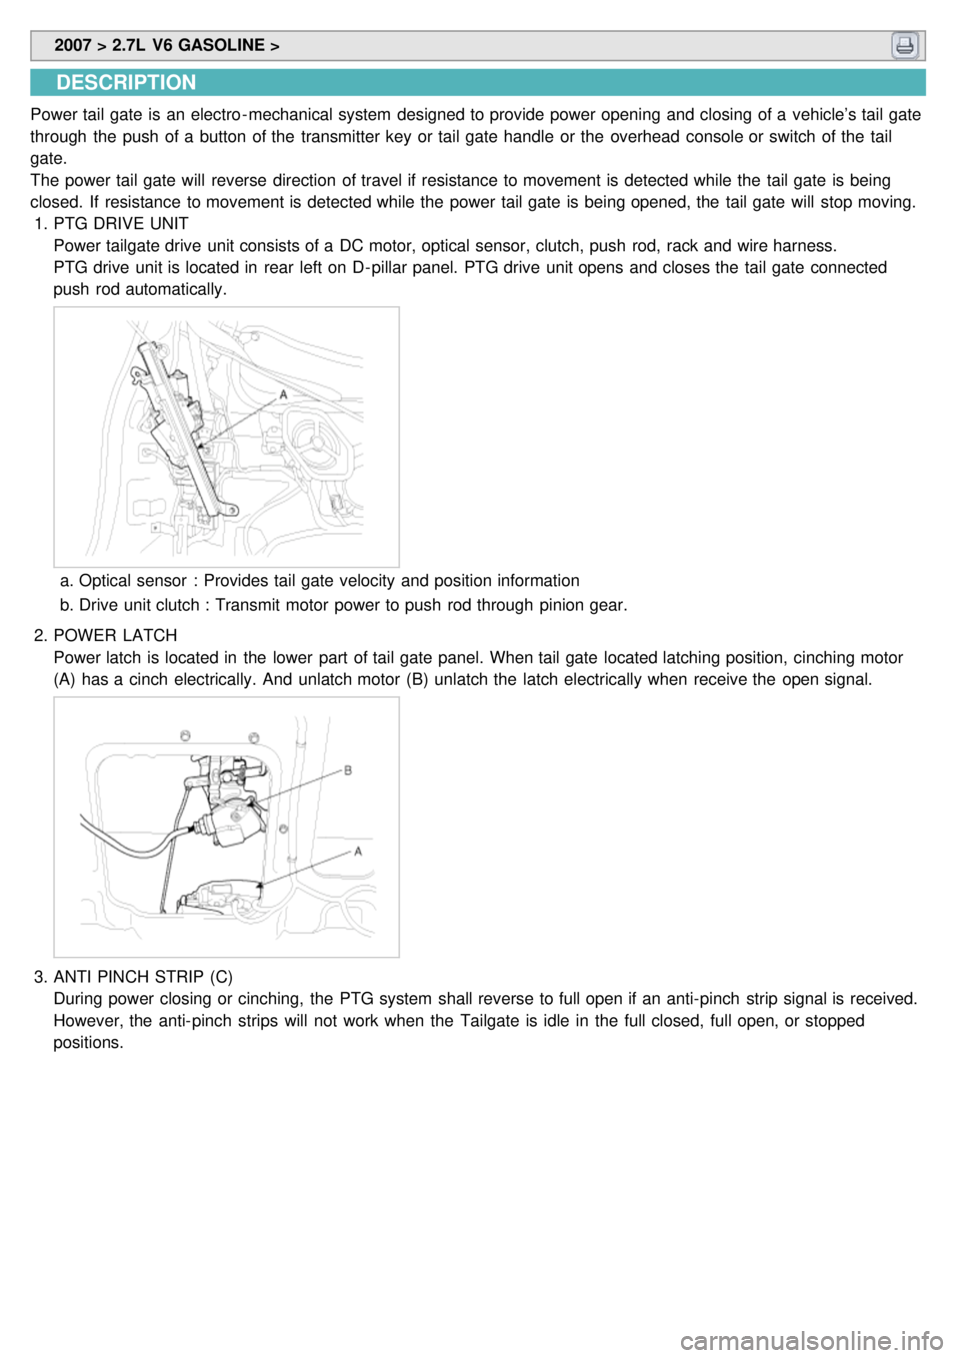
DESCRIPTION
Power tail gate is an electro - mechanical system designed to provide power opening and closing of a vehicle’s tail gate
through the push of a button of the transmitter key or tail gate handle or the overhead console or switch of the tail
gate.
The power tail gate will reverse direction of travel if resistance to movement is detected while the tail gate is being
closed. If resistance to movement is detected while the power tail gate is being opened, the tail gate will stop moving.
1. PTG DRIVE UNIT
Power tailgate drive unit consists of a DC motor, optical sensor, clutch, push rod, rack and wire harness.
PTG drive unit is located in rear left on D- pillar panel. PTG drive unit opens and closes the tail gate connected
push rod automatically.
a.Optical sensor : Provides tail gate velocity and position information
b. Drive unit clutch : Transmit motor power to push rod through pinion gear.
2. POWER LATCH
Power latch is located in the lower part of tail gate panel. When tail gate located latching position, cinching motor
(A) has a cinch electrically. And unlatch motor (B) unlatch the latch electrically when receive the open signal.
3.ANTI PINCH STRIP (C)
During power closing or cinching, the PTG system shall reverse to full open if an anti- pinch strip signal is received.
However, the anti- pinch strips will not work when the Tailgate is idle in the full closed, full open, or stopped
positions.
Page 1368 of 1575
4.PTG CHIME (D)
When a power operation cannot be performed as requested or an obstacle has been detected.
5.REMOTE KEYLESS ENTRY (A)
Push the power tail gate (A) of the remote keyless entry more than 0.5s to open the power tail gate. Power Open
operation shall be reversed when an additional Open/Close signal is received during power opening.
6. OPERATING ORDER
Switch ON → clutch on → motor operation → pinion gear rotation → rack rectilinear motion → push rod motion →
tail gate open/close
OPERATION
POWER TAIL GATE OPEN/CLOSE
1. The power tail gate is opened and closed automatically if the main switch (A) is pressed on the overhead console.
Page 1374 of 1575

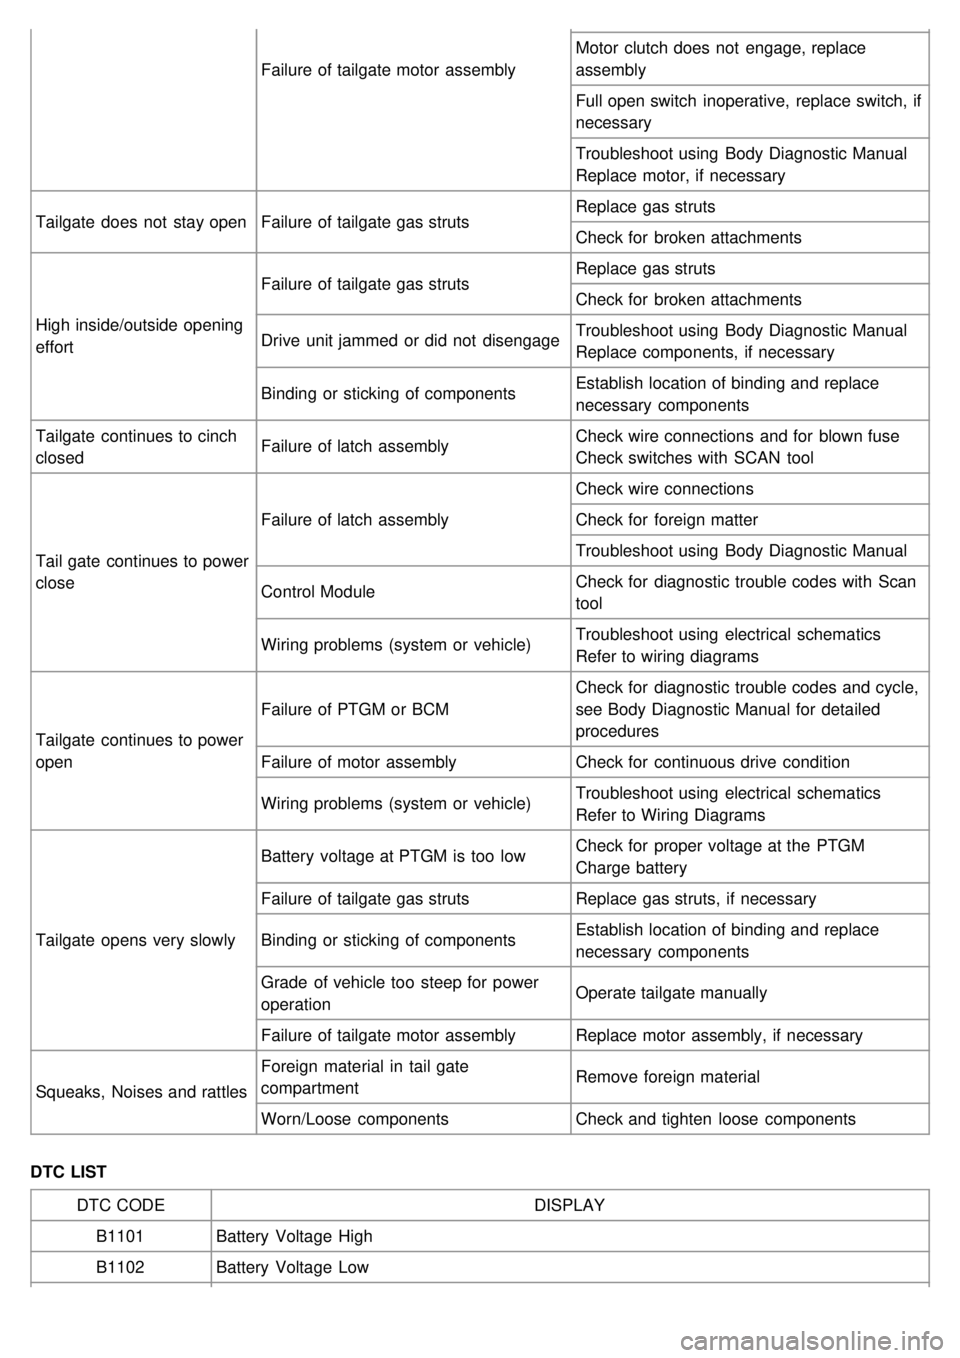
Failure of tailgate motor assemblyMotor clutch does not engage, replace
assembly
Full open switch inoperative, replace switch, if
necessary
Troubleshoot using Body Diagnostic Manual
Replace motor, if necessary
Tailgate does not stay open Failure of tailgate gas struts Replace gas struts
Check for broken attachments
High inside/outside opening
effort Failure of tailgate gas struts
Replace gas struts
Check for broken attachments
Drive unit jammed or did not disengage Troubleshoot using Body Diagnostic Manual
Replace components, if necessary
Binding or sticking of components Establish location of binding and replace
necessary components
Tailgate continues to cinch
closed Failure of latch assembly
Check wire connections and for blown fuse
Check switches with SCAN tool
Tail gate continues to power
close Failure of latch assembly
Check wire connections
Check for foreign matter
Troubleshoot using Body Diagnostic Manual
Control Module Check for diagnostic trouble codes with Scan
tool
Wiring problems (system or vehicle) Troubleshoot using electrical schematics
Refer to wiring diagrams
Tailgate continues to power
open Failure of PTGM or BCM
Check for diagnostic trouble codes and cycle,
see Body Diagnostic Manual for detailed
procedures
Failure of motor assembly Check for continuous drive condition
Wiring problems (system or vehicle) Troubleshoot using electrical schematics
Refer to Wiring Diagrams
Tailgate opens very slowly Battery voltage at PTGM is too low
Check for proper voltage at the PTGM
Charge battery
Failure of tailgate gas struts Replace gas struts, if necessary
Binding or sticking of components Establish location of binding and replace
necessary components
Grade of vehicle too steep for power
operation Operate tailgate manually
Failure of tailgate motor assembly Replace motor assembly, if necessary
Squeaks, Noises and rattles Foreign material in tail gate
compartment
Remove foreign material
Worn/Loose components Check and tighten loose components
DTC LIST DTC CODE DISPLAY
B1101 Battery Voltage High
B1102 Battery Voltage Low
Page 1375 of 1575

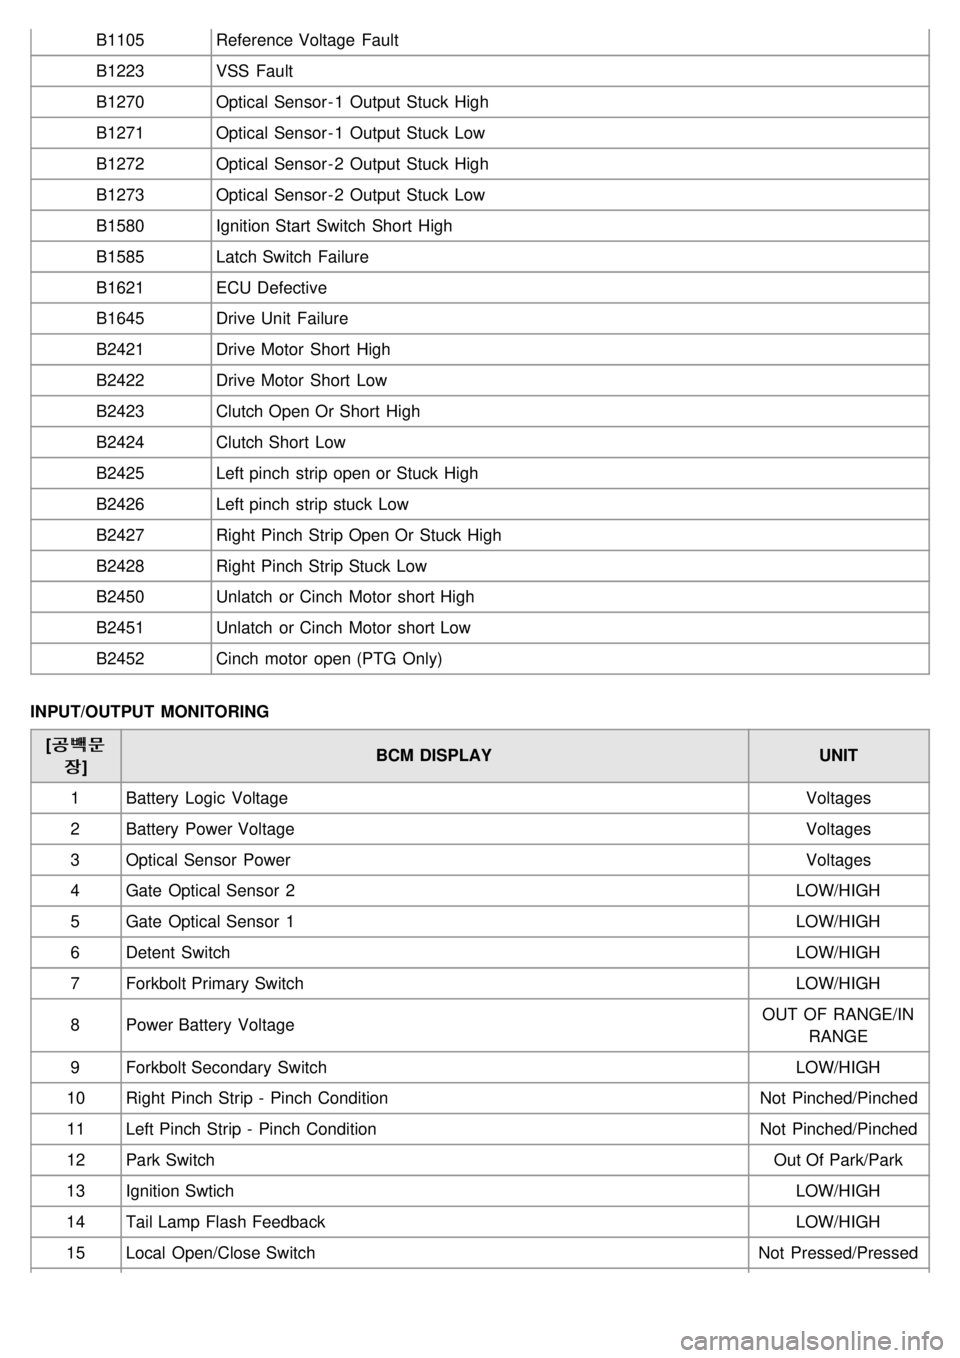
B1105Reference Voltage Fault
B1223 VSS Fault
B1270 Optical Sensor - 1 Output Stuck High
B1271 Optical Sensor - 1 Output Stuck Low
B1272 Optical Sensor - 2 Output Stuck High
B1273 Optical Sensor - 2 Output Stuck Low
B1580 Ignition Start Switch Short High
B1585 Latch Switch Failure
B1621 ECU Defective
B1645 Drive Unit Failure
B2421 Drive Motor Short High
B2422 Drive Motor Short Low
B2423 Clutch Open Or Short High
B2424 Clutch Short Low
B2425 Left pinch strip open or Stuck High
B2426 Left pinch strip stuck Low
B2427 Right Pinch Strip Open Or Stuck High
B2428 Right Pinch Strip Stuck Low
B2450 Unlatch or Cinch Motor short High
B2451 Unlatch or Cinch Motor short Low
B2452 Cinch motor open (PTG Only)
INPUT/OUTPUT MONITORING [�•�Ô�™�•�Ô�™
b
b] BCM DISPLAY
UNIT
1 Battery Logic Voltage Voltages
2 Battery Power Voltage Voltages
3 Optical Sensor Power Voltages
4 Gate Optical Sensor 2 LOW/HIGH
5 Gate Optical Sensor 1 LOW/HIGH
6 Detent Switch LOW/HIGH
7 Forkbolt Primary Switch LOW/HIGH
8 Power Battery Voltage OUT OF RANGE/IN
RANGE
9 Forkbolt Secondary Switch LOW/HIGH
10 Right Pinch Strip - Pinch Condition Not Pinched/Pinched
11 Left Pinch Strip - Pinch Condition Not Pinched/Pinched
12 Park Switch Out Of Park/Park
13 Ignition Swtich LOW/HIGH
14 Tail Lamp Flash Feedback LOW/HIGH
15 Local Open/Close Switch Not Pressed/Pressed
Page 1376 of 1575
16Master Open/Close Switch Not Pressed/Pressed
17 Spare Switch LOW/HIGH
18 Learn Process Complete Status Not Complet/Complete
19 Vehicle Speed Slow Status ≥5kph/<5kph
20 On/Off Switch ON/OFF
21 Start Switch LOW/HIGH
22 Gate Open Feedback Voltages
23 Cinch Feedback (PTG Only) Voltages
24 Uncinch Feedback (PTG Only) Voltages
25 Gate Close Feedback Voltages
26 Unlatch Feedback Voltages
27 Unlatch Return Feedback Voltages
28 Clutch Feedback Voltages
29 Gate Position Count -
30 Most Recent Cinch Time ms
31 2nd Most Recent Cinch Time ms
32 3rd Most Recent Cinch Time ms
33 4th Most Recent Cinch Time ms
34 Left Pinch Strip Voltage Voltages
35 Right Pinch Strip Voltage Voltages