2007 ISUZU KB P190 torque
[x] Cancel search: torquePage 3939 of 6020
Automatic Transmission – 4L60E – On-vehicle Servicing Page 7C4–26
Clean and Inspect
1 Clean all components in a commercially available cleaning fluid and blow dry using compressed air.
2 Inspect the springs and ensure they are not distorted or broken, replace as required.
3 Inspect all machined surfaces for damage, wear or burrs.
Reinstall
Reinstallation of the 1 – 2 accumulator assembly is the reverse of the removal procedure, noting the following:
1 Lubricate a new seal with petroleum jelly and install it to the piston. Ensure the piston seal does not bind in the piston groove.
2 Tighten the three bolts attaching the accumulator cover to the correct torque specification.
1 – 2 Accumulator cover attaching
bolt torque specification ..................................... 12.0 Nm
3.13 Control Valve Body Harness
Remove
1 Raise the vehicle and support in a safe manner, refer to 0A General Information for the location of support points.
2 As required, remove the oil pan and filter, refer to 3.1 Fluid Change and Filter Replacement.
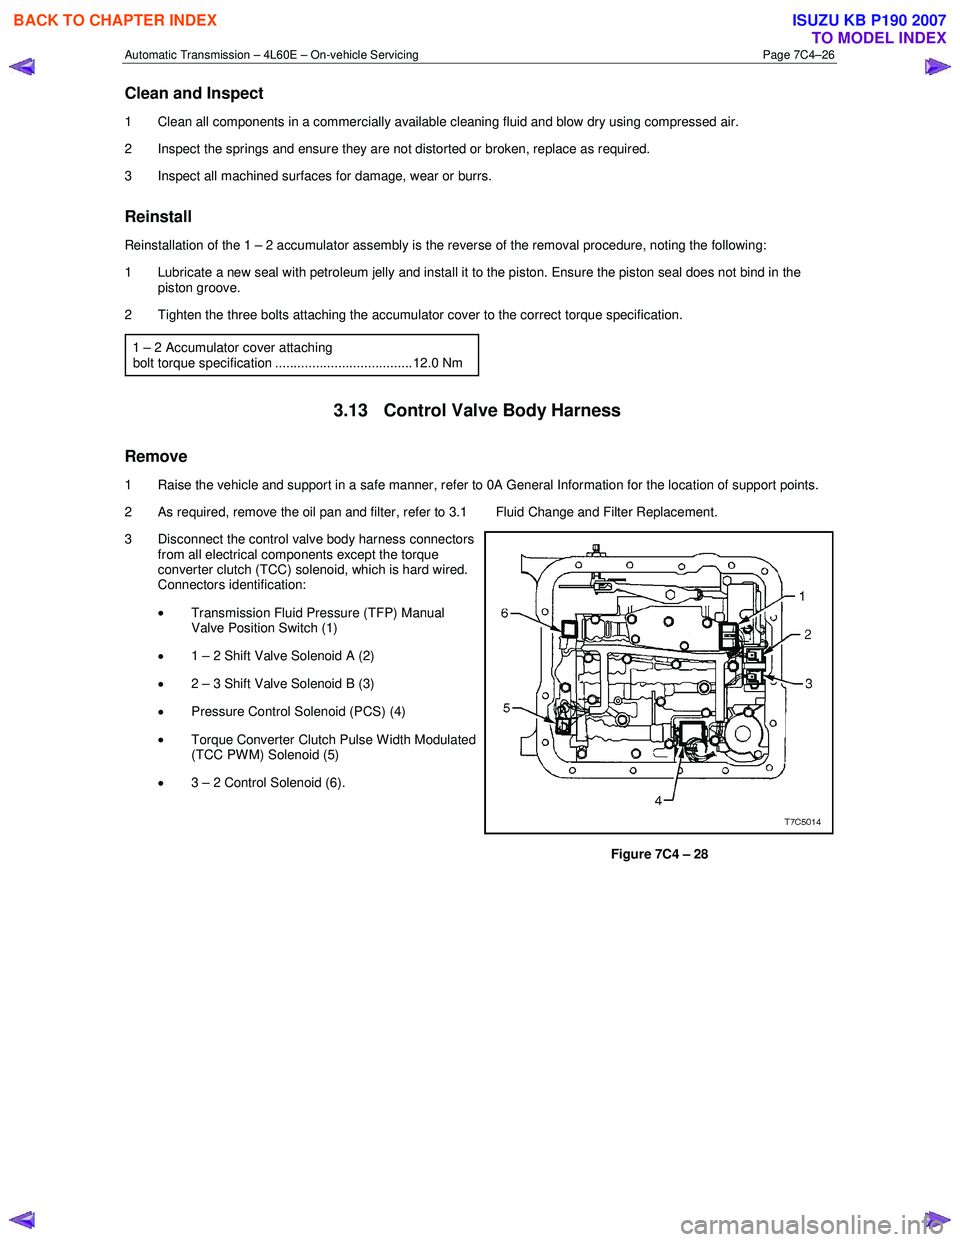
3 Disconnect the control valve body harness connectors from all electrical components except the torque
converter clutch (TCC) solenoid, which is hard wired.
Connectors identification:
• Transmission Fluid Pressure (TFP) Manual
Valve Position Switch (1)
• 1 – 2 Shift Valve Solenoid A (2)
• 2 – 3 Shift Valve Solenoid B (3)
• Pressure Control Solenoid (PCS) (4)
• Torque Converter Clutch Pulse W idth Modulated
(TCC PWM) Solenoid (5)
• 3 – 2 Control Solenoid (6).
Figure 7C4 – 28
BACK TO CHAPTER INDEX
TO MODEL INDEX
ISUZU KB P190 2007
Page 3941 of 6020
Automatic Transmission – 4L60E – On-vehicle Servicing Page 7C4–28
10 Lower the transmission to provide clearance between
the floor pan and the pass-thru connector located at
the right-hand rear of the transmission case.
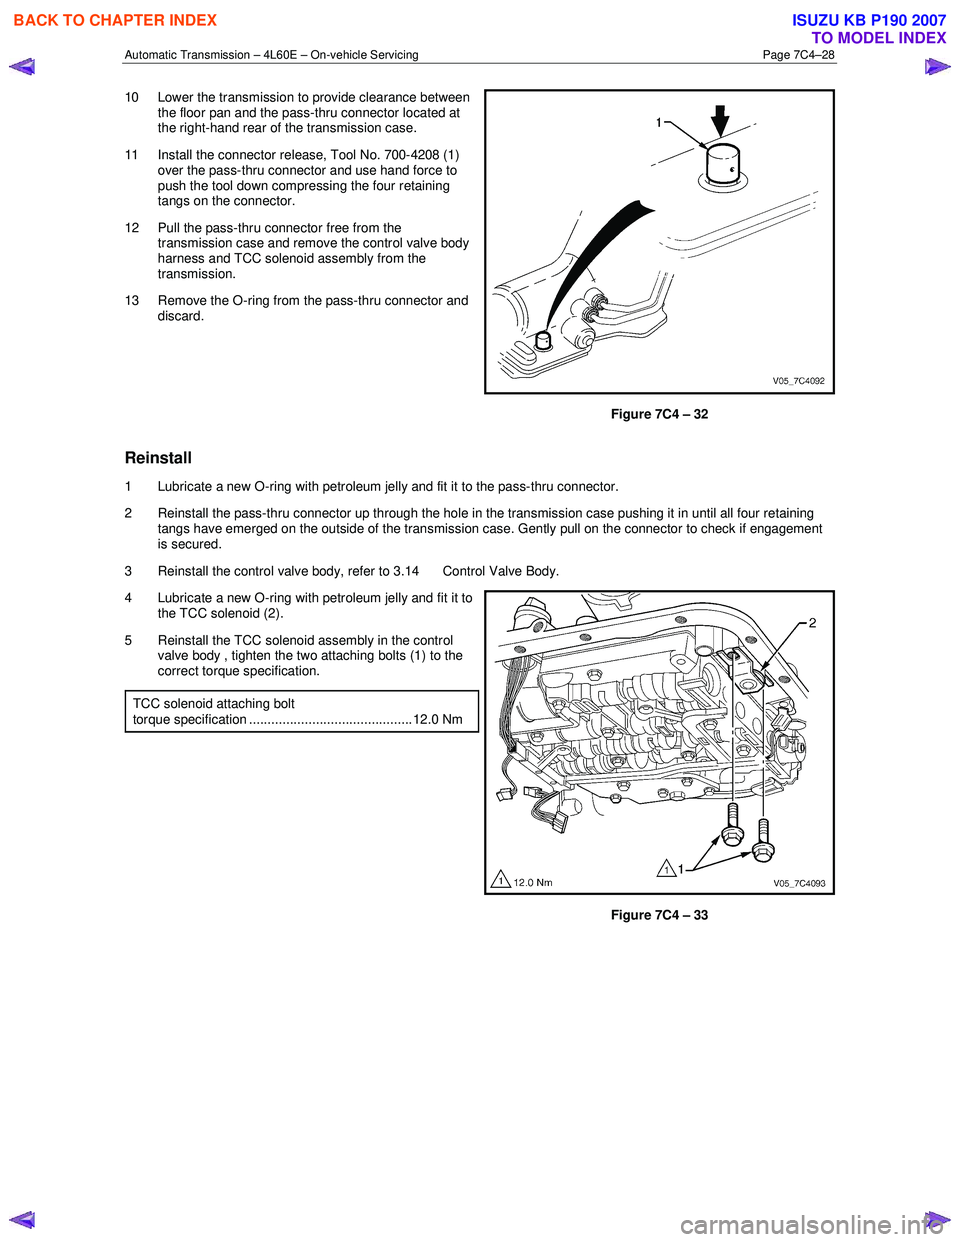
11 Install the connector release, Tool No. 700-4208 (1) over the pass-thru connector and use hand force to
push the tool down compressing the four retaining
tangs on the connector.
12 Pull the pass-thru connector free from the transmission case and remove the control valve body
harness and TCC solenoid assembly from the
transmission.
13 Remove the O-ring from the pass-thru connector and discard.
Figure 7C4 – 32
Reinstall
1 Lubricate a new O-ring with petroleum jelly and fit it to the pass-thru connector.
2 Reinstall the pass-thru connector up through the hole in the transmission case pushing it in until all four retaining tangs have emerged on the outside of the transmission case. Gently pull on the connector to check if engagement
is secured.
3 Reinstall the control valve body, refer to 3.14 Control Valve Body.
4 Lubricate a new O-ring with petroleum jelly and fit it to the TCC solenoid (2).
5 Reinstall the TCC solenoid assembly in the control valve body , tighten the two attaching bolts (1) to the
correct torque specification.
TCC solenoid attaching bolt
torque specification ............................................ 12.0 Nm
Figure 7C4 – 33
BACK TO CHAPTER INDEX
TO MODEL INDEX
ISUZU KB P190 2007
Page 3942 of 6020
Automatic Transmission – 4L60E – On-vehicle Servicing Page 7C4–29
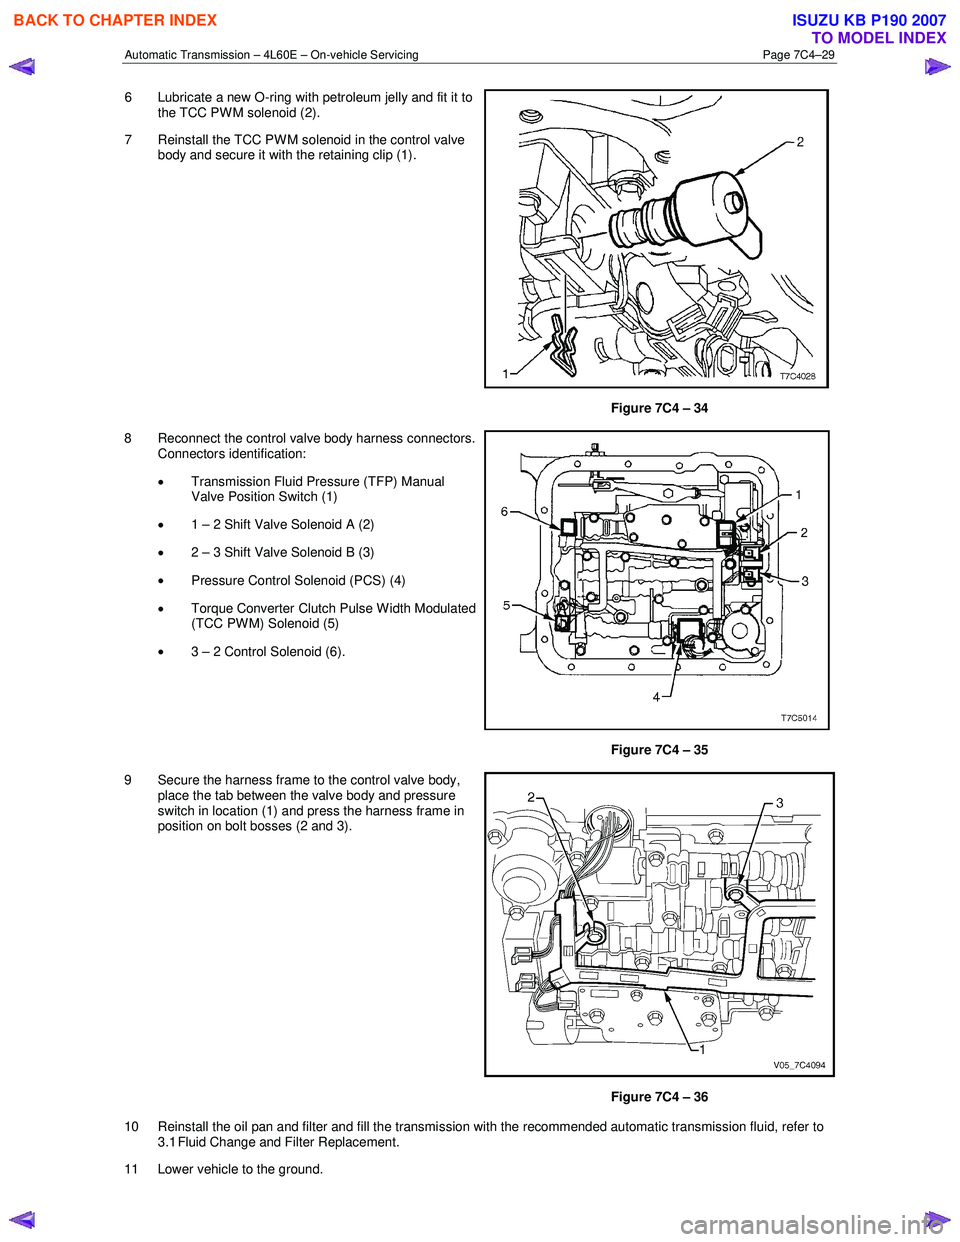
6 Lubricate a new O-ring with petroleum jelly and fit it to
the TCC PW M solenoid (2).
7 Reinstall the TCC PWM solenoid in the control valve body and secure it with the retaining clip (1).
Figure 7C4 – 34
8 Reconnect the control valve body harness connectors. Connectors identification:
• Transmission Fluid Pressure (TFP) Manual
Valve Position Switch (1)
• 1 – 2 Shift Valve Solenoid A (2)
• 2 – 3 Shift Valve Solenoid B (3)
• Pressure Control Solenoid (PCS) (4)
• Torque Converter Clutch Pulse W idth Modulated
(TCC PWM) Solenoid (5)
• 3 – 2 Control Solenoid (6).
Figure 7C4 – 35
9 Secure the harness frame to the control valve body, place the tab between the valve body and pressure
switch in location (1) and press the harness frame in
position on bolt bosses (2 and 3).
Figure 7C4 – 36
10 Reinstall the oil pan and filter and fill the transmission with the recommended automatic transmission fluid, refer to 3.1 Fluid Change and Filter Replacement.
11 Lower vehicle to the ground.
BACK TO CHAPTER INDEX
TO MODEL INDEX
ISUZU KB P190 2007
Page 3944 of 6020
Automatic Transmission – 4L60E – On-vehicle Servicing Page 7C4–31
Keep the control valve body level when
lowering it to prevent the loss of the
checkballs located in the body passages.
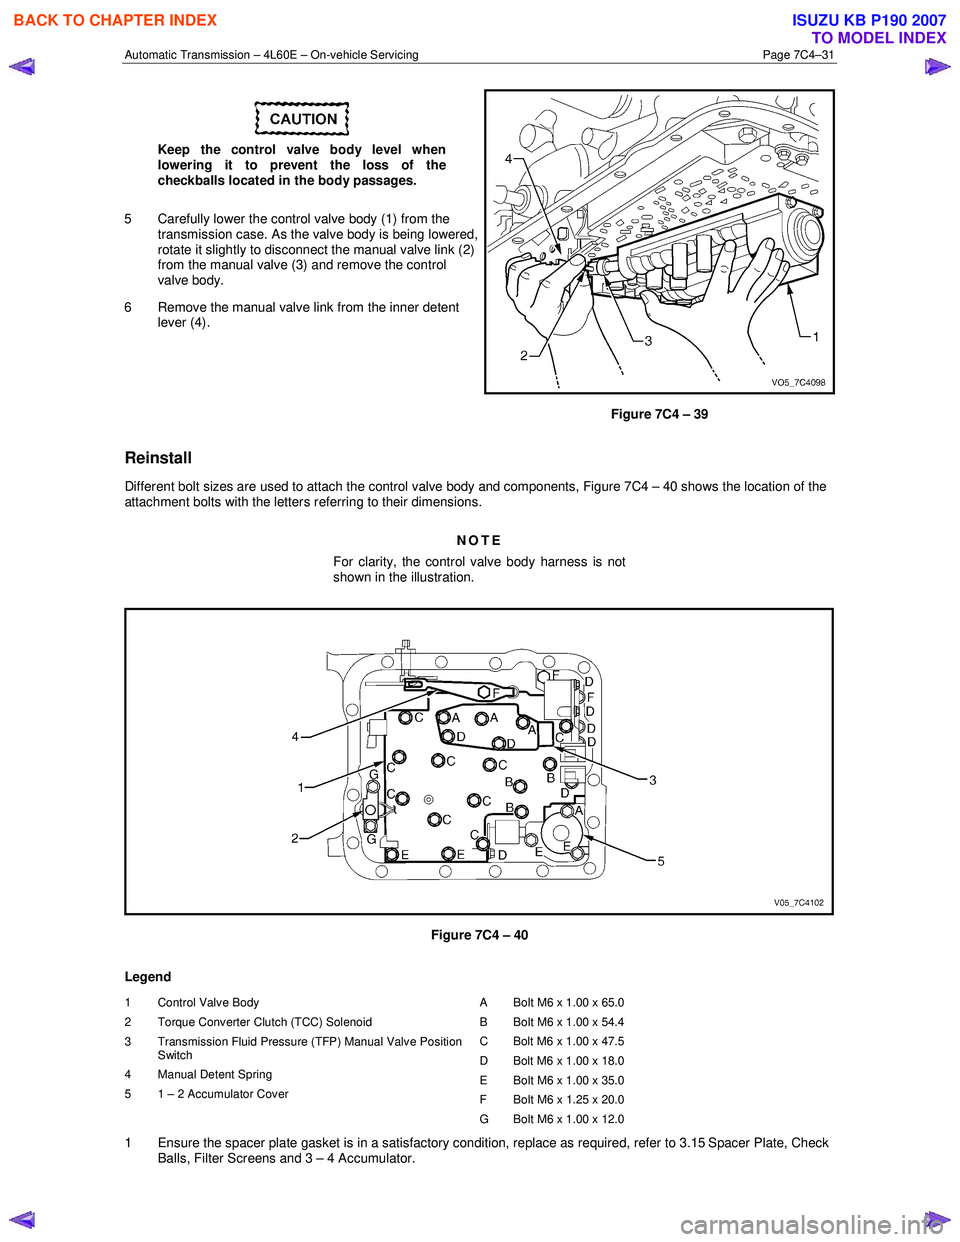
5 Carefully lower the control valve body (1) from the transmission case. As the valve body is being lowered,
rotate it slightly to disconnect the manual valve link (2)
from the manual valve (3) and remove the control
valve body.
6 Remove the manual valve link from the inner detent lever (4).
Figure 7C4 – 39
Reinstall
Different bolt sizes are used to attach the control valve body and components, Figure 7C4 – 40 shows the location of the
attachment bolts with the letters referring to their dimensions.
NOTE
For clarity, the control valve body harness is not
shown in the illustration.
Figure 7C4 – 40
Legend
1 Control Valve Body
2 Torque Converter Clutch (TCC) Solenoid
3 Transmission Fluid Pressure (TFP) Manual Valve Position Switch
4 Manual Detent Spring
5 1 – 2 Accumulator Cover A Bolt M6 x 1.00 x 65.0
B Bolt M6 x 1.00 x 54.4
C Bolt M6 x 1.00 x 47.5
D Bolt M6 x 1.00 x 18.0
E Bolt M6 x 1.00 x 35.0
F Bolt M6 x 1.25 x 20.0
G Bolt M6 x 1.00 x 12.0
1 Ensure the spacer plate gasket is in a satisfactory condition, replace as required, refer to 3.15 Spacer Plate, Check Balls, Filter Screens and 3 – 4 Accumulator.
BACK TO CHAPTER INDEX
TO MODEL INDEX
ISUZU KB P190 2007
Page 3947 of 6020
Automatic Transmission – 4L60E – On-vehicle Servicing Page 7C4–34
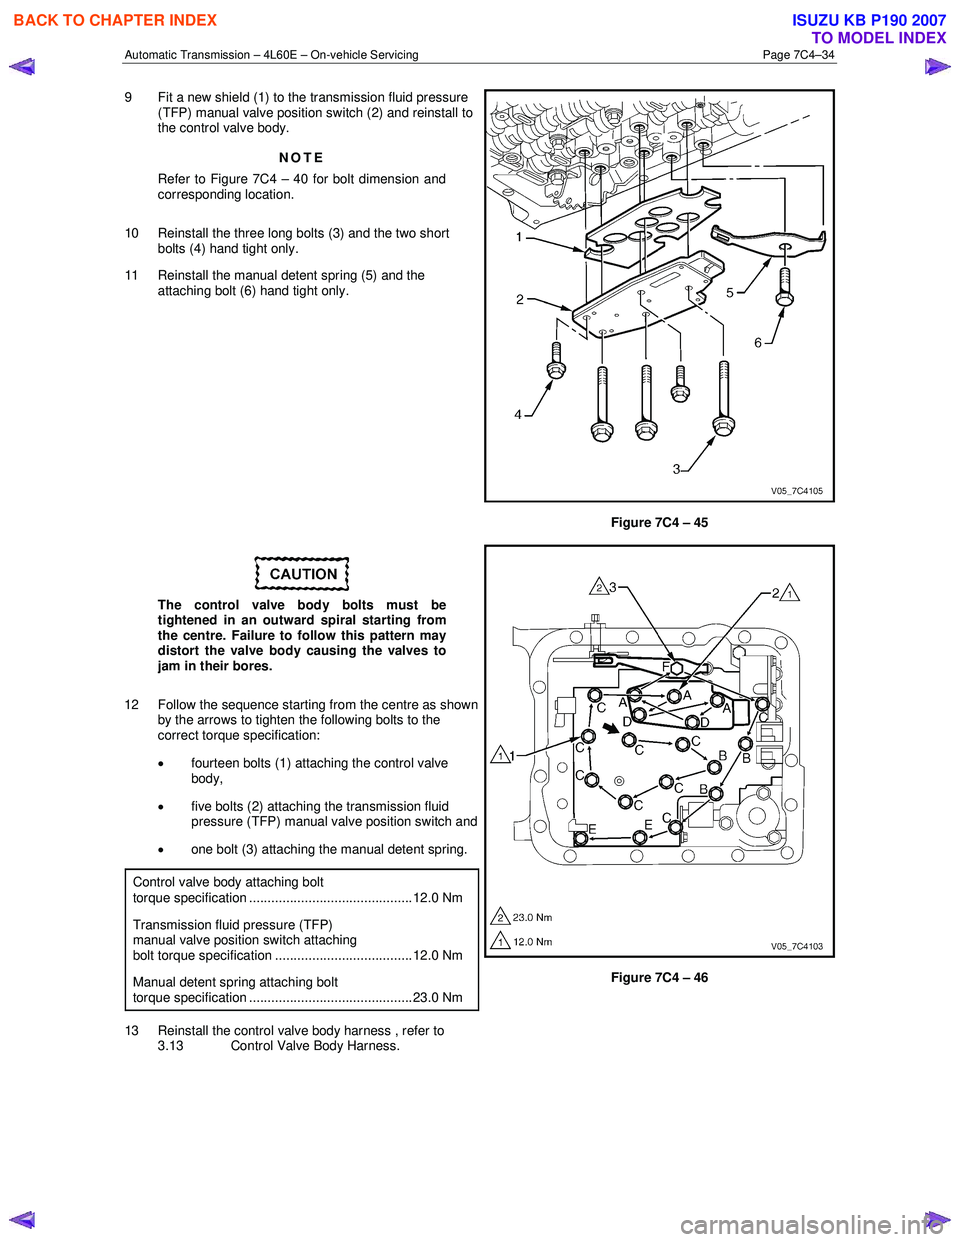
9 Fit a new shield (1) to the transmission fluid pressure
(TFP) manual valve position switch (2) and reinstall to
the control valve body.
NOTE
Refer to Figure 7C4 – 40 for bolt dimension and
corresponding location.
10 Reinstall the three long bolts (3) and the two short bolts (4) hand tight only.
11 Reinstall the manual detent spring (5) and the attaching bolt (6) hand tight only.
Figure 7C4 – 45
The control valve body bolts must be
tightened in an outward spiral starting from
the centre. Failure to follow this pattern may
distort the valve body causing the valves to
jam in their bores.
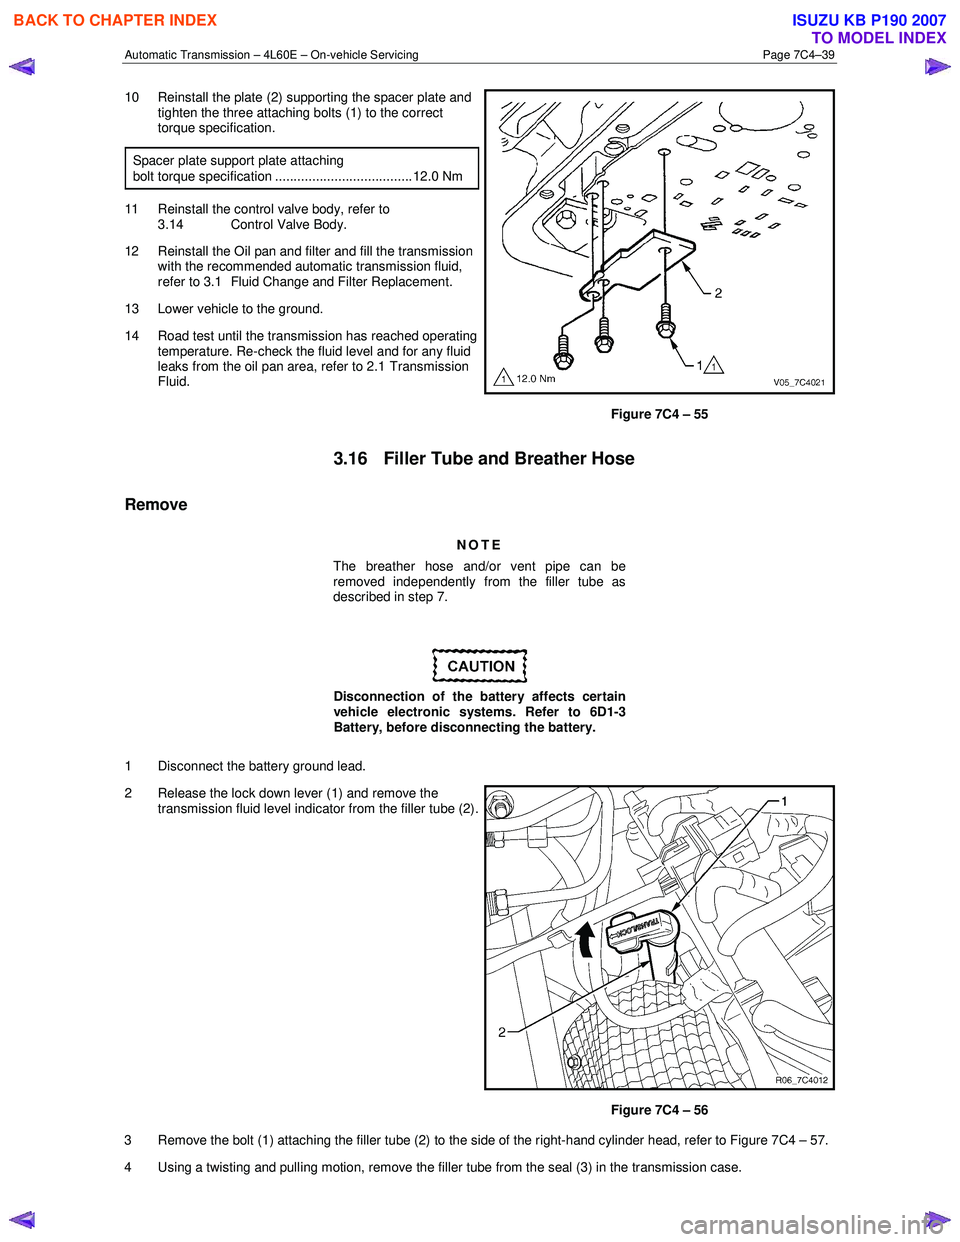
12 Follow the sequence starting from the centre as shown by the arrows to tighten the following bolts to the
correct torque specification:
• fourteen bolts (1) attaching the control valve
body,
• five bolts (2) attaching the transmission fluid
pressure (TFP) manual valve position switch and
• one bolt (3) attaching the manual detent spring.
Control valve body attaching bolt
torque specification ............................................ 12.0 Nm
Transmission fluid pressure (TFP) manual valve position switch attaching bolt torque specification ..................................... 12.0 Nm
Manual detent spring attaching bolt torque specification ............................................ 23.0 Nm
13 Reinstall the control valve body harness , refer to 3.13 Control Valve Body Harness.
Figure 7C4 – 46
BACK TO CHAPTER INDEX
TO MODEL INDEX
ISUZU KB P190 2007
Page 3952 of 6020
Automatic Transmission – 4L60E – On-vehicle Servicing Page 7C4–39
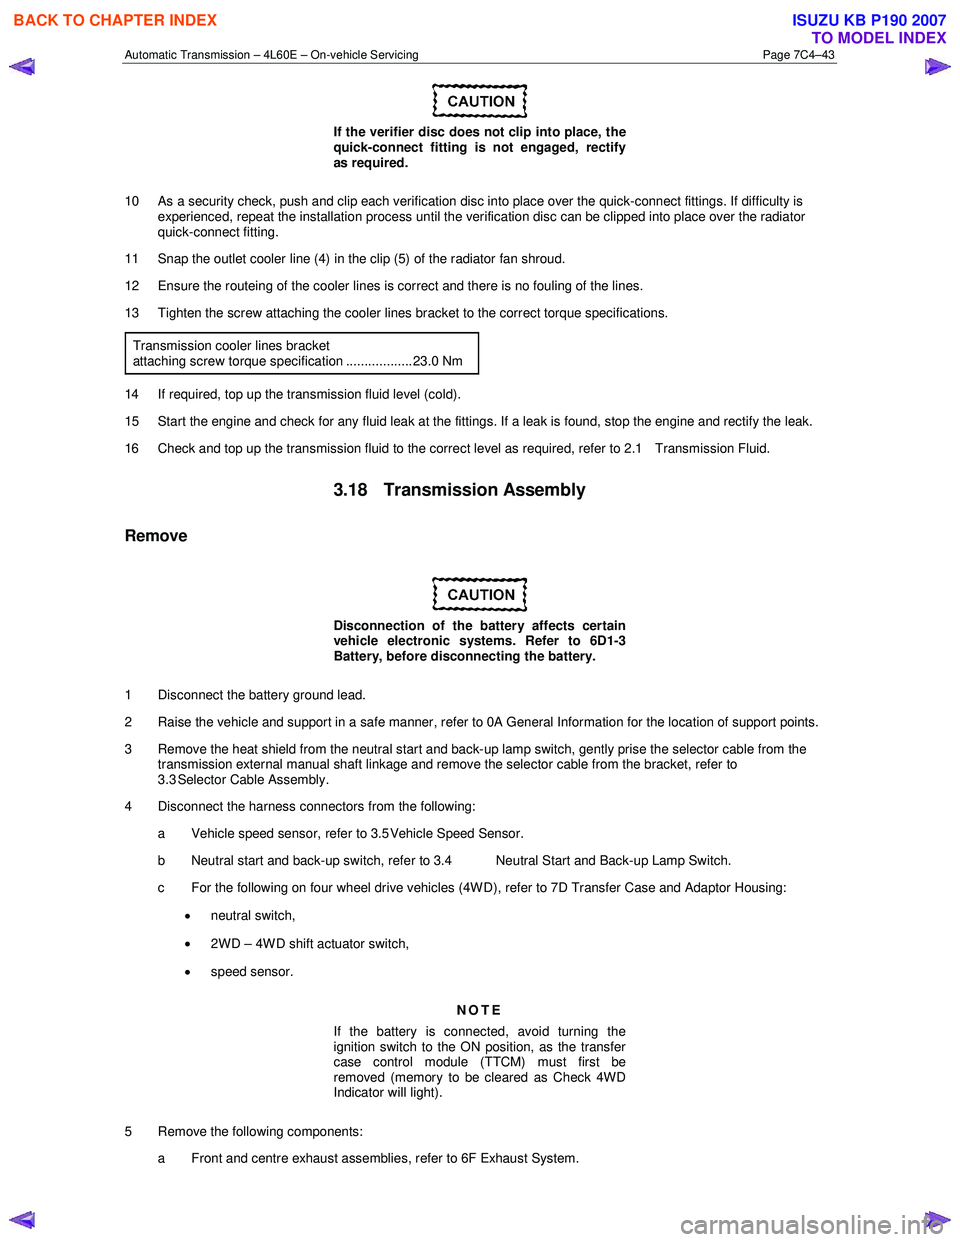
10 Reinstall the plate (2) supporting the spacer plate and
tighten the three attaching bolts (1) to the correct
torque specification.
Spacer plate support plate attaching
bolt torque specification ..................................... 12.0 Nm
11 Reinstall the control valve body, refer to 3.14 Control Valve Body.
12 Reinstall the Oil pan and filter and fill the transmission with the recommended automatic transmission fluid,
refer to 3.1 Fluid Change and Filter Replacement.
13 Lower vehicle to the ground.
14 Road test until the transmission has reached operating temperature. Re-check the fluid level and for any fluid
leaks from the oil pan area, refer to 2.1 Transmission
Fluid.
Figure 7C4 – 55
3.16 Filler Tube and Breather Hose
Remove
NOTE
The breather hose and/or vent pipe can be
removed independently from the filler tube as
described in step 7.
Disconnection of the battery affects certain
vehicle electronic systems. Refer to 6D1-3
Battery, before disconnecting the battery.
1 Disconnect the battery ground lead.
2 Release the lock down lever (1) and remove the transmission fluid level indicator from the filler tube (2).
Figure 7C4 – 56
3 Remove the bolt (1) attaching the filler tube (2) to the side of the right-hand cylinder head, refer to Figure 7C4 – 57.
4 Using a twisting and pulling motion, remove the filler tube from the seal (3) in the transmission case.
BACK TO CHAPTER INDEX
TO MODEL INDEX
ISUZU KB P190 2007
Page 3953 of 6020

Automatic Transmission – 4L60E – On-vehicle Servicing Page 7C4–40
5 Remove the filler tube from the engine compartment.
6 Remove the filler tube seal from the transmission case and discard.
7 If the breather hose needs to be replaced proceed as follows: a unclip the breather hose (4) from the harness channel (5).
b Remove the transmission support and lower the rear of the transmission sufficiently to get access to the breather hose, refer to 3.7 Transmission Support and Mount.
c Disconnect the breather hose from the T-joint (6) and the top of the transmission case and remove.
d If required, remove the two bolts (7) attaching the brackets of the vent pipe (8) to the chassis, disconnect from the T-joint and remove the vent pipe.
Figure 7C4 – 57
Reinstall
Reinstallation of the transmission filler tube and/or the breather hose is the reverse of the removal procedure, noting the
following:
1 Smear a new filler tube seal with clean transmission fluid and fit it to the transmission case.
2 Ensure the transmission breather hose and the harness are secured to the filler tube lower bracket.
3 Tighten the bolt attaching the filler tube bracket to the correct torque specification.
Filler tube bracket attaching bolt
torque specification ................................. 20.0 – 35.0 Nm
4 If required, tighten the two bolts attaching the vent pipe bracket to the chassis to the correct torque specification.
Vent pipe attaching bolt
torque specification ..............................................6.0 Nm
BACK TO CHAPTER INDEX
TO MODEL INDEX
ISUZU KB P190 2007
Page 3956 of 6020
Automatic Transmission – 4L60E – On-vehicle Servicing Page 7C4–43
If the verifier disc does not clip into place, the
quick-connect fitting is not engaged, rectify
as required.
10 As a security check, push and clip each verification disc into place over the quick-connect fittings. If difficulty is experienced, repeat the installation process until the verification disc can be clipped into place over the radiator
quick-connect fitting.
11 Snap the outlet cooler line (4) in the clip (5) of the radiator fan shroud.
12 Ensure the routeing of the cooler lines is correct and there is no fouling of the lines.
13 Tighten the screw attaching the cooler lines bracket to the correct torque specifications.
Transmission cooler lines bracket
attaching screw torque specification .................. 23.0 Nm
14 If required, top up the transmission fluid level (cold).
15 Start the engine and check for any fluid leak at the fittings. If a leak is found, stop the engine and rectify the leak.
16 Check and top up the transmission fluid to the correct level as required, refer to 2.1 Transmission Fluid.
3.18 Transmission Assembly
Remove
Disconnection of the battery affects certain
vehicle electronic systems. Refer to 6D1-3
Battery, before disconnecting the battery.
1 Disconnect the battery ground lead.
2 Raise the vehicle and support in a safe manner, refer to 0A General Information for the location of support points.
3 Remove the heat shield from the neutral start and back-up lamp switch, gently prise the selector cable from the transmission external manual shaft linkage and remove the selector cable from the bracket, refer to
3.3 Selector Cable Assembly.
4 Disconnect the harness connectors from the following:
a Vehicle speed sensor, refer to 3.5 Vehicle Speed Sensor.
b Neutral start and back-up switch, refer to 3.4 Neutral Start and Back-up Lamp Switch.
c For the following on four wheel drive vehicles (4W D), refer to 7D Transfer Case and Adaptor Housing:
• neutral switch,
• 2WD – 4WD shift actuator switch,
• speed sensor.
NOTE
If the battery is connected, avoid turning the
ignition switch to the ON position, as the transfer
case control module (TTCM) must first be
removed (memory to be cleared as Check 4W D
Indicator will light).
5 Remove the following components: a Front and centre exhaust assemblies, refer to 6F Exhaust System.
BACK TO CHAPTER INDEX
TO MODEL INDEX
ISUZU KB P190 2007