Page 1406 of 6020
6A-46 ENGINE MECHANICAL (4JK1/4JJ1)
Exhaust Manifold (High Output)
Components
RTW 76FMF000101
Legend
1. EGR Cooler
2. EGR Cooler Gasket
3. EGR Cooler Gasket 5. Heat Protector
6. Exhaust Manifold
BACK TO CHAPTER INDEX
TO MODEL INDEX
ISUZU KB P190 2007
Page 1407 of 6020

ENGINE MECHANICAL (4JK1/4JJ1) 6A-47
Removal
1. Drain the engine coolant.
2. Remove the turbocharger. • Refer to “Turbocharger”.
3. Remove the EGR cooler heat protector.
4. Disconnect the water hoses from the EGR coole
r
water pipes.
5. Remove the EGR cooler.
6. Remove the exhaust manifold.
RTW 76ASH002101
Inspection
• Inspection of the exhaust manifold. Inspect the
plane surface of the plane on which the
manifold and the cylinder head are to be
installed.
Manifold installation plane surface mm (in)
Standard 0.3 (0.01) or lower
Limit 0.5 (0.02)
Caution:
If the plane surface exceeds the limit, replace it.
LNW 21BSH022301
• Check a crack in the exhaust manifold visually.
Carefully inspect the turbocharger for abrasion and/o
r
excessive wear. Make any necessary adjustments,
repairs, and/or part replacements.
Installation
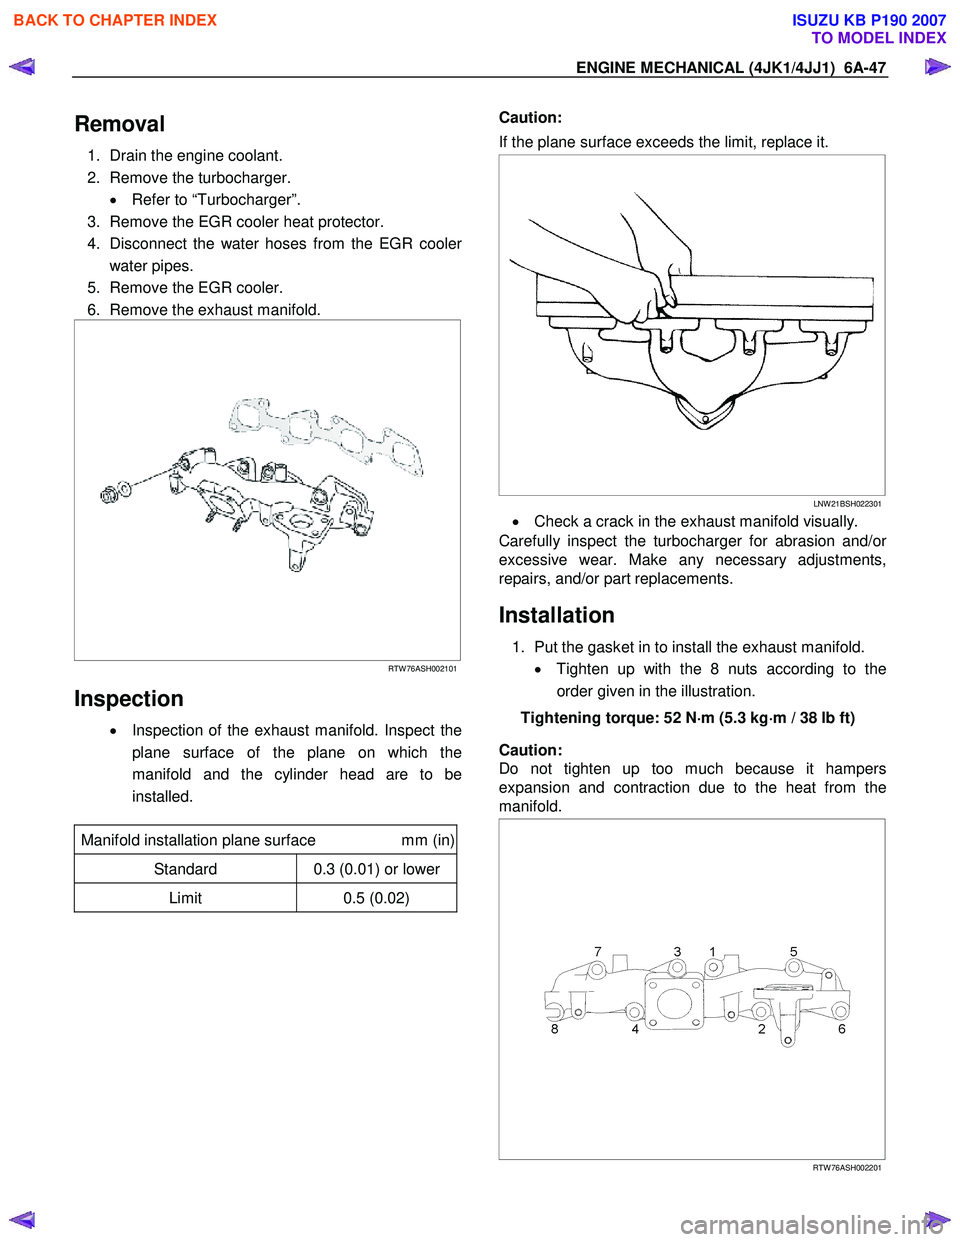
1. Put the gasket in to install the exhaust manifold.
• Tighten up with the 8 nuts according to the
order given in the illustration.
Tightening torque: 52 N ⋅
⋅⋅
⋅
m (5.3 kg ⋅
⋅⋅
⋅
m / 38 lb ft)
Caution:
Do not tighten up too much because it hampers
expansion and contraction due to the heat from the
manifold.
RTW 76ASH002201
BACK TO CHAPTER INDEX
TO MODEL INDEX
ISUZU KB P190 2007
Page 1408 of 6020
6A-48 ENGINE MECHANICAL (4JK1/4JJ1)
2. Install the EGR cooler.
• Install the gaskets.
• Install the EGR cooler.
• Temporary tightening order.
1 →2→ 3→ 4→ 5→ 6
• Fully tightening order.
3 →4→ 5→ 1→ 2→ 6
Tighten the nut and bolts to the specified torque.
Tightening torque: Nuts and bots 1-5: 27 N·m (2.8 kg·m / 20 lb ft)
Bolt 6: 52 N·m (5.3 kg·m / 38 lb ft)
6
543
1
2
RTW 76FSH000201
3. Install the water hoses to the EGR cooler water
pipes.
4. Heat protector.
Tighten the bolts to the specified torque.
Tightening torque: 25 N·m (2.5 kg·m / 18 lb ft)
RTW 76FSH000101
5. Install the turbocharger.
• Refer to “Turbocharger”.
6. Replenish the engine coolant.
BACK TO CHAPTER INDEX
TO MODEL INDEX
ISUZU KB P190 2007
Page 1409 of 6020
ENGINE MECHANICAL (4JK1/4JJ1) 6A-49
Torque Specifications
RTW 76AMF000701
BACK TO CHAPTER INDEX
TO MODEL INDEX
ISUZU KB P190 2007
Page 1410 of 6020
6A-50 ENGINE MECHANICAL (4JK1/4JJ1)
Timing Gear Train
Components
RTW 56ALF001101
Legend 1. Oil Pump Gear
2. Crankshaft Gear
3. Idle Gear D
4. Exhaust Camshaft Gear
5. Intake Camshaft Gear
6. Idle Gear D Sprocket
7. Timing Chain 8. Injection Pump Sprocket
9. Injection Pump Gear
10. Idle Gear A
11. Vacuum Pump Gear
12. Power Steering Oil Pump Gear
13. Idle Gear C
BACK TO CHAPTER INDEX
TO MODEL INDEX
ISUZU KB P190 2007
Page 1411 of 6020
ENGINE MECHANICAL (4JK1/4JJ1) 6A-51
Removal
1. Partially drain the engine coolant.
2. Remove the radiator upper hose.
RTW 56FSH000101
3. Remove the fan guide.
RTW 46BSH000101
Legend
1. Fan Guide
2. Clips
3. Lower Fan Guide
4. Fan Shroud
4. Remove the cooling fan and fan pulley.
RTW 56ASH025401
5. Remove the A/C compressor drive belt and fan
belt.
6. Remove the crank pulley.
7. Remove the power steering pump with hose.
RTW 56ASH021101
Legend
1. Power Steering Pump
2. Nut
• Disconnect the bracket (1) of power steering oil
hose.
BACK TO CHAPTER INDEX
TO MODEL INDEX
ISUZU KB P190 2007
Page 1412 of 6020
6A-52 ENGINE MECHANICAL (4JK1/4JJ1)
LTW 56ASH000101
8. Remove the vacuum pump.
• Remove the vacuum pipe bracket and vacuum
pipe.
• Remove the oil pipe (feed side and return side)
of vacuum pump.
RTW 76ASH000201
9. Remove the front cover.
RTW 56ASH019701
10. Install the M6 bolt to the idle gear A.
11. Remove the idle gear A and idle gear A flange, idle gear A shaft.
RTW 56ASH011301
BACK TO CHAPTER INDEX
TO MODEL INDEX
ISUZU KB P190 2007
Page 1413 of 6020
ENGINE MECHANICAL (4JK1/4JJ1) 6A-53
12. Remove the idle gear C and idle gear C shaft.
RTW 56ASH011401
13. Remove the crankshaft gear.
RTW 56ASH021501
Disassembly
1. Remove the scissor gear assembly.
• Clamp the vise. Insert soft metal protectors
(aluminum) between the vise and component.
Use a pair of snap ring pliers to remove the
scissor gear assembly.
RTW 56ASH022001
Legend
1. Snap Ring
2. Sub-gear
3. Spring
4. Idle Gear A
Reassembly
1. Install the scissor gear assembly.
• Clamp the vise. Insert soft metal protectors
(aluminum) between the vise and component.
Press against the pin on the left side of the idle
gear A spring to make a gap on the right side o
f
the spring. Push the spring into place.
BACK TO CHAPTER INDEX
TO MODEL INDEX
ISUZU KB P190 2007