2007 ISUZU KB P190 oil
[x] Cancel search: oilPage 2213 of 6020

ENGINE DRIVEABILITY AND EMISSIONS 6E–43
J1-21 J1-21 Crankshaft Position (CKP) Sensor Signal WHT - - Wave form
or approx. 3.7V Wave form
A or
approx. 7.8V Connect AC V J1-21 J1-6
J1-22 J1-22 No.2 Injector GRN/
WHT Less than
1V Wave form E or 12-14V
Connect DC V J1-22 GND
J1-23 J1-23 No Connection - --- - -- - -
J1-24 J1-24 MAP Sensor Signal GRY Less than 1VApprox.
4.8V Approx.
1.3V Approx.
0.9V Connect DC V J1-24 J1-16
J1-25 J1-25 No Connection - --- - -- - -
J1-26 J1-26 No Connection - --- - -- J1-26 -
J1-27 J1-27 Engine Coolant Temp. (ECT) Sensor Signal GRY Less than
1V
20℃: Approx. 2.4V / 40 ℃: Approx. 1.4V or
4.1V / 60 ℃: Approx. 3.3V / 80 ℃: Approx.
2.5VConnect DC V J1-27 J1-32
J1-28 J1-28 Idle Air Control Valve (IACV) Coil A High BLU Less than
1V Less than 1V / 10-14V
Connect DC V J1-28 GND
J1-29 J1-29 Idle Air Control Valve (IACV) Coil B Low BLU/
BLK Less than
1V Less than 1V / 10-14V
Connect DC V J1-29 GND
J1-30 J1-30 Idle Air Control Valve (IACV) Coil A Low BLU/
WHT Less than
1V Less than 1V / 10-14V
Connect DC V J1-30 GND
J1-31 J1-31 MAP Sensor Power Supply RED Less than
1V Approx.. 5V
Connect DC V J1-31 J1-16
J1-32 J1-32 ECT Sensor, Knock Sensor, Throttle
Position Sensor Ground GRN Continuity
with
ground -
- - Connect ΩJ1-32 GND
Pin
No. B/
Box No. Pin Function
Wire
Color Signal or Continuity
ECM
Connection Tester Position
Key SW Off Key SW
On Engine
Idle Engine
2000rpm Range (+) (-)
BACK TO CHAPTER INDEX
TO MODEL INDEX
ISUZU KB P190 2007
Page 2216 of 6020
6E–46 ENGINE DRIVEABILITY AND EMISSIONS
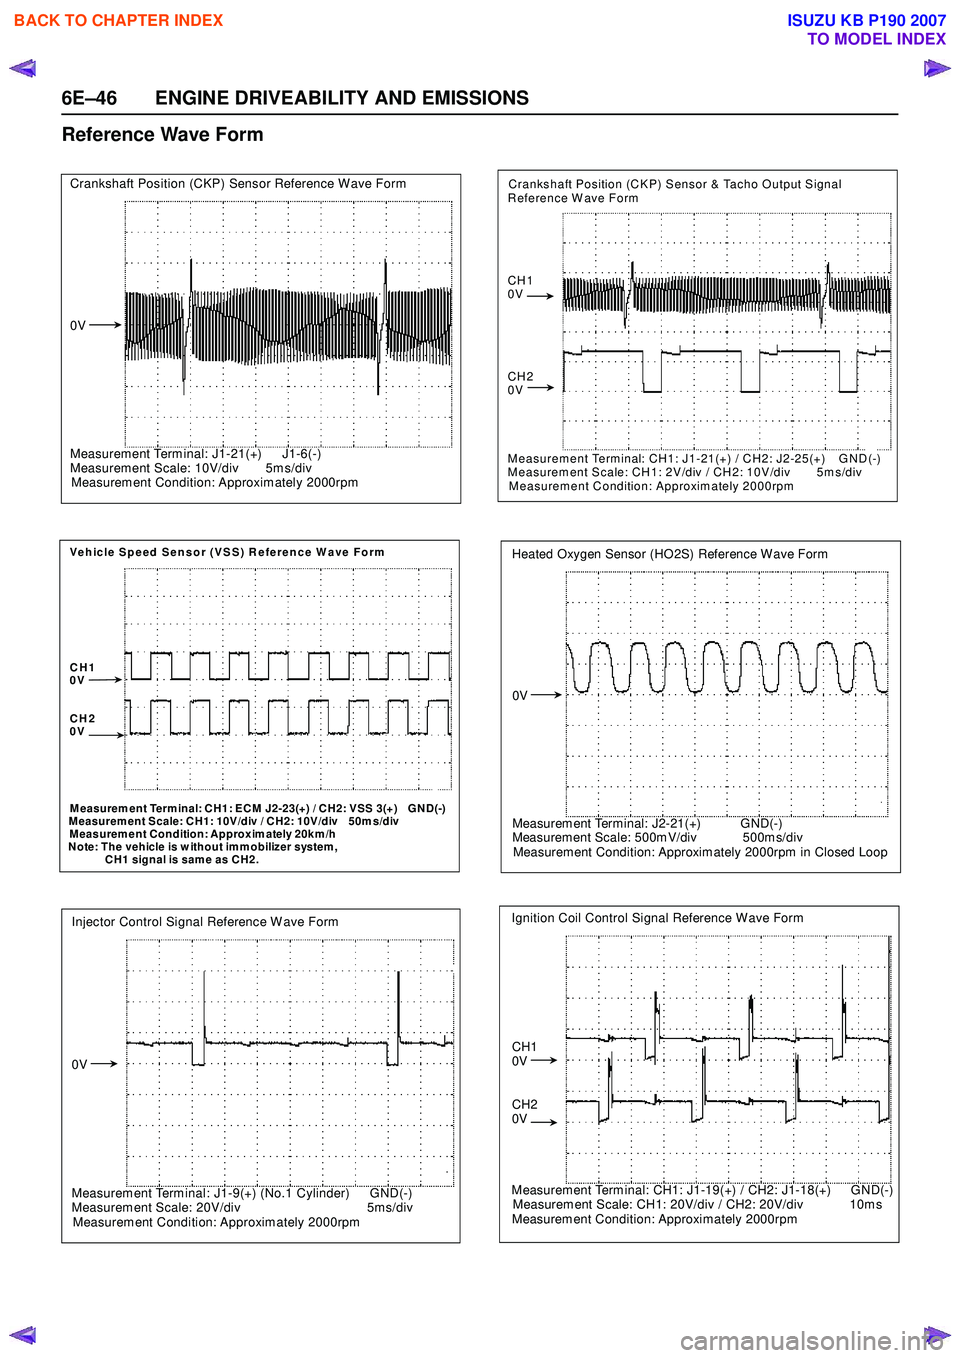
Reference Wave Form
Crankshaft Position (CKP) Sensor Reference W ave Form
0V
Measurem ent Term inal: J1-21(+) J1-6(-)
Measurem ent Scale: 10V/div 5m s/div
Measurem ent Condition: Approxim ately 2000rpm
Vehicle Speed Sensor (VSS) Reference Wave Form
CH1
0V
CH2
0V
M easurem ent Term inal: CH1: ECM J2-23(+) / CH2: VSS 3(+) GND(-)
M easurem ent Scale: CH1: 10V/div / CH2: 10V/div 50m s/div
Measurem ent Condition: Approxim ately 20km /h
Note: The vehicle is w ithout imm obilizer system,
CH1 signal is same as CH2.
Injector Control Signal Reference W ave Form
0V
Measurem ent Term inal: J1-9(+) (No.1 Cylinder) GND(-)
Measurement Scale: 20V/div 5ms/div
Measurem ent Condition: Approximately 2000rpm
Crankshaft Position (CKP) Sensor & Tacho Output Signal
Reference W ave Form
CH1
0V
CH2
0V
Measurement Terminal: CH1: J1-21(+) / CH2: J2-25(+) GND(-)
Measurement Scale: CH1: 2V/div / CH2: 10V/div 5ms/div
Measurement Condition: Approximately 2000rpm
Heated Oxygen Sensor (HO2S) Reference Wave Form
0V
Measurem ent Terminal: J2-21(+) GND(-)
Measurem ent Scale: 500m V/div 500m s/div
Measurement Condition: Approxim ately 2000rpm in Closed Loop
Ignition Coil Control Signal Reference Wave Form
CH1
0V
CH2
0V
Measurement Terminal: CH1: J1-19(+) / CH2: J1-18(+) GND(-)
Measurem ent Scale: CH1: 20V/div / CH2: 20V/div 10m s
Measurement Condition: Approximately 2000rpm
BACK TO CHAPTER INDEX
TO MODEL INDEX
ISUZU KB P190 2007
Page 2219 of 6020

ENGINE DRIVEABILITY AND EMISSIONS 6E–49
Throttle Position Sensor (TPS)
The TPS is a potentiometer connected to throttle shaft
on the throttle body.
The engine control module (ECM) monitors the voltage
on the signal line and calculates throttle position. As the
throttle valve angle is changed when accelerator pedal
moved. The TPS signal also changed at a moved
throttle valve. As the throttle valve opens, the output
increases so that the output voltage should be high.
The throttle body has a throttle plate to control the
amount of the air delivered to the engine.
Engine coolant is directed through a coolant cavity in
the throttle body to warm the throttle valve and to
prevent icing.
Idle Air Control (IAC) Valve
The idle air control valve (IAC) valve is two directional
and gives 2-way control. With power supply to the coils
controlled steps by the engine control module (ECM),
the IAC valve's pintle is moved to adjust idle speed,
raising it for fast idle when cold or there is extra load
from the air conditioning or power steering.
By moving the pintle in (to decrease air flow) or out (to
increase air flow), a controlled amount of the air can
move around the throttle plate. If the engine speed is
too low, the engine control module (ECM) will retract the
IAC pintle, resulting in more air moving past the throttle
plate to increase the engine speed.
If the engine speed is too high, the engine control
module (ECM) will extend the IAC pintle, allowing less
air to move past the throttle plate, decreasing the
engine speed.
The IAC pintle valve moves in small step called counts.
During idle, the proper position of the IAC pintle is
calculated by the engine control module (ECM) based
on battery voltage, coolant temperature, engine load,
and engine speed.
If the engine speed drops below a specified value, and
the throttle plate is closed, the engine control module
(ECM) senses a near-stall condition. The engine control
module (ECM) will then calculate a new IAC pintle valve
position to prevent stalls.
If the IAC valve is disconnected and reconnected with
the engine running, the idle speed will be wrong. In this
case, the IAC must be reset. The IAC resets when the
key is cycled “On” then “Off”. When servicing the IAC, it
should only be disconnected or connected with the
ignition “Off”.
The position of the IAC pintle valve affects engine start-
up and the idle characteristic of the vehicle.
If the IAC pintle is fully open, too much air will be
allowed into the manifold. This results in high idle
speed, along with possible hard starting and lean air/
fuel ratio.
(1) Throttle Position Sensor
(2) Idle Air Control (IAC) Valve
1
2
C harac teris t ic of TPS -R ef erenc e-
0
0.5
1
1.5 2
2.5
3
3.5 4
4.5 5
0 10 2030 405060 7080 90100 Throt t le Angle (% ) (Tec h2 R eading)
Output Voltage (V)
StepCoilAB CDCoil A H igh
(ECM J1-28) On On
Coil A Low
(ECM J1-30) On On
Coil B H igh
(ECM J1-13) On On
Coil B Low
(ECM J1-29) On On
(IAC Valve Close Direction)
(IAC Valve Open Direction)
BACK TO CHAPTER INDEX
TO MODEL INDEX
ISUZU KB P190 2007
Page 2224 of 6020
6E–54 ENGINE DRIVEABILITY AND EMISSIONS
GENERAL DESCRIPTION FOR ELECTRIC
IGNITION SYSTEM
The engine use two ignition coils, one per two cylinders.
A two wire connector provides a battery voltage primary
supply through the ignition fuse.
The ignition control spark timing is the ECM’s method of
controlling the spark advance and the ignition dwell.
The ignition control spark advance and the ignition dwell
are calculated by the ECM using the following inputs.
• Engine speed
• Crankshaft position (CKP) sensor
• Engine coolant temperature (ECT) sensor
• Throttle position sensor
• Vehicle speed sensor
• ECM and ignition system supply voltage
Ignition coil works to generate only the secondary
voltage be receiving the primary voltage from ECM.
The primary voltage is generated at the coil driver
located in the ECM. The coil driver generate the primary
voltage based on the crankshaft position signal. In
accordance with the crankshaft position signal, ignition
coil driver determines the adequate ignition timing and
also cylinder number to ignite.
Ignition timing is determined the coolant temperature,
intake air temperature, engine speed, engine load,
knock sensor signal, etc.
Spark Plug
Although worn or dirty spark plugs may give satisfactory
operation at idling speed, they frequently fail at higher
engine speeds. Faulty spark plugs may cause poor fuel
economy, power loss, loss of speed, hard starting and
generally poor engine performance. Follow the
scheduled maintenance service recommendations to
ensure satisfactory spark plug performance. Refer to
Maintenance and Lubrication .
Normal spark plug operation will result in brown to
grayish-tan deposits appearing on the insulator portion
of the spark plug. A small amount of red-brown, yellow,
and white powdery material may also be present on the
insulator tip around the center electrode. These
deposits are normal combustion by-products of fuels
and lubricating oils with additives. Some electrode wear
will also occur. Engines which are not running properly
are often referred to as “misfiring.” This means the
ignition spark is not igniting the air/fuel mixture at the
proper time. While other ignition and fuel system causes
must also be considered, possible causes include
ignition system conditions which allow the spark voltage
to reach ground in some other manner than by jumping
across the air gap at the tip of the spark plug, leaving
the air/fuel mixture unburned. Misfiring may also occur
when the tip of the spark plug becomes overheated and
ignites the mixture before the spark jumps. This is
referred to as “pre-ignition.”
Spark plugs may also misfire due to fouling, excessive
gap, or a cracked or broken insulator. If misfiring occurs before the recommended replacement interval, locate
and correct the cause.
Carbon fouling of the spark plug is indicated by dry,
black carbon (soot) deposits on the portion of the spark
plug in the cylinder. Excessive idling and slow speeds
under light engine loads can keep the spark plug
temperatures so low that these deposits are not burned
off. Very rich fuel mixtures or poor ignition system output
may also be the cause. Refer to DTC P1167.
Oil fouling of the spark plug is indicated by wet oily
deposits on the portion of the spark plug in the cylinder,
usually with little electrode wear. This may be caused by
oil during break-in of new or newly overhauled engines.
Deposit fouling of the spark plug occurs when the
normal red-brown, yellow or white deposits of
combustion by-products become sufficient to cause
misfiring. In some cases, these deposits may melt and
form a shiny glaze on the insulator around the center
electrode. If the fouling is found in only one or two
cylinders, valve stem clearances or intake valve seals
may be allowing excess lubricating oil to enter the
cylinder, particularly if the deposits are heavier on the
side of the spark plug facing the intake valve.
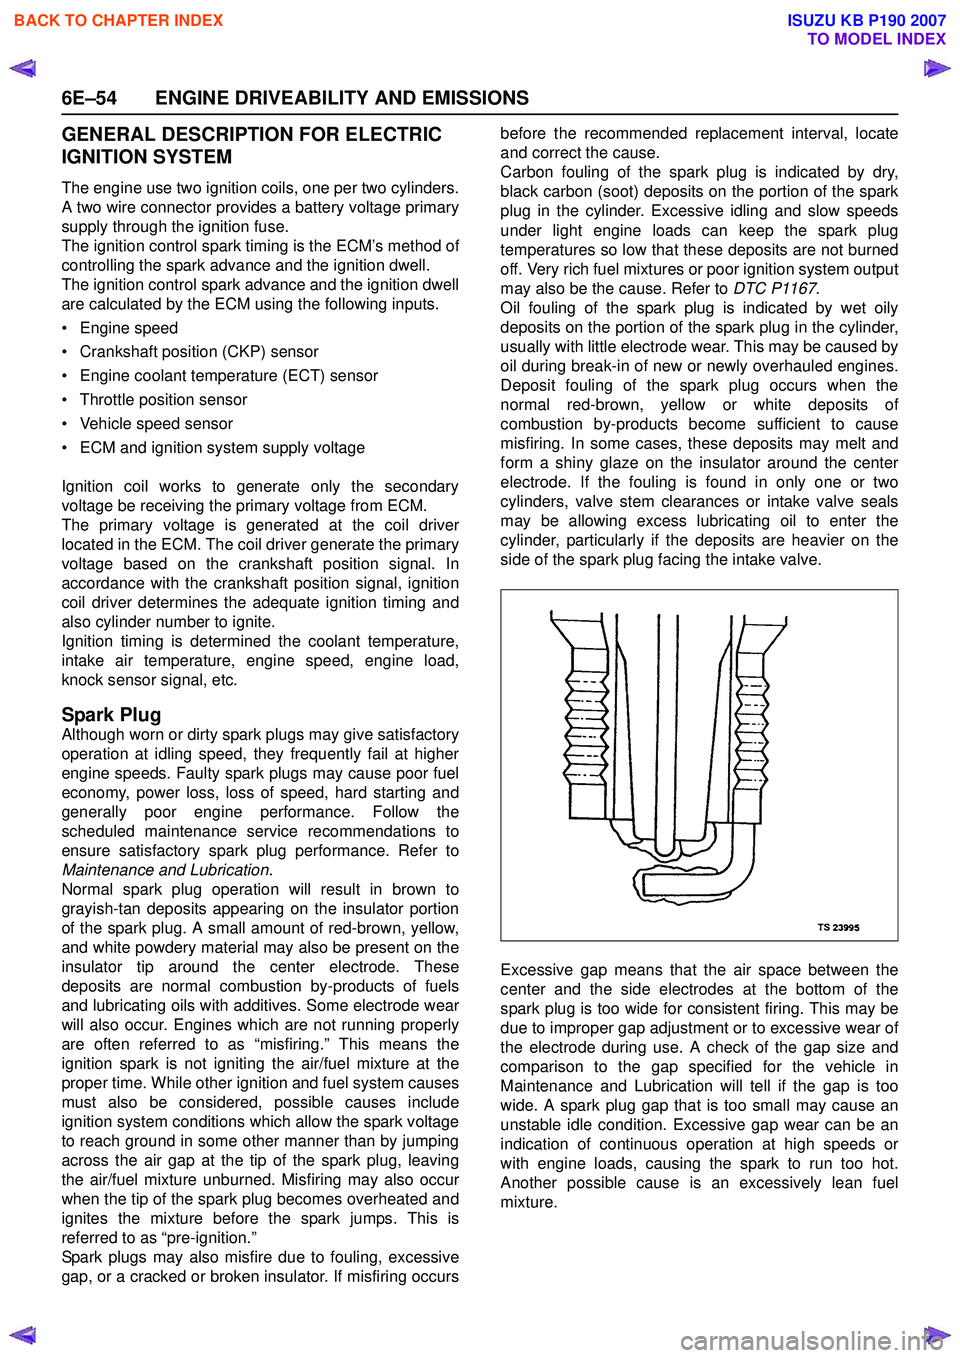
Excessive gap means that the air space between the
center and the side electrodes at the bottom of the
spark plug is too wide for consistent firing. This may be
due to improper gap adjustment or to excessive wear of
the electrode during use. A check of the gap size and
comparison to the gap specified for the vehicle in
Maintenance and Lubrication will tell if the gap is too
wide. A spark plug gap that is too small may cause an
unstable idle condition. Excessive gap wear can be an
indication of continuous operation at high speeds or
with engine loads, causing the spark to run too hot.
Another possible cause is an excessively lean fuel
mixture.
BACK TO CHAPTER INDEX
TO MODEL INDEX
ISUZU KB P190 2007
Page 2225 of 6020
ENGINE DRIVEABILITY AND EMISSIONS 6E–55
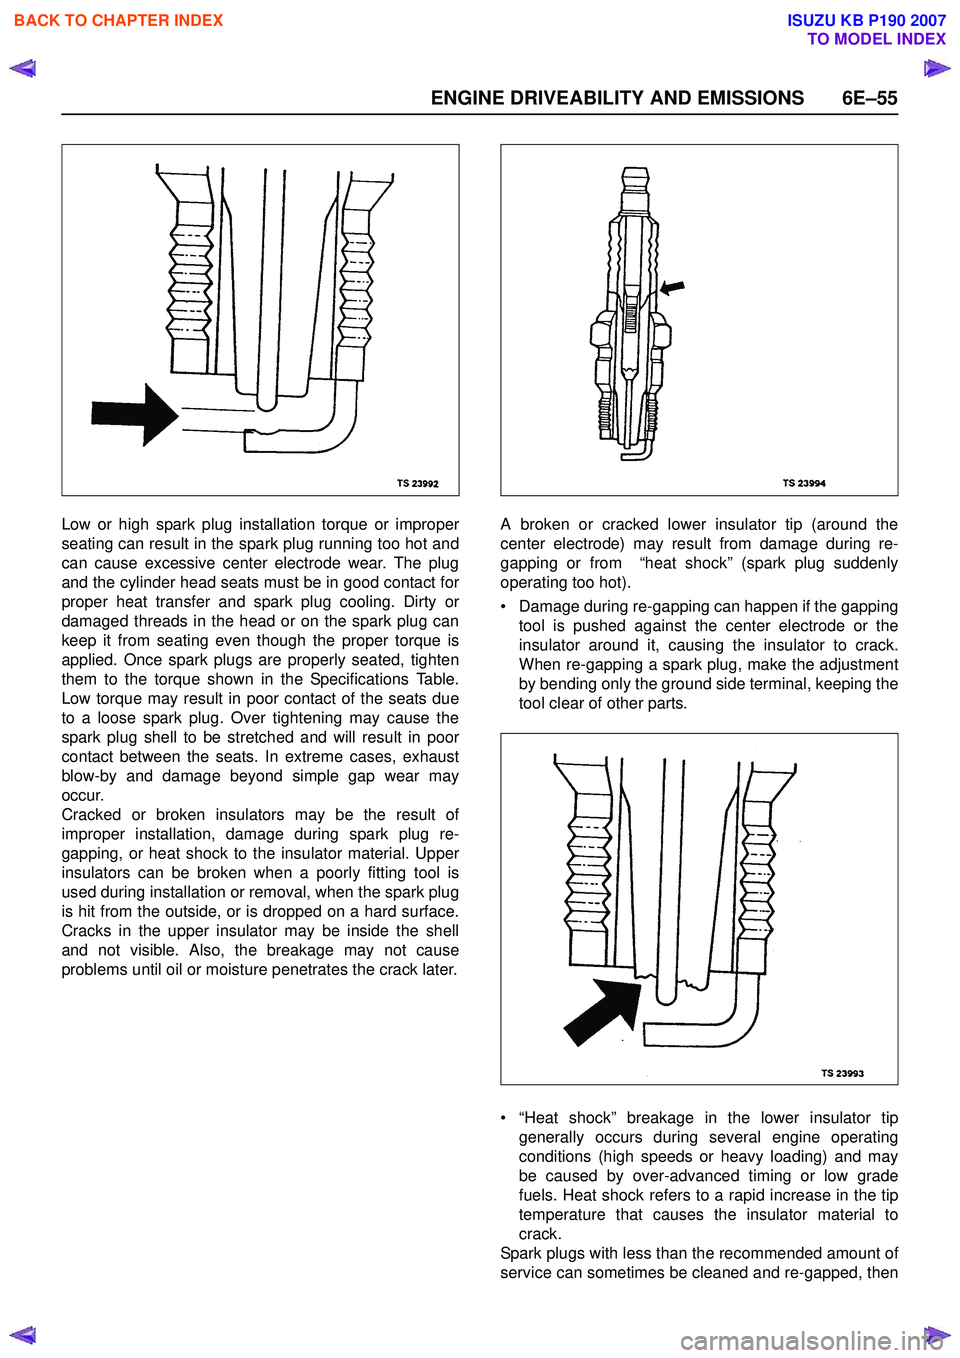
Low or high spark plug installation torque or improper
seating can result in the spark plug running too hot and
can cause excessive center electrode wear. The plug
and the cylinder head seats must be in good contact for
proper heat transfer and spark plug cooling. Dirty or
damaged threads in the head or on the spark plug can
keep it from seating even though the proper torque is
applied. Once spark plugs are properly seated, tighten
them to the torque shown in the Specifications Table.
Low torque may result in poor contact of the seats due
to a loose spark plug. Over tightening may cause the
spark plug shell to be stretched and will result in poor
contact between the seats. In extreme cases, exhaust
blow-by and damage beyond simple gap wear may
occur.
Cracked or broken insulators may be the result of
improper installation, damage during spark plug re-
gapping, or heat shock to the insulator material. Upper
insulators can be broken when a poorly fitting tool is
used during installation or removal, when the spark plug
is hit from the outside, or is dropped on a hard surface.
Cracks in the upper insulator may be inside the shell
and not visible. Also, the breakage may not cause
problems until oil or moisture penetrates the crack later. A broken or cracked lower insulator tip (around the
center electrode) may result from damage during re-
gapping or from “heat shock” (spark plug suddenly
operating too hot).
• Damage during re-gapping can happen if the gapping tool is pushed against the center electrode or the
insulator around it, causing the insulator to crack.
When re-gapping a spark plug, make the adjustment
by bending only the ground side terminal, keeping the
tool clear of other parts.
• “Heat shock” breakage in the lower insulator tip generally occurs during several engine operating
conditions (high speeds or heavy loading) and may
be caused by over-advanced timing or low grade
fuels. Heat shock refers to a rapid increase in the tip
temperature that causes the insulator material to
crack.
Spark plugs with less than the recommended amount of
service can sometimes be cleaned and re-gapped, then
BACK TO CHAPTER INDEX
TO MODEL INDEX
ISUZU KB P190 2007
Page 2229 of 6020
ENGINE DRIVEABILITY AND EMISSIONS 6E–59
POSITIVE CRANKCASE VENTILATION
(PCV) SYSTEM
Crankcase Ventilation System Purpose
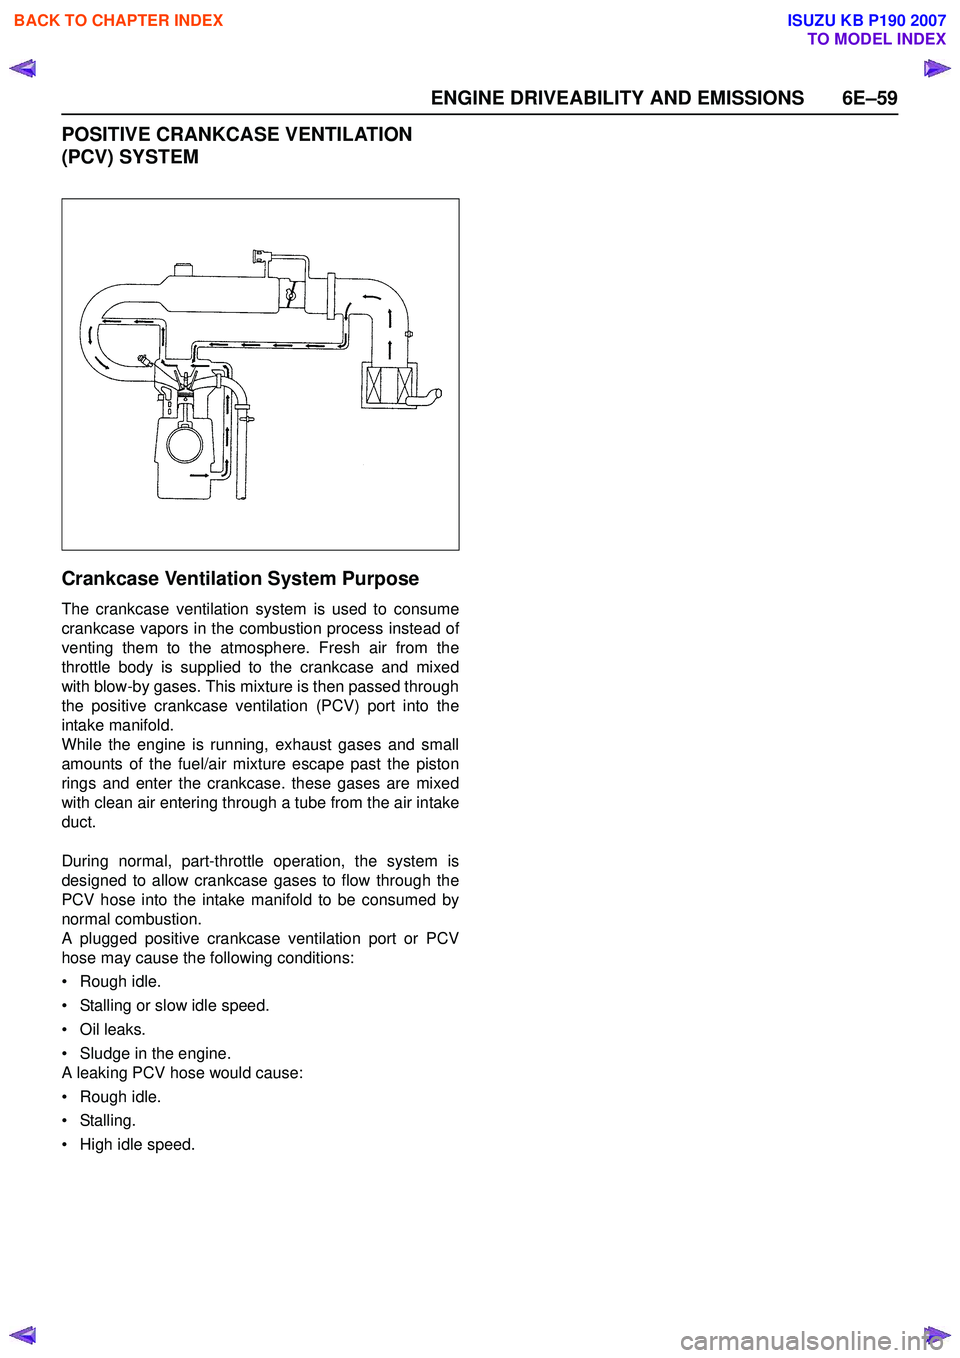
The crankcase ventilation system is used to consume
crankcase vapors in the combustion process instead of
venting them to the atmosphere. Fresh air from the
throttle body is supplied to the crankcase and mixed
with blow-by gases. This mixture is then passed through
the positive crankcase ventilation (PCV) port into the
intake manifold.
While the engine is running, exhaust gases and small
amounts of the fuel/air mixture escape past the piston
rings and enter the crankcase. these gases are mixed
with clean air entering through a tube from the air intake
duct.
During normal, part-throttle operation, the system is
designed to allow crankcase gases to flow through the
PCV hose into the intake manifold to be consumed by
normal combustion.
A plugged positive crankcase ventilation port or PCV
hose may cause the following conditions:
• Rough idle.
• Stalling or slow idle speed.
• Oil leaks.
• Sludge in the engine.
A leaking PCV hose would cause:
• Rough idle.
• Stalling.
• High idle speed.
BACK TO CHAPTER INDEX
TO MODEL INDEX
ISUZU KB P190 2007
Page 2230 of 6020
6E–60 ENGINE DRIVEABILITY AND EMISSIONS
A/C CLUTCH DIAGNOSIS
A/C Clutch Circuit Operation
A 12-volt signal is supplied to the A/C request input of
the ECM when the A/C is selected through the A/C
control switch.
The A/C compressor clutch relay is controlled through
the ECM. This allows the ECM to modify the idle air
control position prior to the A/C clutch engagement for
better idle quality. If the engine operating conditions are
within their specified calibrated acceptable ranges, the
ECM will enable the A/C compressor relay. This is done
by providing a ground path for the A/C relay coil within
the ECM. When the A/C compressor relay is enabled,
battery voltage is supplied to the compressor relay is
enabled, battery voltage is supplied to the compressor
clutch coil.
The ECM will enable the A/C compressor clutch
whenever the engine is running and the A/C has been
requested. The ECM will not enable the A/C
compressor clutch if any of the following conditions are
met:
• The engine speed is greater than 6000 RPM.
• The ECT is greater than 122°C (251°F).
• The throttle is more than 95% open.
A/C Clutch Circuit Purpose
The A/C compressor operation is controlled by the
engine control module (ECM) for the following reasons:
• It improves idle quality during compressor clutch engagement.
• It improves wide open throttle (WOT) performance.
• It provides A/C compressor protection from operation with incorrect refrigerant pressures.
The A/C electrical system consists of the following
components:
• The A/C control switch.
• The A/C refrigerant pressure switches.
• The A/C compressor clutch.
• The A/C compressor clutch relay.
•The ECM.
A/C Request Signal
This signal tells the ECM when the A/C mode is
selected at the A/C control switch. The ECM uses this
input to adjust the idle speed before turning on the A/C
clutch. The A/C compressor will be inoperative if this
signal is not available to the ECM.
Refer to A/C Clutch Circuit Diagnosis for A/C wiring
diagrams and diagnosis for the A/C electrical system.
BACK TO CHAPTER INDEX
TO MODEL INDEX
ISUZU KB P190 2007
Page 2234 of 6020
6E–64 ENGINE DRIVEABILITY AND EMISSIONS
– Are there areas subjected to vibration ormovement (engine, transmission or
suspension)?
– Are there areas exposed to moisture, road salt or other corrosives (battery acid, oil or other
fluids)?
– Are there common mounting areas with other systems/components?
– Have previous repairs been performed to wiring, connectors, components or mounting areas
(causing pinched wires between panels and
drivetrain or suspension components without
causing and immediate problem)?
– Does the vehicle have aftermarket or dealer- installed equipment (radios, telephone, etc.)
Step 2: Isolate the problem
At this point, you should have a good idea of what could
cause the present condition, as well as could not cause
the condition. Actions to take include the following:
• Divide (and separate, where possible) the system or circuit into smaller sections
• Confine the problem to a smaller area of the vehicle (start with main harness connections while removing
panels and trim as necessary in order to eliminate
large vehicle sections from further investigation)
• For two or more circuits that do not share a common power or ground, concentrate on areas where
harnesses are routed together or connectors are
shared (refer to the following hints)
Hints
Though the symptoms may vary, basic electrical failures
are generally caused by:
• Loose connections: – Open/high resistance in terminals, splices,connectors or grounds
• Incorrect connector/harness routing (usually in new vehicles or after a repair has been made):
– Open/high resistance in terminals, splices, connectors of grounds
• Corrosion and wire damage:
– Open/high resistance in terminals, splices,connectors of grounds
• Component failure: – Opens/short and high resistance in relays,modules, switches or loads
• Aftermarket equipment affecting normal operation of other systems
You may isolate circuits by:
• Unplugging connectors or removing a fuse to separate one part of the circuit from another part
• Operating shared circuits and eliminating those that function normally from the suspect circuit
• If only one component fails to operate, begin testing at the component
• If a number of components do no operate, begin tests at the area of commonality (such as power sources,
ground circuits, switches or major connectors)
What resources you should use
Whenever appropriate, you should use the following
resources to assist in the diagnostic process:
• Service manual
• Technical equipment (for data analysis)
• Experience
• Technical Assistance
• Circuit testing tools
5d. Intermittent Diagnosis
By definition, an intermittent problem is one that does
not occur continuously and will occur when certain
conditions are met. All these conditions, however, may
not be obvious or currently known. Generally,
intermittents are caused by:
• Faulty electrical connections and wiring
• Malfunctioning components (such as sticking relays, solenoids, etc.)
• EMI/RFI (Electromagnetic/radio frequency interference)
• Aftermarket equipment
Intermittent diagnosis requires careful analysis of
suspected systems to help prevent replacing good
parts. This may involve using creativity and ingenuity to
interpret customer complaints and simulating all
external and internal system conditions to duplicate the
problem.
What you should do
Step 1: Acquire information
A thorough and comprehensive customer check sheet
is critical to intermittent problem diagnosis. You should
require this, since it will dictate the diagnostic starting
point. The vehicle service history file is another
source for accumulating information about the
complaint.
Step 2: Analyze the intermittent problem
Analyze the customer check sheet and service history
file to determine conditions relevant to the suspect
system(s).
Using service manual information, you must identify,
trace and locate all electrical circuits related to the
malfunctioning system(s). If there is more than one
system failure, you should identify, trace and locate
areas of commonality shared by the suspect circuits.
BACK TO CHAPTER INDEX
TO MODEL INDEX
ISUZU KB P190 2007