Page 4707 of 6020
MANUAL TRANSMISSION 7B1-101
Main Data and Specifications
General Specifications
MUA5G MUA5H MUA5S
Transmission type Fully synchronized forward and reverse gears
Control method Remote control with the gear shift lever on the floor.
Gear ratio: Transmission 1st 4.008 4.008 4.357
2nd 2.301 2.301 2.502
3rd 1.427 1.427 1.501
4th 1.000 1.000 1.000
5th 0.828 0.744 0.809
Rev. 3.651 3.651 3.970
Transmission oil capacity 2.95 lit. (3.12 US qt)
Type of lubricant Engine oil: Refer to the chart in "SECTION 0"
BACK TO CHAPTER INDEX
TO MODEL INDEX
ISUZU KB P190 2007
Page 4712 of 6020
7B1-106 MANUAL TRANSMISSION
2) NOISY OPERATION
Checkpoint Trouble Cause Countermeasure
Replenish or replace the gear
oilInsufficient or improper engine
oil
NG
Replace the gear(s)
Replace the gear(s)
Replace the bearing(s)
Gears (Gear whining)Lack of backlash between
meshing gears
Free running gears seizing on
the thrust face or the inner
face
Bearings (Hissing, thumping
or bumping)W orn or broken bearing(s)
Gears (Squealing at high
speeds)
Replace the gear(s)Gears (Growling, humming, or
grinding)W orn, chipped, or cracked
gear(s)
NG
NG
NG
NG
OK
OK
OK
OK
Gear oil (Metallic rattling)
BACK TO CHAPTER INDEX
TO MODEL INDEX
ISUZU KB P190 2007
Page 4713 of 6020
MANUAL TRANSMISSION 7B1-107
2. HARD SHIFTING
Checkpoint Trouble Cause Countermeasure
Change lever play
Clutch pedal free play
Repair or replace the
applicable parts and regrease
Readjust the clutch pedal free
play
W orn change lever sliding
portions
Improper clutch pedal free
play
Change lever operationRepair or regrease the change
lever assembly
Replenish or replace the
engine oil
Hard operating change lever
caused insufficient grease
Insufficient or improper gear
oil
OK
OK NG
NG
NG
NG
OK
OKGear oil
Continued on the next page
Shift rod and quadrant box
sliding faces, and other partsReplace the shidt rod and/or
the quadrant boxW orn shift rod and/or sliding
faces
Repair or replace the sleeveSleeve movement failure
NG
NG
OKShift block sleeve movement
BACK TO CHAPTER INDEX
TO MODEL INDEX
ISUZU KB P190 2007
Page 4731 of 6020

7B1-12 Manual Transmission (MUX)
22. Remove the transmission retaining nuts and bolts.Remove the transmission assembly (4x2 model) or
the transmission & transfer assembly (4x4 model)
from the vehicle.
23. Remove the transmission-transfer fixing bolts and nut, and disassemble the transfer from the
transmission. (4x4 model)
Installation
1. Apply grease (BESCO L-2 or equivalent) on the splined portion of the output shaft.
2. Connect the transfer to the transmission. (4x4 model)
3. Install the transmission-transfer fixing bolts and nut, and tighten them to the specified torque. (4x4
model)
Torque: 41 N ⋅m (4.2 kgf ⋅m/30 lb ⋅ft)
4. Apply a thin coat of molybdenum disulfide grease on the splined portion of the input shaft spline.
5. Slowly operate the transmission jack until the front of transmission is aligned with the rear of the
engine.
6. Align the input shaft spline with the clutch driven plate spline.
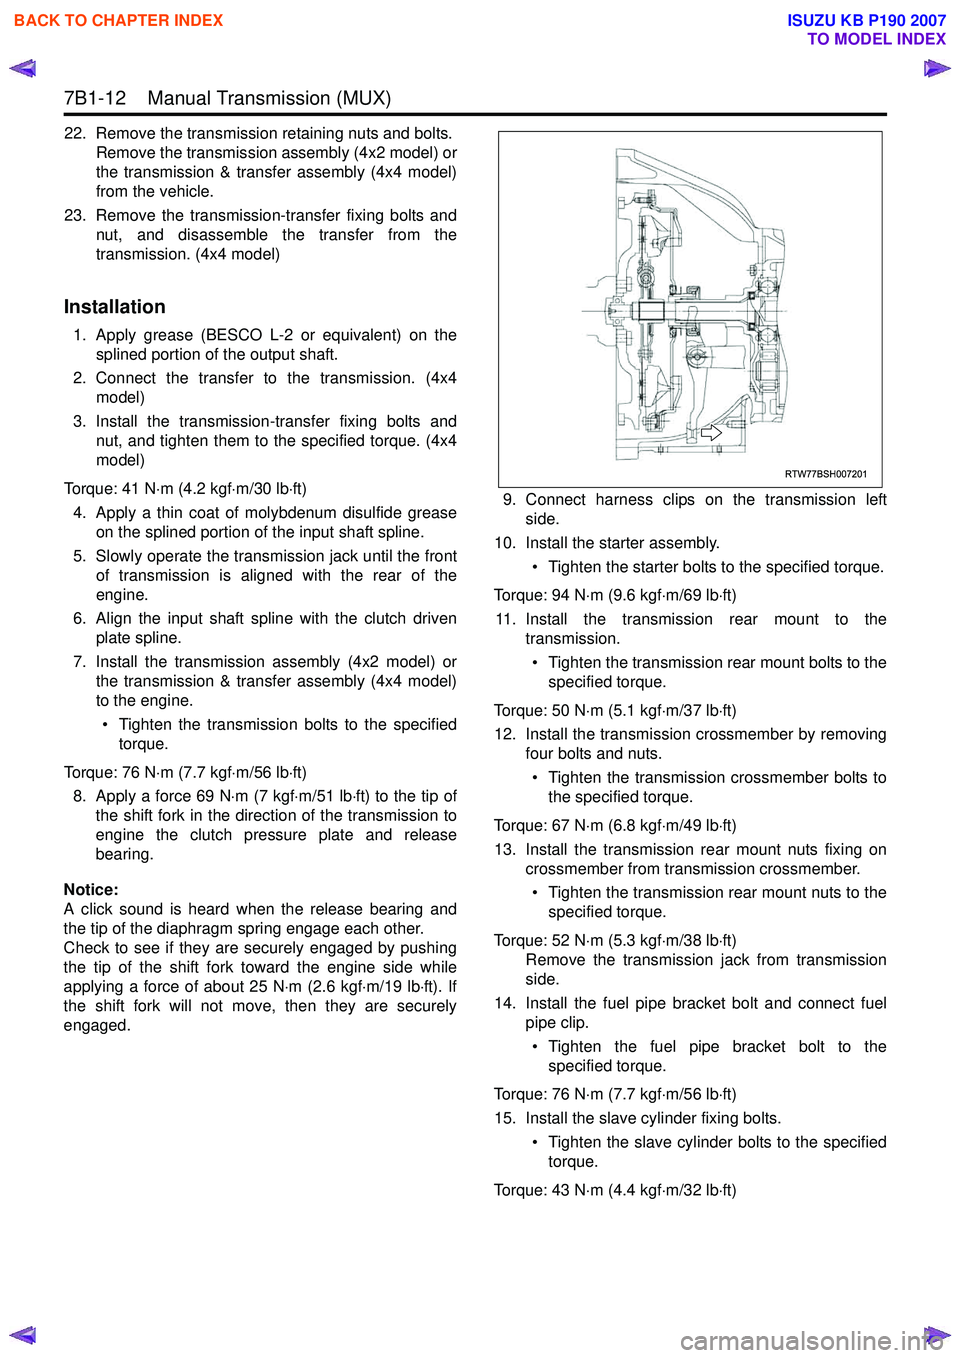
7. Install the transmission assembly (4x2 model) or the transmission & transfer assembly (4x4 model)
to the engine.
• Tighten the transmission bolts to the specified torque.
Torque: 76 N ⋅m (7.7 kgf ⋅m/56 lb ⋅ft)
8. Apply a force 69 N ⋅m (7 kgf ⋅m/51 lb ⋅ft) to the tip of
the shift fork in the direction of the transmission to
engine the clutch pressure plate and release
bearing.
Notice:
A click sound is heard when the release bearing and
the tip of the diaphragm spring engage each other.
Check to see if they are securely engaged by pushing
the tip of the shift fork toward the engine side while
applying a force of about 25 N ⋅m (2.6 kgf ⋅m/19 lb ⋅ft). If
the shift fork will not move, then they are securely
engaged. 9. Connect harness clips on the transmission left
side.
10. Install the starter assembly.
• Tighten the starter bolts to the specified torque.
Torque: 94 N ⋅m (9.6 kgf ⋅m/69 lb ⋅ft)
11. Install the transmission rear mount to the transmission.
• Tighten the transmission rear mount bolts to the specified torque.
Torque: 50 N ⋅m (5.1 kgf ⋅m/37 lb ⋅ft)
12. Install the transmission crossmember by removing four bolts and nuts.
• Tighten the transmission crossmember bolts to the specified torque.
Torque: 67 N ⋅m (6.8 kgf ⋅m/49 lb ⋅ft)
13. Install the transmission rear mount nuts fixing on crossmember from transmission crossmember.
• Tighten the transmission rear mount nuts to the specified torque.
Torque: 52 N ⋅m (5.3 kgf ⋅m/38 lb ⋅ft)
Remove the transmission jack from transmission
side.
14. Install the fuel pipe bracket bolt and connect fuel pipe clip.
• Tighten the fuel pipe bracket bolt to the specified torque.
Torque: 76 N ⋅m (7.7 kgf ⋅m/56 lb ⋅ft)
15. Install the slave cylinder fixing bolts. • Tighten the slave cylinder bolts to the specifiedtorque.
Torque: 43 N ⋅m (4.4 kgf ⋅m/32 lb ⋅ft)
RTW77BSH007201
BACK TO CHAPTER INDEX
TO MODEL INDEX
ISUZU KB P190 2007
Page 4743 of 6020

7B1-24 Manual Transmission (MUX)
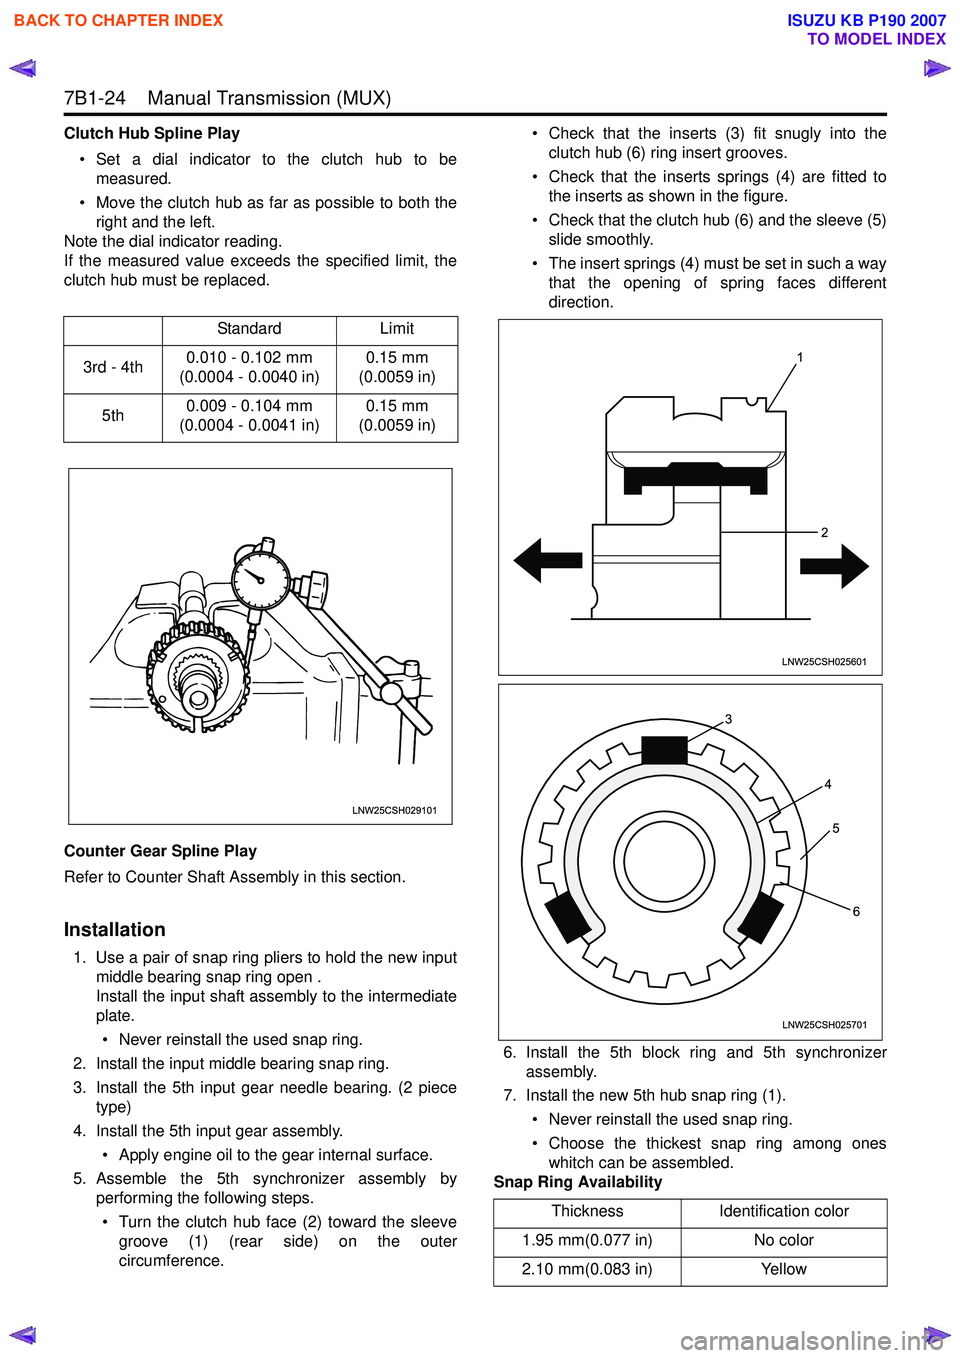
Clutch Hub Spline Play• Set a dial indicator to the clutch hub to be measured.
• Move the clutch hub as far as possible to both the right and the left.
Note the dial indicator reading.
If the measured value exceeds the specified limit, the
clutch hub must be replaced.
Counter Gear Spline Play
Refer to Counter Shaft Assembly in this section.
Installation
1. Use a pair of snap ring pliers to hold the new input middle bearing snap ring open .
Install the input shaft assembly to the intermediate
plate.
• Never reinstall the used snap ring.
2. Install the input middle bearing snap ring.
3. Install the 5th input gear needle bearing. (2 piece type)
4. Install the 5th input gear assembly. • Apply engine oil to the gear internal surface.
5. Assemble the 5th synchronizer assembly by performing the following steps.
• Turn the clutch hub face (2) toward the sleeve groove (1) (rear side) on the outer
circumference. • Check that the inserts (3) fit snugly into the
clutch hub (6) ring insert grooves.
• Check that the inserts springs (4) are fitted to the inserts as shown in the figure.
• Check that the clutch hub (6) and the sleeve (5) slide smoothly.
• The insert springs (4) must be set in such a way that the opening of spring faces different
direction.
6. Install the 5th block ring and 5th synchronizer assembly.
7. Install the new 5th hub snap ring (1).
• Never reinstall the used snap ring.
• Choose the thickest snap ring among ones whitch can be assembled.
Snap Ring Availability
Standard
Limit
3rd - 4th 0.010 - 0.102 mm
(0.0004 - 0.0040 in) 0.15 mm
(0.0059 in)
5th 0.009 - 0.104 mm
(0.0004 - 0.0041 in) 0.15 mm
(0.0059 in)
LNW25CSH029101
Thickness Identification color
1.95 mm(0.077 in) No color
2.10 mm(0.083 in) Yellow
1
2
LNW25CSH025601
3 45
6
LNW25CSH025701
BACK TO CHAPTER INDEX
TO MODEL INDEX
ISUZU KB P190 2007
Page 4744 of 6020

Manual Transmission (MUX) 7B1-25
8. Install the counter middle roller bearing outer race,counter shaft assembly and 5th counter gear to the
intermediate plate.
• Apply engine oil to the gear internal surface.
9. Install the 3rd counter gear. • Apply engine oil to the gear internal surface.
10. Iinstall the 3rd input gear needle bearing.
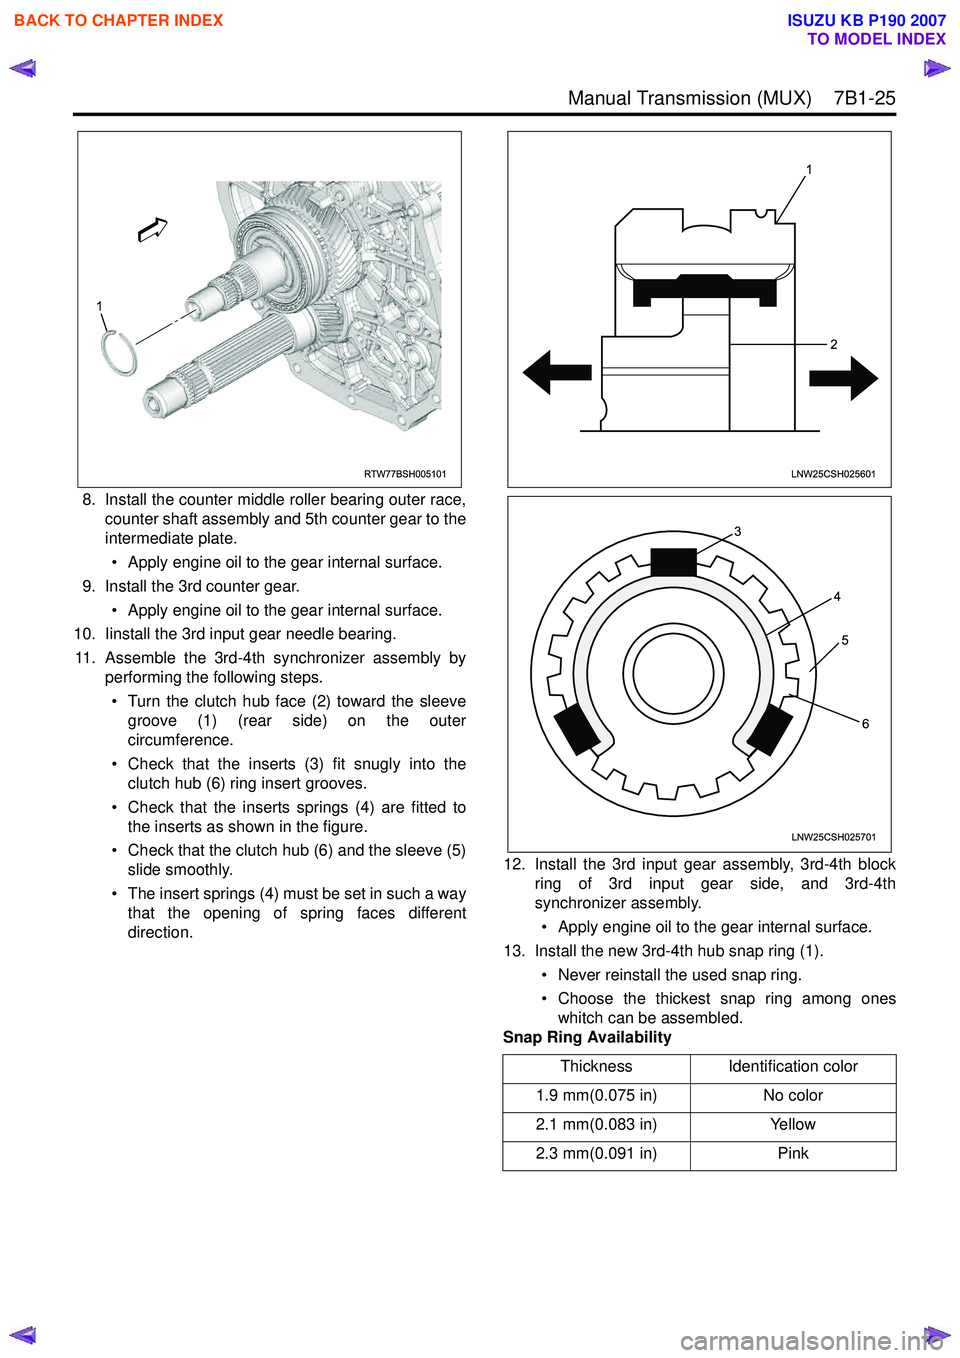
11. Assemble the 3rd-4th synchronizer assembly by performing the following steps.
• Turn the clutch hub face (2) toward the sleeve groove (1) (rear side) on the outer
circumference.
• Check that the inserts (3) fit snugly into the clutch hub (6) ring insert grooves.
• Check that the inserts springs (4) are fitted to the inserts as shown in the figure.
• Check that the clutch hub (6) and the sleeve (5) slide smoothly.
• The insert springs (4) must be set in such a way that the opening of spring faces different
direction. 12. Install the 3rd input gear assembly, 3rd-4th block
ring of 3rd input gear side, and 3rd-4th
synchronizer assembly.
• Apply engine oil to the gear internal surface.
13. Install the new 3rd-4th hub snap ring (1).
• Never reinstall the used snap ring.
• Choose the thickest snap ring among ones whitch can be assembled.
Snap Ring Availability
RTW77BSH005101
1
Thickness Identification color
1.9 mm(0.075 in) No color
2.1 mm(0.083 in) Yellow
2.3 mm(0.091 in) Pink
1
2
LNW25CSH025601
3 45
6
LNW25CSH025701
BACK TO CHAPTER INDEX
TO MODEL INDEX
ISUZU KB P190 2007
Page 4745 of 6020

7B1-26 Manual Transmission (MUX)
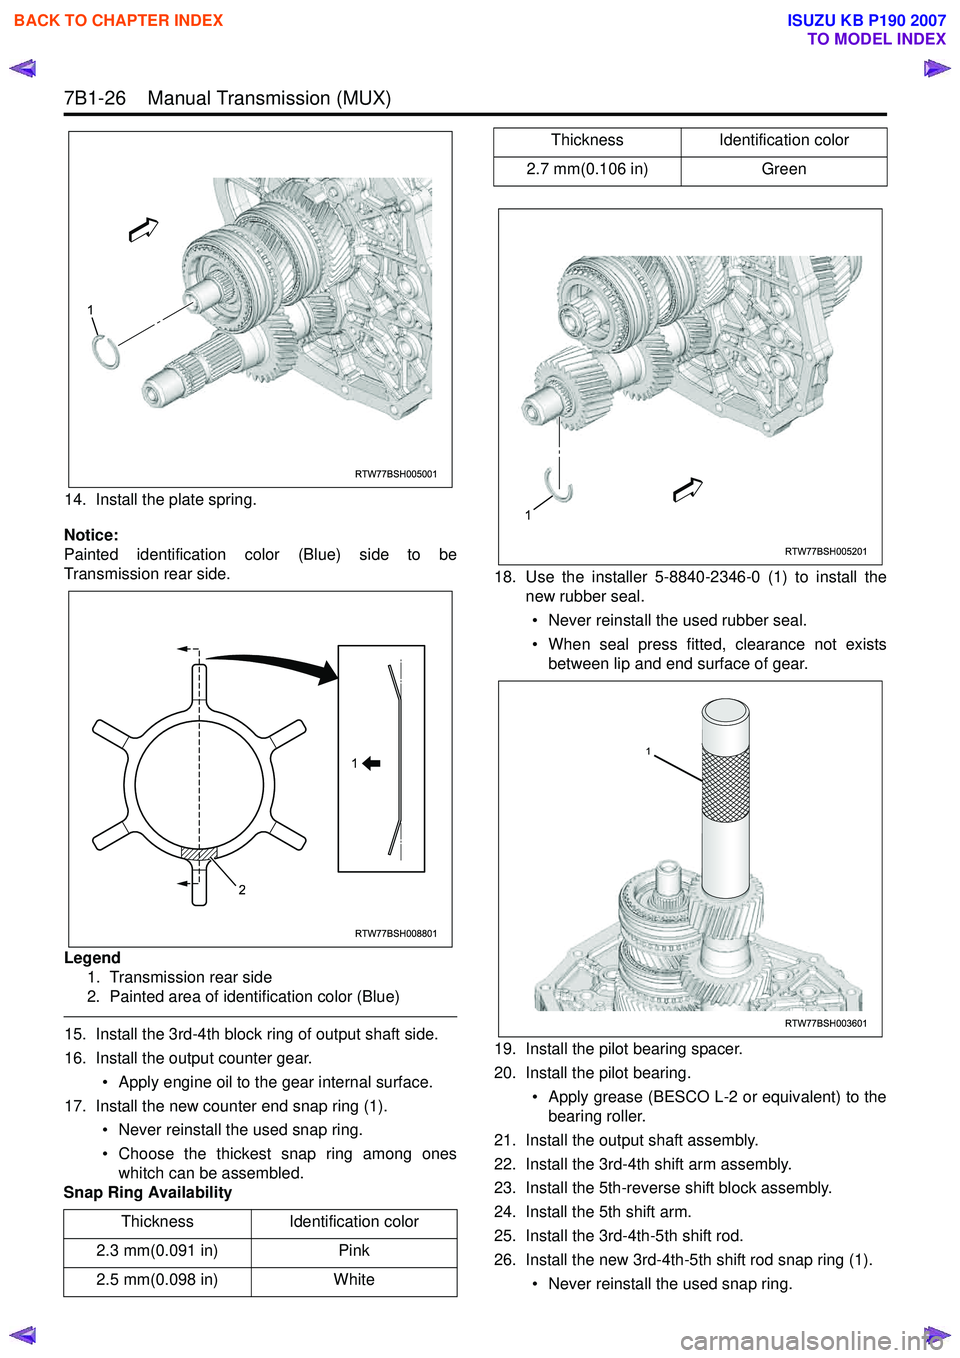
14. Install the plate spring.
Notice:
Painted identification color (Blue) side to be
Transmission rear side.
Legend 1. Transmission rear side
2. Painted area of identification color (Blue)
15. Install the 3rd-4th block ring of output shaft side.
16. Install the output counter gear.
• Apply engine oil to the gear internal surface.
17. Install the new counter end snap ring (1). • Never reinstall the used snap ring.
• Choose the thickest snap ring among ones whitch can be assembled.
Snap Ring Availability 18. Use the installer 5-8840-2346-0 (1) to install the
new rubber seal.
• Never reinstall the used rubber seal.
• When seal press fitted, clearance not exists between lip and end surface of gear.
19. Install the pilot bearing spacer.
20. Install the pilot bearing. • Apply grease (BESCO L-2 or equivalent) to thebearing roller.
21. Install the output shaft assembly.
22. Install the 3rd-4th shift arm assembly.
23. Install the 5th-reverse shift block assembly.
24. Install the 5th shift arm.
25. Install the 3rd-4th-5th shift rod.
26. Install the new 3rd-4th-5th shift rod snap ring (1).
• Never reinstall the used snap ring.
Thickness
Identification color
2.3 mm(0.091 in) Pink
2.5 mm(0.098 in) White
RTW77BSH005001
1
RTW77BSH008801
1
2
2.7 mm(0.106 in) Green
Thickness
Identification color
RTW77BSH005201
1
RTW77BSH003601
1
BACK TO CHAPTER INDEX
TO MODEL INDEX
ISUZU KB P190 2007
Page 4752 of 6020
Manual Transmission (MUX) 7B1-33
63. Install the front cover.• Tighten the front cover bolts to the specifiedtorque.
Torque: 23 N ⋅m (2.3 kgf ⋅m/17 lb ⋅ft)
64. After reassembling the transmission, refill the case with the new specified transmission oil.
a. Install the drain plug with new gasket. • Never reinstall the used gasket.
• Apply engine oil to the new gasket surface.
• Tighten the drain plug to the specified torque.
Torque: 39 N ⋅m (4.0 kgf ⋅m/29 lb ⋅ft)
b. Remove the filler plug with gasket.
c. Refill the case with the new specified transmission oil (BESCO Trans Axle Oil 5W-30
SF) amount 3.0 liters.
d. Install the filler plug with new gasket. • Never reinstall the used gasket.
• Apply engine oil to the new gasket surface.
• Tighten the filler plug to the specified torque.
Torque: 39 N ⋅m (4.0 kgf ⋅m/29 lb ⋅ft)
BACK TO CHAPTER INDEX
TO MODEL INDEX
ISUZU KB P190 2007