Page 1012 of 6020
ENGINE ELECTRICAL 6D – 11
RTW46DSH000301
7. Rotor Assembly
1. Remove the rotor from front cover assembly.
Remove the front cover stator and rectifier.
RTW46DSH000701
8. Front Cover Assembly
1. Remove the front cover bearing retainer screws.
2. Remove the bearing.
RTW46DSH000801
9. Rear rotor bearing
Re-use improper parts.
10. Rectifier 1. Disconnect the stator coil leads between each rectifier by melting the solder connection.
Hold the lead wire between the solder and the rectifier
with a pair of long nose pliers.
This will prevent heat transfer and resultant damage to
the rectifier.
RTW46DSH000401
BACK TO CHAPTER INDEX
TO MODEL INDEX
ISUZU KB P190 2007
Page 1013 of 6020
6D – 12 ENGINE ELECTRICAL
INSPECTION AND REPAIR
Make the necessary adjustments, repairs, and part replacement if excessive wear or damage is discovered during
inspection.
ROTOR ASSEMBLY
1. Inspect the slip ring faces for dirt and pitting. Wipe away any dirt with a clean cloth soaked in
alcohol.
2. Measure the slip ring diameter.
Slip Ring Diameter mm (in)
Standard Limit
RTW06DSH000101
31.6 (1.245) 30.6 (1.183)
If the slip ring diameter is less than the specified limit, the
slip rings must be replaced.
3. Measure the rotor coil resistance.
Rotor Coil Resistance at 20 °C (68 °F) ohms
Standard 3.8
RTW46DSH001001
RTW46DSH001101
4. Check for continuity between the slip rings and the
rotor core or shaft.
If there is continuity, the entire rotor assmbly must be
replaced.
BACK TO CHAPTER INDEX
TO MODEL INDEX
ISUZU KB P190 2007
Page 1014 of 6020

ENGINE ELECTRICAL 6D – 13
STATOR COIL ASSEMBLY
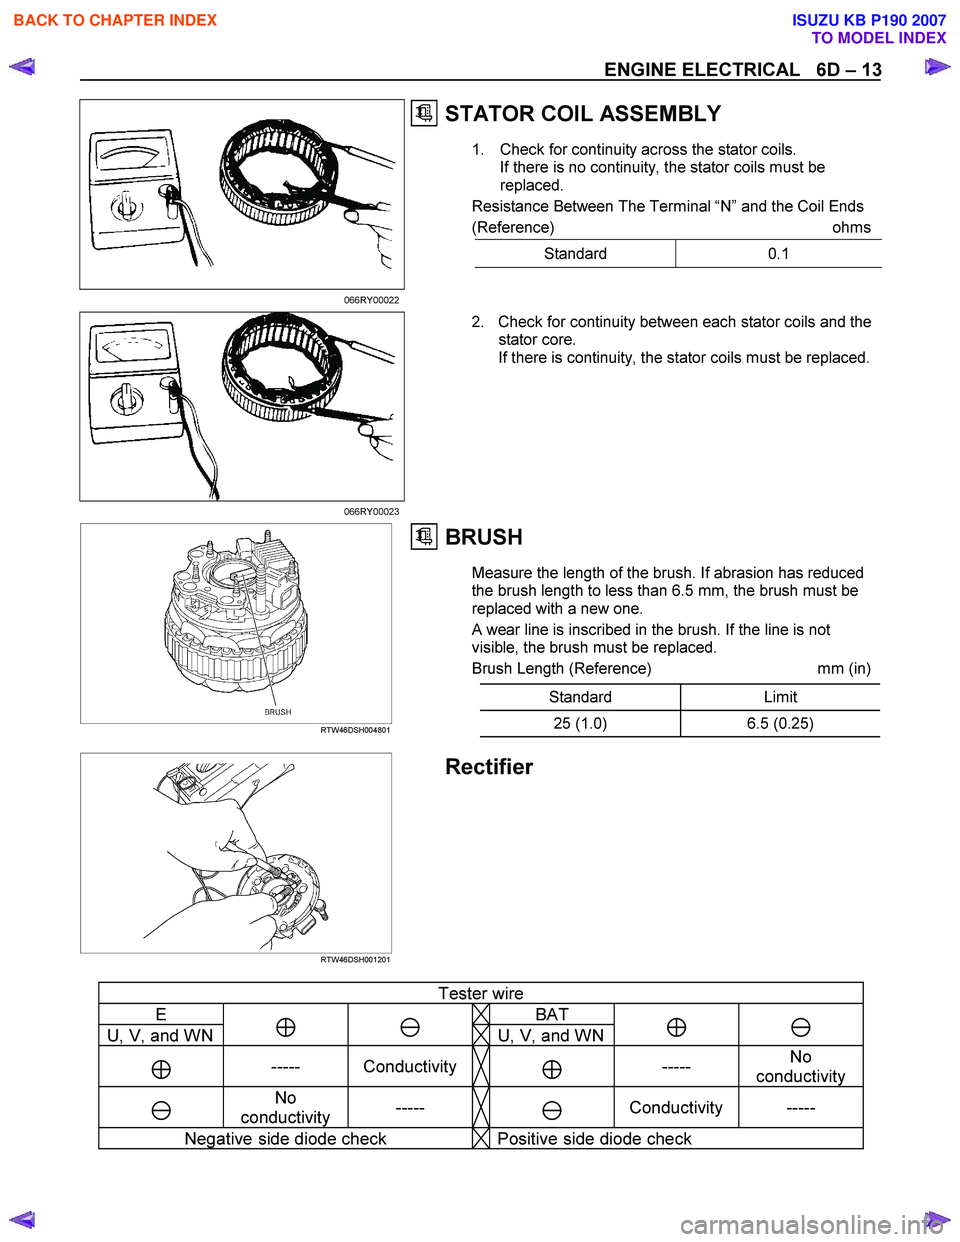
1. Check for continuity across the stator coils.
If there is no continuity, the stator coils must be
replaced.
Resistance Between The Terminal “N ” and the Coil Ends
(Reference) ohms
Standard 0.1
066RY00022 2. Check for continuity between each stator coils and the stator core.
If there is continuity, the stator coils must be replaced.
066RY00023
RTW46DSH004801
BRUSH
Measure the length of the brush. If abrasion has reduced
the brush length to less than 6.5 mm, the brush must be
replaced with a new one.
A wear line is inscribed in the brush. If the line is not
visible, the brush must be replaced.
Brush Length (Reference) mm (in)
Standard Limit
25 (1.0) 6.5 (0.25)
RTW46DSH001201
Rectifier
Tester wire
E BAT
U, V, and WN ⊕ � U, V, and WN⊕ �
⊕ ----- Conductivity ⊕ ----- No
conductivity
�
No
conductivity -----
�
Conductivity -----
Negative side diode check Positive side diode check
BACK TO CHAPTER INDEX
TO MODEL INDEX
ISUZU KB P190 2007
Page 1015 of 6020

6D – 14 ENGINE ELECTRICAL
RECTIFIER ASSEMBLY
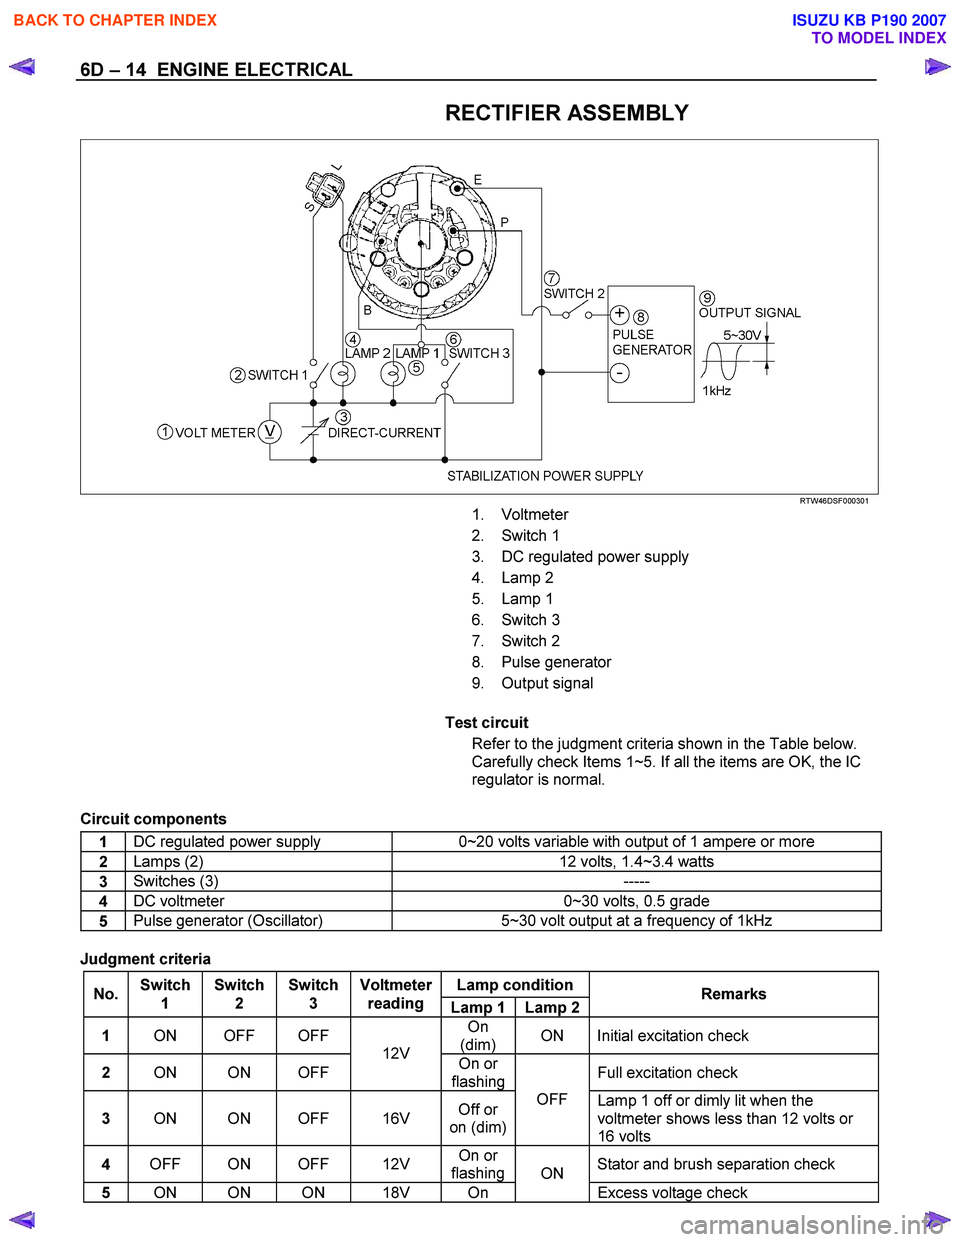
RTW46DSF000301
1. Voltmeter
2. Switch 1
3. DC regulated power supply
4. Lamp 2
5. Lamp 1
6. Switch 3
7. Switch 2
8. Pulse generator
9. Output signal
Test circuit
Refer to the judgment criteria shown in the Table below.
Carefully check Items 1~5. If all the items are OK, the IC
regulator is normal.
Circuit components
1 DC regulated power supply 0~20 volts variable with output of 1 ampere or more
2 Lamps (2)
12 volts, 1.4~3.4 watts
3 Switches (3)
-----
4 DC voltmeter
0~30 volts, 0.5 grade
5 Pulse generator (Oscillator)
5~30 volt output at a frequency of 1kHz
Judgment criteria
Lamp condition
No. Switch
1 Switch
2 Switch
3 Voltmeter
reading Lamp 1 Lamp 2 Remarks
1
ON OFF OFF On
(dim) ON Initial excitation check
2
ON ON OFF 12V
On or
flashing Full excitation check
3
ON ON OFF 16V Off or
on (dim) OFF
Lamp 1 off or dimly lit when the
voltmeter shows less than 12 volts or
16 volts
4 OFF ON OFF 12V On or
flashing Stator and brush separation check
5
ON ON ON 18V On ON
Excess voltage check
BACK TO CHAPTER INDEX
TO MODEL INDEX
ISUZU KB P190 2007
Page 1016 of 6020

ENGINE ELECTRICAL 6D – 15
Oil seal
The oil seal must be replaced with a new one whenever
the alternator is disassembled.
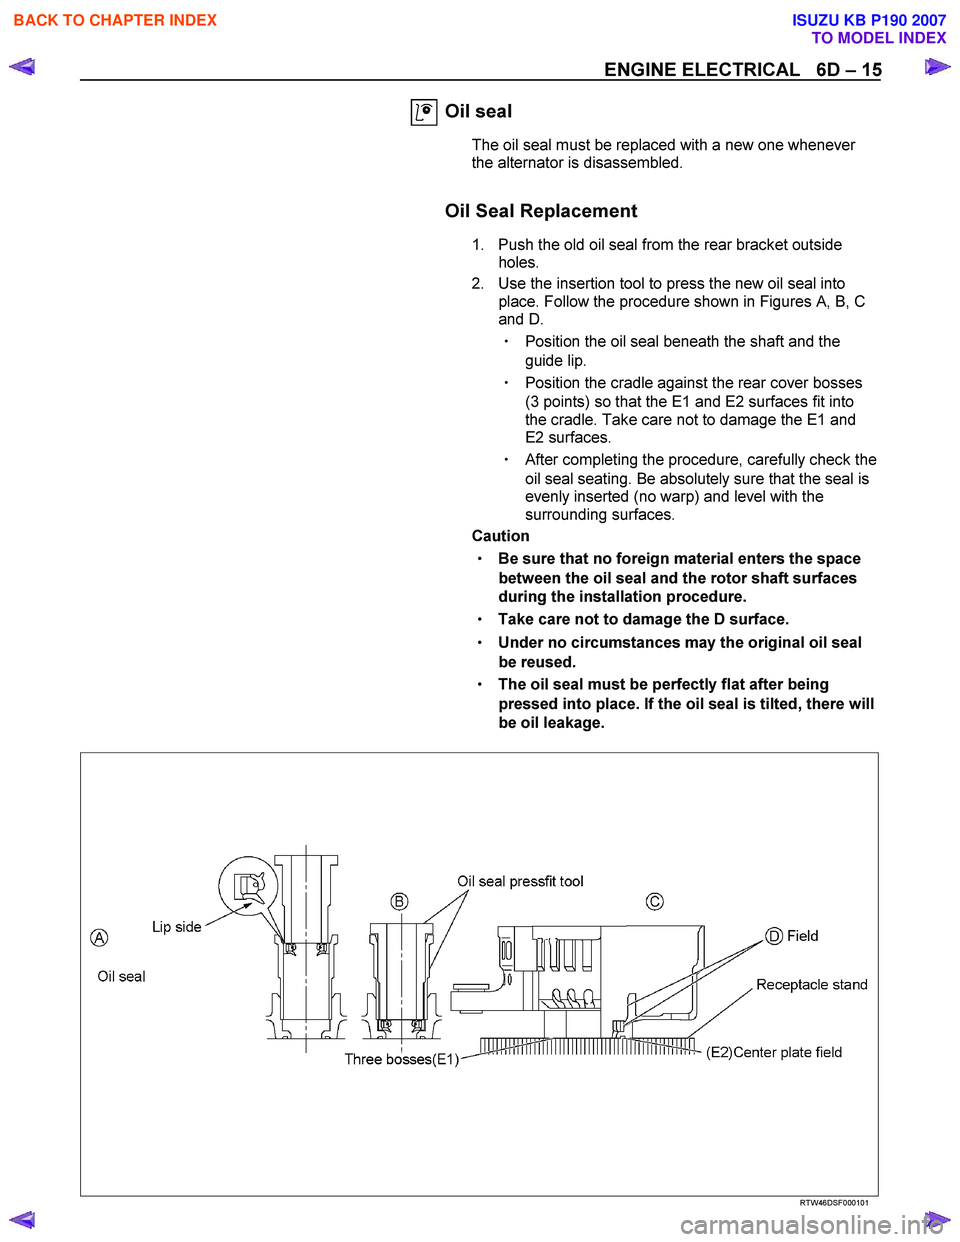
Oil Seal Replacement
1. Push the old oil seal from the rear bracket outside holes.
2. Use the insertion tool to press the new oil seal into place. Follow the procedure shown in Figures A, B, C
and D.
� Position the oil seal beneath the shaft and the
guide lip.
� Position the cradle against the rear cover bosses
(3 points) so that the E1 and E2 surfaces fit into
the cradle. Take care not to damage the E1 and
E2 surfaces.
� After completing the procedure, carefully check the
oil seal seating. Be absolutely sure that the seal is
evenly inserted (no warp) and level with the
surrounding surfaces.
Caution
�
��
�
Be sure that no foreign material enters the space
between the oil seal and the rotor shaft surfaces
during the installation procedure.
�
��
�
Take care not to damage the D surface.
�
��
�
Under no circumstances may the original oil seal
be reused.
�
��
�
The oil seal must be perfectly flat after being
pressed into place. If the oil seal is tilted, there will
be oil leakage.
RTW46DSF000101
BACK TO CHAPTER INDEX
TO MODEL INDEX
ISUZU KB P190 2007
Page 1017 of 6020

6D – 16 ENGINE ELECTRICAL
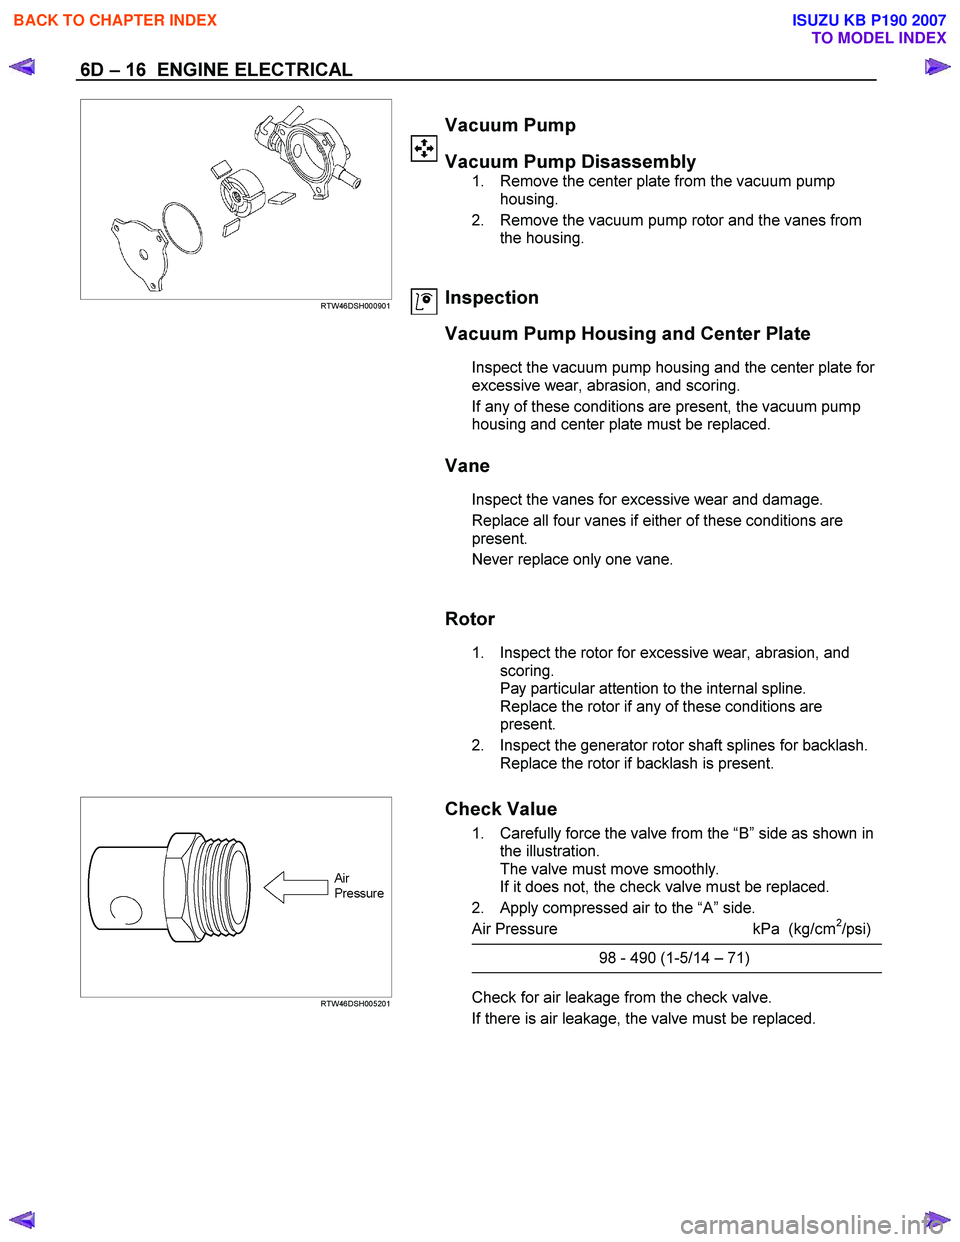
RTW46DSH000901
Vacuum Pump
Vacuum Pump Disassembly
1. Remove the center plate from the vacuum pump housing.
2. Remove the vacuum pump rotor and the vanes from the housing.
Inspection
Vacuum Pump Housing and Center Plate
Inspect the vacuum pump housing and the center plate for
excessive wear, abrasion, and scoring.
If any of these conditions are present, the vacuum pump
housing and center plate must be replaced.
Vane
Inspect the vanes for excessive wear and damage.
Replace all four vanes if either of these conditions are
present.
Never replace only one vane.
Rotor
1. Inspect the rotor for excessive wear, abrasion, and scoring.
Pay particular attention to the internal spline.
Replace the rotor if any of these conditions are
present.
2. Inspect the generator rotor shaft splines for backlash. Replace the rotor if backlash is present.
RTW46DSH005201
Check Value
1. Carefully force the valve from the
“B ” side as shown in
the illustration.
The valve must move smoothly.
If it does not, the check valve must be replaced.
2. Apply compressed air to the “A ” side.
Air Pressure kPa (kg/cm
2/psi)
98 - 490 (1-5/14 – 71)
Check for air leakage from the check valve.
If there is air leakage, the valve must be replaced.
BACK TO CHAPTER INDEX
TO MODEL INDEX
ISUZU KB P190 2007
Page 1018 of 6020
ENGINE ELECTRICAL 6D – 17
RTW46DSH001801
Vacuum Pump Reassembly
1. Install the vanes to the rotor slits.
The rounded side of the vanes must be facing the
rotor housing.
RTW46DSH001901
2. Install the rotor with the concave side facing the center
plate.
RTW46DSH002001
3. Install the center plate to the rotor housing.
Be sure to use a new O-ring.
BACK TO CHAPTER INDEX
TO MODEL INDEX
ISUZU KB P190 2007
Page 1019 of 6020
6D – 18 ENGINE ELECTRICAL
REASSEMBLY
RTW46DLF000501
Reassembly Step
1.
Front cover
2.
Rear rotor bearing
3.
Rotor Assembly
4.
Pulley
5.
Rectifier Assembly
6.
Stator Assembly
7.
Rear cover
8.
B Terminal nuts
9.
Through bolt
10.
O-ring
11.
Vacuum pump
BACK TO CHAPTER INDEX
TO MODEL INDEX
ISUZU KB P190 2007