2007 ISUZU KB P190 cooling
[x] Cancel search: coolingPage 3333 of 6020
Engine Management – V6 – Diagnostics Page 6C1-2–55
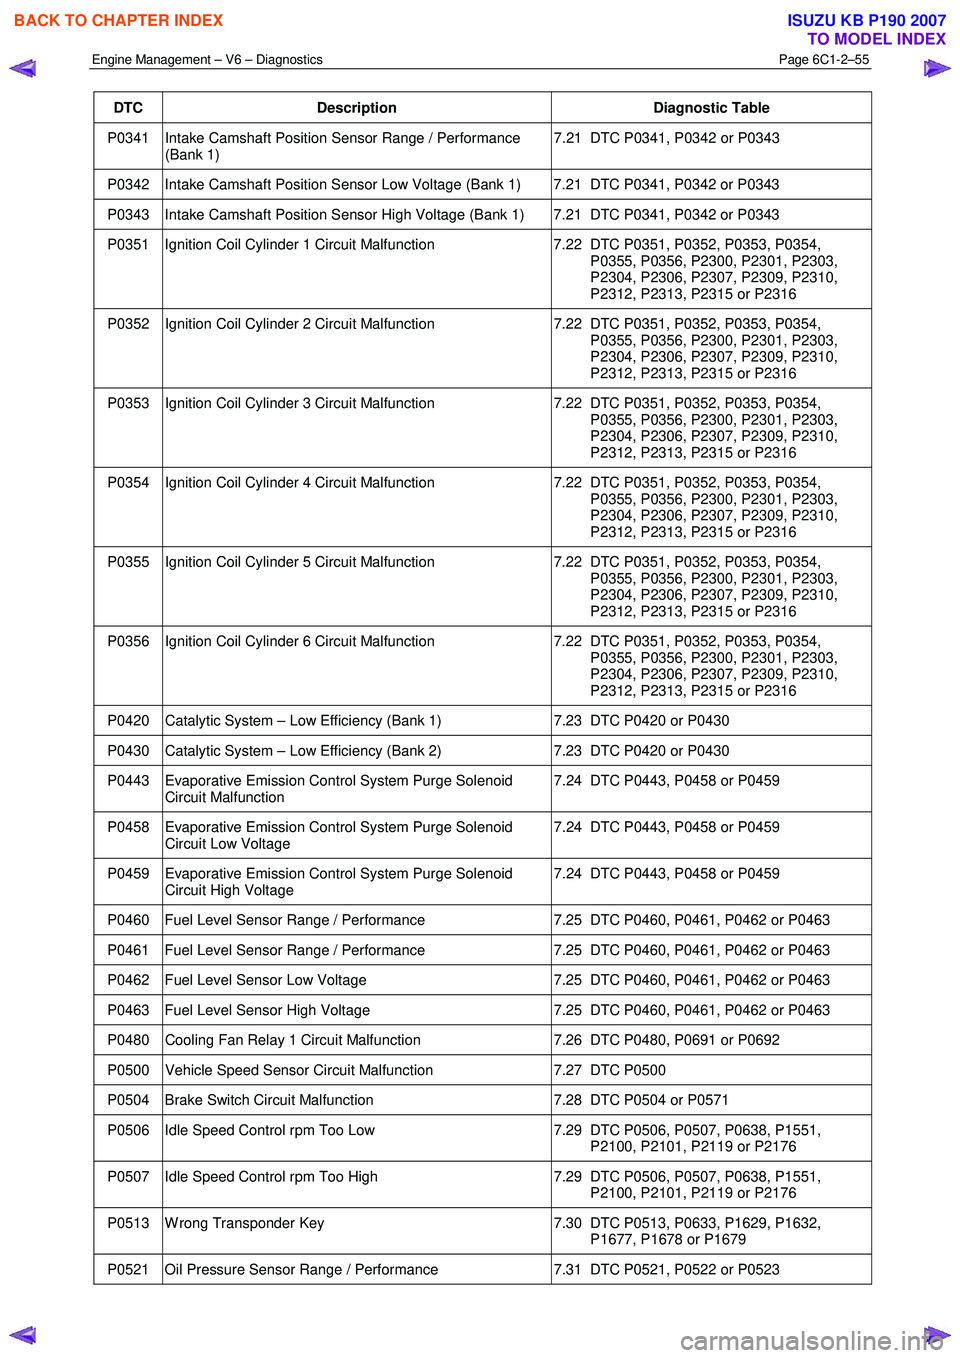
DTC Description Diagnostic Table
P0341 Intake Camshaft Position Sensor Range / Performance
(Bank 1) 7.21 DTC P0341, P0342 or P0343
P0342 Intake Camshaft Position Sensor Low Voltage (Bank 1) 7.21 DTC P0341, P0342 or P0343
P0343 Intake Camshaft Position Sensor High Voltage (Bank 1) 7.21 DTC P0341, P0342 or P0343
P0351 Ignition Coil Cylinder 1 Circuit Malfunction
7.22 DTC P0351, P0352, P0353, P0354,
P0355, P0356, P2300, P2301, P2303,
P2304, P2306, P2307, P2309, P2310,
P2312, P2313, P2315 or P2316
P0352 Ignition Coil Cylinder 2 Circuit Malfunction 7.22 DTC P0351, P0352, P0353, P0354,
P0355, P0356, P2300, P2301, P2303,
P2304, P2306, P2307, P2309, P2310,
P2312, P2313, P2315 or P2316
P0353 Ignition Coil Cylinder 3 Circuit Malfunction 7.22 DTC P0351, P0352, P0353, P0354,
P0355, P0356, P2300, P2301, P2303,
P2304, P2306, P2307, P2309, P2310,
P2312, P2313, P2315 or P2316
P0354 Ignition Coil Cylinder 4 Circuit Malfunction 7.22 DTC P0351, P0352, P0353, P0354,
P0355, P0356, P2300, P2301, P2303,
P2304, P2306, P2307, P2309, P2310,
P2312, P2313, P2315 or P2316
P0355 Ignition Coil Cylinder 5 Circuit Malfunction 7.22 DTC P0351, P0352, P0353, P0354,
P0355, P0356, P2300, P2301, P2303,
P2304, P2306, P2307, P2309, P2310,
P2312, P2313, P2315 or P2316
P0356 Ignition Coil Cylinder 6 Circuit Malfunction 7.22 DTC P0351, P0352, P0353, P0354,
P0355, P0356, P2300, P2301, P2303,
P2304, P2306, P2307, P2309, P2310,
P2312, P2313, P2315 or P2316
P0420 Catalytic System – Low Efficiency (Bank 1) 7.23 DTC P0420 or P0430
P0430 Catalytic System – Low Efficiency (Bank 2) 7.23 DTC P0420 or P0430
P0443 Evaporative Emission Control System Purge Solenoid
Circuit Malfunction 7.24 DTC P0443, P0458 or P0459
P0458 Evaporative Emission Control System Purge Solenoid
Circuit Low Voltage 7.24 DTC P0443, P0458 or P0459
P0459 Evaporative Emission Control System Purge Solenoid
Circuit High Voltage 7.24 DTC P0443, P0458 or P0459
P0460 Fuel Level Sensor Range / Performance
7.25 DTC P0460, P0461, P0462 or P0463
P0461 Fuel Level Sensor Range / Performance 7.25 DTC P0460, P0461, P0462 or P0463
P0462 Fuel Level Sensor Low Voltage 7.25 DTC P0460, P0461, P0462 or P0463
P0463 Fuel Level Sensor High Voltage 7.25 DTC P0460, P0461, P0462 or P0463
P0480 Cooling Fan Relay 1 Circuit Malfunction 7.26 DTC P0480, P0691 or P0692
P0500 Vehicle Speed Sensor Circuit Malfunction 7.27 DTC P0500
P0504 Brake Switch Circuit Malfunction 7.28 DTC P0504 or P0571
P0506 Idle Speed Control rpm Too Low 7.29 DTC P0506, P0507, P0638, P1551,
P2100, P2101, P2119 or P2176
P0507 Idle Speed Control rpm Too High 7.29 DTC P0506, P0507, P0638, P1551,
P2100, P2101, P2119 or P2176
P0513 W rong Transponder Key 7.30 DTC P0513, P0633, P1629, P1632,
P1677, P1678 or P1679
P0521 Oil Pressure Sensor Range / Performance 7.31 DTC P0521, P0522 or P0523
BACK TO CHAPTER INDEX
TO MODEL INDEX
ISUZU KB P190 2007
Page 3334 of 6020
Engine Management – V6 – Diagnostics Page 6C1-2–56
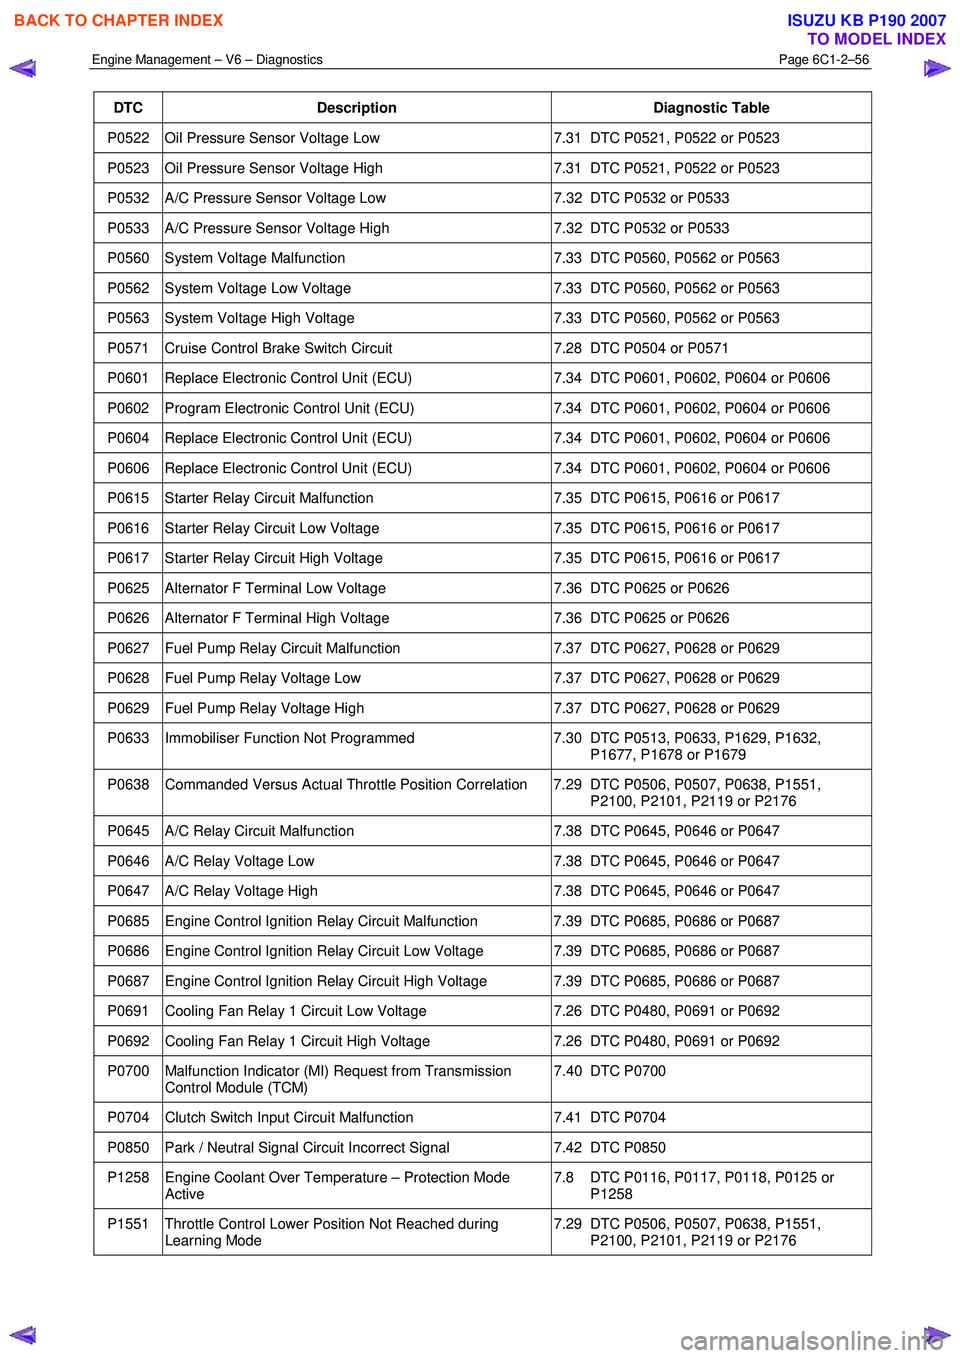
DTC Description Diagnostic Table
P0522 Oil Pressure Sensor Voltage Low 7.31 DTC P0521, P0522 or P0523
P0523 Oil Pressure Sensor Voltage High 7.31 DTC P0521, P0522 or P0523
P0532 A/C Pressure Sensor Voltage Low 7.32 DTC P0532 or P0533
P0533 A/C Pressure Sensor Voltage High 7.32 DTC P0532 or P0533
P0560 System Voltage Malfunction 7.33 DTC P0560, P0562 or P0563
P0562 System Voltage Low Voltage 7.33 DTC P0560, P0562 or P0563
P0563 System Voltage High Voltage 7.33 DTC P0560, P0562 or P0563
P0571 Cruise Control Brake Switch Circuit 7.28 DTC P0504 or P0571
P0601 Replace Electronic Control Unit (ECU) 7.34 DTC P0601, P0602, P0604 or P0606
P0602 Program Electronic Control Unit (ECU) 7.34 DTC P0601, P0602, P0604 or P0606
P0604 Replace Electronic Control Unit (ECU) 7.34 DTC P0601, P0602, P0604 or P0606
P0606 Replace Electronic Control Unit (ECU) 7.34 DTC P0601, P0602, P0604 or P0606
P0615 Starter Relay Circuit Malfunction 7.35 DTC P0615, P0616 or P0617
P0616 Starter Relay Circuit Low Voltage 7.35 DTC P0615, P0616 or P0617
P0617 Starter Relay Circuit High Voltage 7.35 DTC P0615, P0616 or P0617
P0625 Alternator F Terminal Low Voltage 7.36 DTC P0625 or P0626
P0626 Alternator F Terminal High Voltage 7.36 DTC P0625 or P0626
P0627 Fuel Pump Relay Circuit Malfunction 7.37 DTC P0627, P0628 or P0629
P0628 Fuel Pump Relay Voltage Low 7.37 DTC P0627, P0628 or P0629
P0629 Fuel Pump Relay Voltage High 7.37 DTC P0627, P0628 or P0629
P0633 Immobiliser Function Not Programmed 7.30 DTC P0513, P0633, P1629, P1632,
P1677, P1678 or P1679
P0638 Commanded Versus Actual Throttle Position Correlation 7.29 DTC P0506, P0507, P0638, P1551, P2100, P2101, P2119 or P2176
P0645 A/C Relay Circuit Malfunction 7.38 DTC P0645, P0646 or P0647
P0646 A/C Relay Voltage Low 7.38 DTC P0645, P0646 or P0647
P0647 A/C Relay Voltage High 7.38 DTC P0645, P0646 or P0647
P0685 Engine Control Ignition Relay Circuit Malfunction 7.39 DTC P0685, P0686 or P0687
P0686 Engine Control Ignition Relay Circuit Low Voltage 7.39 DTC P0685, P0686 or P0687
P0687 Engine Control Ignition Relay Circuit High Voltage 7.39 DTC P0685, P0686 or P0687
P0691 Cooling Fan Relay 1 Circuit Low Voltage 7.26 DTC P0480, P0691 or P0692
P0692 Cooling Fan Relay 1 Circuit High Voltage 7.26 DTC P0480, P0691 or P0692
P0700 Malfunction Indicator (MI) Request from Transmission
Control Module (TCM) 7.40 DTC P0700
P0704 Clutch Switch Input Circuit Malfunction
7.41 DTC P0704
P0850 Park / Neutral Signal Circuit Incorrect Signal 7.42 DTC P0850
P1258 Engine Coolant Over Temperature – Protection Mode
Active 7.8 DTC P0116, P0117, P0118, P0125 or
P1258
P1551 Throttle Control Lower Position Not Reached during Learning Mode 7.29 DTC P0506, P0507, P0638, P1551,
P2100, P2101, P2119 or P2176
BACK TO CHAPTER INDEX
TO MODEL INDEX
ISUZU KB P190 2007
Page 3354 of 6020
Engine Management – V6 – Diagnostics Page 6C1-2–76
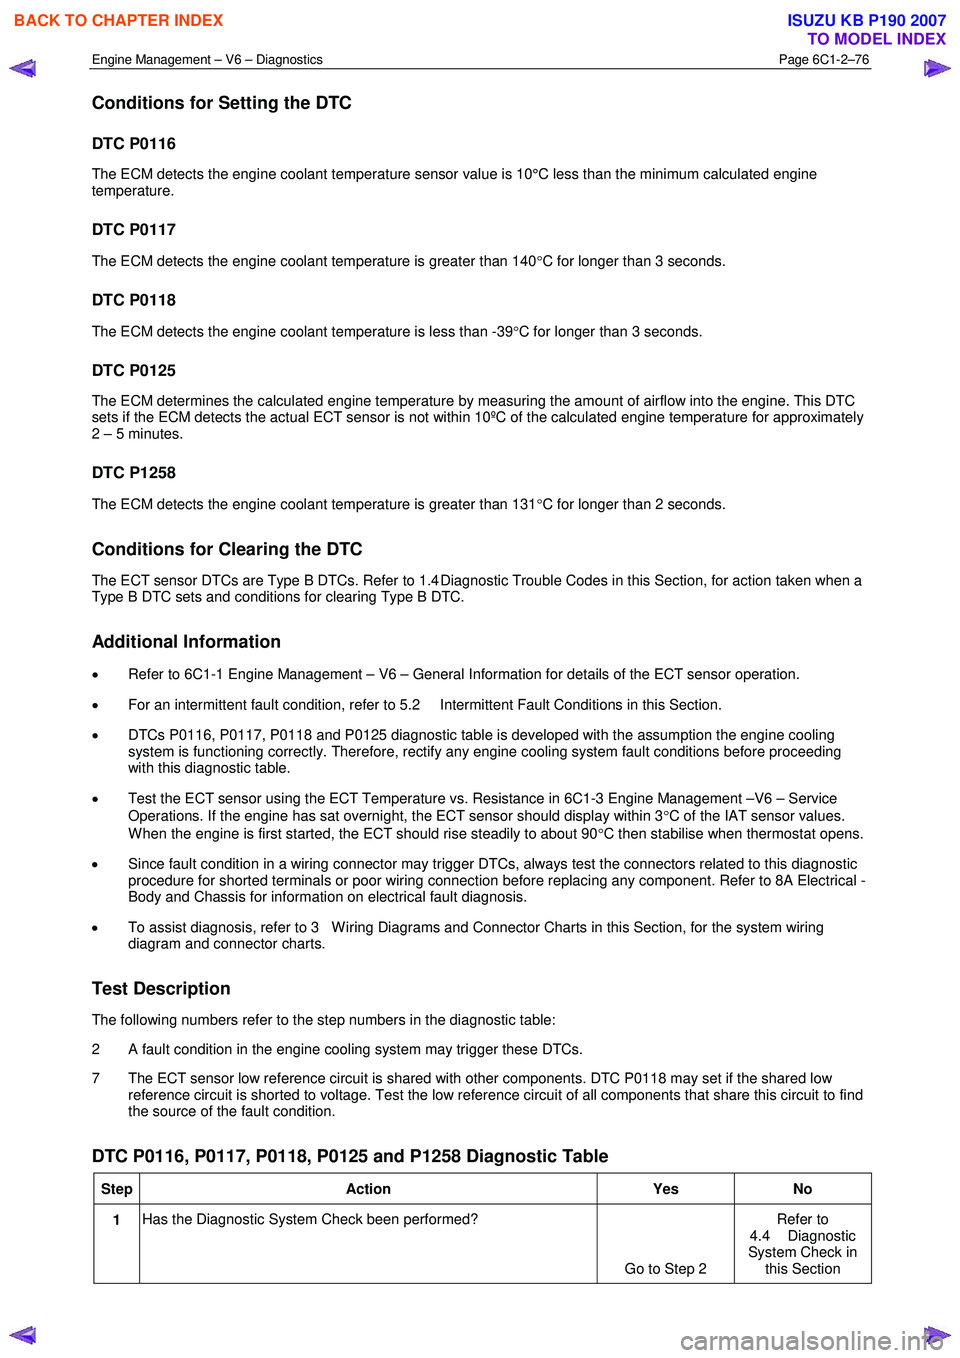
Conditions for Setting the DTC
DTC P0116
The ECM detects the engine coolant temperature sensor value is 10°C less than the minimum calculated engine
temperature.
DTC P0117
The ECM detects the engine coolant temperature is greater than 140 °C for longer than 3 seconds.
DTC P0118
The ECM detects the engine coolant temperature is less than -39 °C for longer than 3 seconds.
DTC P0125
The ECM determines the calculated engine temperature by measuring the amount of airflow into the engine. This DTC
sets if the ECM detects the actual ECT sensor is not within 10ºC of the calculated engine temperature for approximately
2 – 5 minutes.
DTC P1258
The ECM detects the engine coolant temperature is greater than 131 °C for longer than 2 seconds.
Conditions for Clearing the DTC
The ECT sensor DTCs are Type B DTCs. Refer to 1.4 Diagnostic Trouble Codes in this Section, for action taken when a
Type B DTC sets and conditions for clearing Type B DTC.
Additional Information
• Refer to 6C1-1 Engine Management – V6 – General Information for details of the ECT sensor operation.
• For an intermittent fault condition, refer to 5.2 Intermittent Fault Conditions in this Section.
• DTCs P0116, P0117, P0118 and P0125 diagnostic table is developed with the assumption the engine cooling
system is functioning correctly. Therefore, rectify any engine cooling system fault conditions before proceeding
with this diagnostic table.
• Test the ECT sensor using the ECT Temperature vs. Resistance in 6C1-3 Engine Management –V6 – Service
Operations. If the engine has sat overnight, the ECT sensor should display within 3 °C of the IAT sensor values.
W hen the engine is first started, the ECT should rise steadily to about 90 °C then stabilise when thermostat opens.
• Since fault condition in a wiring connector may trigger DTCs, always test the connectors related to this diagnostic
procedure for shorted terminals or poor wiring connection before replacing any component. Refer to 8A Electrical -
Body and Chassis for information on electrical fault diagnosis.
• To assist diagnosis, refer to 3 W iring Diagrams and Connector Charts in this Section, for the system wiring
diagram and connector charts.
Test Description
The following numbers refer to the step numbers in the diagnostic table:
2 A fault condition in the engine cooling system may trigger these DTCs.
7 The ECT sensor low reference circuit is shared with other components. DTC P0118 may set if the shared low reference circuit is shorted to voltage. Test the low reference circuit of all components that share this circuit to find
the source of the fault condition.
DTC P0116, P0117, P0118, P0125 and P1258 Diagnostic Table
Step Action Yes No
1 Has the Diagnostic System Check been performed?
Go to Step 2 Refer to
4.4 Diagnostic
System Check in this Section
BACK TO CHAPTER INDEX
TO MODEL INDEX
ISUZU KB P190 2007
Page 3355 of 6020
Engine Management – V6 – Diagnostics Page 6C1-2–77
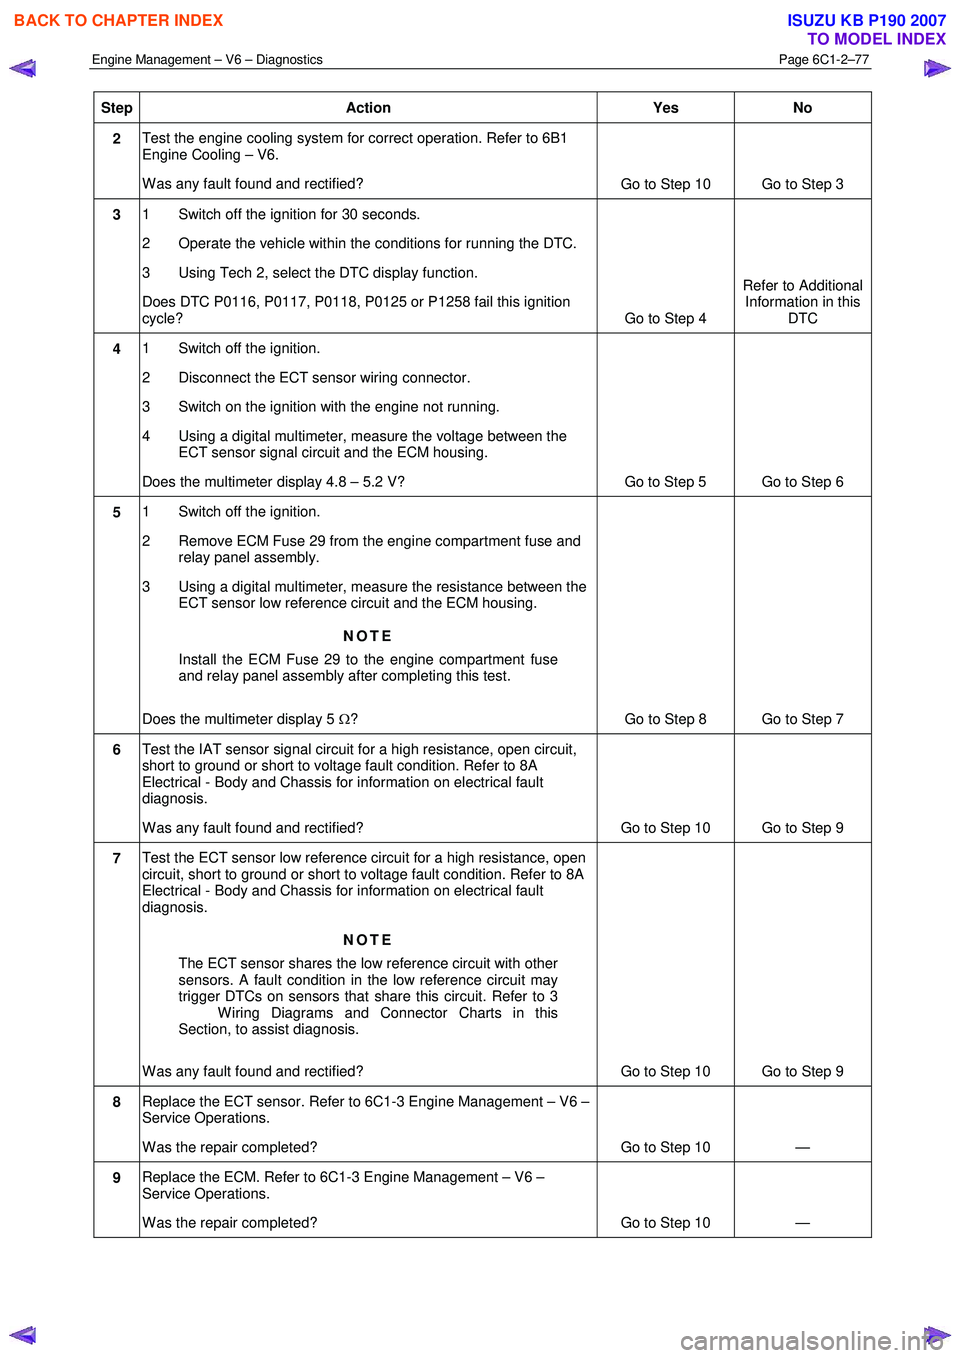
Step Action Yes No
2 Test the engine cooling system for correct operation. Refer to 6B1
Engine Cooling – V6.
W as any fault found and rectified? Go to Step 10 Go to Step 3
3 1 Switch off the ignition for 30 seconds.
2 Operate the vehicle within the conditions for running the DTC.
3 Using Tech 2, select the DTC display function.
Does DTC P0116, P0117, P0118, P0125 or P1258 fail this ignition
cycle? Go to Step 4 Refer to Additional
Information in this DTC
4 1 Switch off the ignition.
2 Disconnect the ECT sensor wiring connector.
3 Switch on the ignition with the engine not running.
4 Using a digital multimeter, measure the voltage between the ECT sensor signal circuit and the ECM housing.
Does the multimeter display 4.8 – 5.2 V? Go to Step 5 Go to Step 6
5 1 Switch off the ignition.
2 Remove ECM Fuse 29 from the engine compartment fuse and relay panel assembly.
3 Using a digital multimeter, measure the resistance between the ECT sensor low reference circuit and the ECM housing.
NOTE
Install the ECM Fuse 29 to the engine compartment fuse
and relay panel assembly after completing this test.
Does the multimeter display 5 Ω? Go to Step 8 Go to Step 7
6 Test the IAT sensor signal circuit for a high resistance, open circuit,
short to ground or short to voltage fault condition. Refer to 8A
Electrical - Body and Chassis for information on electrical fault
diagnosis.
W as any fault found and rectified? Go to Step 10 Go to Step 9
7 Test the ECT sensor low reference circuit for a high resistance, open
circuit, short to ground or short to voltage fault condition. Refer to 8A
Electrical - Body and Chassis for information on electrical fault
diagnosis.
NOTE
The ECT sensor shares the low reference circuit with other
sensors. A fault condition in the low reference circuit may
trigger DTCs on sensors that share this circuit. Refer to 3
W iring Diagrams and Connector Charts in this
Section, to assist diagnosis.
W as any fault found and rectified? Go to Step 10 Go to Step 9
8 Replace the ECT sensor. Refer to 6C1-3 Engine Management – V6 –
Service Operations.
W as the repair completed? Go to Step 10 —
9 Replace the ECM. Refer to 6C1-3 Engine Management – V6 –
Service Operations.
W as the repair completed? Go to Step 10 —
BACK TO CHAPTER INDEX
TO MODEL INDEX
ISUZU KB P190 2007
Page 3369 of 6020
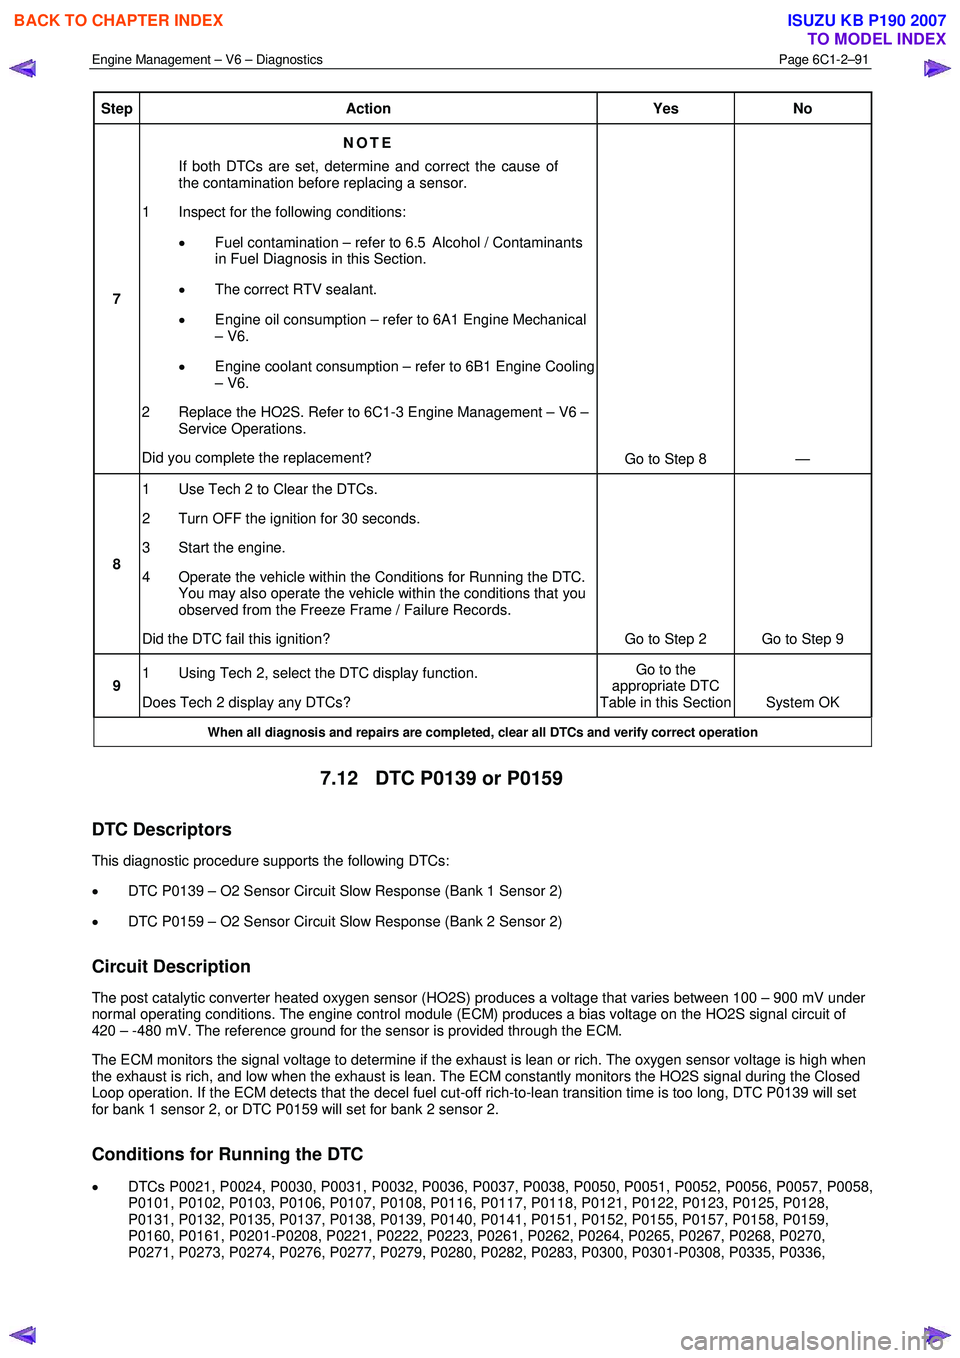
Engine Management – V6 – Diagnostics Page 6C1-2–91
Step Action Yes No
7 NOTE
If both DTCs are set, determine and correct the cause of
the contamination before replacing a sensor.
1 Inspect for the following conditions:
• Fuel contamination – refer to 6.5 Alcohol / Contaminants
in Fuel Diagnosis in this Section.
• The correct RTV sealant.
• Engine oil consumption – refer to 6A1 Engine Mechanical
– V6.
• Engine coolant consumption – refer to 6B1 Engine Cooling
– V6.
2 Replace the HO2S. Refer to 6C1-3 Engine Management – V6 – Service Operations.
Did you complete the replacement? Go to Step 8 —
8 1 Use Tech 2 to Clear the DTCs.
2 Turn OFF the ignition for 30 seconds.
3 Start the engine.
4 Operate the vehicle within the Conditions for Running the DTC. You may also operate the vehicle within the conditions that you
observed from the Freeze Frame / Failure Records.
Did the DTC fail this ignition? Go to Step 2 Go to Step 9
9 1 Using Tech 2, select the DTC display function.
Does Tech 2 display any DTCs? Go to the
appropriate DTC
Table in this Section System OK
When all diagnosis and repairs are completed, clear all DTCs and verify correct operation
7.12 DTC P0139 or P0159
DTC Descriptors
This diagnostic procedure supports the following DTCs:
• DTC P0139 – O2 Sensor Circuit Slow Response (Bank 1 Sensor 2)
• DTC P0159 – O2 Sensor Circuit Slow Response (Bank 2 Sensor 2)
Circuit Description
The post catalytic converter heated oxygen sensor (HO2S) produces a voltage that varies between 100 – 900 mV under
normal operating conditions. The engine control module (ECM) produces a bias voltage on the HO2S signal circuit of
420 – -480 mV. The reference ground for the sensor is provided through the ECM.
The ECM monitors the signal voltage to determine if the exhaust is lean or rich. The oxygen sensor voltage is high when
the exhaust is rich, and low when the exhaust is lean. The ECM constantly monitors the HO2S signal during the Closed
Loop operation. If the ECM detects that the decel fuel cut-off rich-to-lean transition time is too long, DTC P0139 will set
for bank 1 sensor 2, or DTC P0159 will set for bank 2 sensor 2.
Conditions for Running the DTC
• DTCs P0021, P0024, P0030, P0031, P0032, P0036, P0037, P0038, P0050, P0051, P0052, P0056, P0057, P0058,
P0101, P0102, P0103, P0106, P0107, P0108, P0116, P0117, P0118, P0121, P0122, P0123, P0125, P0128,
P0131, P0132, P0135, P0137, P0138, P0139, P0140, P0141, P0151, P0152, P0155, P0157, P0158, P0159,
P0160, P0161, P0201-P0208, P0221, P0222, P0223, P0261, P0262, P0264, P0265, P0267, P0268, P0270,
P0271, P0273, P0274, P0276, P0277, P0279, P0280, P0282, P0283, P0300, P0301-P0308, P0335, P0336,
BACK TO CHAPTER INDEX
TO MODEL INDEX
ISUZU KB P190 2007
Page 3374 of 6020
Engine Management – V6 – Diagnostics Page 6C1-2–96
• Since fault condition in a wiring connector may trigger DTCs, always test the connectors related to this diagnostic
procedure for shorted terminals or poor wiring connection before replacing any component. Refer to 8A Electrical -
Body and Chassis for information on electrical fault diagnosis.
• To assist diagnosis, refer to 3 W iring Diagrams and Connector Charts in this Section, for the system wiring
diagram and connector charts.
Test Description
The following numbers refer to the step numbers in the diagnostic table:
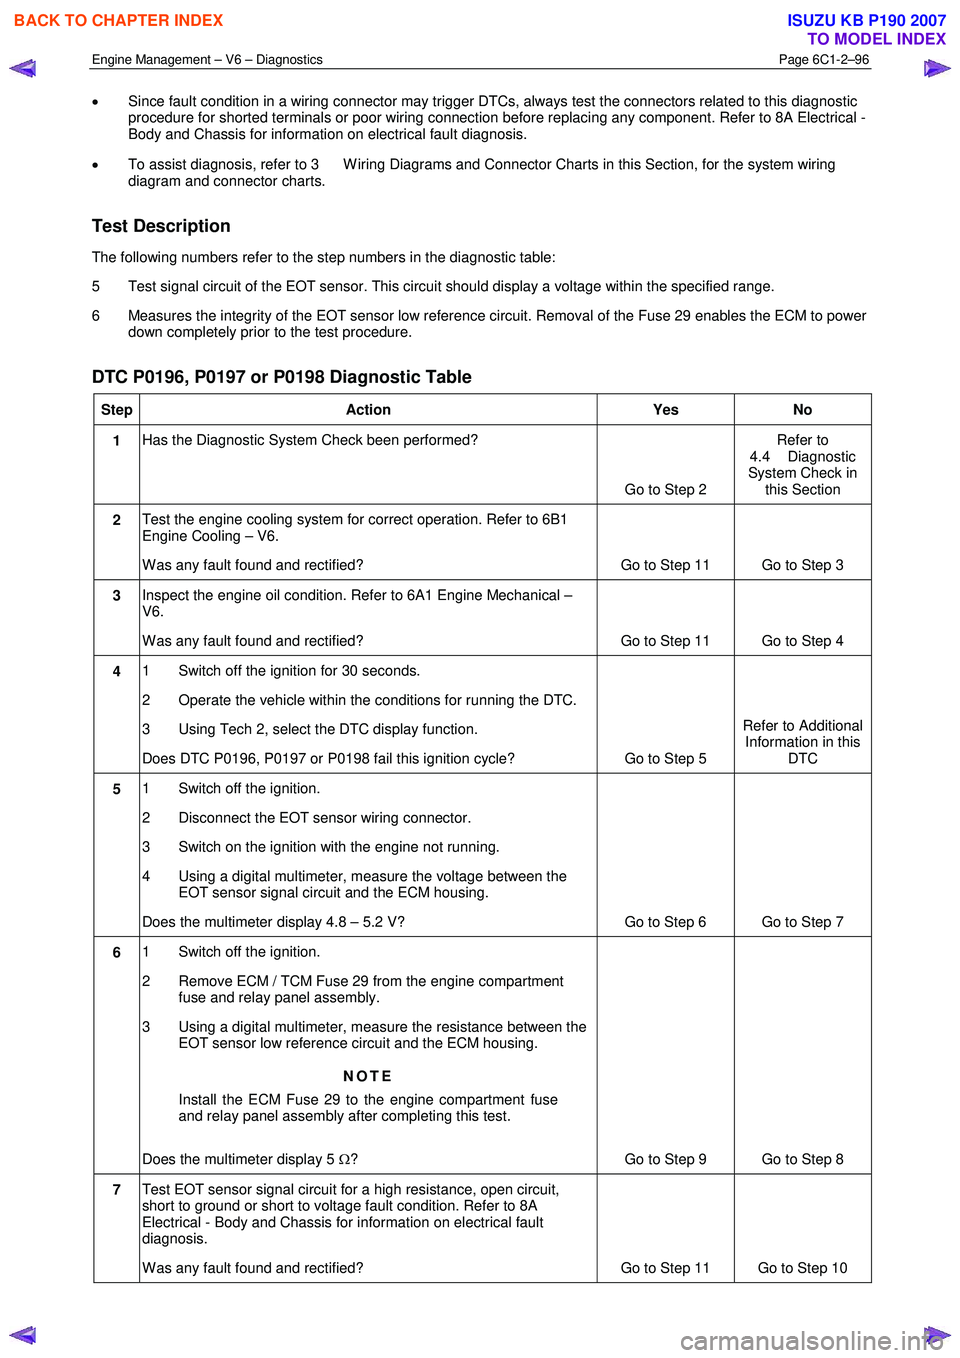
5 Test signal circuit of the EOT sensor. This circuit should display a voltage within the specified range.
6 Measures the integrity of the EOT sensor low reference circuit. Removal of the Fuse 29 enables the ECM to power down completely prior to the test procedure.
DTC P0196, P0197 or P0198 Diagnostic Table
Step Action Yes No
1 Has the Diagnostic System Check been performed?
Go to Step 2 Refer to
4.4 Diagnostic
System Check in this Section
2 Test the engine cooling system for correct operation. Refer to 6B1
Engine Cooling – V6.
W as any fault found and rectified? Go to Step 11 Go to Step 3
3 Inspect the engine oil condition. Refer to 6A1 Engine Mechanical –
V6.
W as any fault found and rectified? Go to Step 11 Go to Step 4
4 1 Switch off the ignition for 30 seconds.
2 Operate the vehicle within the conditions for running the DTC.
3 Using Tech 2, select the DTC display function.
Does DTC P0196, P0197 or P0198 fail this ignition cycle? Go to Step 5 Refer to Additional
Information in this DTC
5 1 Switch off the ignition.
2 Disconnect the EOT sensor wiring connector.
3 Switch on the ignition with the engine not running.
4 Using a digital multimeter, measure the voltage between the EOT sensor signal circuit and the ECM housing.
Does the multimeter display 4.8 – 5.2 V? Go to Step 6 Go to Step 7
6 1 Switch off the ignition.
2 Remove ECM / TCM Fuse 29 from the engine compartment fuse and relay panel assembly.
3 Using a digital multimeter, measure the resistance between the EOT sensor low reference circuit and the ECM housing.
NOTE
Install the ECM Fuse 29 to the engine compartment fuse
and relay panel assembly after completing this test.
Does the multimeter display 5 Ω? Go to Step 9 Go to Step 8
7 Test EOT sensor signal circuit for a high resistance, open circuit,
short to ground or short to voltage fault condition. Refer to 8A
Electrical - Body and Chassis for information on electrical fault
diagnosis.
W as any fault found and rectified? Go to Step 11 Go to Step 10
BACK TO CHAPTER INDEX
TO MODEL INDEX
ISUZU KB P190 2007
Page 3406 of 6020
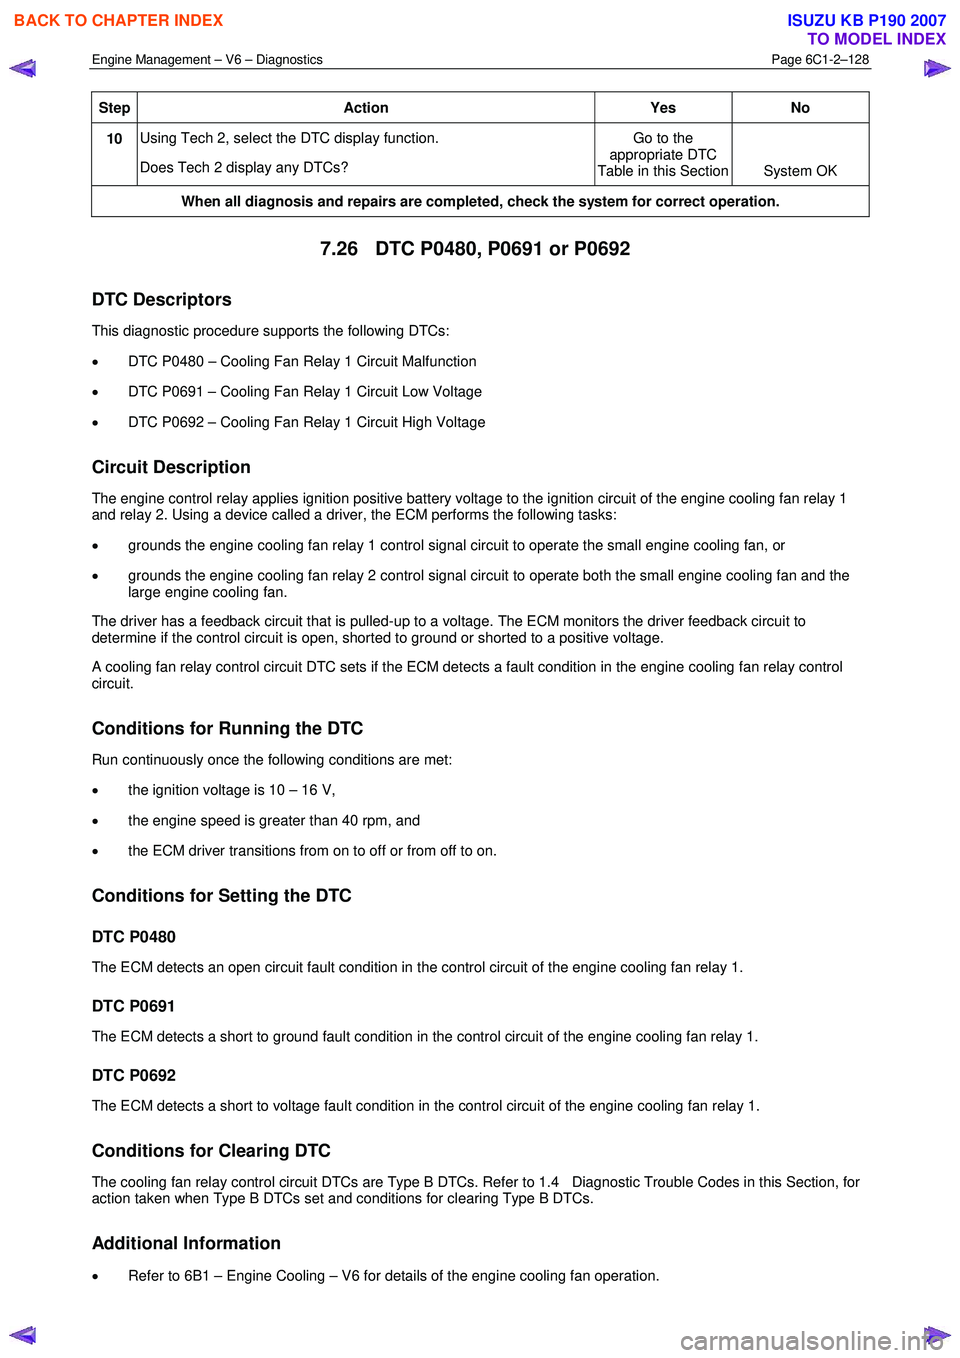
Engine Management – V6 – Diagnostics Page 6C1-2–128
Step Action Yes No
10 Using Tech 2, select the DTC display function.
Does Tech 2 display any DTCs? Go to the
appropriate DTC
Table in this Section System OK
When all diagnosis and repairs are completed, check the system for correct operation.
7.26 DTC P0480, P0691 or P0692
DTC Descriptors
This diagnostic procedure supports the following DTCs:
• DTC P0480 – Cooling Fan Relay 1 Circuit Malfunction
• DTC P0691 – Cooling Fan Relay 1 Circuit Low Voltage
• DTC P0692 – Cooling Fan Relay 1 Circuit High Voltage
Circuit Description
The engine control relay applies ignition positive battery voltage to the ignition circuit of the engine cooling fan relay 1
and relay 2. Using a device called a driver, the ECM performs the following tasks:
• grounds the engine cooling fan relay 1 control signal circuit to operate the small engine cooling fan, or
• grounds the engine cooling fan relay 2 control signal circuit to operate both the small engine cooling fan and the
large engine cooling fan.
The driver has a feedback circuit that is pulled-up to a voltage. The ECM monitors the driver feedback circuit to
determine if the control circuit is open, shorted to ground or shorted to a positive voltage.
A cooling fan relay control circuit DTC sets if the ECM detects a fault condition in the engine cooling fan relay control
circuit.
Conditions for Running the DTC
Run continuously once the following conditions are met:
• the ignition voltage is 10 – 16 V,
• the engine speed is greater than 40 rpm, and
• the ECM driver transitions from on to off or from off to on.
Conditions for Setting the DTC
DTC P0480
The ECM detects an open circuit fault condition in the control circuit of the engine cooling fan relay 1.
DTC P0691
The ECM detects a short to ground fault condition in the control circuit of the engine cooling fan relay 1.
DTC P0692
The ECM detects a short to voltage fault condition in the control circuit of the engine cooling fan relay 1.
Conditions for Clearing DTC
The cooling fan relay control circuit DTCs are Type B DTCs. Refer to 1.4 Diagnostic Trouble Codes in this Section, for
action taken when Type B DTCs set and conditions for clearing Type B DTCs.
Additional Information
• Refer to 6B1 – Engine Cooling – V6 for details of the engine cooling fan operation.
BACK TO CHAPTER INDEX
TO MODEL INDEX
ISUZU KB P190 2007
Page 3407 of 6020
Engine Management – V6 – Diagnostics Page 6C1-2–129
• For an intermittent fault condition, refer to 5.2 Intermittent Fault Conditions in this Section.
• Since fault condition in a wiring connector may trigger DTCs, always test the connectors related to this diagnostic
procedure for shorted terminals or poor wiring connection before replacing any component. Refer to 8A Electrical-
Body and Chassis for information on electrical fault diagnosis.
• To assist diagnosis, refer to 3 W iring Diagrams and Connector Charts in this Section, for the system wiring
diagram and connector charts.
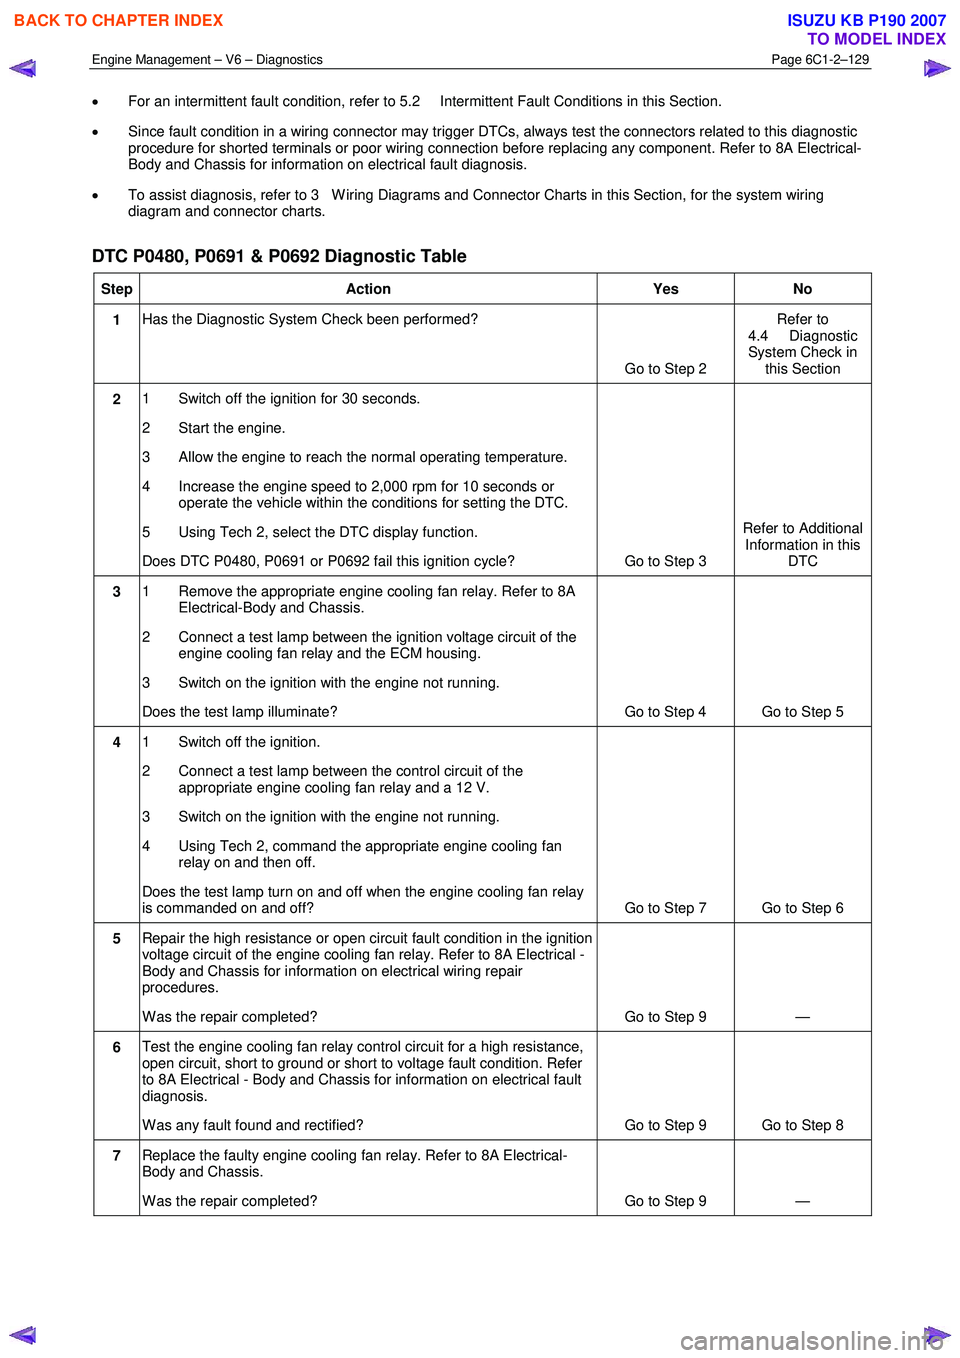
DTC P0480, P0691 & P0692 Diagnostic Table
Step Action Yes No
1 Has the Diagnostic System Check been performed?
Go to Step 2 Refer to
4.4 Diagnostic
System Check in this Section
2 1 Switch off the ignition for 30 seconds.
2 Start the engine.
3 Allow the engine to reach the normal operating temperature.
4 Increase the engine speed to 2,000 rpm for 10 seconds or operate the vehicle within the conditions for setting the DTC.
5 Using Tech 2, select the DTC display function.
Does DTC P0480, P0691 or P0692 fail this ignition cycle? Go to Step 3 Refer to Additional
Information in this DTC
3 1 Remove the appropriate engine cooling fan relay. Refer to 8A
Electrical-Body and Chassis.
2 Connect a test lamp between the ignition voltage circuit of the engine cooling fan relay and the ECM housing.
3 Switch on the ignition with the engine not running.
Does the test lamp illuminate? Go to Step 4 Go to Step 5
4 1 Switch off the ignition.
2 Connect a test lamp between the control circuit of the appropriate engine cooling fan relay and a 12 V.
3 Switch on the ignition with the engine not running.
4 Using Tech 2, command the appropriate engine cooling fan relay on and then off.
Does the test lamp turn on and off when the engine cooling fan relay
is commanded on and off? Go to Step 7 Go to Step 6
5 Repair the high resistance or open circuit fault condition in the ignition
voltage circuit of the engine cooling fan relay. Refer to 8A Electrical -
Body and Chassis for information on electrical wiring repair
procedures.
W as the repair completed? Go to Step 9 —
6 Test the engine cooling fan relay control circuit for a high resistance,
open circuit, short to ground or short to voltage fault condition. Refer
to 8A Electrical - Body and Chassis for information on electrical fault
diagnosis.
W as any fault found and rectified? Go to Step 9 Go to Step 8
7 Replace the faulty engine cooling fan relay. Refer to 8A Electrical-
Body and Chassis.
W as the repair completed? Go to Step 9 —
BACK TO CHAPTER INDEX
TO MODEL INDEX
ISUZU KB P190 2007