Page 3182 of 6020

Engine Cooling – V6 Engine Page 6B1–47
Disconnection of the battery affects certain
vehicle electronic systems. Refer to 1.1
WARNING, CAUTION and NOTES, before
removing the ground lead.
2 Disconnect the battery ground lead. Refer to 8A – Electrical Body & Chassis.
Refer to ‘
‘‘
‘
Environmental Issues ’
’’
’
in 3.1
Service Notes, before draining the coolant.
3 Draining the coolant from the system. Refer to 3.3 Draining and Filling Cooling System in this Section.
4 Raise the front of the vehicle and support on safety stands. Refer to 0A General Information for the location of jacking and support points.
Always wear protective safety glasses when
working with spring type hose clamps.
Failure to do so could result in eye injury.
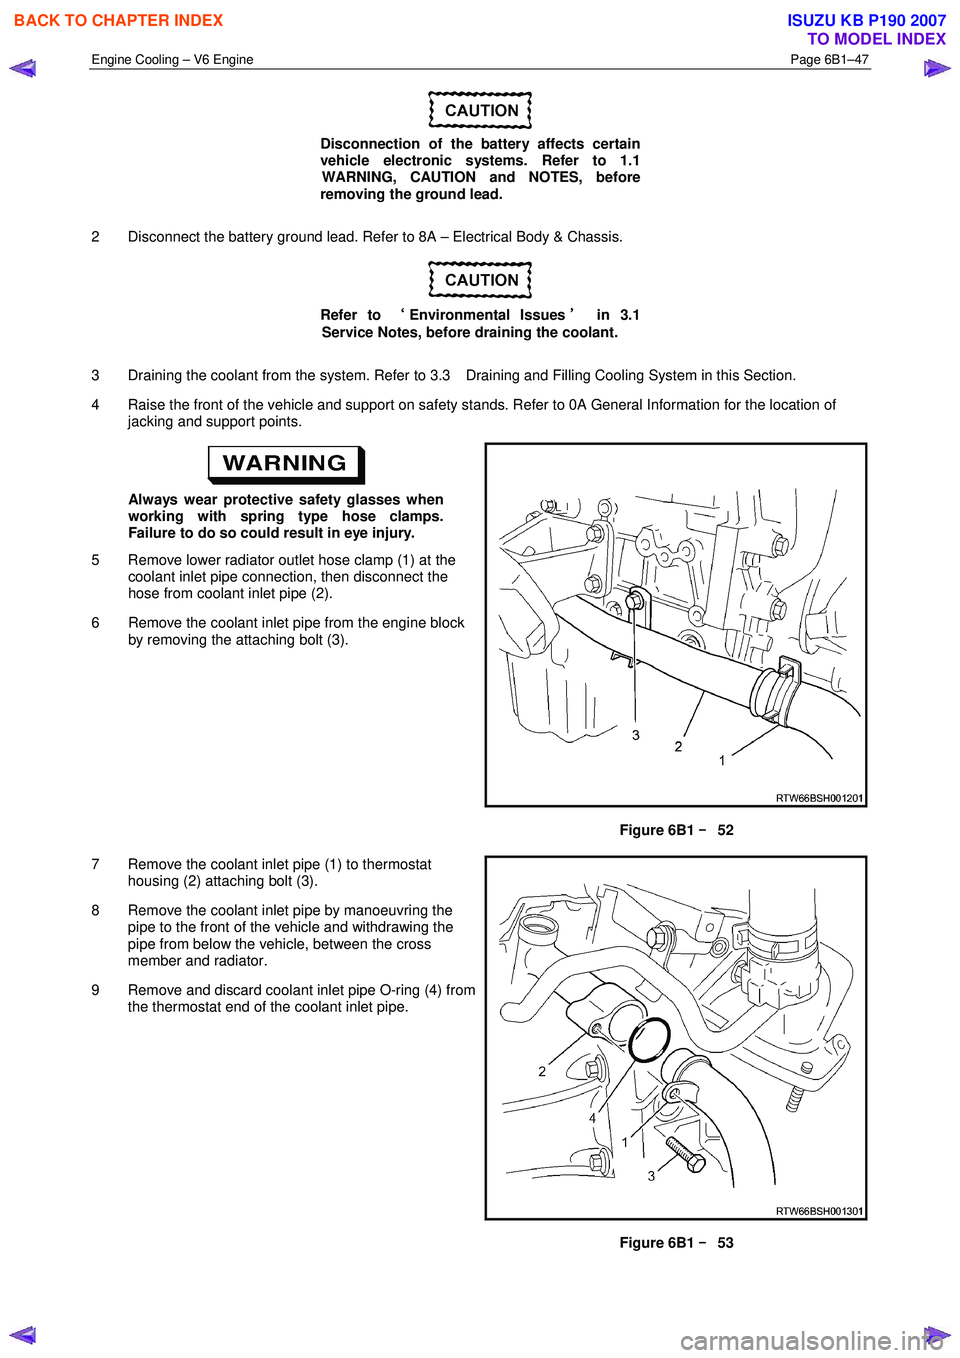
5 Remove lower radiator outlet hose clamp (1) at the coolant inlet pipe connection, then disconnect the
hose from coolant inlet pipe (2).
6 Remove the coolant inlet pipe from the engine block by removing the attaching bolt (3).
Figure 6B1 –
––
–
52
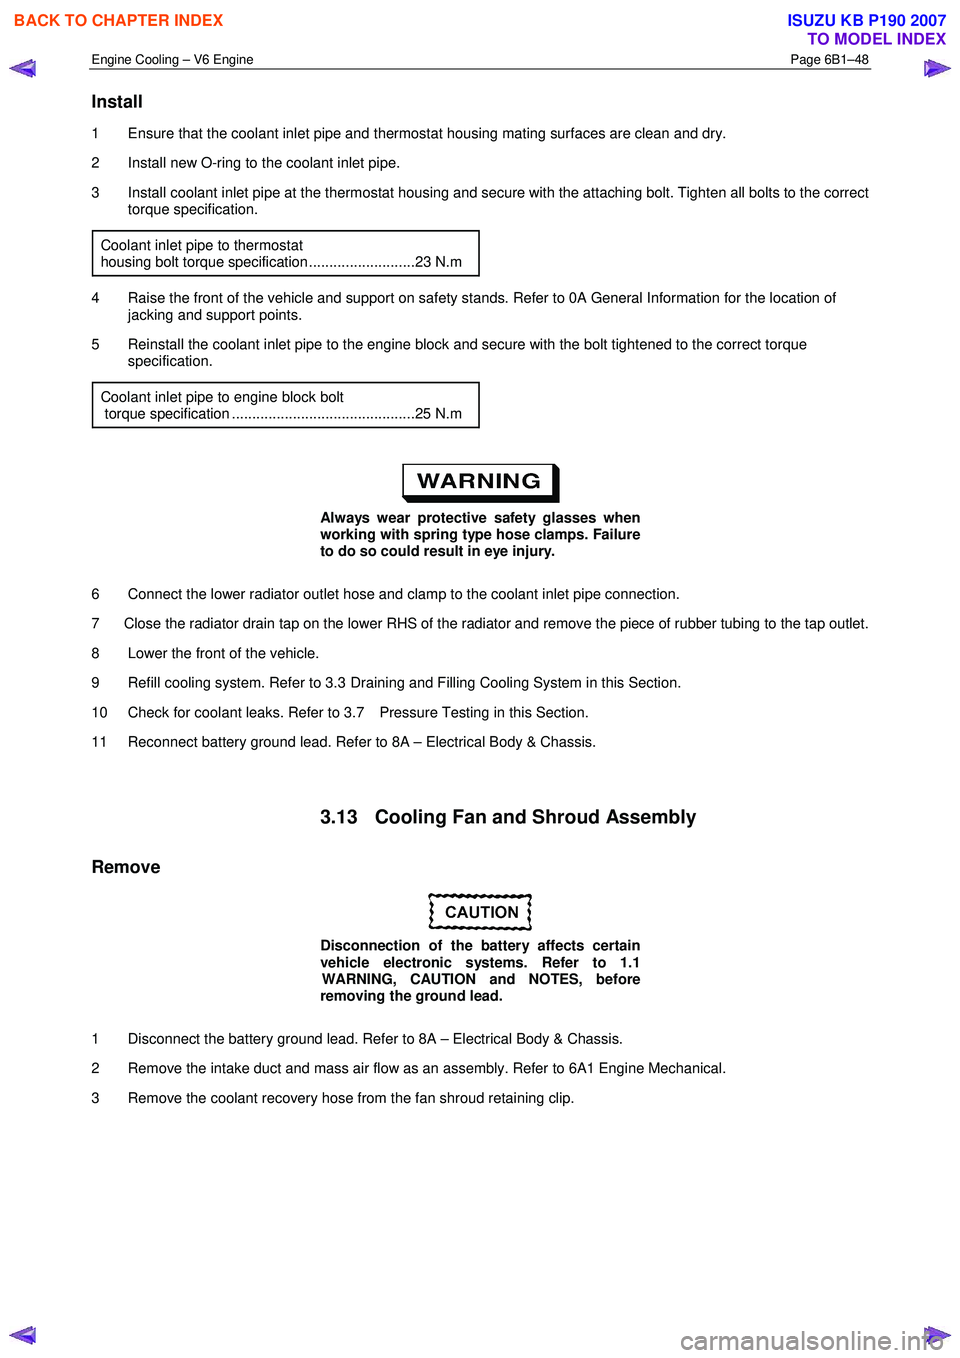
7 Remove the coolant inlet pipe (1) to thermostat housing (2) attaching bolt (3).
8 Remove the coolant inlet pipe by manoeuvring the pipe to the front of the vehicle and withdrawing the
pipe from below the vehicle, between the cross
member and radiator.
9 Remove and discard coolant inlet pipe O-ring (4) from the thermostat end of the coolant inlet pipe.
Figure 6B1 –
––
–
53
BACK TO CHAPTER INDEX
TO MODEL INDEX
ISUZU KB P190 2007
Page 3183 of 6020

Engine Cooling – V6 Engine Page 6B1–48
Install
1 Ensure that the coolant inlet pipe and thermostat housing mating surfaces are clean and dry.
2 Install new O-ring to the coolant inlet pipe.
3 Install coolant inlet pipe at the thermostat housing and secure with the attaching bolt. Tighten all bolts to the correct torque specification.
Coolant inlet pipe to thermostat
housing bolt torque specification ..........................23 N.m
4 Raise the front of the vehicle and support on safety stands. Refer to 0A General Information for the location of jacking and support points.
5 Reinstall the coolant inlet pipe to the engine block and secure with the bolt tightened to the correct torque specification.
Coolant inlet pipe to engine block bolt
torque specification .............................................25 N.m
Always wear protective safety glasses when
working with spring type hose clamps. Failure
to do so could result in eye injury.
6 Connect the lower radiator outlet hose and clamp to the coolant inlet pipe connection.
7 Close the radiator drain tap on the lower RHS of the radiator and remove the piece of rubber tubing to the tap outlet.
8 Lower the front of the vehicle.
9 Refill cooling system. Refer to 3.3 Draining and Filling Cooling System in this Section.
10 Check for coolant leaks. Refer to 3.7 Pressure Testing in this Section.
11 Reconnect battery ground lead. Refer to 8A – Electrical Body & Chassis.
3.13 Cooling Fan and Shroud Assembly
Remove
Disconnection of the battery affects certain
vehicle electronic systems. Refer to 1.1
WARNING, CAUTION and NOTES, before
removing the ground lead.
1 Disconnect the battery ground lead. Refer to 8A – Electrical Body & Chassis.
2 Remove the intake duct and mass air flow as an assembly. Refer to 6A1 Engine Mechanical.
3 Remove the coolant recovery hose from the fan shroud retaining clip.
BACK TO CHAPTER INDEX
TO MODEL INDEX
ISUZU KB P190 2007
Page 3184 of 6020
Engine Cooling – V6 Engine Page 6B1–49
4 Depress tang on main wiring harness to cooling fan
motor wiring harness connector and separate
connector (1).
Figure 6B1 –
––
–
54
7 Remove the attaching bolt (1), from both sides of the radiator fan and shroud assembly.
Figure 6B1 –
––
–
55
BACK TO CHAPTER INDEX
TO MODEL INDEX
ISUZU KB P190 2007
Page 3185 of 6020
Engine Cooling – V6 Engine Page 6B1–50
When removing, transporting or installing the
fan and shroud assembly, do not grasp the
assembly by the fan rings (1) as this may
bend the fan motor shaft and cause fan
vibrations
Figure 6B3 – 56
When handling the fan assembly, always hold
the assembly at the fan shroud (1).
Figure 6B3 – 57
Install
Installation of the cooling fan and shroud assembly is the reverse of removal procedures, noting the following points:
1 Ensure that fan and shroud assembly to radiator attaching clips are fully engaged.
2 Ensure that the top automatic transmission cooling pipe (if fitted) is installed to the integral shroud clip.
3 Check cooling fan operation. Refer to 6C1-2 Engine Management Diagnostics. Also check for correct rotational direction of the cooling fan.
BACK TO CHAPTER INDEX
TO MODEL INDEX
ISUZU KB P190 2007
Page 3186 of 6020

Engine Cooling – V6 Engine Page 6B1–51
Disassemble
1 Remove cooling fan and shroud assembly as previously described.
NOTE
Neither fan is to be separated from its fan motor.
The assembly is carefully balanced during
manufacture and duplicating this balance on
reassembly, is not possible.
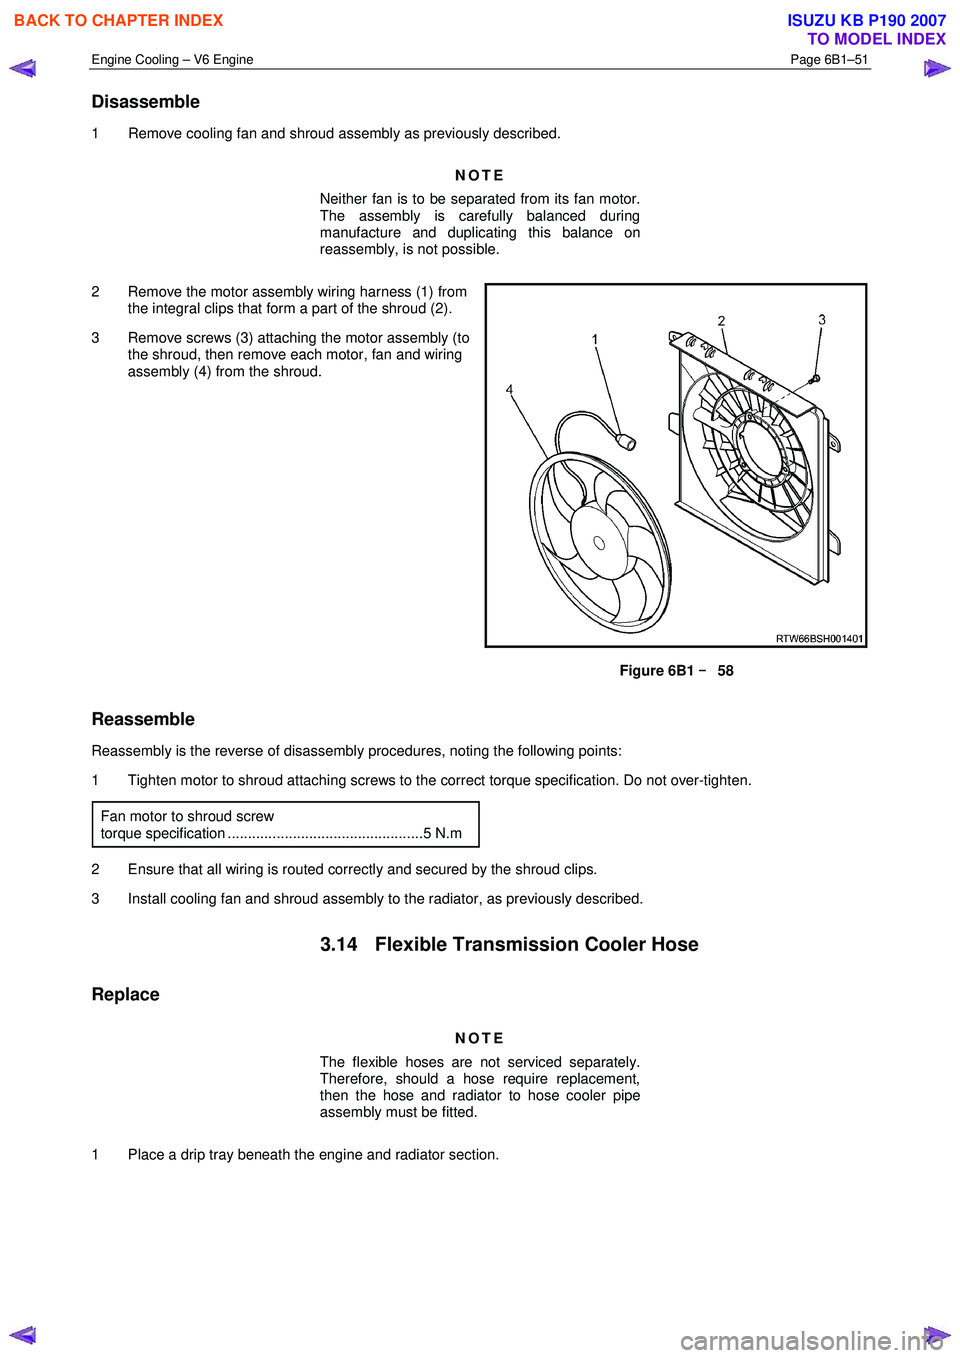
2 Remove the motor assembly wiring harness (1) from the integral clips that form a part of the shroud (2).
3 Remove screws (3) attaching the motor assembly (to the shroud, then remove each motor, fan and wiring
assembly (4) from the shroud.
Figure 6B1 –
––
–
58
Reassemble
Reassembly is the reverse of disassembly procedures, noting the following points:
1 Tighten motor to shroud attaching screws to the correct torque specification. Do not over-tighten.
Fan motor to shroud screw
torque specification ................................................5 N.m
2 Ensure that all wiring is routed correctly and secured by the shroud clips.
3 Install cooling fan and shroud assembly to the radiator, as previously described.
3.14 Flexible Transmission Cooler Hose
Replace
NOTE
The flexible hoses are not serviced separately.
Therefore, should a hose require replacement,
then the hose and radiator to hose cooler pipe
assembly must be fitted.
1 Place a drip tray beneath the engine and radiator section.
BACK TO CHAPTER INDEX
TO MODEL INDEX
ISUZU KB P190 2007
Page 3187 of 6020

Engine Cooling – V6 Engine Page 6B1–52
2 Disconnect the transmission cooler pipes from the
transmission.
• Release the verifier disk (2) by pulling back with
the fingers, then slide back down the cooler line
(1).
• Open the cooler line release tool J-41623-B and
slip over cooler line to be disconnected from the
transmission, above the verifier disk (2), as
shown.
• Slide the release tool along the line to engage
with the quick-connect fitting.
• W hile pushing inwards, rotate the tool about one
sixth of a turn to release the spring clip holding
the line.
• W ith the release tool held in this position, pull
back on the cooler line to release.
• Repeat this process with the remaining line and
quick-connect fitting.
3 Plug both pipe openings and hoses to minimise fluid loss and prevent foreign matter entry.
Figure 6B1 –
––
–
59
4 Disconnect the transmission cooler hose/line assemblies from the radiator quick connect fittings as
follows:
• Pull back the verifier disc (1) from the quick
connect fitting (2) and slide it back along the line.
• Open the release tool, Tool No J-41623-B (3),
slip it over the cooler line to be disconnected
from the radiator, ahead of the verifier disc.
• Slide the release tool along the cooler line and
engage it with the quick-connect fitting (2).
• W hile pushing inwards, rotate the release tool
clockwise, about one sixth of a turn to release
the spring clip holding the cooler line.
• W ith the release tool held in this position, pull
back on the cooler line to release it.
• Plug the openings to prevent fluid loss and/or
contamination.
• Repeat the procedure to remove the remaining
cooler line.
NOTE
If the spring clip and/or O-ring seal in the quick-
connect fitting is damaged during the removal
process, the complete fitting must be replaced.
5 Unclip the outlet cooler line (4) from the radiator fan shroud (5).
Figure 6B1 –
––
–
60
BACK TO CHAPTER INDEX
TO MODEL INDEX
ISUZU KB P190 2007
Page 3188 of 6020

Engine Cooling – V6 Engine Page 6B1–53
NOTE
Should the spring clip or the O-ring seal in the
quick connect fitting be damaged during the line
removal process, then the complete fitting must
be replaced.
Reinstall
1 Remove the plugs installed in the transmission cooler line and hose openings and wipe all exposed parts
with a clean shop rag.
• Smear clean automatic transmission fluid on
each cooler line end, then push into the radiator
quick connect fittings. As a security check gently
pull on the connector to ensure correct
engagement.
• As a security check, push and clip each
verification disc into place over the quick-
connect fittings. If difficulty is experienced,
repeat the installation process until the
verification disc can be clipped into place over
the radiator quick-connect fitting.
If the verifier disc does not clip into place,
the quick-connect fitting is not engaged,
rectify this before proceeding.
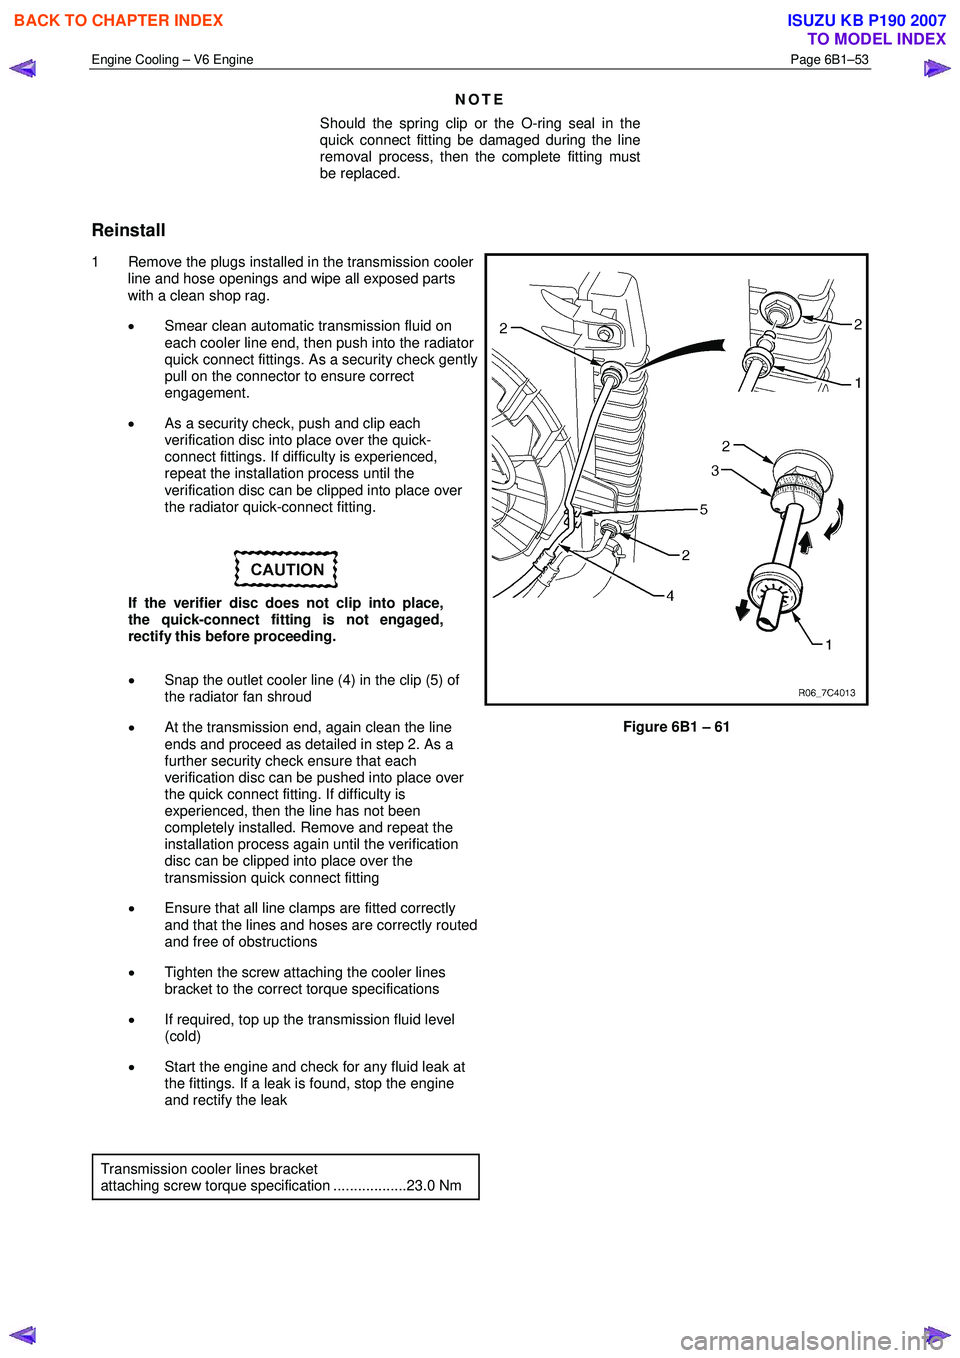
• Snap the outlet cooler line (4) in the clip (5) of
the radiator fan shroud
• At the transmission end, again clean the line
ends and proceed as detailed in step 2. As a
further security check ensure that each
verification disc can be pushed into place over
the quick connect fitting. If difficulty is
experienced, then the line has not been
completely installed. Remove and repeat the
installation process again until the verification
disc can be clipped into place over the
transmission quick connect fitting
• Ensure that all line clamps are fitted correctly
and that the lines and hoses are correctly routed
and free of obstructions
• Tighten the screw attaching the cooler lines
bracket to the correct torque specifications
• If required, top up the transmission fluid level
(cold)
• Start the engine and check for any fluid leak at
the fittings. If a leak is found, stop the engine
and rectify the leak
Figure 6B1 – 61
Transmission cooler lines bracket
attaching screw torque specification ..................23.0 Nm
BACK TO CHAPTER INDEX
TO MODEL INDEX
ISUZU KB P190 2007
Page 3189 of 6020
Engine Cooling – V6 Engine Page 6B1–54
3.15 Radiator
Remove
Refer to 3.1 Service Notes in this Section, for
important safety items.
1 Allow engine to cool to ambient temperature (less than 50 ° C), then remove coolant filler cap.
Disconnection of the battery affects certain
vehicle electronic systems. Refer to 00
Warnings, Cautions and Notes, before
removing the ground lead.
2 Disconnect the battery ground lead. Refer to 8A – Electrical Body & Chassis.
3 Depress the tang on the main wiring harness to the cooling fan motor wiring harness connector (1) and
separate the connector.
4 Remove the radiator cooling fan and shroud assembly. Refer to 3.13 Cooling Fan and Shroud
Assembly in this Section.
5 Drain the coolant from the system. Refer to 3.3 Draining and Filling Cooling System in this
Section.
Refer to ‘
‘‘
‘
Environmental Issues ’
’’
’
in 3.1
Service Notes, before draining the
coolant.
Figure 6B1 – 62
BACK TO CHAPTER INDEX
TO MODEL INDEX
ISUZU KB P190 2007