2007 ISUZU KB P190 engine mount
[x] Cancel search: engine mountPage 2705 of 6020
Engine Mechanical – V6 Page 6A1–226
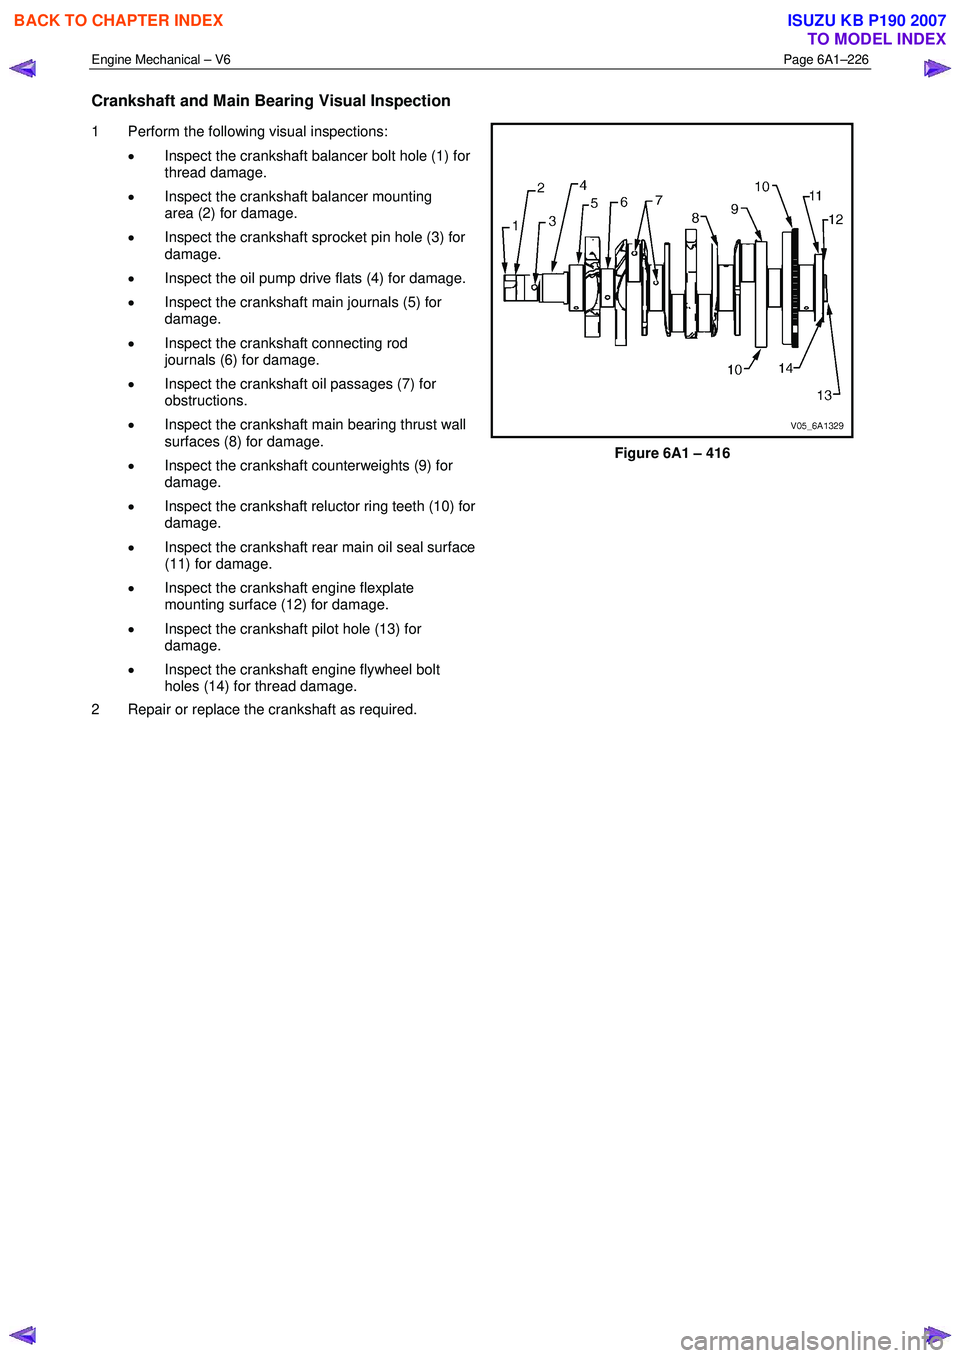
Crankshaft and Main Bearing Visual Inspection
1 Perform the following visual inspections:
• Inspect the crankshaft balancer bolt hole (1) for
thread damage.
• Inspect the crankshaft balancer mounting
area (2) for damage.
• Inspect the crankshaft sprocket pin hole (3) for
damage.
• Inspect the oil pump drive flats (4) for damage.
• Inspect the crankshaft main journals (5) for
damage.
• Inspect the crankshaft connecting rod
journals (6) for damage.
• Inspect the crankshaft oil passages (7) for
obstructions.
• Inspect the crankshaft main bearing thrust wall
surfaces (8) for damage.
• Inspect the crankshaft counterweights (9) for
damage.
• Inspect the crankshaft reluctor ring teeth (10) for
damage.
• Inspect the crankshaft rear main oil seal surface
(11) for damage.
• Inspect the crankshaft engine flexplate
mounting surface (12) for damage.
• Inspect the crankshaft pilot hole (13) for
damage.
• Inspect the crankshaft engine flywheel bolt
holes (14) for thread damage.
2 Repair or replace the crankshaft as required.
Figure 6A1 – 416
BACK TO CHAPTER INDEX
TO MODEL INDEX
ISUZU KB P190 2007
Page 2708 of 6020
Engine Mechanical – V6 Page 6A1–229
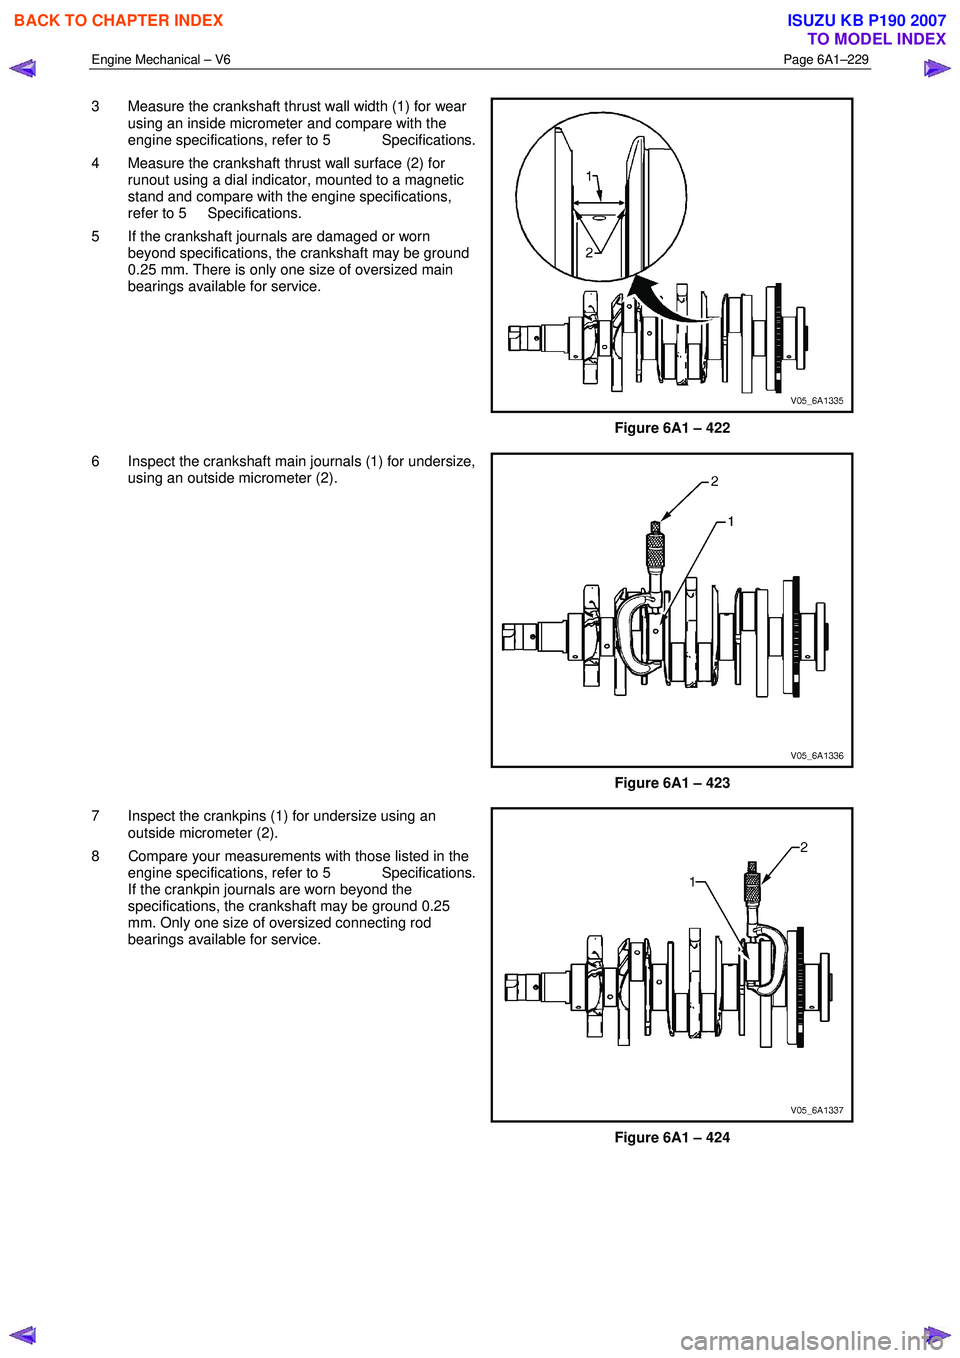
3 Measure the crankshaft thrust wall width (1) for wear
using an inside micrometer and compare with the
engine specifications, refer to 5 Specifications.
4 Measure the crankshaft thrust wall surface (2) for runout using a dial indicator, mounted to a magnetic
stand and compare with the engine specifications,
refer to 5 Specifications.
5 If the crankshaft journals are damaged or worn beyond specifications, the crankshaft may be ground
0.25 mm. There is only one size of oversized main
bearings available for service.
Figure 6A1 – 422
6 Inspect the crankshaft main journals (1) for undersize, using an outside micrometer (2).
Figure 6A1 – 423
7 Inspect the crankpins (1) for undersize using an outside micrometer (2).
8 Compare your measurements with those listed in the engine specifications, refer to 5 Specifications.
If the crankpin journals are worn beyond the
specifications, the crankshaft may be ground 0.25
mm. Only one size of oversized connecting rod
bearings available for service.
Figure 6A1 – 424
BACK TO CHAPTER INDEX
TO MODEL INDEX
ISUZU KB P190 2007
Page 2712 of 6020
Engine Mechanical – V6 Page 6A1–233
Crankshaft Final Installation Procedure
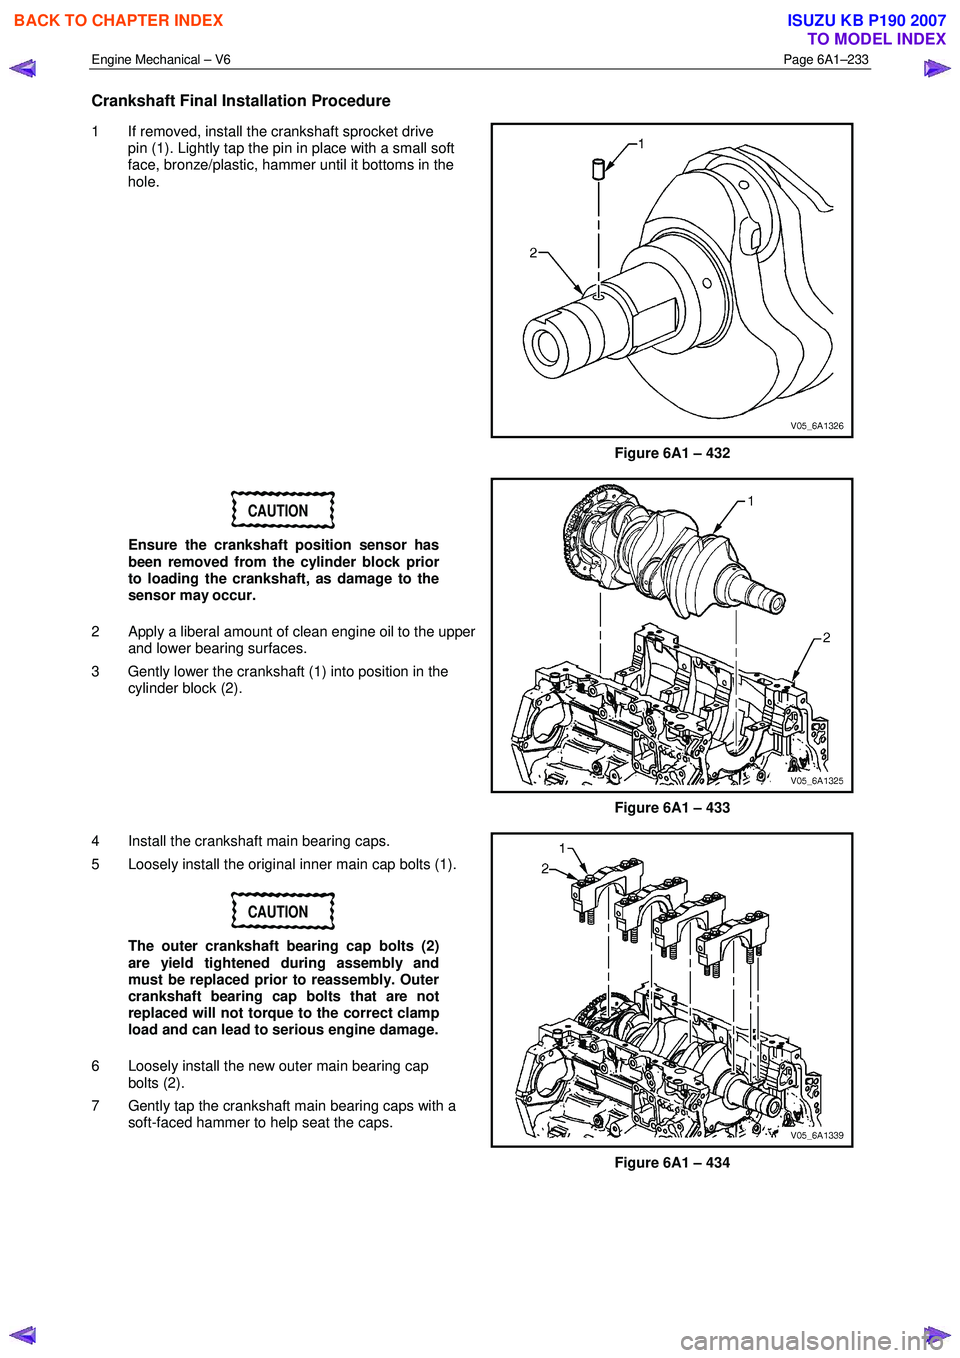
1 If removed, install the crankshaft sprocket drive
pin (1). Lightly tap the pin in place with a small soft
face, bronze/plastic, hammer until it bottoms in the
hole.
Figure 6A1 – 432
CAUTION
Ensure the crankshaft position sensor has
been removed from the cylinder block prior
to loading the crankshaft, as damage to the
sensor may occur.
2
Apply a liberal amount of clean engine oil to the upper
and lower bearing surfaces.
3 Gently lower the crankshaft (1) into position in the cylinder block (2).
Figure 6A1 – 433
4 Install the crankshaft main bearing caps.
5 Loosely install the original inner main cap bolts (1).
CAUTION
The outer crankshaft bearing cap bolts (2)
are yield tightened during assembly and
must be replaced prior to reassembly. Outer
crankshaft bearing cap bolts that are not
replaced will not torque to the correct clamp
load and can lead to serious engine damage.
6 Loosely install the new outer main bearing cap bolts (2).
7 Gently tap the crankshaft main bearing caps with a soft-faced hammer to help seat the caps.
Figure 6A1 – 434
BACK TO CHAPTER INDEX
TO MODEL INDEX
ISUZU KB P190 2007
Page 2718 of 6020
Engine Mechanical – V6 Page 6A1–239
Inspect
Visual Inspection
NOTE
The following procedure assumes the engine has
been disassembled and cleaned, as described
above.
1 Inspect the crankshaft bearing journals for damage or spun bearings. The crankshaft bearing journals are not repairable and if damage is found, the cylinder block assembly must be replaced.
2 Inspect the primary camshaft chain tensioner mounting surface on the engine block for burrs or any defects that would affect the sealing of the new primary camshaft chain tensioner gasket.
3 Inspect all sealing and mating surfaces for damage, repair or replace the cylinder block assembly if required.
4 Inspect all threaded and through holes for damage or excessive debris.
5 Inspect all bolts for damage, if damaged replace with new bolts only.
6 Inspect the cylinder walls for cracks or damage. The cylinder sleeves are not serviced separately, if the cylinders are damaged the cylinder block assembly must be replaced.
7 Inspect the engine block for cracks. Do not repair any cracks. If cracks are found, the cylinder block assembly must be replaced. Repair any damaged threaded holes, refer to 4.9 Thread Repair Specifications.
Measuring Cylinder Bore Diameter
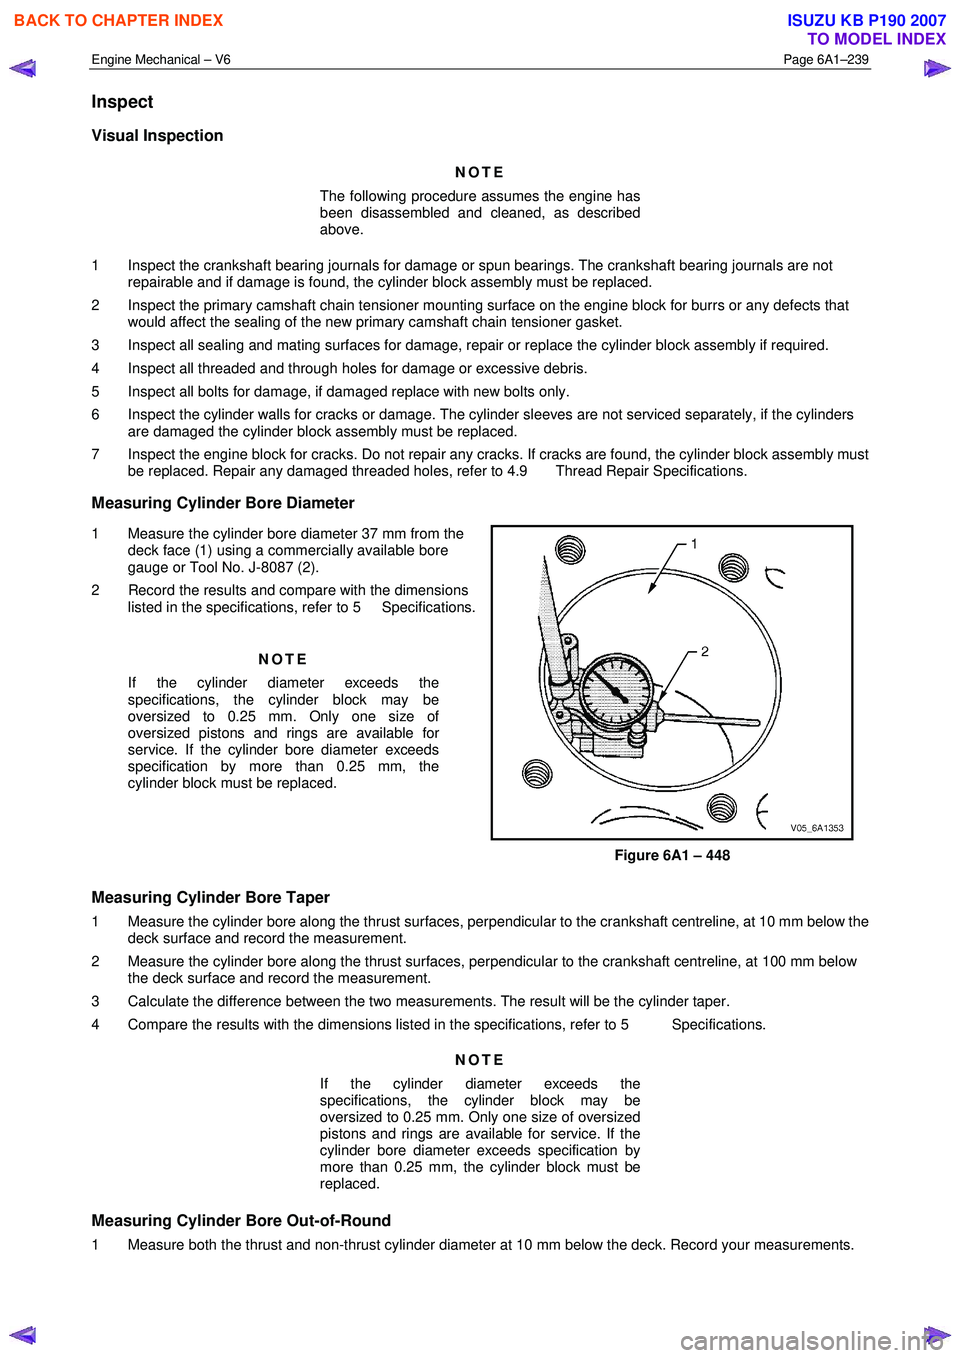
1 Measure the cylinder bore diameter 37 mm from the deck face (1) using a commercially available bore
gauge or Tool No. J-8087 (2).
2 Record the results and compare with the dimensions listed in the specifications, refer to 5 Specifications.
NOTE
If the cylinder diameter exceeds the
specifications, the cylinder block may be
oversized to 0.25 mm. Only one size of
oversized pistons and rings are available for
service. If the cylinder bore diameter exceeds
specification by more than 0.25 mm, the
cylinder block must be replaced.
Figure 6A1 – 448
Measuring Cylinder Bore Taper
1 Measure the cylinder bore along the thrust surfaces, perpendicular to the crankshaft centreline, at 10 mm below the deck surface and record the measurement.
2 Measure the cylinder bore along the thrust surfaces, perpendicular to the crankshaft centreline, at 100 mm below the deck surface and record the measurement.
3 Calculate the difference between the two measurements. The result will be the cylinder taper.
4 Compare the results with the dimensions listed in the specifications, refer to 5 Specifications.
NOTE
If the cylinder diameter exceeds the
specifications, the cylinder block may be
oversized to 0.25 mm. Only one size of oversized
pistons and rings are available for service. If the
cylinder bore diameter exceeds specification by
more than 0.25 mm, the cylinder block must be
replaced.
Measuring Cylinder Bore Out-of-Round
1 Measure both the thrust and non-thrust cylinder diameter at 10 mm below the deck. Record your measurements.
BACK TO CHAPTER INDEX
TO MODEL INDEX
ISUZU KB P190 2007
Page 2719 of 6020
Engine Mechanical – V6 Page 6A1–240
2 Calculate the difference between the two measurements. The result will indicate out-of-round at the upper end of
the cylinder.
3 Measure both the thrust and non-thrust cylinder diameter at 100 mm below the deck surface. Record your measurements.
4 Calculate the difference between the two measurements. The result will indicate out-of-round at the lower end of the cylinder.
5 Compare your results with the dimensions listed in the specifications, refer to 5 Specifications.
NOTE
If the cylinder diameter exceeds the
specifications, the cylinder block may be
oversized to 0.25 mm. Only one size of oversized
pistons and rings are available for service. If the
cylinder bore diameter exceeds specification by
more than 0.25 mm, the cylinder block must be
replaced.
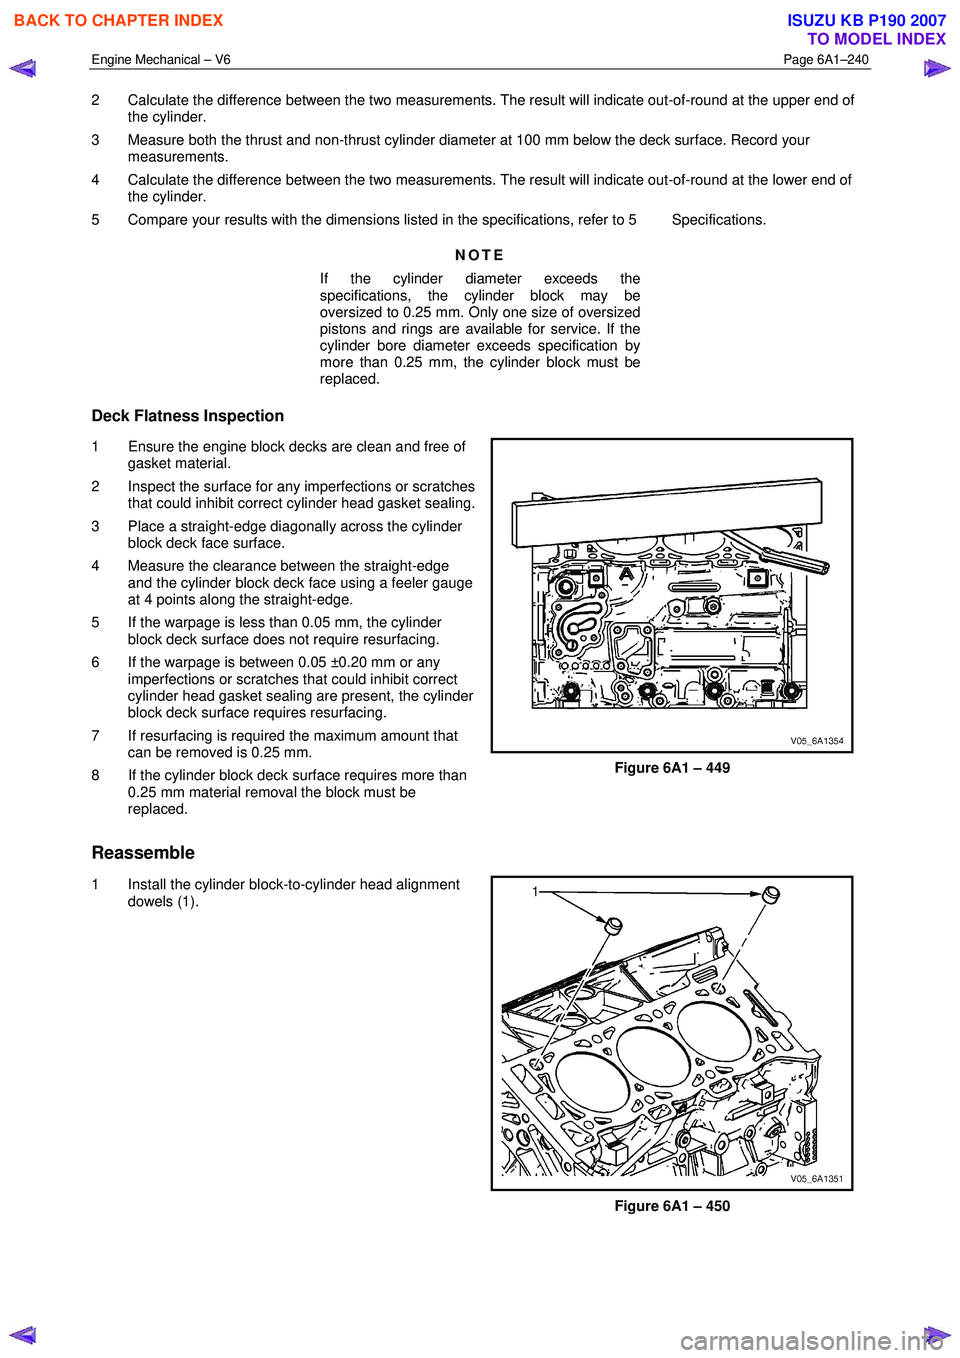
Deck Flatness Inspection
1 Ensure the engine block decks are clean and free of gasket material.
2 Inspect the surface for any imperfections or scratches that could inhibit correct cylinder head gasket sealing.
3 Place a straight-edge diagonally across the cylinder block deck face surface.
4 Measure the clearance between the straight-edge and the cylinder block deck face using a feeler gauge
at 4 points along the straight-edge.
5 If the warpage is less than 0.05 mm, the cylinder block deck surface does not require resurfacing.
6 If the warpage is between 0.05 ±0.20 mm or any imperfections or scratches that could inhibit correct
cylinder head gasket sealing are present, the cylinder
block deck surface requires resurfacing.
7 If resurfacing is required the maximum amount that can be removed is 0.25 mm.
8 If the cylinder block deck surface requires more than 0.25 mm material removal the block must be
replaced.
Figure 6A1 – 449
Reassemble
1 Install the cylinder block-to-cylinder head alignment
dowels (1).
Figure 6A1 – 450
BACK TO CHAPTER INDEX
TO MODEL INDEX
ISUZU KB P190 2007
Page 2771 of 6020
Engine Mechanical – V6 Page 6A1–292
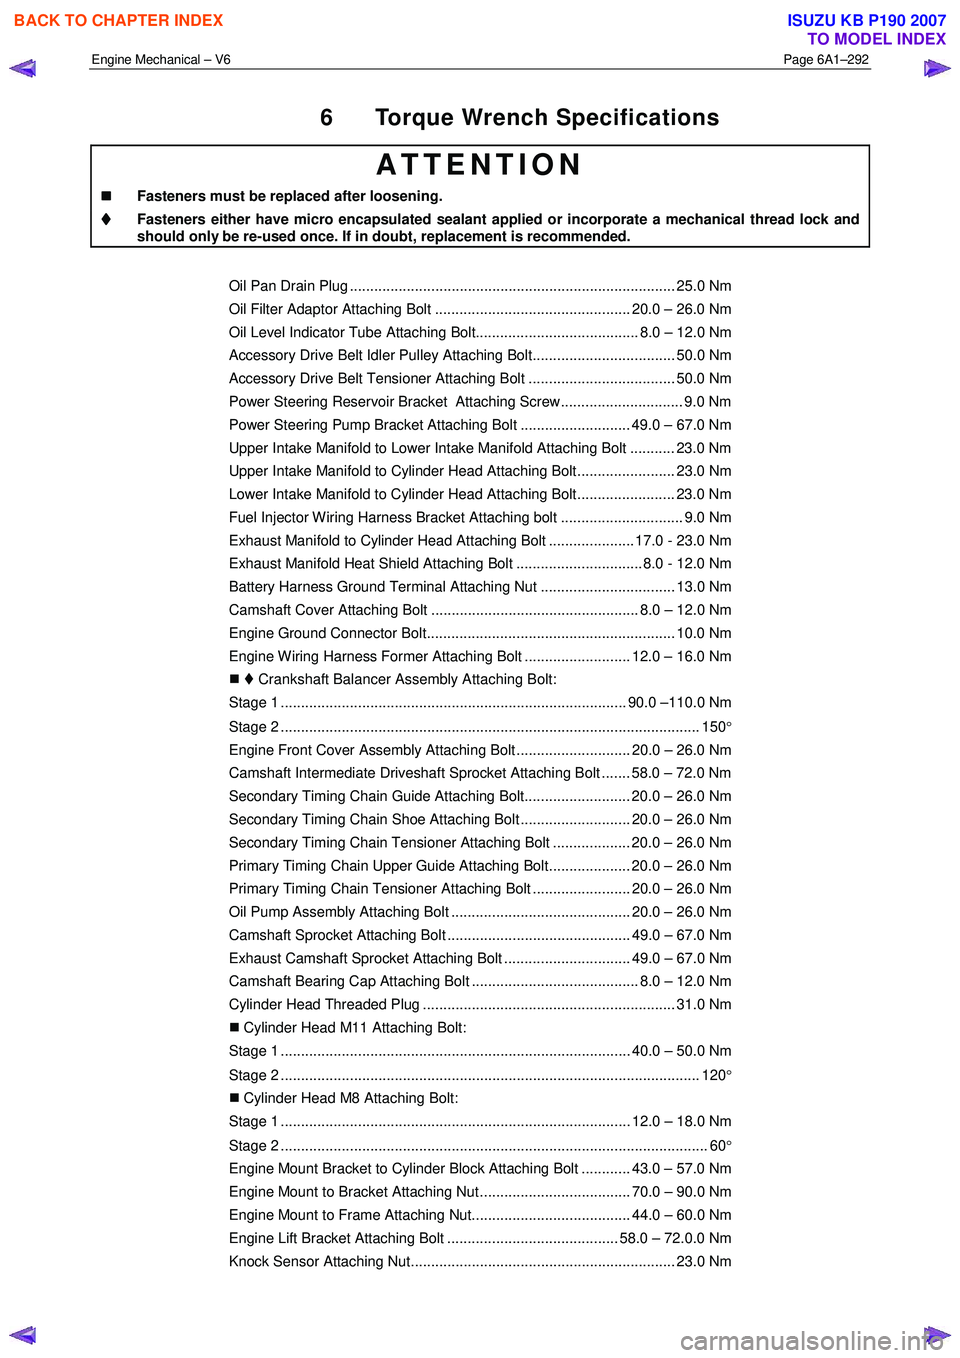
6 Torque Wrench Specifications
ATTENTION
�„
�„�„
�„
Fasteners must be replaced after loosening.
Fasteners either have micro encapsulated sealant applied or incorporate a mechanical thread lock and
should only be re-used once. If in doubt, replacement is recommended.
Oil Pan Drain Plug ................................................................................ 25.0 Nm
Oil Filter Adaptor Attaching Bolt ................................................ 20.0 – 26.0 Nm
Oil Level Indicator Tube Attaching Bolt........................................ 8.0 – 12.0 Nm
Accessory Drive Belt Idler Pulley Attaching Bolt................................... 50.0 Nm
Accessory Drive Belt Tensioner Attaching Bolt .................................... 50.0 Nm
Power Steering Reservoir Bracket Attaching Screw.............................. 9.0 Nm
Power Steering Pump Bracket Attaching Bolt ........................... 49.0 – 67.0 Nm
Upper Intake Manifold to Lower Intake Manifold Attaching Bolt ........... 23.0 Nm
Upper Intake Manifold to Cylinder Head Attaching Bolt........................ 23.0 Nm
Lower Intake Manifold to Cylinder Head Attaching Bolt........................ 23.0 Nm
Fuel Injector Wiring Harness Bracket Attaching bolt .............................. 9.0 Nm
Exhaust Manifold to Cylinder Head Attaching Bolt ..................... 17.0 - 23.0 Nm
Exhaust Manifold Heat Shield Attaching Bolt ............................... 8.0 - 12.0 Nm
Battery Harness Ground Terminal Attaching Nut ................................. 13.0 Nm
Camshaft Cover Attaching Bolt ................................................... 8.0 – 12.0 Nm
Engine Ground Connector Bolt............................................................. 10.0 Nm
Engine Wiring Harness Former Attaching Bolt .......................... 12.0 – 16.0 Nm
�„ Crankshaft Balancer Assembly Attaching Bolt:
Stage 1 ..................................................................................... 90.0 –110.0 Nm
Stage 2 ....................................................................................................... 150 °
Engine Front Cover Assembly Attaching Bolt ............................ 20.0 – 26.0 Nm
Camshaft Intermediate Driveshaft Sprocket Attaching Bolt ....... 58.0 – 72.0 Nm
Secondary Timing Chain Guide Attaching Bolt.......................... 20.0 – 26.0 Nm
Secondary Timing Chain Shoe Attaching Bolt ........................... 20.0 – 26.0 Nm
Secondary Timing Chain Tensioner Attaching Bolt ................... 20.0 – 26.0 Nm
Primary Timing Chain Upper Guide Attaching Bolt.................... 20.0 – 26.0 Nm
Primary Timing Chain Tensioner Attaching Bolt ........................ 20.0 – 26.0 Nm
Oil Pump Assembly Attaching Bolt ............................................ 20.0 – 26.0 Nm
Camshaft Sprocket Attaching Bolt ............................................. 49.0 – 67.0 Nm
Exhaust Camshaft Sprocket Attaching Bolt ............................... 49.0 – 67.0 Nm
Camshaft Bearing Cap Attaching Bolt ......................................... 8.0 – 12.0 Nm
Cylinder Head Threaded Plug .............................................................. 31.0 Nm
�„ Cylinder Head M11 Attaching Bolt:
Stage 1 ...................................................................................... 40.0 – 50.0 Nm
Stage 2 ....................................................................................................... 120 °
�„ Cylinder Head M8 Attaching Bolt:
Stage 1 ...................................................................................... 12.0 – 18.0 Nm
Stage 2 ......................................................................................................... 60 °
Engine Mount Bracket to Cylinder Block Attaching Bolt ............ 43.0 – 57.0 Nm
Engine Mount to Bracket Attaching Nut ..................................... 70.0 – 90.0 Nm
Engine Mount to Frame Attaching Nut....................................... 44.0 – 60.0 Nm
Engine Lift Bracket Attaching Bolt .......................................... 58.0 – 72.0.0 Nm
Knock Sensor Attaching Nut................................................................. 23.0 Nm
BACK TO CHAPTER INDEX
TO MODEL INDEX
ISUZU KB P190 2007
Page 2772 of 6020
Engine Mechanical – V6 Page 6A1–293
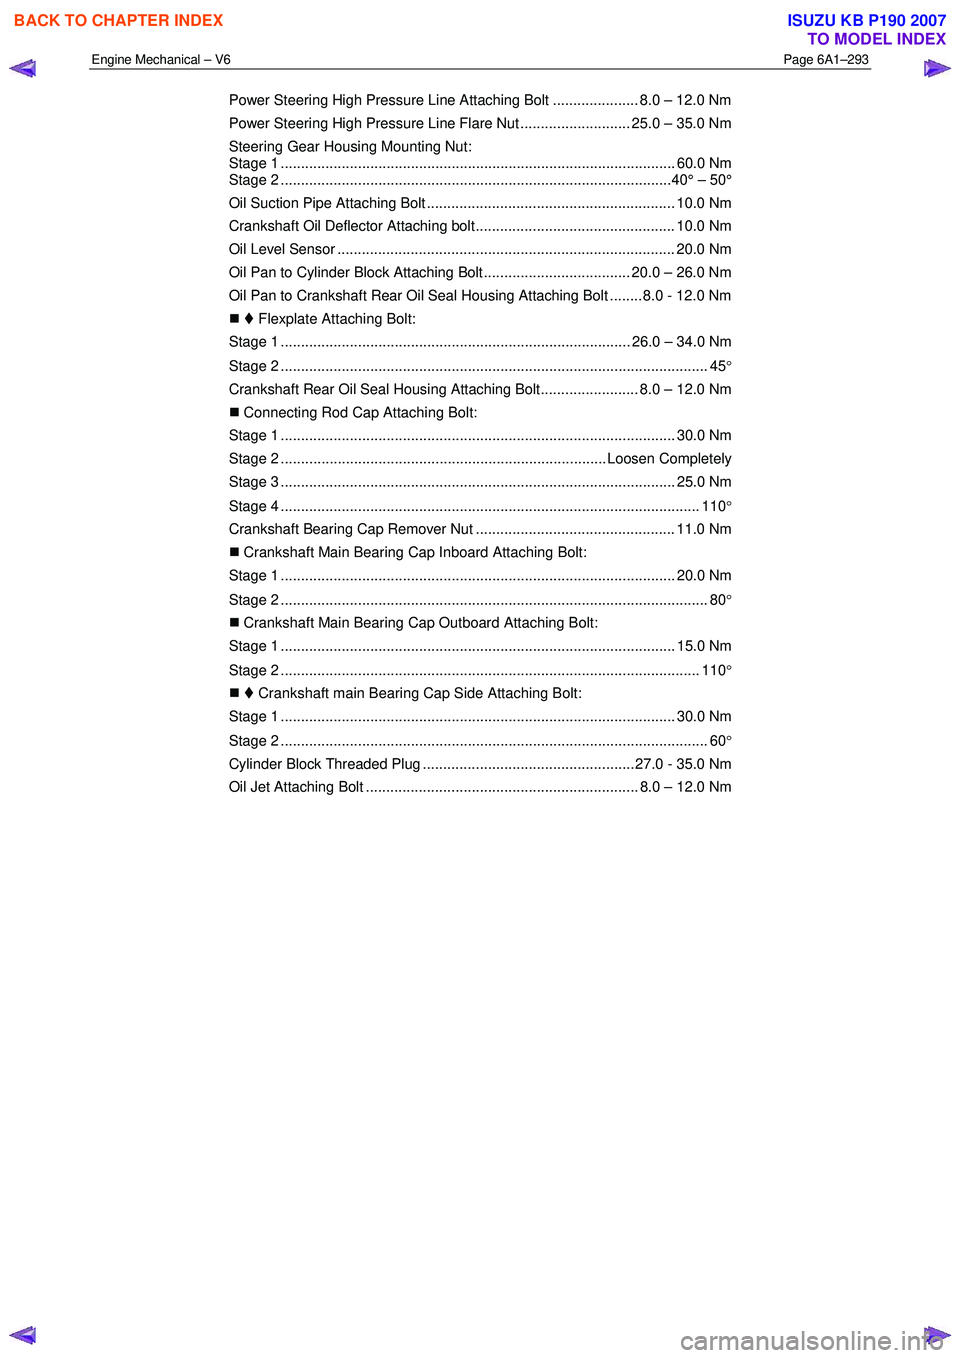
Power Steering High Pressure Line Attaching Bolt ..................... 8.0 – 12.0 Nm
Power Steering High Pressure Line Flare Nut ........................... 25.0 – 35.0 Nm
Steering Gear Housing Mounting Nut:
Stage 1 ................................................................................................. 60.0 Nm
Stage 2 ................................................................................................40° – 50°
Oil Suction Pipe Attaching Bolt ............................................................. 10.0 Nm
Crankshaft Oil Deflector Attaching bolt................................................. 10.0 Nm
Oil Level Sensor ................................................................................... 20.0 Nm
Oil Pan to Cylinder Block Attaching Bolt .................................... 20.0 – 26.0 Nm
Oil Pan to Crankshaft Rear Oil Seal Housing Attaching Bolt ........ 8.0 - 12.0 Nm
�„ Flexplate Attaching Bolt:
Stage 1 ...................................................................................... 26.0 – 34.0 Nm
Stage 2 ......................................................................................................... 45 °
Crankshaft Rear Oil Seal Housing Attaching Bolt........................ 8.0 – 12.0 Nm
�„ Connecting Rod Cap Attaching Bolt:
Stage 1 ................................................................................................. 30.0 Nm
Stage 2 ................................................................................ Loosen Completely
Stage 3 ................................................................................................. 25.0 Nm
Stage 4 ....................................................................................................... 110 °
Crankshaft Bearing Cap Remover Nut ................................................. 11.0 Nm
�„ Crankshaft Main Bearing Cap Inboard Attaching Bolt:
Stage 1 ................................................................................................. 20.0 Nm
Stage 2 ......................................................................................................... 80 °
�„ Crankshaft Main Bearing Cap Outboard Attaching Bolt:
Stage 1 ................................................................................................. 15.0 Nm
Stage 2 ....................................................................................................... 110 °
�„ Crankshaft main Bearing Cap Side Attaching Bolt:
Stage 1 ................................................................................................. 30.0 Nm
Stage 2 ......................................................................................................... 60 °
Cylinder Block Threaded Plug .................................................... 27.0 - 35.0 Nm
Oil Jet Attaching Bolt ................................................................... 8.0 – 12.0 Nm
BACK TO CHAPTER INDEX
TO MODEL INDEX
ISUZU KB P190 2007
Page 2782 of 6020
Engine Mechanical – V6 Page 6A1–5
Page 6A1–5
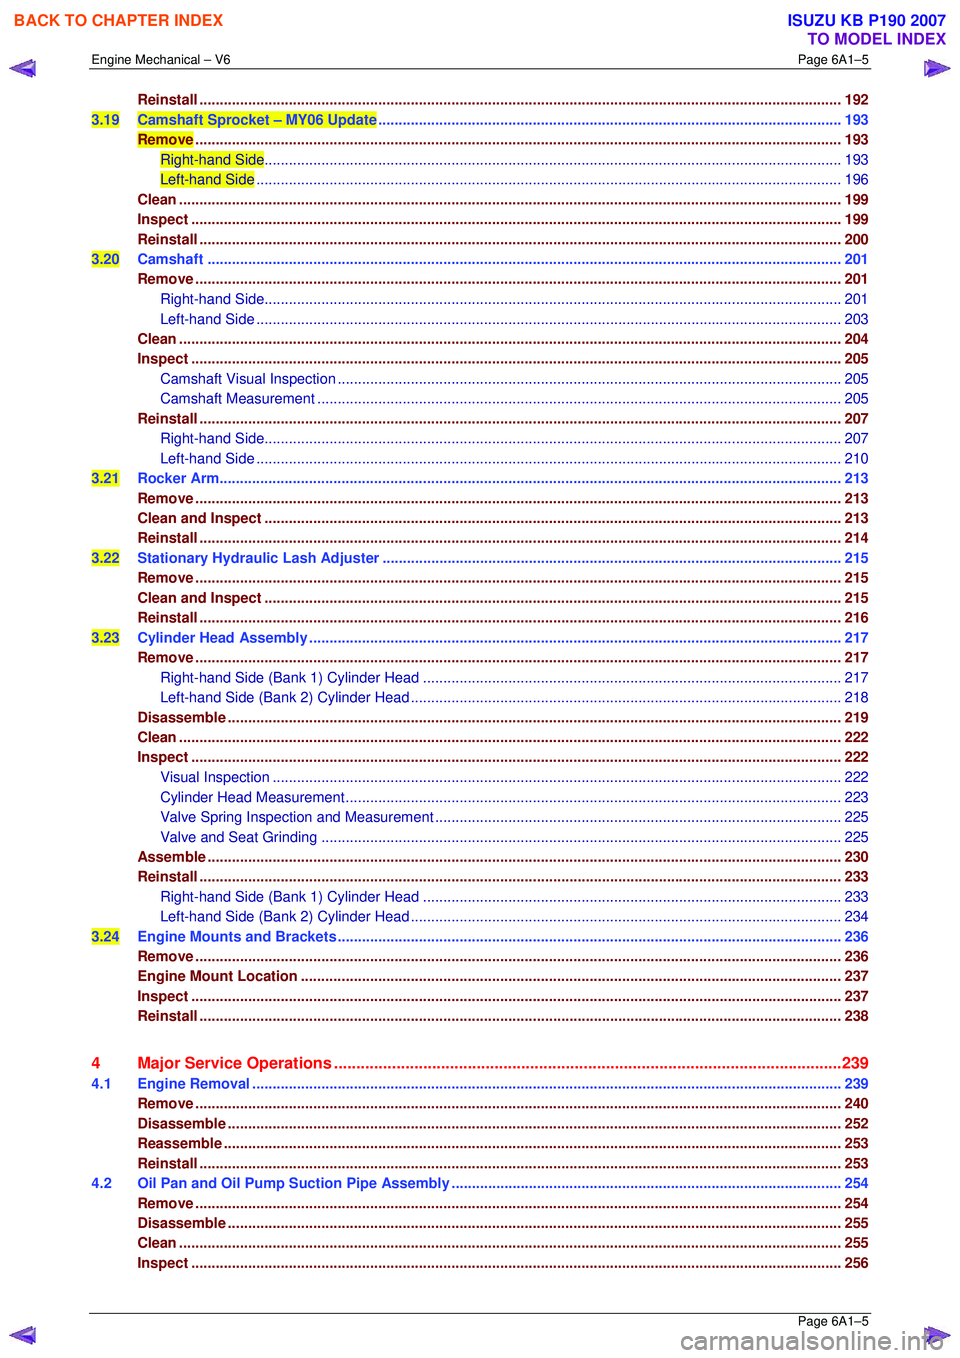
Reinstall .............................................................................................................................................................. 192
3.19 Camshaft Sprocket – MY06 Update ................................................................................................ ..................193
Remove ............................................................................................................................................................... 193
Right-hand Side................................................................................................................ ..............................193
Left-hand Side ................................................................................................................................................ 196
Clean................................................................................................................................................................... 199
Inspect ........................................................................................................................ ........................................199
Reinstall .............................................................................................................................................................. 200
3.20 Camshaft ............................................................................................................................................................ 201
Remove ............................................................................................................................................................... 201
Right-hand Side................................................................................................................ ..............................201
Left-hand Side ................................................................................................................................................ 203
Clean................................................................................................................................................................... 204
Inspect ........................................................................................................................ ........................................205
Camshaft Visual Inspection ..................................................................................................... .......................205
Camshaft Meas urement ................................................................................................................................. 205
Reinstall .............................................................................................................................................................. 207
Right-hand Side................................................................................................................ ..............................207
Left-hand Side ................................................................................................................................................ 210
3.21 Rocker Arm......................................................................................................................................................... 213
Remove ............................................................................................................................................................... 213
Clean and Inspect .............................................................................................................. ................................213
Reinstall .............................................................................................................................................................. 214
3.22 Stationary Hydraulic Lash Adjuster ............................................................................................. ....................215
Remove ............................................................................................................................................................... 215
Clean and Inspect .............................................................................................................. ................................215
Reinstall .............................................................................................................................................................. 216
3.23 Cylinder Head Assembly ......................................................................................................... ..........................217
Remove ............................................................................................................................................................... 217
Right-hand Side (Bank 1) Cylinder Head ......................................................................................... ..............217
Left-hand Side (Bank 2) Cylinder Head .......................................................................................... ................218
Disassemble ....................................................................................................................................................... 219
Clean................................................................................................................................................................... 222
Inspect ........................................................................................................................ ........................................222
Visual Inspection .............................................................................................................. ..............................222
Cylinder Head Measurement.......................................................................................................................... 223
Valve Spring Inspection and Measurement ........................................................................................ ............225
Valve and Seat Grinding ........................................................................................................ ........................225
Assemble ....................................................................................................................... .....................................230
Reinstall .............................................................................................................................................................. 233
Right-hand Side (Bank 1) Cylinder Head ......................................................................................... ..............233
Left-hand Side (Bank 2) Cylinder Head .......................................................................................... ................234
3.24 Engine Mounts and Brackets ..................................................................................................... .......................236
Remove ............................................................................................................................................................... 236
Engine Mount Location ..................................................................................................................................... 237
Inspect ........................................................................................................................ ........................................237
Reinstall .............................................................................................................................................................. 238
4 Major Service Operations ....................................................................................................... ...........239
4.1 Engine Re moval ................................................................................................................. ................................239
Remove ............................................................................................................................................................... 240
Disassemble ....................................................................................................................................................... 252
Reassemble ........................................................................................................................................................ 253
Reinstall .............................................................................................................................................................. 253
4.2 Oil Pan and Oil Pump Suction Pipe Assembly ..................................................................................... ...........254
Remove ............................................................................................................................................................... 254
Disassemble ....................................................................................................................................................... 255
Clean................................................................................................................................................................... 255
Inspect ........................................................................................................................ ........................................256
BACK TO CHAPTER INDEX
TO MODEL INDEX
ISUZU KB P190 2007