2007 ISUZU KB P190 fuse
[x] Cancel search: fusePage 2275 of 6020
ENGINE DRIVEABILITY AND EMISSIONS 6E–105
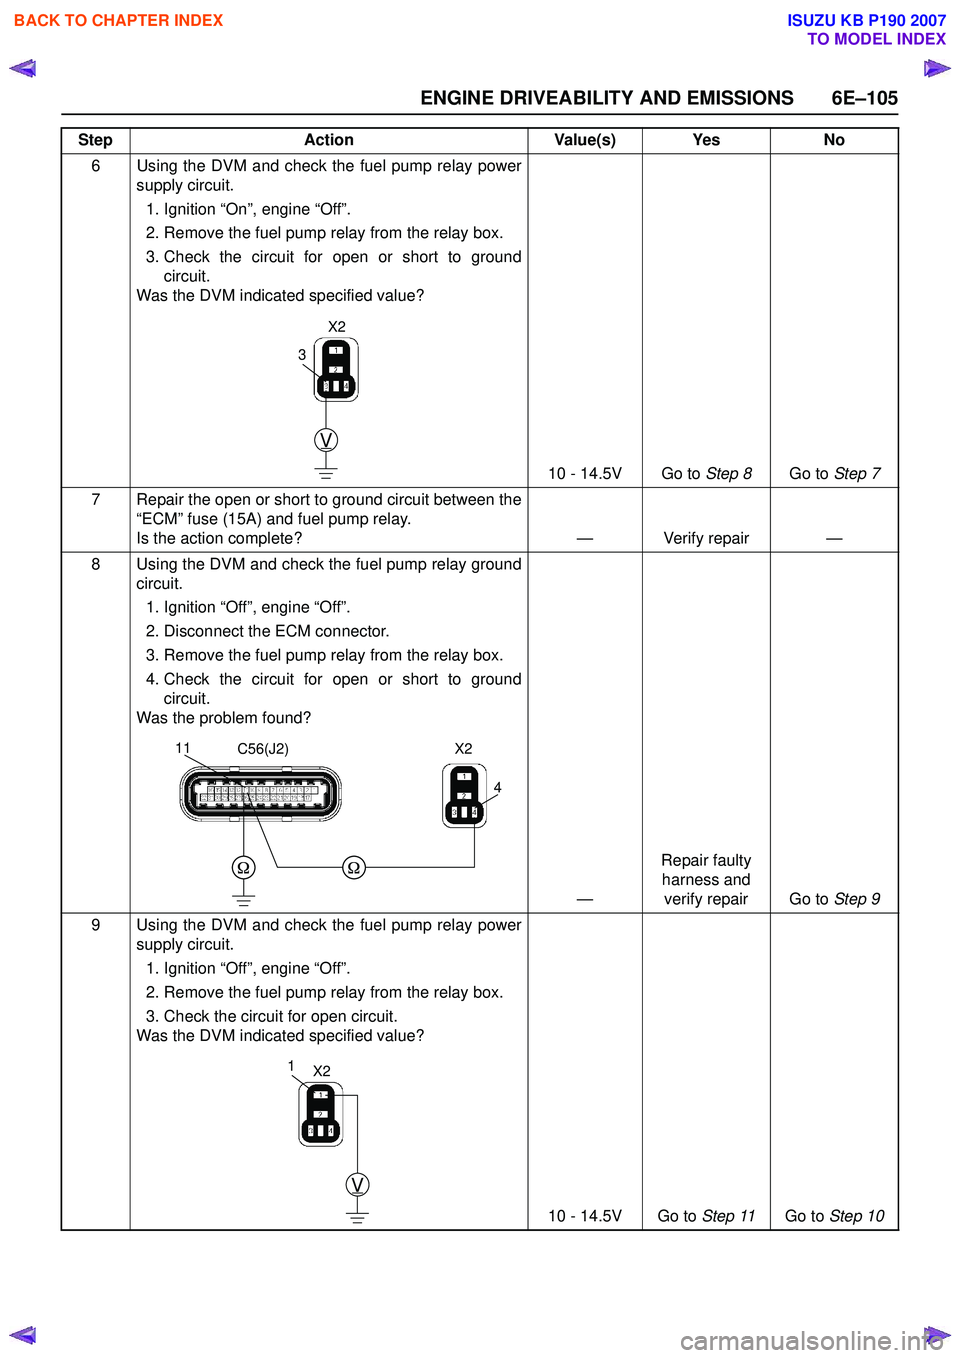
6 Using the DVM and check the fuel pump relay powersupply circuit.
1. Ignition “On”, engine “Off”.
2. Remove the fuel pump relay from the relay box.
3. Check the circuit for open or short to ground circuit.
Was the DVM indicated specified value?
10 - 14.5V Go to Step 8Go to Step 7
7 Repair the open or short to ground circuit between the “ECM” fuse (15A) and fuel pump relay.
Is the action complete? — Verify repair —
8 Using the DVM and check the fuel pump relay ground circuit.
1. Ignition “Off”, engine “Off”.
2. Disconnect the ECM connector.
3. Remove the fuel pump relay from the relay box.
4. Check the circuit for open or short to ground circuit.
Was the problem found?
—Repair faulty
harness and verify repair Go to Step 9
9 Using the DVM and check the fuel pump relay power supply circuit.
1. Ignition “Off”, engine “Off”.
2. Remove the fuel pump relay from the relay box.
3. Check the circuit for open circuit.
Was the DVM indicated specified value?
10 - 14.5V Go to Step 11Go to Step 10
Step
Action Value(s) Yes No
V
3
X2
4
11C56(J2)X2
V
1X2
BACK TO CHAPTER INDEX
TO MODEL INDEX
ISUZU KB P190 2007
Page 2279 of 6020
ENGINE DRIVEABILITY AND EMISSIONS 6E–109
• The fuel injector(s).
4. Fuel pressure that drops off during acceleration, cruise, or hard cornering may case a lean condition.
A lean condition can cause a loss of power, surging,
or misfire. A lean condition can be diagnosed using a
Tech 2 Scan Tool.
Following are applicable to the vehicle with
closed Loop System:
If an extremely lean condition occurs, the oxygen
sensor(s) will stop toggling. The oxygen sensor
output voltage(s) will drop below 500 mV. Also, the
fuel injector pulse width will increase.
Important: Make sure the fuel system is not
operating in the “Fuel Cut-Off Mode.”
When the engine is at idle, the manifold pressure is
low (high vacuum). This low pressure (high vacuum)
is applied to the fuel pressure regulator diaphragm.
The low pressure (high vacuum) will offset the
pressure being applied to the fuel pressure regulator
diaphragm by the spring inside the fuel pressure
regulator. When this happens, the result is lower fuel
pressure. The fuel pressure at idle will vary slightly
as the barometric pressure changes, but the fuel
pressure at idle should always be less than the fuel
pressure noted in step 2 with the engine OFF.
16.Check the spark plug associated with a particular
fuel injector for fouling or saturation in order to
determine if that particular fuel injector is leaking. If
checking the spark plug associated with a particular
fuel injector for fouling or saturation does not
determine that a particular fuel injector is leaking,
use the following procedure:
• Remove the fuel rail, but leave the fuel lines and injectors connected to the fuel rail. Refer to Fuel
Rail Assembly in On-Vehicle Service .
• Lift the fuel rail just enough to leave the fuel injector nozzles in the fuel injector ports.
Caution: In order to reduce the risk of fire and
personal injury that may result from fuel
spraying on the engine, verify that the fuel rail is
positioned over the fuel injector ports and verify
that the fuel injector retaining clips are intact.
• Pressurize the fuel system by connecting a 20 amp fused jumper between B+ and the fuel
pump relay connector.
• Visually and physically inspect the fuel injector nozzles for leaks.
17.A rich condition may result from the fuel pressure being above 376 kPa (55 psi). A rich condition may
cause a 45 to set. Driveability conditions associated with rich conditions can include hard starting
(followed by black smoke) and a strong sulfur smell
in the exhaust.
20.This test determines if the high fuel pressure is due to a restricted fuel return line or if the high fuel
pressure is due to a faulty fuel pressure regulator.
21.A lean condition may result from fuel pressure below 333 kPa (48 psi). A lean condition may cause a 44 to
set. Driveability conditions associated with lean
conditions can include hard starting (when the
engine is cold), hesitation, poor driveability, lack of
power, surging, and misfiring.
22.Restricting the fuel return line causes the fuel pressure to rise above the regulated fuel pressure.
Command the fuel pump ON with the scan tool. The
fuel pressure should rise above 376 kPa (55 psi) as
the fuel return line becomes partially closed.
NOTE: Do not allow the fuel pressure to exceed 414
kPa (60 psi). Fuel pressure in excess of 414 kPa (60
psi) may damage the fuel pressure regulator. Caution: To reduce the risk of fire and personal
injury:
• It is necessary to relieve fuel system pressure before connecting a fuel pressure gauge.
Refer to Fuel Pressure Relief Procedure,
below.
• A small amount of fuel may be released when disconnecting the fuel lines. Cover fuel line
fittings with a shop towel before
disconnecting, to catch any fuel that may leak
out. Place the towel in an approved container
when the disconnect is completed.
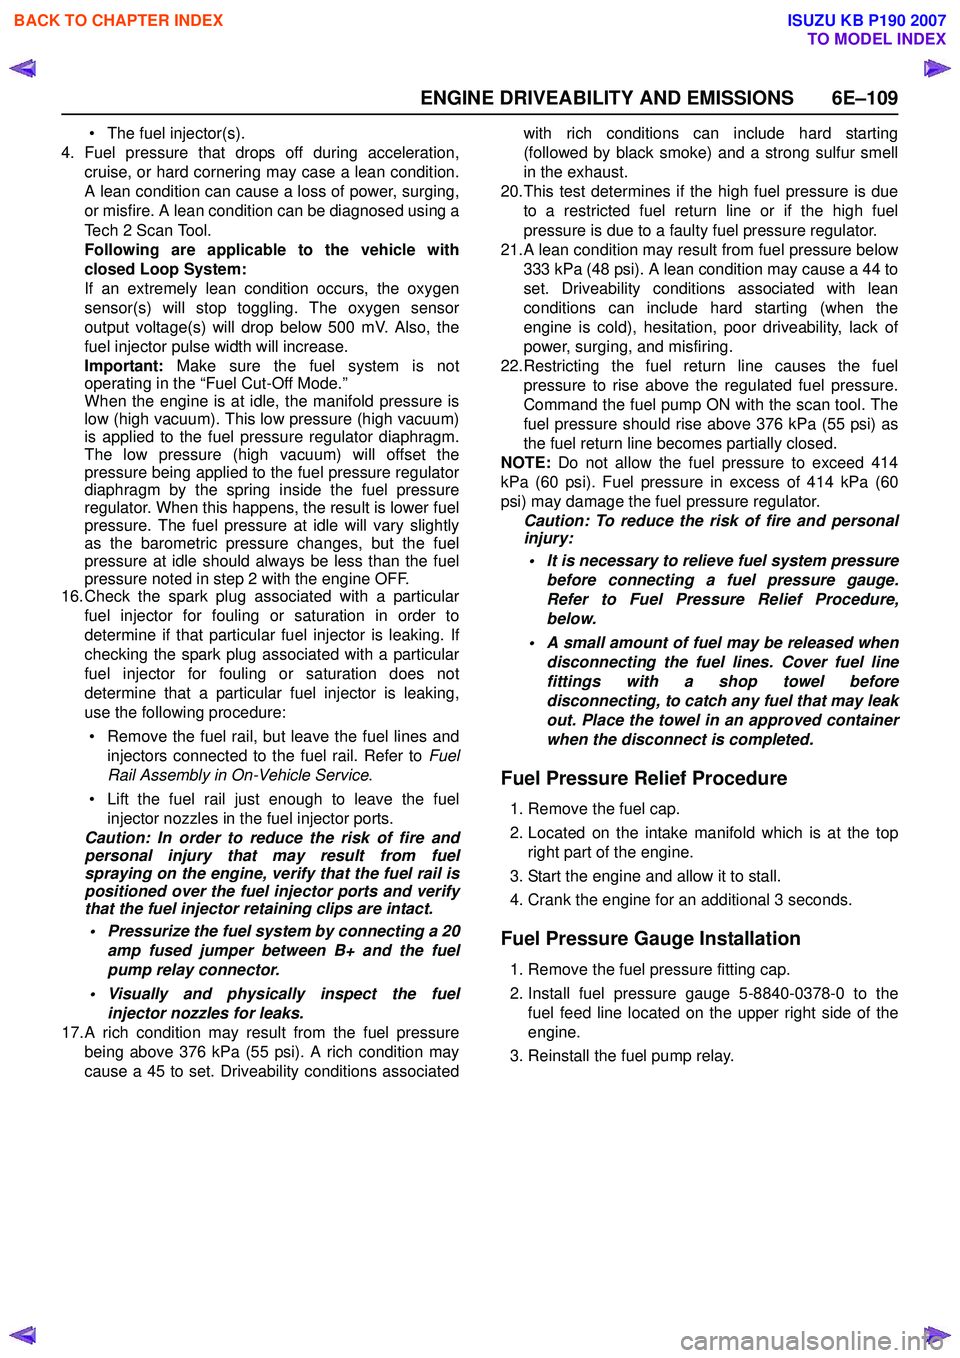
Fuel Pressure Relief Procedure
1. Remove the fuel cap.
2. Located on the intake manifold which is at the top right part of the engine.
3. Start the engine and allow it to stall.
4. Crank the engine for an additional 3 seconds.
Fuel Pressure Gauge Installation
1. Remove the fuel pressure fitting cap.
2. Install fuel pressure gauge 5-8840-0378-0 to the fuel feed line located on the upper right side of the
engine.
3. Reinstall the fuel pump relay.
BACK TO CHAPTER INDEX
TO MODEL INDEX
ISUZU KB P190 2007
Page 2335 of 6020
ENGINE DRIVEABILITY AND EMISSIONS 6E–165
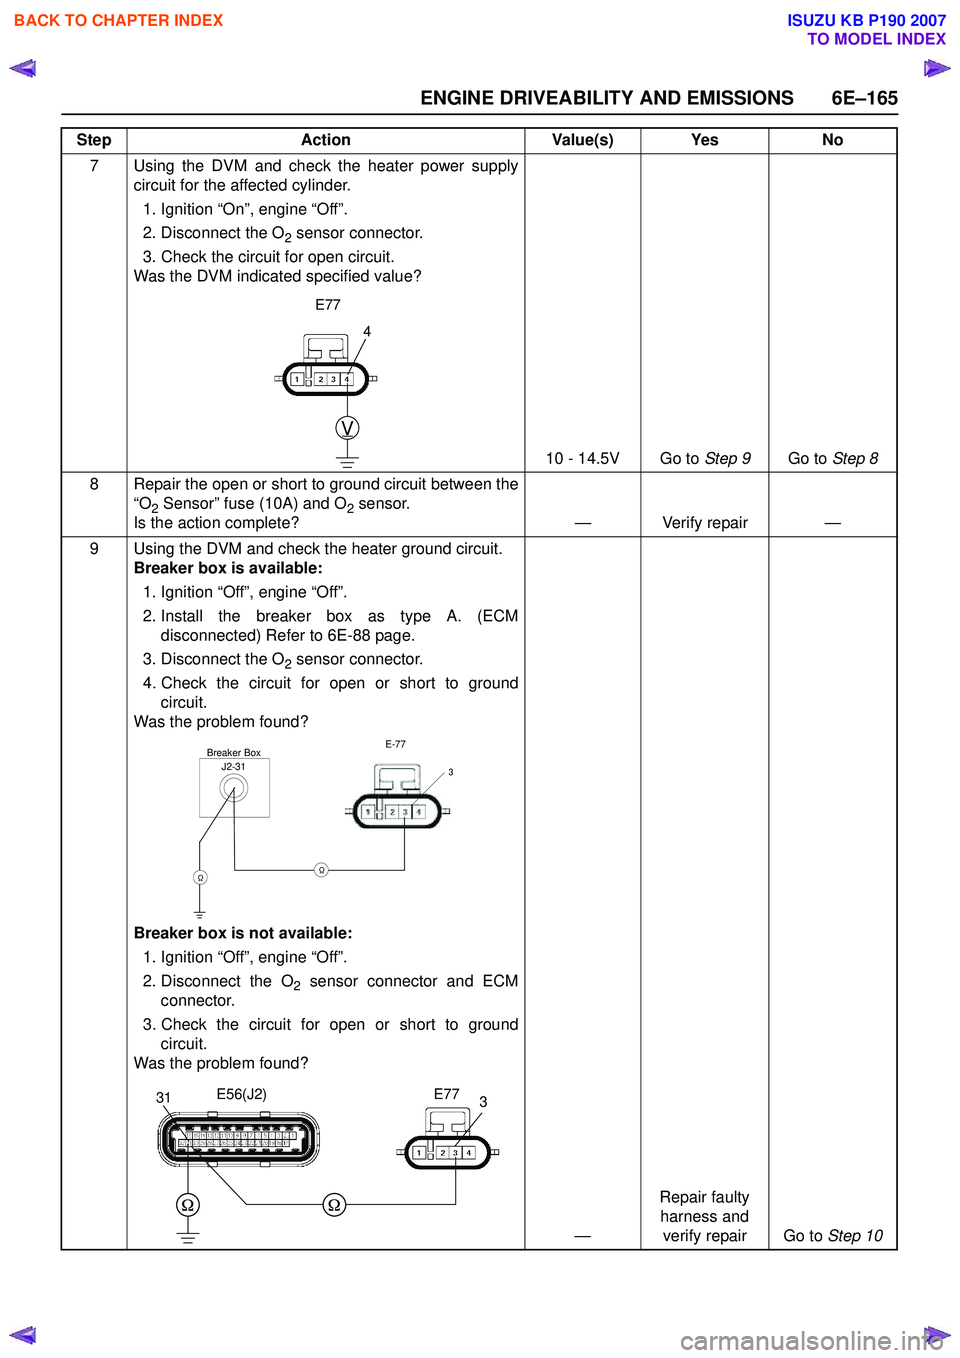
7 Using the DVM and check the heater power supplycircuit for the affected cylinder.
1. Ignition “On”, engine “Off”.
2. Disconnect the O
2 sensor connector.
3. Check the circuit for open circuit.
Was the DVM indicated specified value?
10 - 14.5V Go to Step 9Go to Step 8
8 Repair the open or short to ground circuit between the “O
2 Sensor” fuse (10A) and O2 sensor.
Is the action complete? — Verify repair —
9 Using the DVM and check the heater ground circuit. Breaker box is available:
1. Ignition “Off”, engine “Off”.
2. Install the breaker box as type A. (ECM disconnected) Refer to 6E-88 page.
3. Disconnect the O
2 sensor connector.
4. Check the circuit for open or short to ground circuit.
Was the problem found?
Breaker box is not available:
1. Ignition “Off”, engine “Off”.
2. Disconnect the O
2 sensor connector and ECM
connector.
3. Check the circuit for open or short to ground circuit.
Was the problem found?
—Repair faulty
harness and verify repair Go to Step 10
Step
Action Value(s) Yes No
4
V
E77
J2-31Breaker BoxE-77
3
ΩΩ
331E56(J2)E77
BACK TO CHAPTER INDEX
TO MODEL INDEX
ISUZU KB P190 2007
Page 2340 of 6020

6E–170 ENGINE DRIVEABILITY AND EMISSIONS
7 Using the DVM and check the injector power supplycircuit for the affected cylinder.
1. Ignition “On”, engine “Off”.
2. Disconnect the injector connector for the affected cylinder.
3. Check the circuit for open circuit.
Was the DVM indicated specified value?
10 - 14.5V Go to Step 9Go to Step 8
8 Repair the open or short to ground circuit between the “IGN” fuse (15A) and injector for the affected cylinder.
Is the action complete? — Verify repair —
Step Action Value(s) Yes No
V
1
E-6
No.1 Cylinder
V
1
E-7
No.2 Cylinder
V
1
E-8
No.3 Cylinder
V
1
E-9
No.4 Cylinder
BACK TO CHAPTER INDEX
TO MODEL INDEX
ISUZU KB P190 2007
Page 2360 of 6020
6E–190 ENGINE DRIVEABILITY AND EMISSIONS
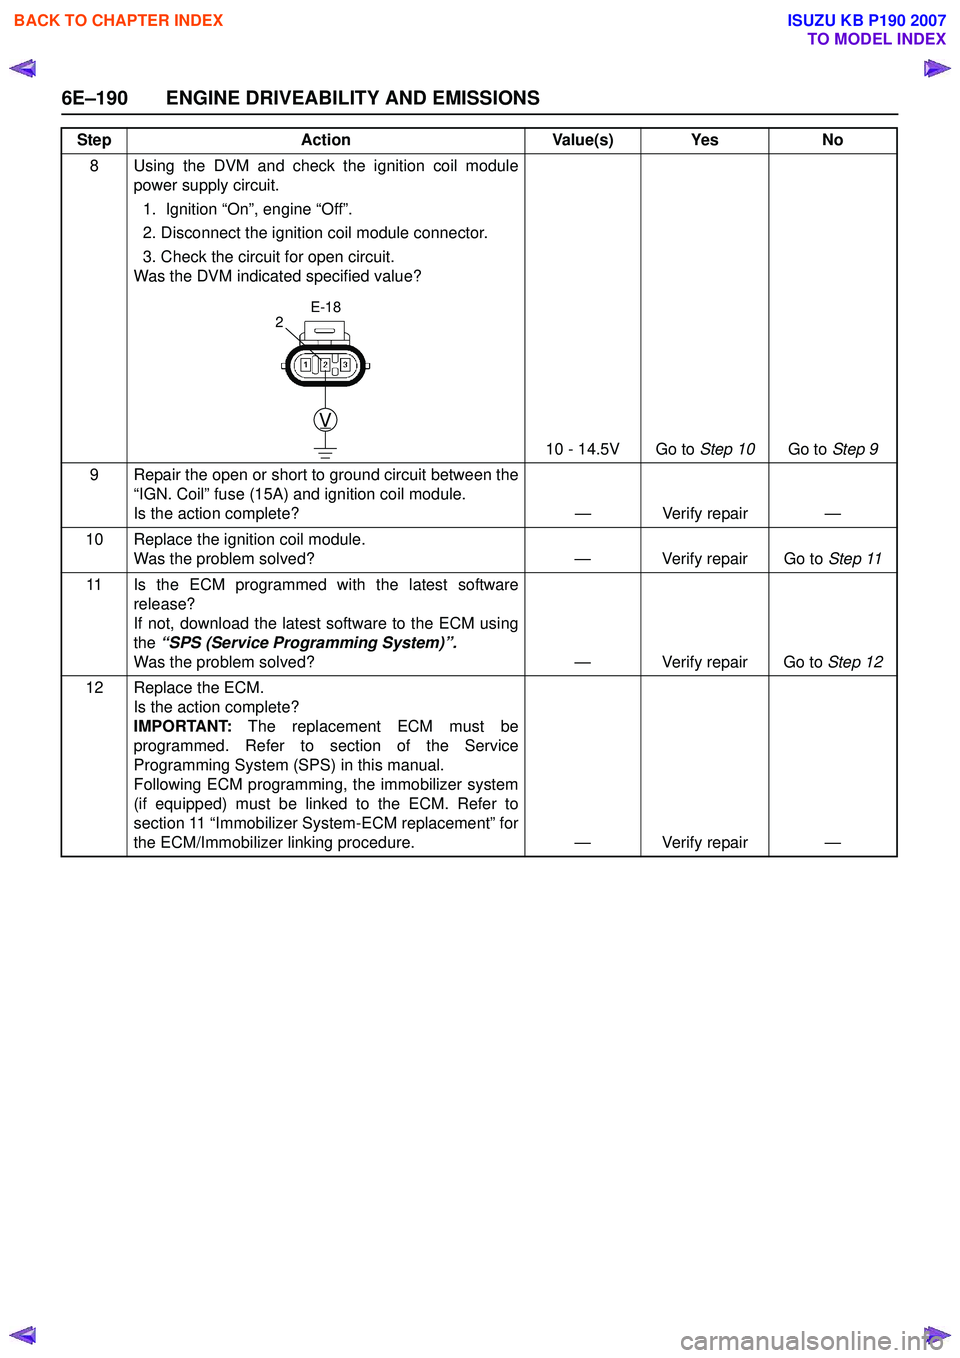
8 Using the DVM and check the ignition coil modulepower supply circuit.
1. Ignition “On”, engine “Off”.
2. Disconnect the ignition coil module connector.
3. Check the circuit for open circuit.
Was the DVM indicated specified value?
10 - 14.5V Go to Step 10Go to Step 9
9 Repair the open or short to ground circuit between the “IGN. Coil” fuse (15A) and ignition coil module.
Is the action complete? — Verify repair —
10 Replace the ignition coil module. Was the problem solved? — Verify repair Go to Step 11
11 Is the ECM programmed with the latest software release?
If not, download the latest software to the ECM using
the “SPS (Service Programming System)”.
Was the problem solved? — Verify repair Go to Step 12
12 Replace the ECM. Is the action complete?
IMPORTANT: The replacement ECM must be
programmed. Refer to section of the Service
Programming System (SPS) in this manual.
Following ECM programming, the immobilizer system
(if equipped) must be linked to the ECM. Refer to
section 11 “Immobilizer System-ECM replacement” for
the ECM/Immobilizer linking procedure. — Verify repair —
Step
Action Value(s) Yes No
V
E-18
2
BACK TO CHAPTER INDEX
TO MODEL INDEX
ISUZU KB P190 2007
Page 2363 of 6020
ENGINE DRIVEABILITY AND EMISSIONS 6E–193
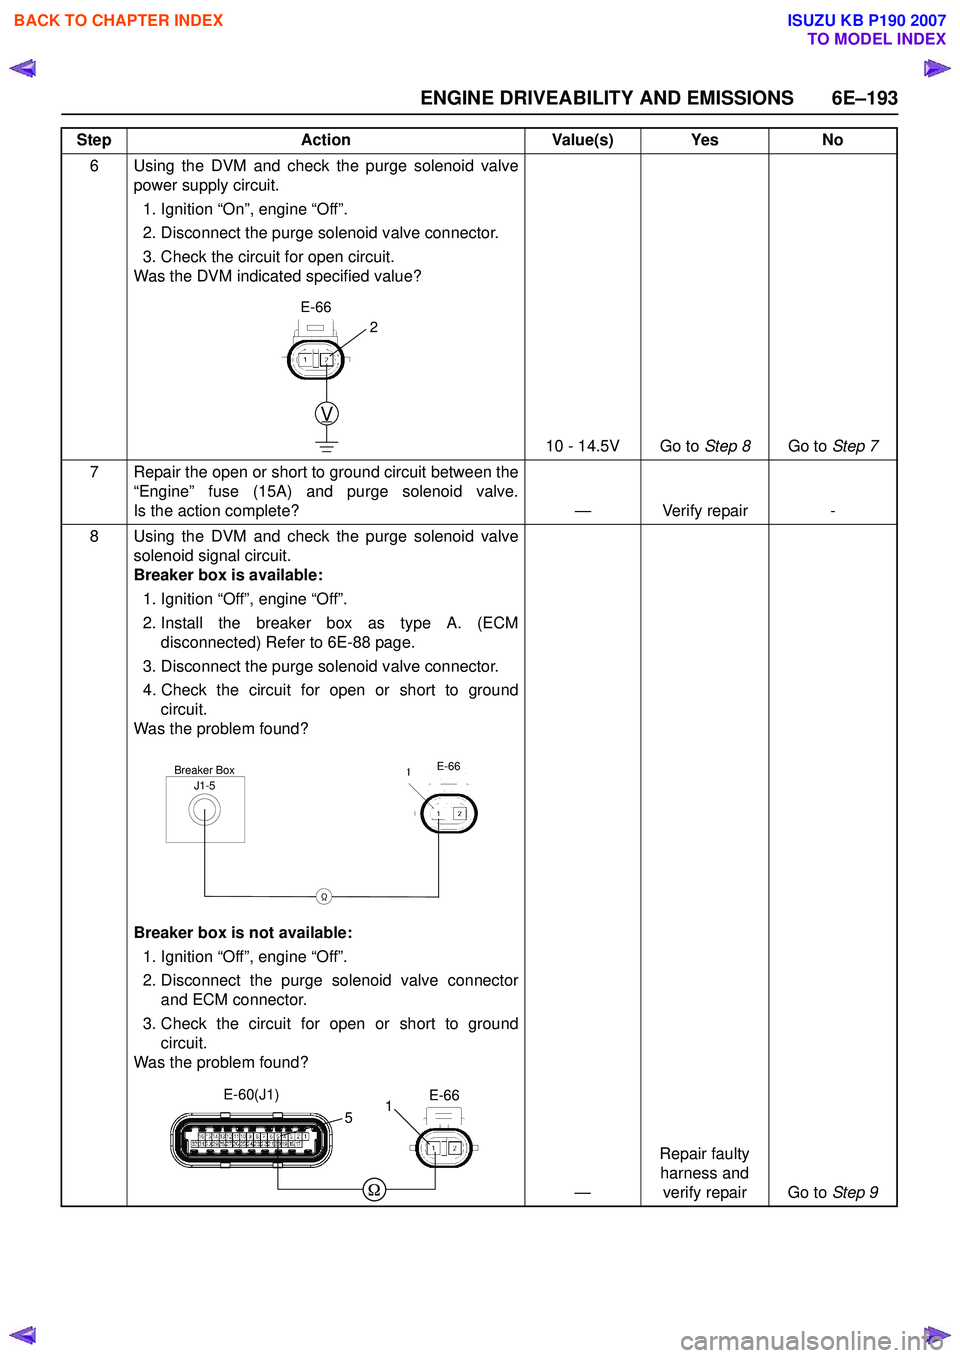
6 Using the DVM and check the purge solenoid valvepower supply circuit.
1. Ignition “On”, engine “Off”.
2. Disconnect the purge solenoid valve connector.
3. Check the circuit for open circuit.
Was the DVM indicated specified value?
10 - 14.5V Go to Step 8Go to Step 7
7 Repair the open or short to ground circuit between the “Engine” fuse (15A) and purge solenoid valve.
Is the action complete? — Verify repair -
8 Using the DVM and check the purge solenoid valve solenoid signal circuit.
Breaker box is available:
1. Ignition “Off”, engine “Off”.
2. Install the breaker box as type A. (ECM disconnected) Refer to 6E-88 page.
3. Disconnect the purge solenoid valve connector.
4. Check the circuit for open or short to ground circuit.
Was the problem found?
Breaker box is not available:
1. Ignition “Off”, engine “Off”.
2. Disconnect the purge solenoid valve connector and ECM connector.
3. Check the circuit for open or short to ground circuit.
Was the problem found?
—Repair faulty
harness and verify repair Go to Step 9
Step Action Value(s) Yes No
V
E-66
2
J1-5Breaker BoxE-66
Ω
1
E-66
E-60(J1)
51
BACK TO CHAPTER INDEX
TO MODEL INDEX
ISUZU KB P190 2007
Page 2365 of 6020
ENGINE DRIVEABILITY AND EMISSIONS 6E–195
DIAGNOSTIC TROUBLE CODE (DTC) P0502 VEHICLE SPEED SENSOR (VSS) CIRCUIT LOW INPUT
Condition for setting the DTC and action taken when the DTC sets
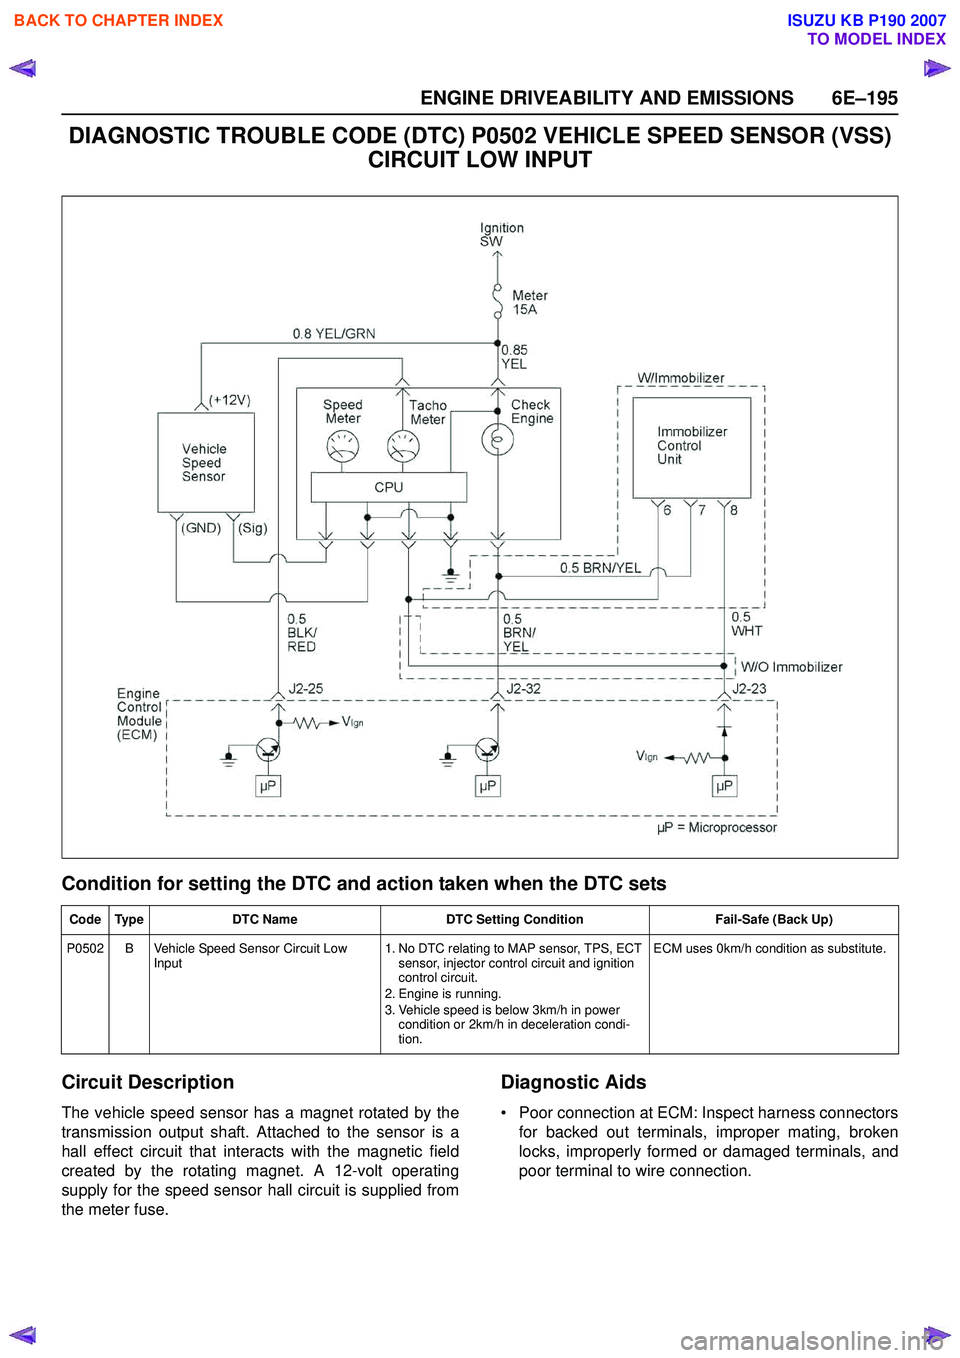
Circuit Description
The vehicle speed sensor has a magnet rotated by the
transmission output shaft. Attached to the sensor is a
hall effect circuit that interacts with the magnetic field
created by the rotating magnet. A 12-volt operating
supply for the speed sensor hall circuit is supplied from
the meter fuse.
Diagnostic Aids
• Poor connection at ECM: Inspect harness connectors for backed out terminals, improper mating, broken
locks, improperly formed or damaged terminals, and
poor terminal to wire connection.
Code Type DTC Name DTC Setting Condition Fail-Safe (Back Up)
P0502 B Vehicle Speed Sensor Circuit Low Input 1. No DTC relating to MAP sensor, TPS, ECT
sensor, injector control circuit and ignition
control circuit.
2. Engine is running.
3. Vehicle speed is below 3km/h in power condition or 2km/h in deceleration condi-
tion. ECM uses 0km/h condition as substitute.
BACK TO CHAPTER INDEX
TO MODEL INDEX
ISUZU KB P190 2007
Page 2367 of 6020
ENGINE DRIVEABILITY AND EMISSIONS 6E–197
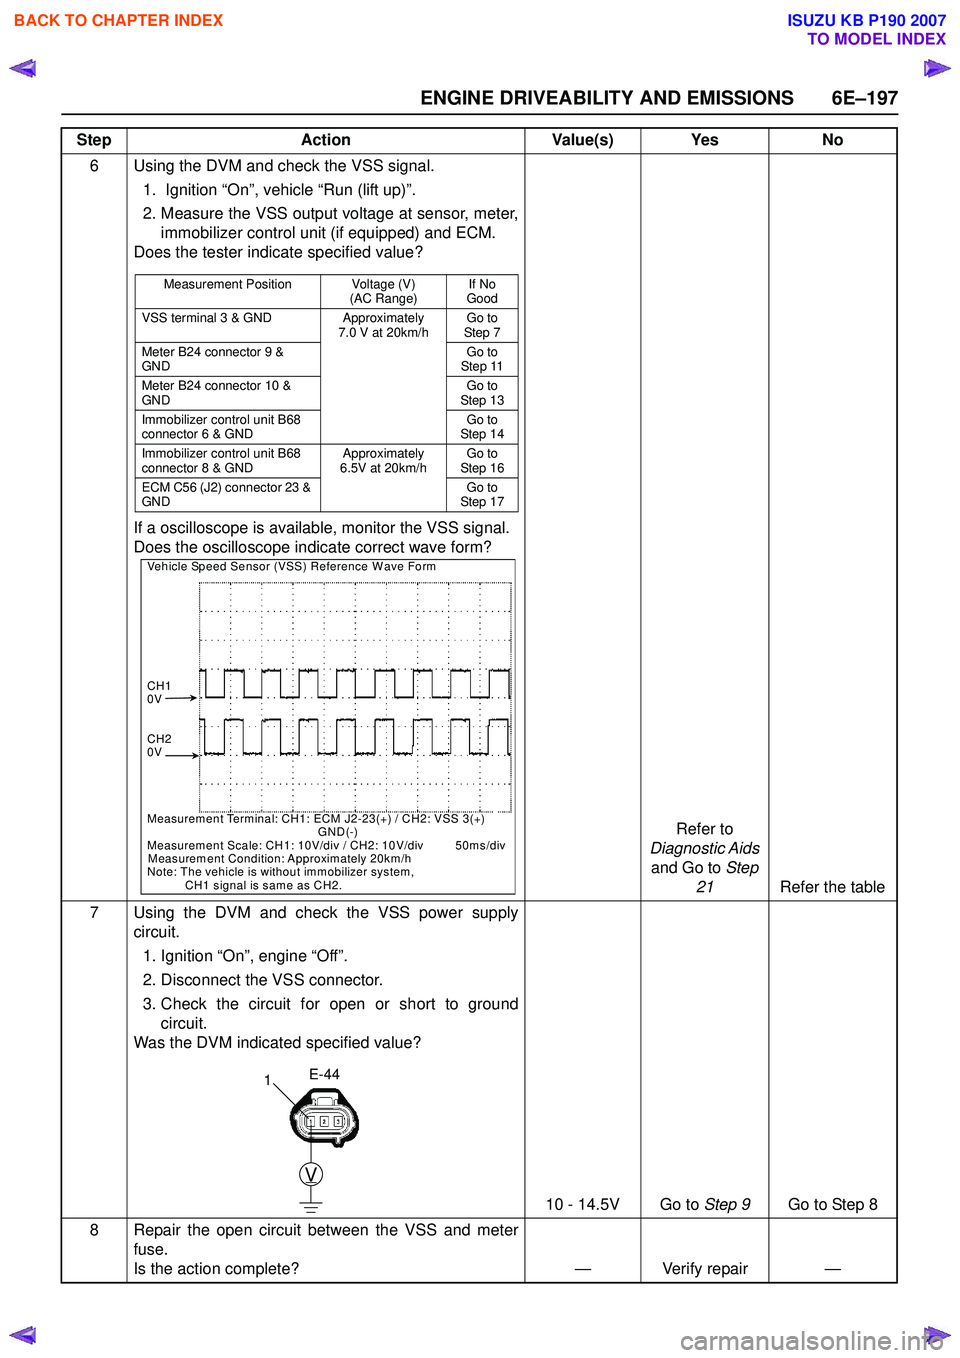
6 Using the DVM and check the VSS signal.1. Ignition “On”, vehicle “Run (lift up)”.
2. Measure the VSS output voltage at sensor, meter, immobilizer control unit (if equipped) and ECM.
Does the tester indicate specified value?
If a oscilloscope is available, monitor the VSS signal.
Does the oscilloscope indicate correct wave form?
Refer to
Diagnostic Aids
and Go to Step
21 Refer the table
7 Using the DVM and check the VSS power supply circuit.
1. Ignition “On”, engine “Off”.
2. Disconnect the VSS connector.
3. Check the circuit for open or short to ground circuit.
Was the DVM indicated specified value?
10 - 14.5V Go to Step 9Go to Step 8
8 Repair the open circuit between the VSS and meter fuse.
Is the action complete? — Verify repair —
Step
Action Value(s) Yes No
Measurement Position Voltage (V)
(AC Range)If No
Good
VSS terminal 3 & GND Approximately 7.0 V at 20km/hGo to
Step 7
Meter B24 connector 9 &
GND Go to
Step 11
Meter B24 connector 10 &
GND Go to
Step 13
Immobilizer control unit B68
connector 6 & GND Go to
Step 14
Immobilizer control unit B68
connector 8 & GND Approximately
6.5V at 20km/h Go to
Step 16
ECM C56 (J2) connector 23 &
GND Go to
Step 17
Vehicle Speed Sensor (VSS) Reference Wave Form
CH1
0V
CH2
0V
Measurement Terminal: CH1: ECM J2-23(+) / CH2: VSS 3(+)
GND(-)
Measurement Scale: CH1: 10V/div / CH2: 10V/div 50ms/div
Measurement Condition: Approximately 20km/h
Note: The vehicle is without immobilizer system,
CH1 signal is same as CH2.
V
E-44
1
BACK TO CHAPTER INDEX
TO MODEL INDEX
ISUZU KB P190 2007