2007 ISUZU KB P190 Wiring harness
[x] Cancel search: Wiring harnessPage 3367 of 6020
Engine Management – V6 – Diagnostics Page 6C1-2–89
• A history DTC clears after 40 consecutive warm-up cycles, if no failures are reported by this or any other emission
related diagnostic.
• Use Tech 2 to clear the MIL/DTC.
Additional Information
• Use the J 35616 Connector Test Adapter Kit for any test that requires probing the ECM harness connector or a
component harness connector.
• The lower connector of the ECM is connector A43-X1 and the upper connector of the ECM is connector A43-X2.
Refer to 3 W iring Diagrams and Connector Charts in this Section.
• The front wide band sensors do not toggle or switch like a switching HO2S. The front HO2S signals will be
relatively stable for an idling engine.
• For an intermittent fault condition, refer to 5.2 Intermittent Fault Conditions in this Section.
• Since fault condition in a wiring connector may trigger DTCs, always test the connectors related to this diagnostic
procedure for shorted terminals or poor wiring connection before replacing any component. Refer to 8A Electrical-
Body and Chassis for information on electrical fault diagnosis.
• To assist diagnosis, refer to 3 W iring Diagrams and Connector Charts in this Section for the system wiring
diagram and connector charts.
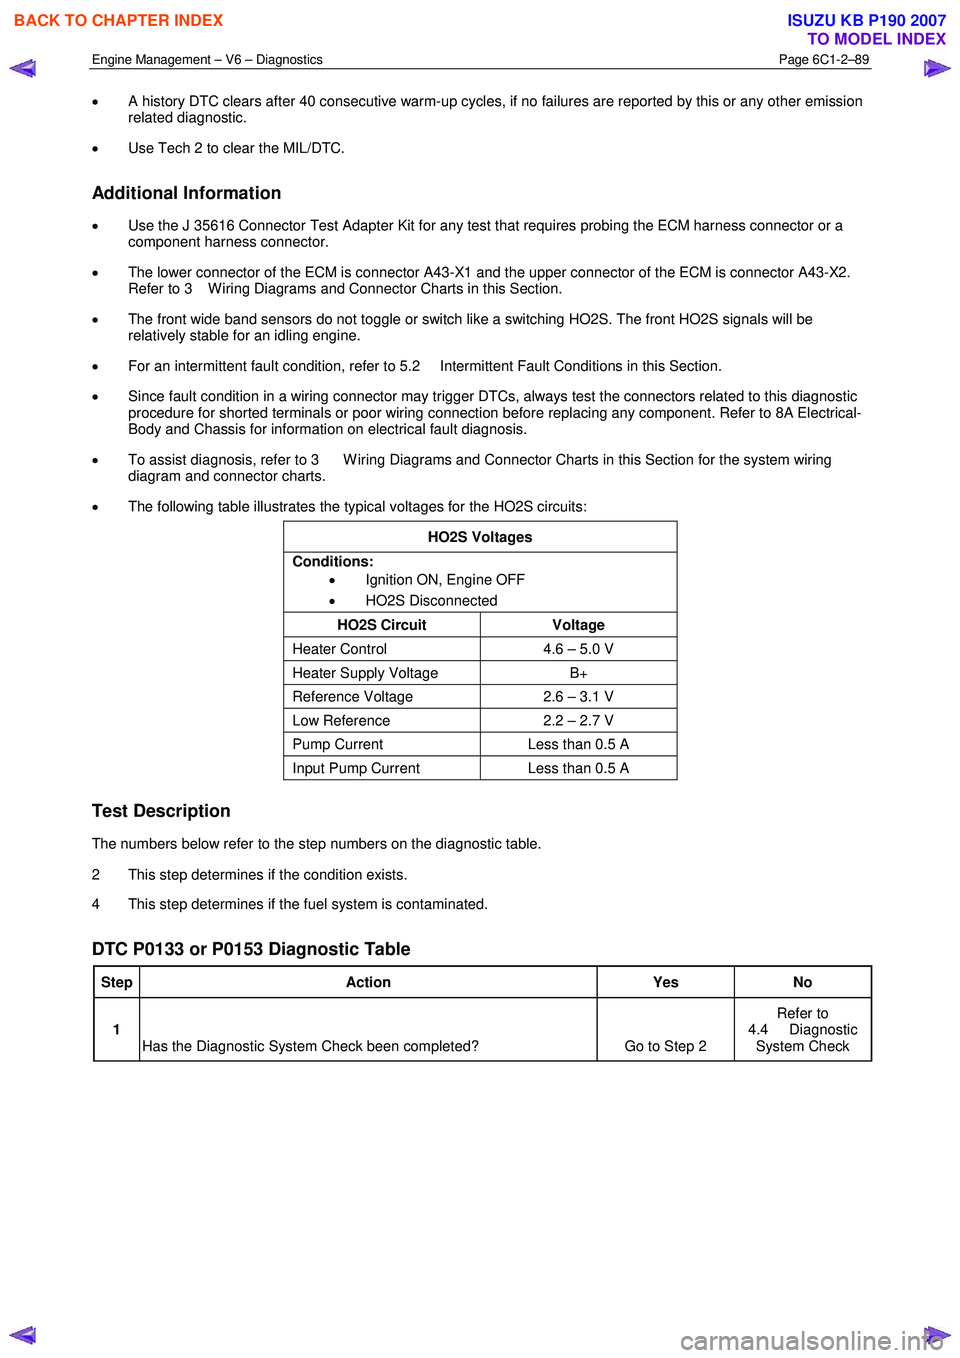
• The following table illustrates the typical voltages for the HO2S circuits:
HO2S Voltages
Conditions: • Ignition ON, Engine OFF
• HO2S Disconnected
HO2S Circuit Voltage
Heater Control 4.6 – 5.0 V
Heater Supply Voltage B+
Reference Voltage 2.6 – 3.1 V
Low Reference 2.2 – 2.7 V
Pump Current Less than 0.5 A
Input Pump Current Less than 0.5 A
Test Description
The numbers below refer to the step numbers on the diagnostic table.
2 This step determines if the condition exists.
4 This step determines if the fuel system is contaminated.
DTC P0133 or P0153 Diagnostic Table
Step Action Yes No
1
Has the Diagnostic System Check been completed? Go to Step 2 Refer to
4.4 Diagnostic System Check
BACK TO CHAPTER INDEX
TO MODEL INDEX
ISUZU KB P190 2007
Page 3376 of 6020
Engine Management – V6 – Diagnostics Page 6C1-2–98
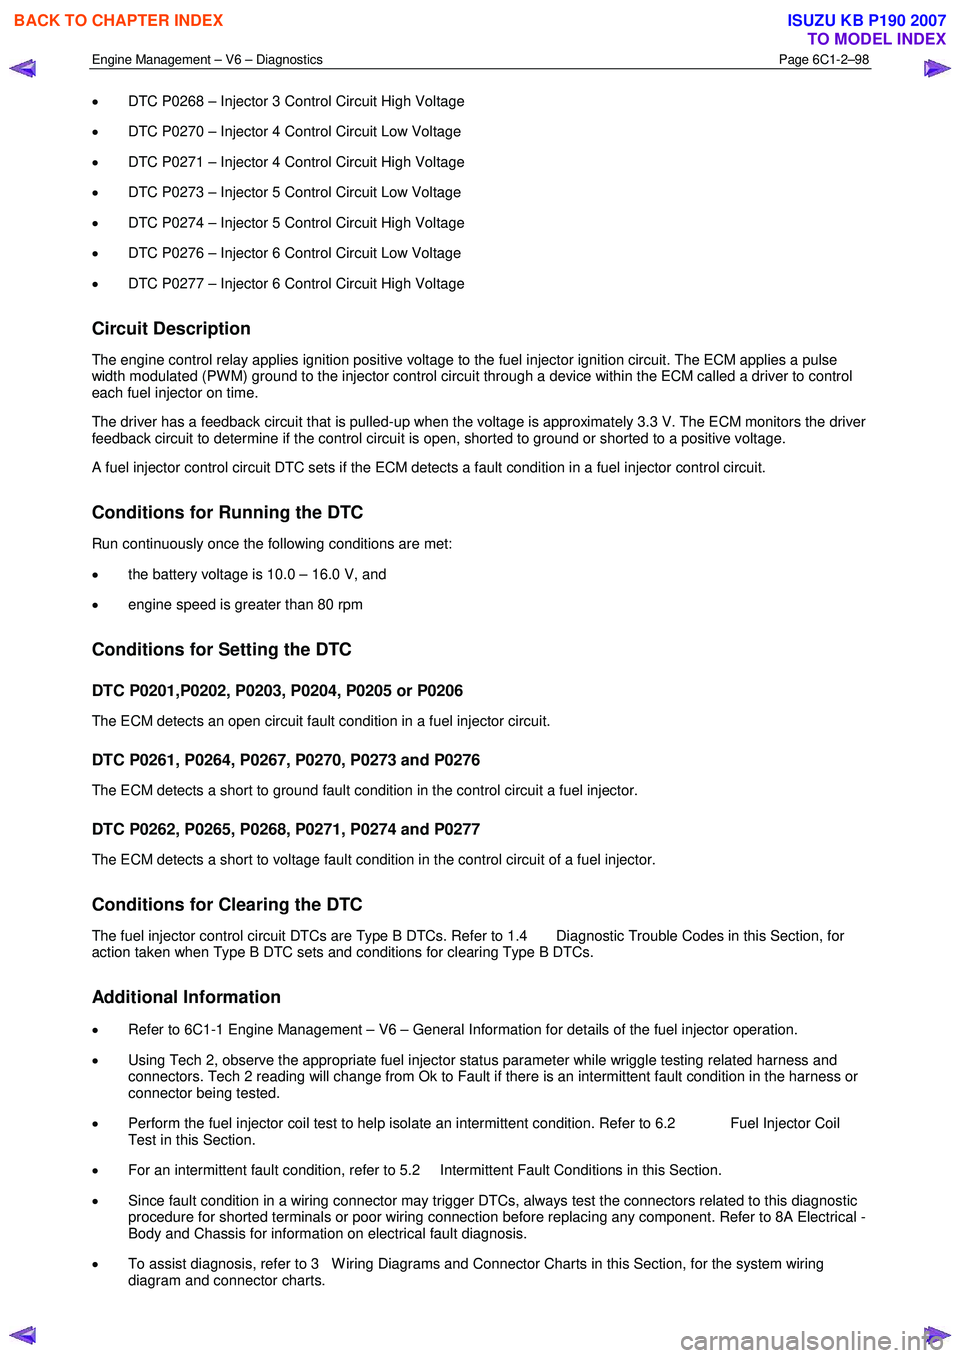
• DTC P0268 – Injector 3 Control Circuit High Voltage
• DTC P0270 – Injector 4 Control Circuit Low Voltage
• DTC P0271 – Injector 4 Control Circuit High Voltage
• DTC P0273 – Injector 5 Control Circuit Low Voltage
• DTC P0274 – Injector 5 Control Circuit High Voltage
• DTC P0276 – Injector 6 Control Circuit Low Voltage
• DTC P0277 – Injector 6 Control Circuit High Voltage
Circuit Description
The engine control relay applies ignition positive voltage to the fuel injector ignition circuit. The ECM applies a pulse
width modulated (PW M) ground to the injector control circuit through a device within the ECM called a driver to control
each fuel injector on time.
The driver has a feedback circuit that is pulled-up when the voltage is approximately 3.3 V. The ECM monitors the driver
feedback circuit to determine if the control circuit is open, shorted to ground or shorted to a positive voltage.
A fuel injector control circuit DTC sets if the ECM detects a fault condition in a fuel injector control circuit.
Conditions for Running the DTC
Run continuously once the following conditions are met:
• the battery voltage is 10.0 – 16.0 V, and
• engine speed is greater than 80 rpm
Conditions for Setting the DTC
DTC P0201,P0202, P0203, P0204, P0205 or P0206
The ECM detects an open circuit fault condition in a fuel injector circuit.
DTC P0261, P0264, P0267, P0270, P0273 and P0276
The ECM detects a short to ground fault condition in the control circuit a fuel injector.
DTC P0262, P0265, P0268, P0271, P0274 and P0277
The ECM detects a short to voltage fault condition in the control circuit of a fuel injector.
Conditions for Clearing the DTC
The fuel injector control circuit DTCs are Type B DTCs. Refer to 1.4 Diagnostic Trouble Codes in this Section, for
action taken when Type B DTC sets and conditions for clearing Type B DTCs.
Additional Information
• Refer to 6C1-1 Engine Management – V6 – General Information for details of the fuel injector operation.
• Using Tech 2, observe the appropriate fuel injector status parameter while wriggle testing related harness and
connectors. Tech 2 reading will change from Ok to Fault if there is an intermittent fault condition in the harness or
connector being tested.
• Perform the fuel injector coil test to help isolate an intermittent condition. Refer to 6.2 Fuel Injector Coil
Test in this Section.
• For an intermittent fault condition, refer to 5.2 Intermittent Fault Conditions in this Section.
• Since fault condition in a wiring connector may trigger DTCs, always test the connectors related to this diagnostic
procedure for shorted terminals or poor wiring connection before replacing any component. Refer to 8A Electrical -
Body and Chassis for information on electrical fault diagnosis.
• To assist diagnosis, refer to 3 W iring Diagrams and Connector Charts in this Section, for the system wiring
diagram and connector charts.
BACK TO CHAPTER INDEX
TO MODEL INDEX
ISUZU KB P190 2007
Page 3377 of 6020
Engine Management – V6 – Diagnostics Page 6C1-2–99
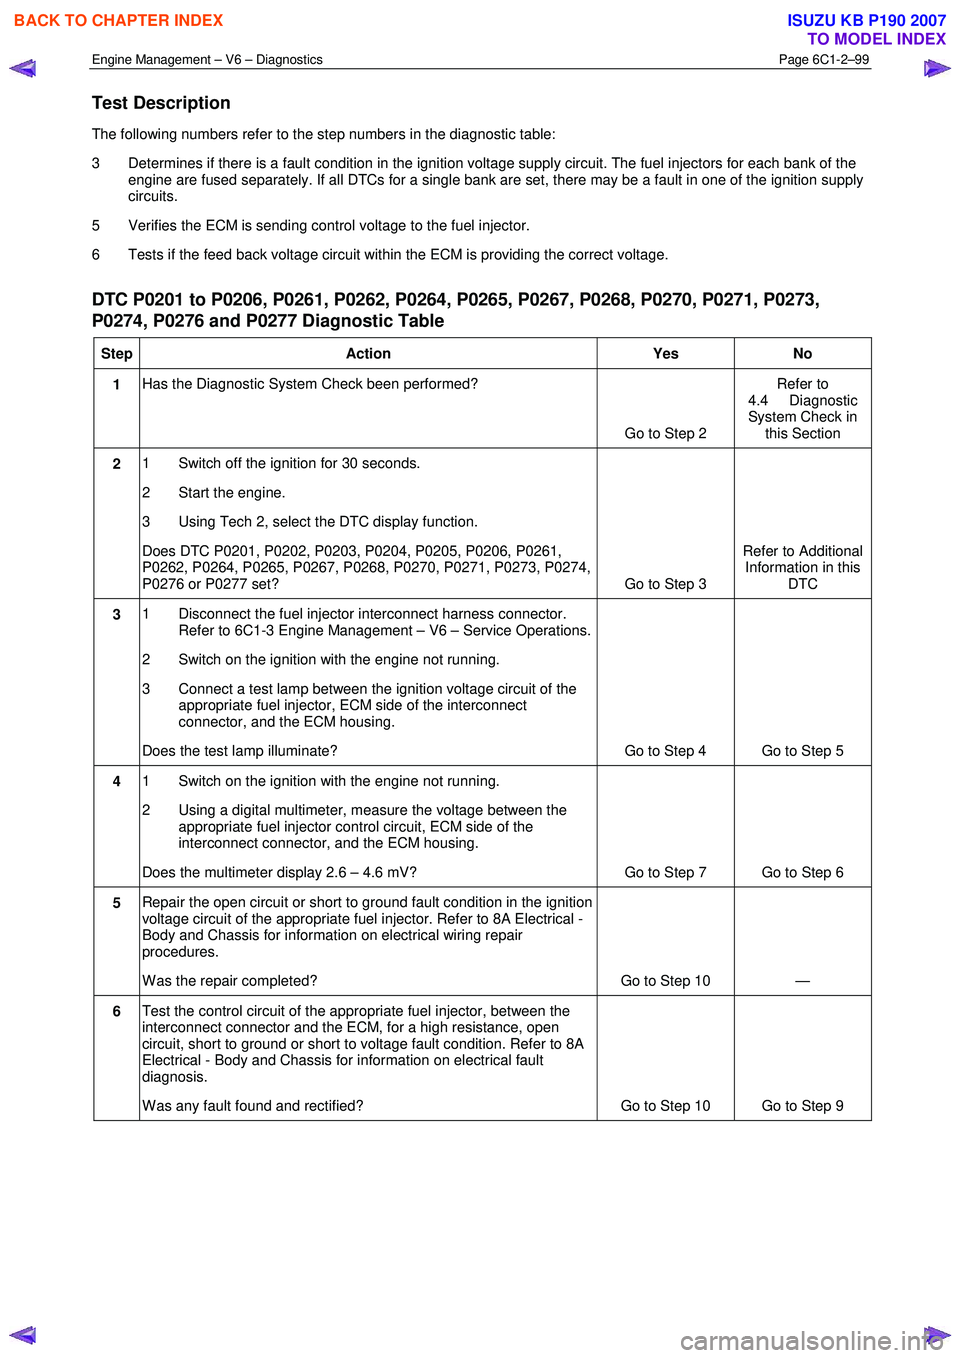
Test Description
The following numbers refer to the step numbers in the diagnostic table:
3 Determines if there is a fault condition in the ignition voltage supply circuit. The fuel injectors for each bank of the engine are fused separately. If all DTCs for a single bank are set, there may be a fault in one of the ignition supply
circuits.
5 Verifies the ECM is sending control voltage to the fuel injector.
6 Tests if the feed back voltage circuit within the ECM is providing the correct voltage.
DTC P0201 to P0206, P0261, P0262, P0264, P0265, P0267, P0268, P0270, P0271, P0273,
P0274, P0276 and P0277 Diagnostic Table
Step Action Yes No
1 Has the Diagnostic System Check been performed?
Go to Step 2 Refer to
4.4 Diagnostic
System Check in this Section
2 1 Switch off the ignition for 30 seconds.
2 Start the engine.
3 Using Tech 2, select the DTC display function.
Does DTC P0201, P0202, P0203, P0204, P0205, P0206, P0261,
P0262, P0264, P0265, P0267, P0268, P0270, P0271, P0273, P0274,
P0276 or P0277 set? Go to Step 3 Refer to Additional
Information in this DTC
3 1 Disconnect the fuel injector interconnect harness connector.
Refer to 6C1-3 Engine Management – V6 – Service Operations.
2 Switch on the ignition with the engine not running.
3 Connect a test lamp between the ignition voltage circuit of the appropriate fuel injector, ECM side of the interconnect
connector, and the ECM housing.
Does the test lamp illuminate? Go to Step 4 Go to Step 5
4 1 Switch on the ignition with the engine not running.
2 Using a digital multimeter, measure the voltage between the appropriate fuel injector control circuit, ECM side of the
interconnect connector, and the ECM housing.
Does the multimeter display 2.6 – 4.6 mV? Go to Step 7 Go to Step 6
5 Repair the open circuit or short to ground fault condition in the ignition
voltage circuit of the appropriate fuel injector. Refer to 8A Electrical -
Body and Chassis for information on electrical wiring repair
procedures.
W as the repair completed? Go to Step 10 —
6 Test the control circuit of the appropriate fuel injector, between the
interconnect connector and the ECM, for a high resistance, open
circuit, short to ground or short to voltage fault condition. Refer to 8A
Electrical - Body and Chassis for information on electrical fault
diagnosis.
W as any fault found and rectified? Go to Step 10 Go to Step 9
BACK TO CHAPTER INDEX
TO MODEL INDEX
ISUZU KB P190 2007
Page 3389 of 6020
Engine Management – V6 – Diagnostics Page 6C1-2–111
Additional Information
• Refer to 6C1-1 Engine Management – V6 – General Information for details of the knock sensor (KS) system
operation.
• Preconditions for running knock sensor circuit DTCs requires that DTC P0324 has ran and passed. Therefore, the
diagnostic table for the knock sensor circuit DTCs is developed with the assumption the ECM internal KS circuitry
is functioning correctly.
• Excessive engine mechanical noise or engine knocking condition may trigger knock sensor circuit DTCs.
• The knock sensor must be tightened correctly. Refer to 6C1-3 Engine Management – V6 – Service Operations.
• The mounting between the knock sensor and engine must be free of burrs, casting flash and foreign material.
• The knock sensor head must be clear from hoses, brackets and engine wiring.
• If the knock sensor lead is damaged in any way, the sensor must be replaced.
• Since fault condition in a wiring connector may trigger DTCs, always test the connectors related to this diagnostic
procedure for shorted terminals or poor wiring connection before replacing any component. Refer to 8A Electrical -
Body and Chassis for information on electrical fault diagnosis.
• To assist diagnosis, refer to 3 W iring Diagrams and Connector Charts in this Section, for the system wiring
diagram and connector charts.
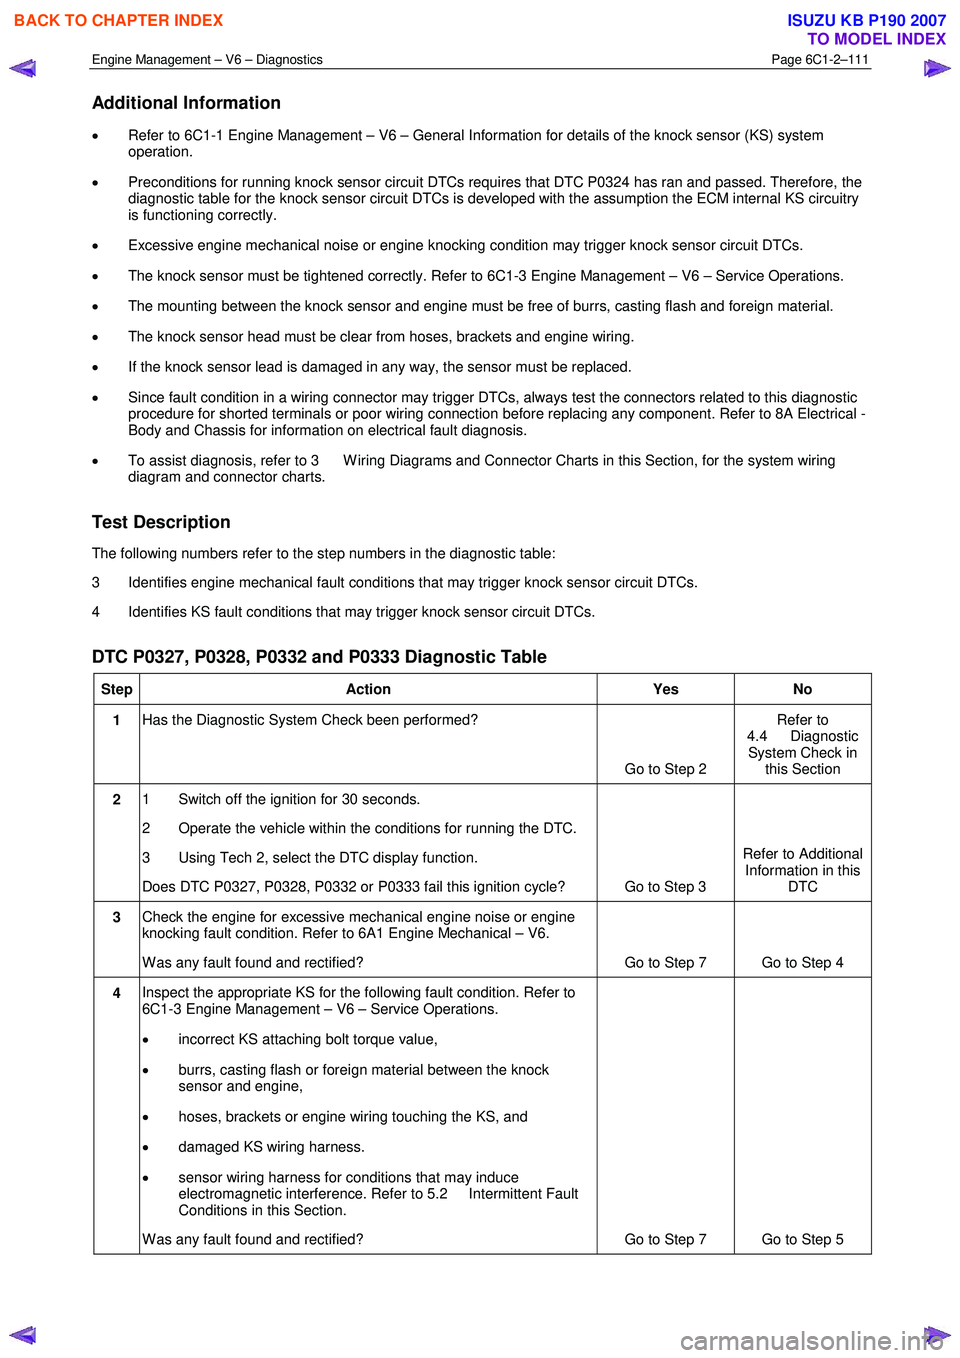
Test Description
The following numbers refer to the step numbers in the diagnostic table:
3 Identifies engine mechanical fault conditions that may trigger knock sensor circuit DTCs.
4 Identifies KS fault conditions that may trigger knock sensor circuit DTCs.
DTC P0327, P0328, P0332 and P0333 Diagnostic Table
Step Action Yes No
1 Has the Diagnostic System Check been performed?
Go to Step 2 Refer to
4.4 Diagnostic System Check in this Section
2 1 Switch off the ignition for 30 seconds.
2 Operate the vehicle within the conditions for running the DTC.
3 Using Tech 2, select the DTC display function.
Does DTC P0327, P0328, P0332 or P0333 fail this ignition cycle? Go to Step 3 Refer to Additional
Information in this DTC
3 Check the engine for excessive mechanical engine noise or engine
knocking fault condition. Refer to 6A1 Engine Mechanical – V6.
W as any fault found and rectified? Go to Step 7 Go to Step 4
4 Inspect the appropriate KS for the following fault condition. Refer to
6C1-3 Engine Management – V6 – Service Operations.
• incorrect KS attaching bolt torque value,
• burrs, casting flash or foreign material between the knock
sensor and engine,
• hoses, brackets or engine wiring touching the KS, and
• damaged KS wiring harness.
• sensor wiring harness for conditions that may induce
electromagnetic interference. Refer to 5.2 Intermittent Fault
Conditions in this Section.
W as any fault found and rectified? Go to Step 7 Go to Step 5
BACK TO CHAPTER INDEX
TO MODEL INDEX
ISUZU KB P190 2007
Page 3392 of 6020
Engine Management – V6 – Diagnostics Page 6C1-2–114
• To assist diagnosis, refer to 3 W iring Diagrams and Connector Charts in this Section, for the system wiring
diagram and connector charts.
Test Description
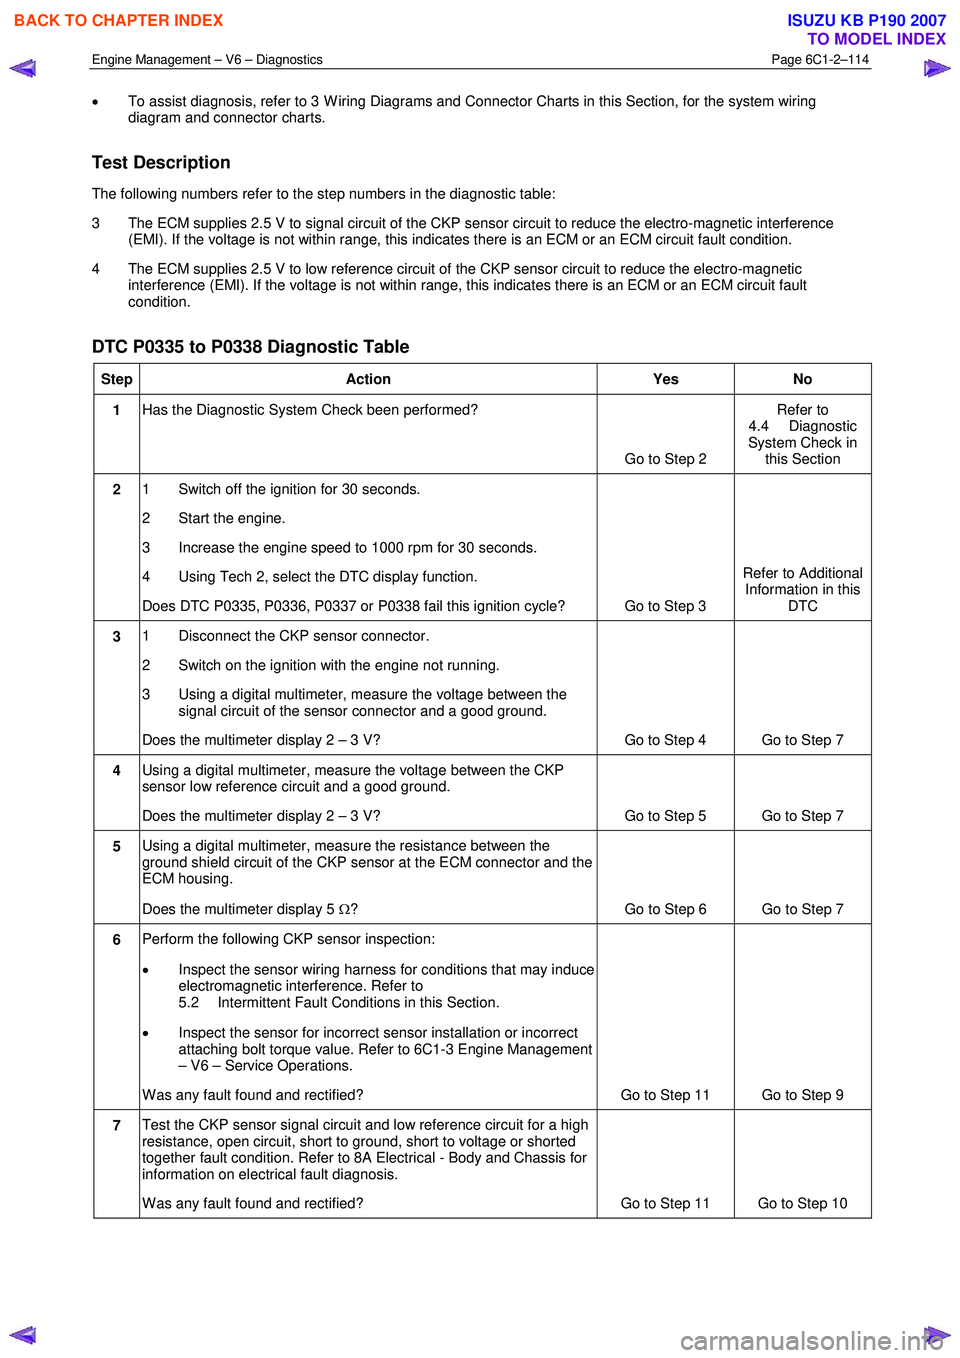
The following numbers refer to the step numbers in the diagnostic table:
3 The ECM supplies 2.5 V to signal circuit of the CKP sensor circuit to reduce the electro-magnetic interference (EMI). If the voltage is not within range, this indicates there is an ECM or an ECM circuit fault condition.
4 The ECM supplies 2.5 V to low reference circuit of the CKP sensor circuit to reduce the electro-magnetic interference (EMI). If the voltage is not within range, this indicates there is an ECM or an ECM circuit fault
condition.
DTC P0335 to P0338 Diagnostic Table
Step Action Yes No
1 Has the Diagnostic System Check been performed?
Go to Step 2 Refer to
4.4 Diagnostic
System Check in this Section
2 1 Switch off the ignition for 30 seconds.
2 Start the engine.
3 Increase the engine speed to 1000 rpm for 30 seconds.
4 Using Tech 2, select the DTC display function.
Does DTC P0335, P0336, P0337 or P0338 fail this ignition cycle? Go to Step 3 Refer to Additional
Information in this DTC
3 1 Disconnect the CKP sensor connector.
2 Switch on the ignition with the engine not running.
3 Using a digital multimeter, measure the voltage between the signal circuit of the sensor connector and a good ground.
Does the multimeter display 2 – 3 V? Go to Step 4 Go to Step 7
4 Using a digital multimeter, measure the voltage between the CKP
sensor low reference circuit and a good ground.
Does the multimeter display 2 – 3 V? Go to Step 5 Go to Step 7
5 Using a digital multimeter, measure the resistance between the
ground shield circuit of the CKP sensor at the ECM connector and the
ECM housing.
Does the multimeter display 5 Ω? Go to Step 6 Go to Step 7
6 Perform the following CKP sensor inspection:
• Inspect the sensor wiring harness for conditions that may induce
electromagnetic interference. Refer to
5.2 Intermittent Fault Conditions in this Section.
• Inspect the sensor for incorrect sensor installation or incorrect
attaching bolt torque value. Refer to 6C1-3 Engine Management
– V6 – Service Operations.
W as any fault found and rectified? Go to Step 11 Go to Step 9
7 Test the CKP sensor signal circuit and low reference circuit for a high
resistance, open circuit, short to ground, short to voltage or shorted
together fault condition. Refer to 8A Electrical - Body and Chassis for
information on electrical fault diagnosis.
W as any fault found and rectified? Go to Step 11 Go to Step 10
BACK TO CHAPTER INDEX
TO MODEL INDEX
ISUZU KB P190 2007
Page 3395 of 6020
Engine Management – V6 – Diagnostics Page 6C1-2–117
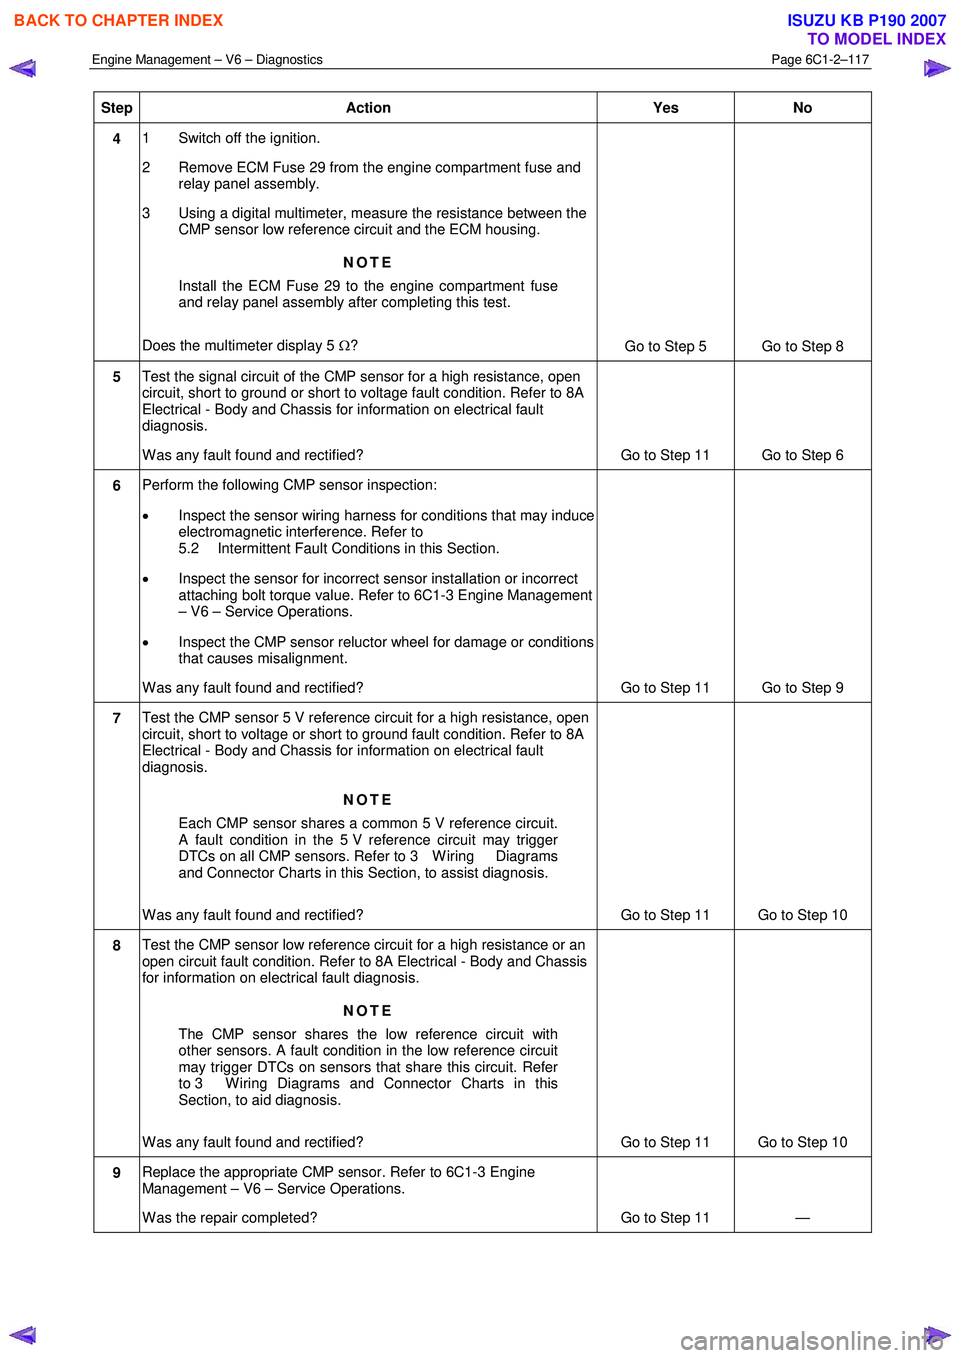
Step Action Yes No
4 1 Switch off the ignition.
2 Remove ECM Fuse 29 from the engine compartment fuse and relay panel assembly.
3 Using a digital multimeter, measure the resistance between the CMP sensor low reference circuit and the ECM housing.
NOTE
Install the ECM Fuse 29 to the engine compartment fuse
and relay panel assembly after completing this test.
Does the multimeter display 5 Ω?
Go to Step 5 Go to Step 8
5 Test the signal circuit of the CMP sensor for a high resistance, open
circuit, short to ground or short to voltage fault condition. Refer to 8A
Electrical - Body and Chassis for information on electrical fault
diagnosis.
W as any fault found and rectified? Go to Step 11 Go to Step 6
6 Perform the following CMP sensor inspection:
• Inspect the sensor wiring harness for conditions that may induce
electromagnetic interference. Refer to
5.2 Intermittent Fault Conditions in this Section.
• Inspect the sensor for incorrect sensor installation or incorrect
attaching bolt torque value. Refer to 6C1-3 Engine Management
– V6 – Service Operations.
• Inspect the CMP sensor reluctor wheel for damage or conditions
that causes misalignment.
W as any fault found and rectified? Go to Step 11 Go to Step 9
7 Test the CMP sensor 5 V reference circuit for a high resistance, open
circuit, short to voltage or short to ground fault condition. Refer to 8A
Electrical - Body and Chassis for information on electrical fault
diagnosis.
NOTE
Each CMP sensor shares a common 5 V reference circuit.
A fault condition in the 5 V reference circuit may trigger
DTCs on all CMP sensors. Refer to 3 W iring Diagrams
and Connector Charts in this Section, to assist diagnosis.
W as any fault found and rectified? Go to Step 11 Go to Step 10
8 Test the CMP sensor low reference circuit for a high resistance or an
open circuit fault condition. Refer to 8A Electrical - Body and Chassis
for information on electrical fault diagnosis.
NOTE
The CMP sensor shares the low reference circuit with
other sensors. A fault condition in the low reference circuit
may trigger DTCs on sensors that share this circuit. Refer
to 3 W iring Diagrams and Connector Charts in this
Section, to aid diagnosis.
W as any fault found and rectified? Go to Step 11 Go to Step 10
9 Replace the appropriate CMP sensor. Refer to 6C1-3 Engine
Management – V6 – Service Operations.
W as the repair completed? Go to Step 11 —
BACK TO CHAPTER INDEX
TO MODEL INDEX
ISUZU KB P190 2007
Page 3410 of 6020
Engine Management – V6 – Diagnostics Page 6C1-2–132
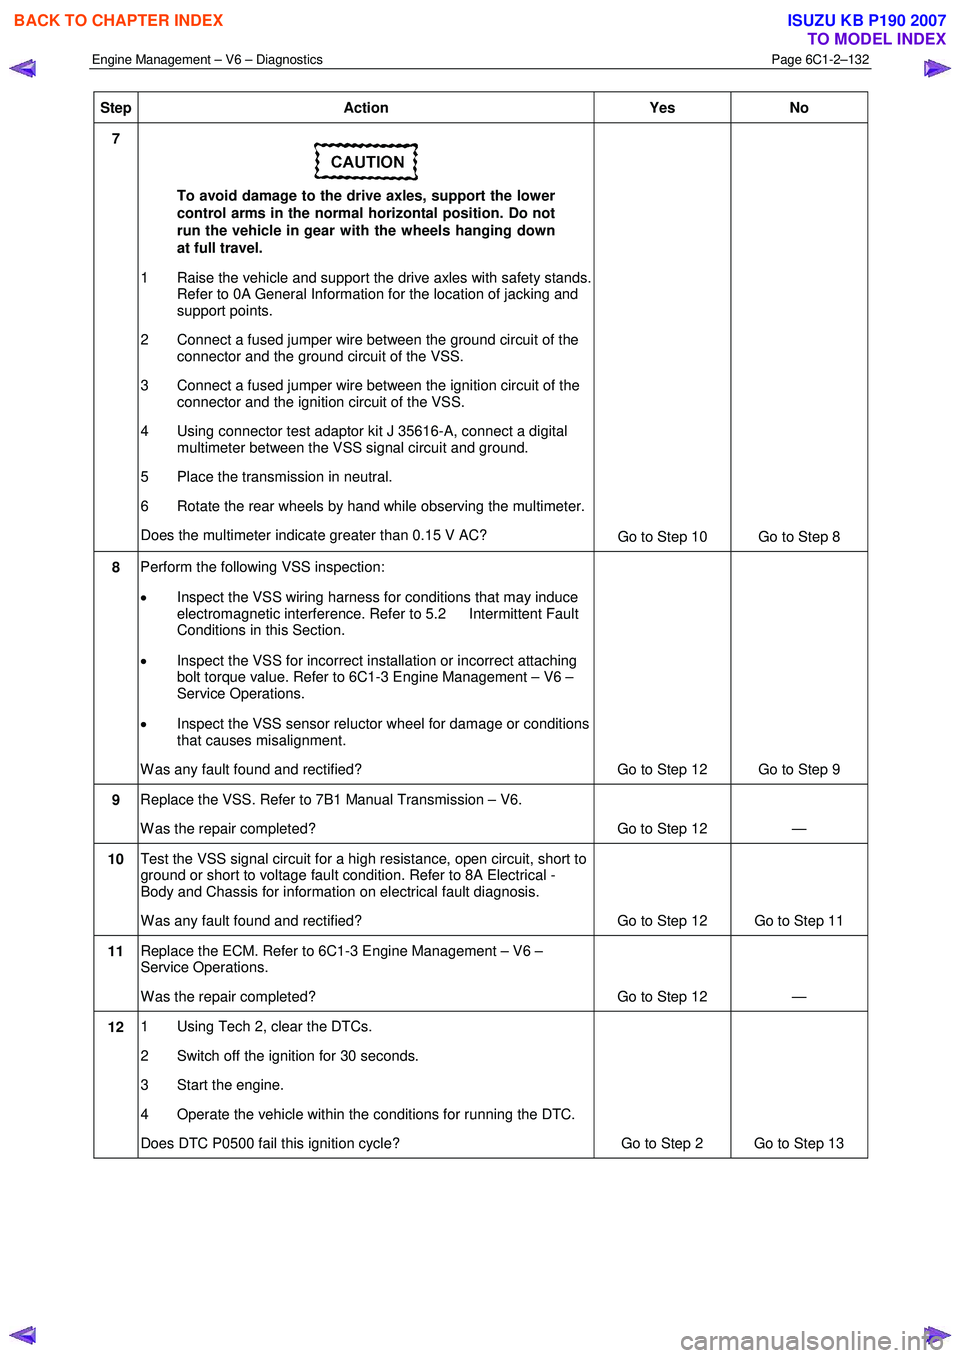
Step Action Yes No
7
To avoid damage to the drive axles, support the lower
control arms in the normal horizontal position. Do not
run the vehicle in gear with the wheels hanging down
at full travel.
1 Raise the vehicle and support the drive axles with safety stands. Refer to 0A General Information for the location of jacking and
support points.
2 Connect a fused jumper wire between the ground circuit of the connector and the ground circuit of the VSS.
3 Connect a fused jumper wire between the ignition circuit of the connector and the ignition circuit of the VSS.
4 Using connector test adaptor kit J 35616-A, connect a digital multimeter between the VSS signal circuit and ground.
5 Place the transmission in neutral.
6 Rotate the rear wheels by hand while observing the multimeter.
Does the multimeter indicate greater than 0.15 V AC? Go to Step 10 Go to Step 8
8 Perform the following VSS inspection:
• Inspect the VSS wiring harness for conditions that may induce
electromagnetic interference. Refer to 5.2 Intermittent Fault
Conditions in this Section.
• Inspect the VSS for incorrect installation or incorrect attaching
bolt torque value. Refer to 6C1-3 Engine Management – V6 –
Service Operations.
• Inspect the VSS sensor reluctor wheel for damage or conditions
that causes misalignment.
W as any fault found and rectified? Go to Step 12 Go to Step 9
9 Replace the VSS. Refer to 7B1 Manual Transmission – V6.
W as the repair completed? Go to Step 12 —
10 Test the VSS signal circuit for a high resistance, open circuit, short to
ground or short to voltage fault condition. Refer to 8A Electrical -
Body and Chassis for information on electrical fault diagnosis.
W as any fault found and rectified? Go to Step 12 Go to Step 11
11 Replace the ECM. Refer to 6C1-3 Engine Management – V6 –
Service Operations.
W as the repair completed? Go to Step 12 —
12 1 Using Tech 2, clear the DTCs.
2 Switch off the ignition for 30 seconds.
3 Start the engine.
4 Operate the vehicle within the conditions for running the DTC.
Does DTC P0500 fail this ignition cycle? Go to Step 2 Go to Step 13
BACK TO CHAPTER INDEX
TO MODEL INDEX
ISUZU KB P190 2007
Page 3451 of 6020
Engine Management – V6 – Diagnostics Page 6C1-2–173
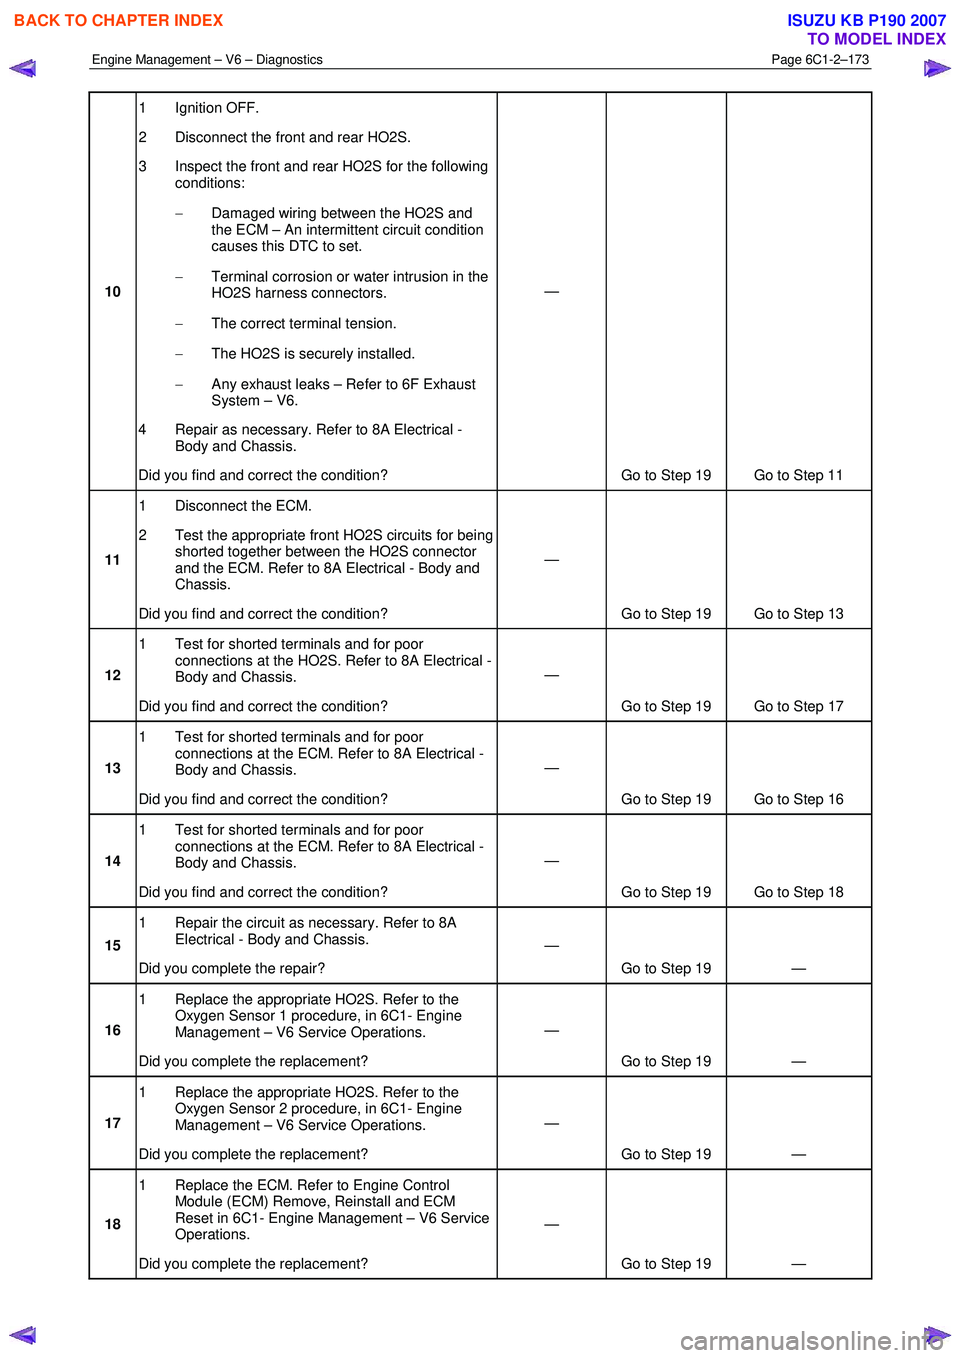
10 1 Ignition OFF.
2 Disconnect the front and rear HO2S.
3 Inspect the front and rear HO2S for the following conditions:
− Damaged wiring between the HO2S and
the ECM – An intermittent circuit condition
causes this DTC to set.
− Terminal corrosion or water intrusion in the
HO2S harness connectors.
− The correct terminal tension.
− The HO2S is securely installed.
− Any exhaust leaks – Refer to 6F Exhaust
System – V6.
4 Repair as necessary. Refer to 8A Electrical - Body and Chassis.
Did you find and correct the condition? —
Go to Step 19 Go to Step 11
11 1 Disconnect the ECM.
2 Test the appropriate front HO2S circuits for being shorted together between the HO2S connector
and the ECM. Refer to 8A Electrical - Body and
Chassis.
Did you find and correct the condition? —
Go to Step 19 Go to Step 13
12 1 Test for shorted terminals and for poor
connections at the HO2S. Refer to 8A Electrical -
Body and Chassis.
Did you find and correct the condition? —
Go to Step 19 Go to Step 17
13 1 Test for shorted terminals and for poor
connections at the ECM. Refer to 8A Electrical -
Body and Chassis.
Did you find and correct the condition? —
Go to Step 19 Go to Step 16
14 1 Test for shorted terminals and for poor
connections at the ECM. Refer to 8A Electrical -
Body and Chassis.
Did you find and correct the condition? —
Go to Step 19 Go to Step 18
15 1 Repair the circuit as necessary. Refer to 8A
Electrical - Body and Chassis.
Did you complete the repair? —
Go to Step 19 —
16 1 Replace the appropriate HO2S. Refer to the
Oxygen Sensor 1 procedure, in 6C1- Engine
Management – V6 Service Operations.
Did you complete the replacement? —
Go to Step 19 —
17 1 Replace the appropriate HO2S. Refer to the
Oxygen Sensor 2 procedure, in 6C1- Engine
Management – V6 Service Operations.
Did you complete the replacement? —
Go to Step 19 —
18 1 Replace the ECM. Refer to Engine Control
Module (ECM) Remove, Reinstall and ECM
Reset in 6C1- Engine Management – V6 Service
Operations.
Did you complete the replacement? —
Go to Step 19 —
BACK TO CHAPTER INDEX
TO MODEL INDEX
ISUZU KB P190 2007