2007 ISUZU KB P190 oil
[x] Cancel search: oilPage 3376 of 6020
Engine Management – V6 – Diagnostics Page 6C1-2–98
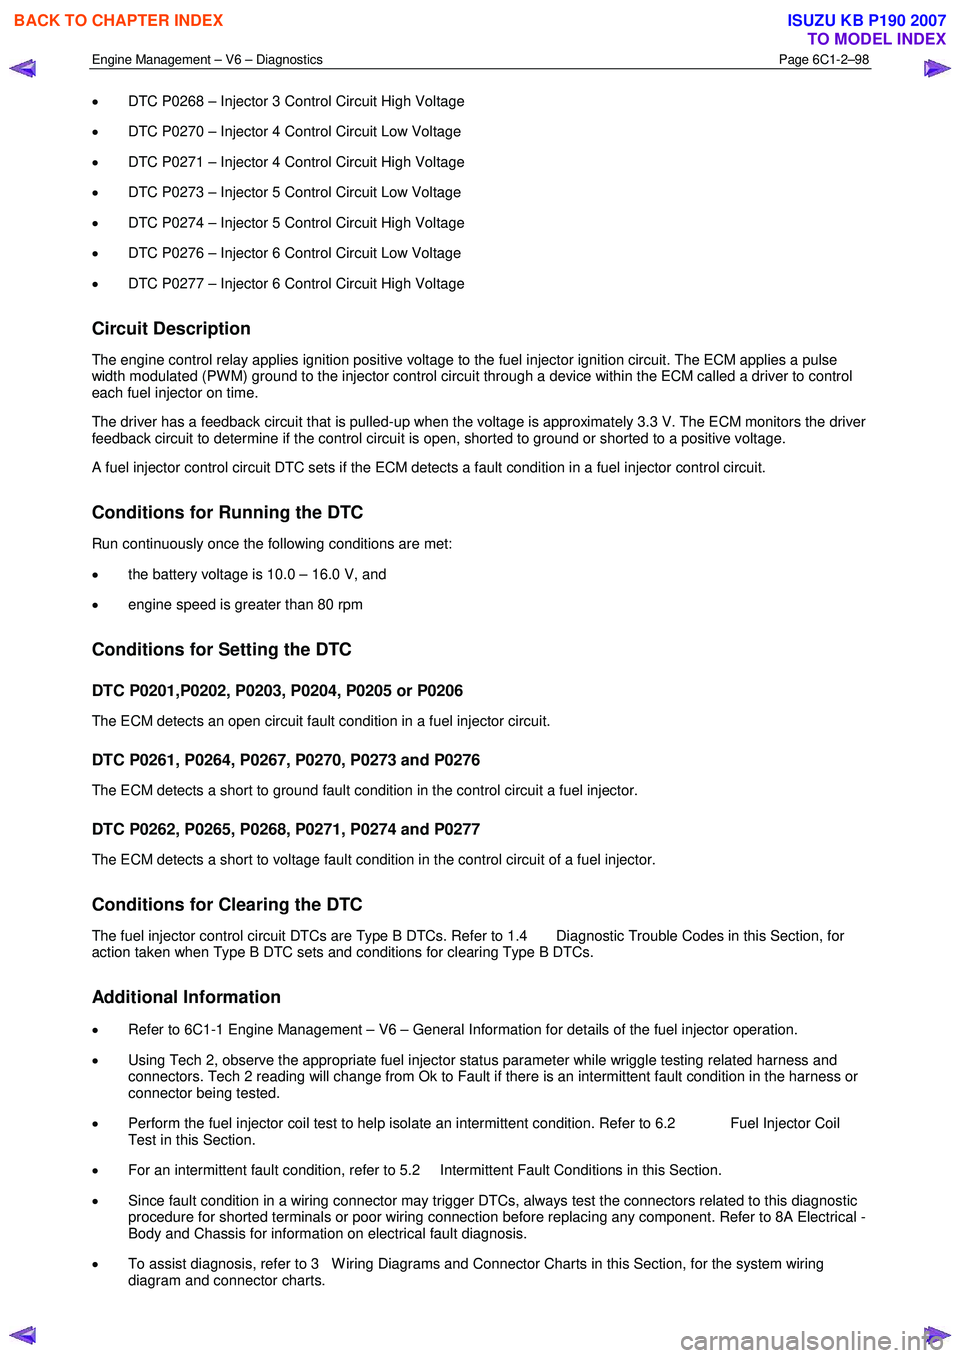
• DTC P0268 – Injector 3 Control Circuit High Voltage
• DTC P0270 – Injector 4 Control Circuit Low Voltage
• DTC P0271 – Injector 4 Control Circuit High Voltage
• DTC P0273 – Injector 5 Control Circuit Low Voltage
• DTC P0274 – Injector 5 Control Circuit High Voltage
• DTC P0276 – Injector 6 Control Circuit Low Voltage
• DTC P0277 – Injector 6 Control Circuit High Voltage
Circuit Description
The engine control relay applies ignition positive voltage to the fuel injector ignition circuit. The ECM applies a pulse
width modulated (PW M) ground to the injector control circuit through a device within the ECM called a driver to control
each fuel injector on time.
The driver has a feedback circuit that is pulled-up when the voltage is approximately 3.3 V. The ECM monitors the driver
feedback circuit to determine if the control circuit is open, shorted to ground or shorted to a positive voltage.
A fuel injector control circuit DTC sets if the ECM detects a fault condition in a fuel injector control circuit.
Conditions for Running the DTC
Run continuously once the following conditions are met:
• the battery voltage is 10.0 – 16.0 V, and
• engine speed is greater than 80 rpm
Conditions for Setting the DTC
DTC P0201,P0202, P0203, P0204, P0205 or P0206
The ECM detects an open circuit fault condition in a fuel injector circuit.
DTC P0261, P0264, P0267, P0270, P0273 and P0276
The ECM detects a short to ground fault condition in the control circuit a fuel injector.
DTC P0262, P0265, P0268, P0271, P0274 and P0277
The ECM detects a short to voltage fault condition in the control circuit of a fuel injector.
Conditions for Clearing the DTC
The fuel injector control circuit DTCs are Type B DTCs. Refer to 1.4 Diagnostic Trouble Codes in this Section, for
action taken when Type B DTC sets and conditions for clearing Type B DTCs.
Additional Information
• Refer to 6C1-1 Engine Management – V6 – General Information for details of the fuel injector operation.
• Using Tech 2, observe the appropriate fuel injector status parameter while wriggle testing related harness and
connectors. Tech 2 reading will change from Ok to Fault if there is an intermittent fault condition in the harness or
connector being tested.
• Perform the fuel injector coil test to help isolate an intermittent condition. Refer to 6.2 Fuel Injector Coil
Test in this Section.
• For an intermittent fault condition, refer to 5.2 Intermittent Fault Conditions in this Section.
• Since fault condition in a wiring connector may trigger DTCs, always test the connectors related to this diagnostic
procedure for shorted terminals or poor wiring connection before replacing any component. Refer to 8A Electrical -
Body and Chassis for information on electrical fault diagnosis.
• To assist diagnosis, refer to 3 W iring Diagrams and Connector Charts in this Section, for the system wiring
diagram and connector charts.
BACK TO CHAPTER INDEX
TO MODEL INDEX
ISUZU KB P190 2007
Page 3384 of 6020
Engine Management – V6 – Diagnostics Page 6C1-2–106
− Damaged accessory drive belt
• For an intermittent condition, refer to 5.2 Intermittent Fault Conditions in this Section.
• Since a fault condition in a wiring connector may trigger DTCs, always test the connectors related to this
diagnostic procedure for shorted terminals or poor wiring connection before replacing any component. Refer to 8A
Electrical - Body and Chassis for information on electrical fault diagnosis.
• To assist diagnosis, refer to 3 W iring Diagrams and Connector Charts in this Section, for the system wiring
diagram and connector charts.
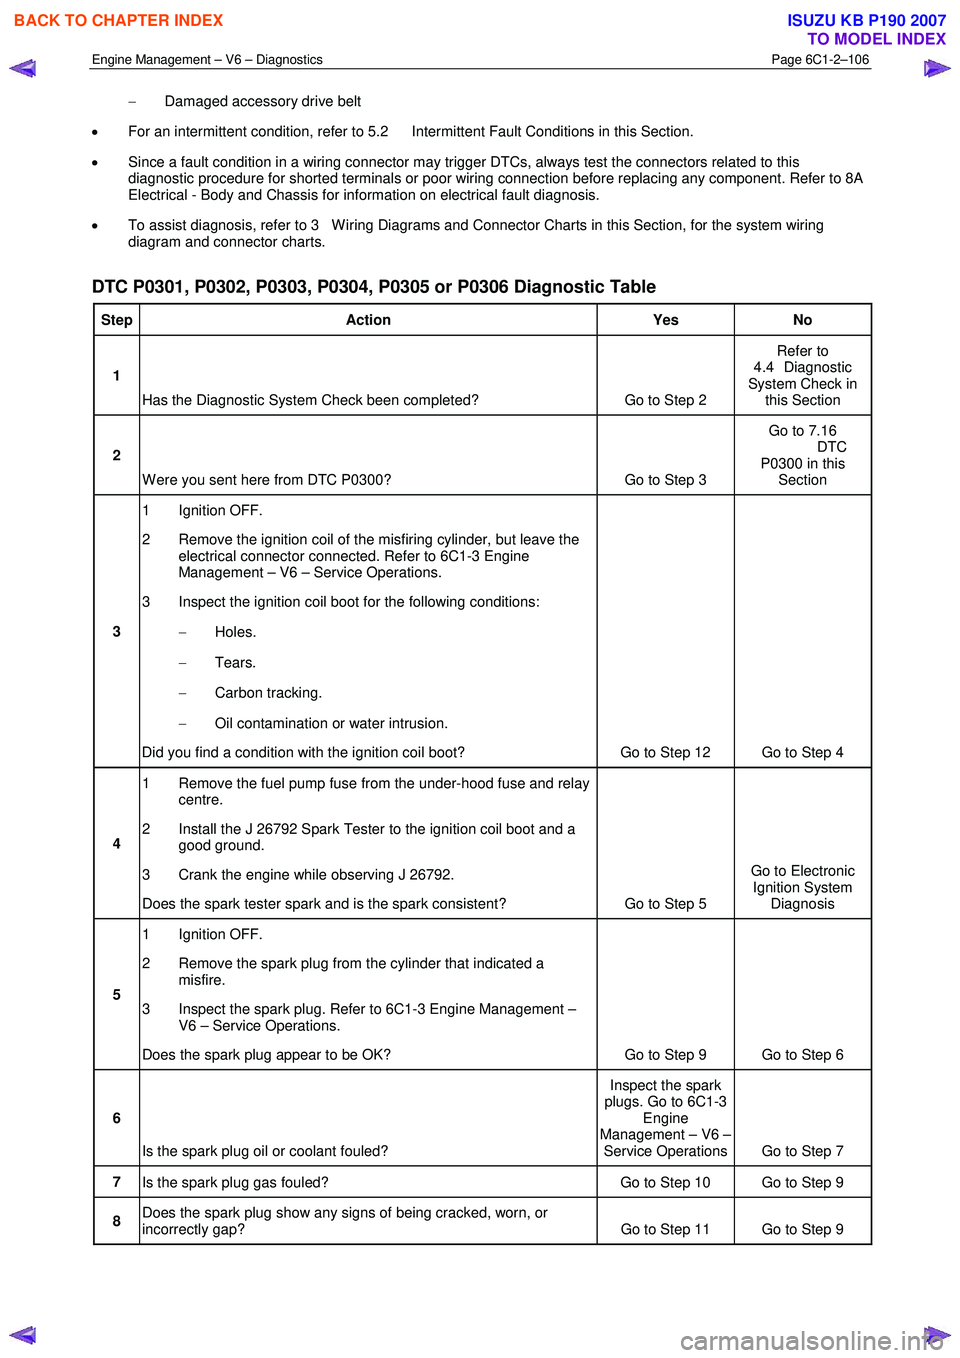
DTC P0301, P0302, P0303, P0304, P0305 or P0306 Diagnostic Table
Step Action Yes No
1
Has the Diagnostic System Check been completed? Go to Step 2 Refer to
4.4 Diagnostic
System Check in this Section
2
W ere you sent here from DTC P0300? Go to Step 3 Go to 7.16
DTC P0300 in this Section
3 1 Ignition OFF.
2 Remove the ignition coil of the misfiring cylinder, but leave the electrical connector connected. Refer to 6C1-3 Engine
Management – V6 – Service Operations.
3 Inspect the ignition coil boot for the following conditions:
− Holes.
− Tears.
− Carbon tracking.
− Oil contamination or water intrusion.
Did you find a condition with the ignition coil boot? Go to Step 12 Go to Step 4
4 1 Remove the fuel pump fuse from the under-hood fuse and relay
centre.
2 Install the J 26792 Spark Tester to the ignition coil boot and a good ground.
3 Crank the engine while observing J 26792.
Does the spark tester spark and is the spark consistent? Go to Step 5 Go to Electronic
Ignition System Diagnosis
5 1 Ignition OFF.
2 Remove the spark plug from the cylinder that indicated a misfire.
3 Inspect the spark plug. Refer to 6C1-3 Engine Management – V6 – Service Operations.
Does the spark plug appear to be OK? Go to Step 9 Go to Step 6
6
Is the spark plug oil or coolant fouled? Inspect the spark
plugs. Go to 6C1-3 Engine
Management – V6 – Service Operations Go to Step 7
7 Is the spark plug gas fouled? Go to Step 10 Go to Step 9
8 Does the spark plug show any signs of being cracked, worn, or
incorrectly gap? Go to Step 11 Go to Step 9
BACK TO CHAPTER INDEX
TO MODEL INDEX
ISUZU KB P190 2007
Page 3385 of 6020
Engine Management – V6 – Diagnostics Page 6C1-2–107
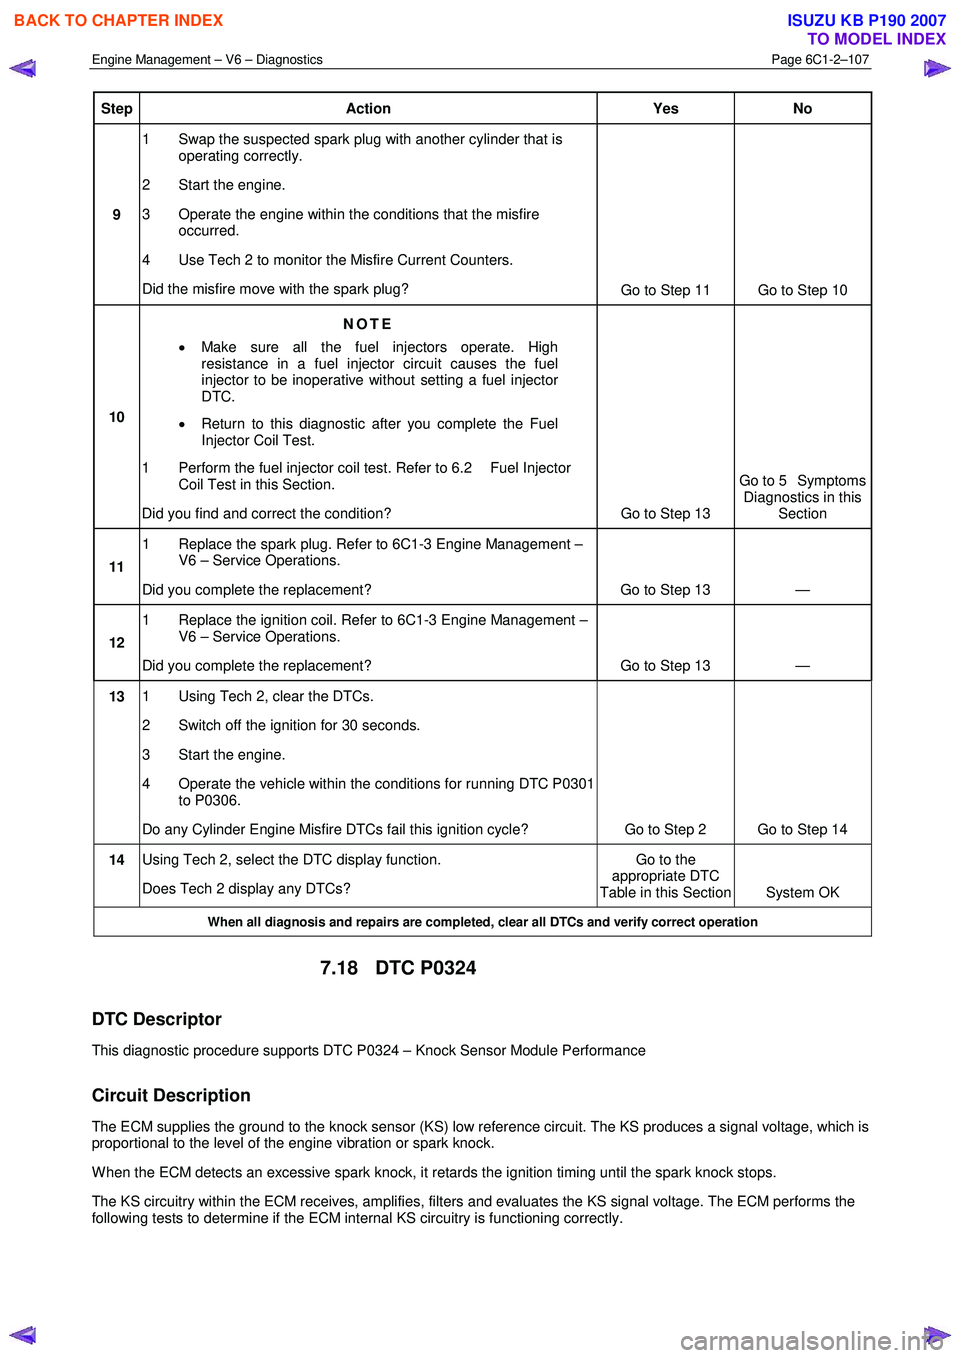
Step Action Yes No
9 1 Swap the suspected spark plug with another cylinder that is
operating correctly.
2 Start the engine.
3 Operate the engine within the conditions that the misfire occurred.
4 Use Tech 2 to monitor the Misfire Current Counters.
Did the misfire move with the spark plug? Go to Step 11 Go to Step 10
10 NOTE
• Make sure all the fuel injectors operate. High
resistance in a fuel injector circuit causes the fuel
injector to be inoperative without setting a fuel injector
DTC.
• Return to this diagnostic after you complete the Fuel
Injector Coil Test.
1 Perform the fuel injector coil test. Refer to 6.2 Fuel Injector Coil Test in this Section.
Did you find and correct the condition? Go to Step 13 Go to 5 Symptoms
Diagnostics in this Section
11 1 Replace the spark plug. Refer to 6C1-3 Engine Management –
V6 – Service Operations.
Did you complete the replacement? Go to Step 13 —
12 1 Replace the ignition coil. Refer to 6C1-3 Engine Management –
V6 – Service Operations.
Did you complete the replacement? Go to Step 13 —
13 1 Using Tech 2, clear the DTCs.
2 Switch off the ignition for 30 seconds.
3 Start the engine.
4 Operate the vehicle within the conditions for running DTC P0301 to P0306.
Do any Cylinder Engine Misfire DTCs fail this ignition cycle? Go to Step 2 Go to Step 14
14 Using Tech 2, select the DTC display function.
Does Tech 2 display any DTCs? Go to the
appropriate DTC
Table in this Section System OK
When all diagnosis and repairs are completed, clear all DTCs and verify correct operation
7.18 DTC P0324
DTC Descriptor
This diagnostic procedure supports DTC P0324 – Knock Sensor Module Performance
Circuit Description
The ECM supplies the ground to the knock sensor (KS) low reference circuit. The KS produces a signal voltage, which is
proportional to the level of the engine vibration or spark knock.
W hen the ECM detects an excessive spark knock, it retards the ignition timing until the spark knock stops.
The KS circuitry within the ECM receives, amplifies, filters and evaluates the KS signal voltage. The ECM performs the
following tests to determine if the ECM internal KS circuitry is functioning correctly.
BACK TO CHAPTER INDEX
TO MODEL INDEX
ISUZU KB P190 2007
Page 3396 of 6020

Engine Management – V6 – Diagnostics Page 6C1-2–118
Step Action Yes No
10 Replace the ECM. Refer to 6C1-3 Engine Management – V6 –
Service Operations.
W as the repair completed? Go to Step 11 —
11 1 Using Tech 2, clear the DTCs.
2 Switch off the ignition for 30 seconds.
3 Start the engine.
4 Operate the vehicle within the conditions for running the DTC.
Does any of the CMP Sensor Circuit DTCs fail this ignition cycle? Go to Step 2 Go to Step 12
12 Using Tech 2, select the DTC display function.
Does Tech 2 display any DTCs? Go to the
appropriate DTC
Table in this Section System OK
When all diagnosis and repairs are completed, check the system for correct operation.
7.22 DTC P0351, P0352, P0353, P0354, P0355,
P0356, P2300, P2301, P2303, P2304,
P2306, P2307, P2309, P2310, P2312,
P2313, P2315 or P2316
DTC Descriptors
This diagnostic procedure supports the following DTCs:
• DTC P0351 – Ignition Coil Cylinder 1 Circuit Malfunction
• DTC P0352 – Ignition Coil Cylinder 2 Circuit Malfunction
• DTC P0353 – Ignition Coil Cylinder 3 Circuit Malfunction
• DTC P0354 – Ignition Coil Cylinder 4 Circuit Malfunction
• DTC P0355 – Ignition Coil Cylinder 5 Circuit Malfunction
• DTC P0356 – Ignition Coil Cylinder 6 Circuit Malfunction
• DTC P2300 – Ignition Coil Cylinder 1 Circuit Low Voltage
• DTC P2301 – Ignition Coil Cylinder 1 Circuit High Voltage
• DTC P2303 – Ignition Coil Cylinder 2 Circuit Low Voltage
• DTC P2304 – Ignition Coil Cylinder 2 Circuit High Voltage
• DTC P2306 – Ignition Coil Cylinder 3 Circuit Low Voltage
• DTC P2307 – Ignition Coil Cylinder 3 Circuit High Voltage
• DTC P2309 – Ignition Coil Cylinder 4 Circuit Low Voltage
• DTC P2310 – Ignition Coil Cylinder 4 Circuit High Voltage
• DTC P2312 – Ignition Coil Cylinder 5 Circuit Low Voltage
• DTC P2313 – Ignition Coil Cylinder 5 Circuit High Voltage
• DTC P2315 – Ignition Coil Cylinder 6 Circuit Low Voltage
• DTC P2316 – Ignition Coil Cylinder 6 Circuit High Voltage
Circuit Description
The engine control relay applies positive voltage to the ignition voltage circuit of the ignition coil and the ignition coil du al
line ground circuits are directly connected to ground.
BACK TO CHAPTER INDEX
TO MODEL INDEX
ISUZU KB P190 2007
Page 3397 of 6020
Engine Management – V6 – Diagnostics Page 6C1-2–119
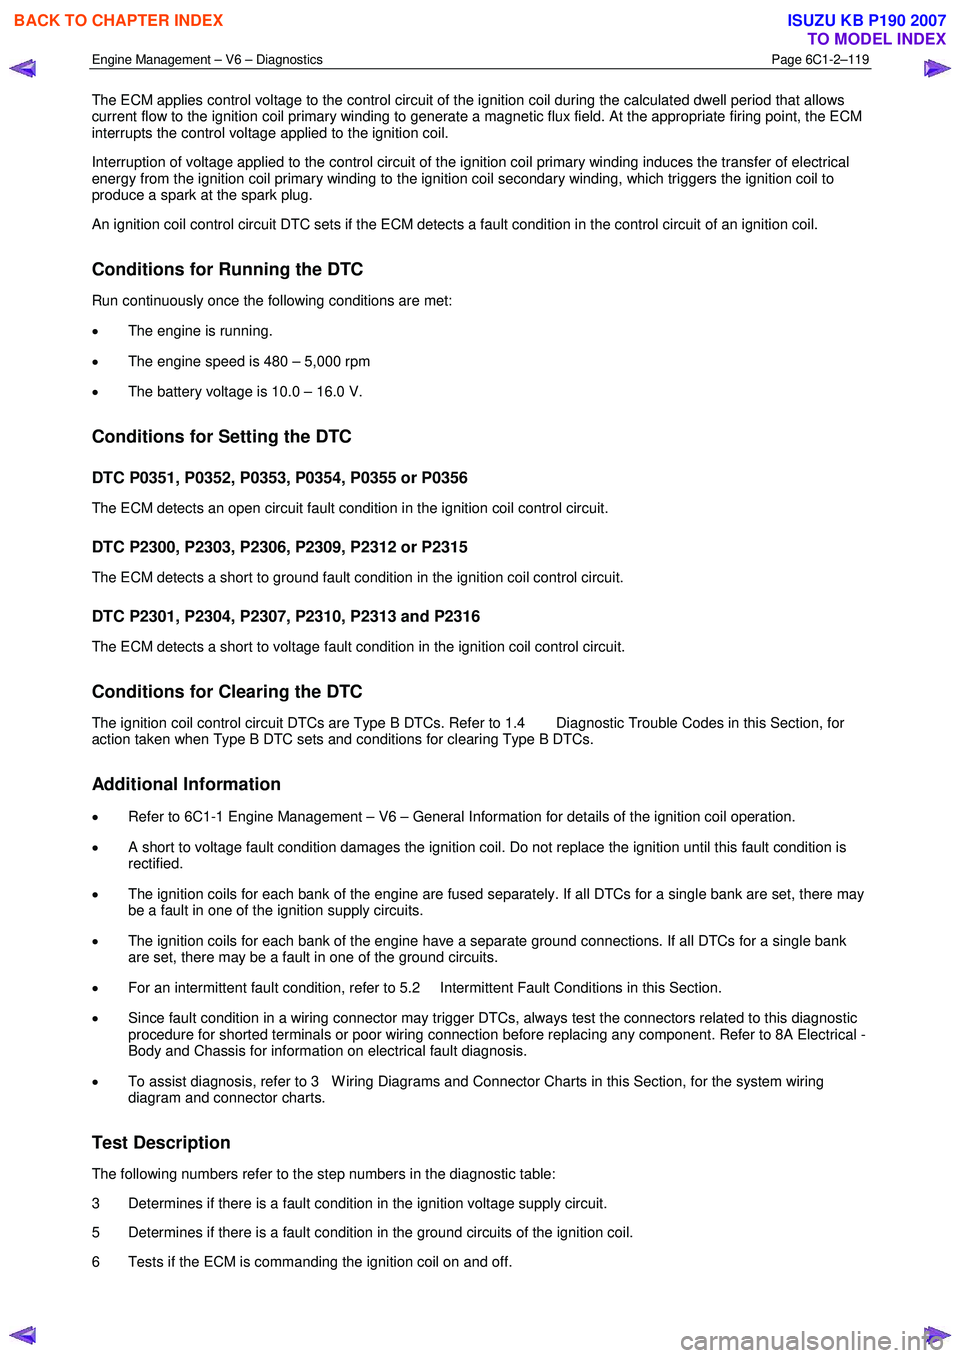
The ECM applies control voltage to the control circuit of the ignition coil during the calculated dwell period that allows
current flow to the ignition coil primary winding to generate a magnetic flux field. At the appropriate firing point, the ECM
interrupts the control voltage applied to the ignition coil.
Interruption of voltage applied to the control circuit of the ignition coil primary winding induces the transfer of electrical
energy from the ignition coil primary winding to the ignition coil secondary winding, which triggers the ignition coil to
produce a spark at the spark plug.
An ignition coil control circuit DTC sets if the ECM detects a fault condition in the control circuit of an ignition coil.
Conditions for Running the DTC
Run continuously once the following conditions are met:
• The engine is running.
• The engine speed is 480 – 5,000 rpm
• The battery voltage is 10.0 – 16.0 V.
Conditions for Setting the DTC
DTC P0351, P0352, P0353, P0354, P0355 or P0356
The ECM detects an open circuit fault condition in the ignition coil control circuit.
DTC P2300, P2303, P2306, P2309, P2312 or P2315
The ECM detects a short to ground fault condition in the ignition coil control circuit.
DTC P2301, P2304, P2307, P2310, P2313 and P2316
The ECM detects a short to voltage fault condition in the ignition coil control circuit.
Conditions for Clearing the DTC
The ignition coil control circuit DTCs are Type B DTCs. Refer to 1.4 Diagnostic Trouble Codes in this Section, for
action taken when Type B DTC sets and conditions for clearing Type B DTCs.
Additional Information
• Refer to 6C1-1 Engine Management – V6 – General Information for details of the ignition coil operation.
• A short to voltage fault condition damages the ignition coil. Do not replace the ignition until this fault condition is
rectified.
• The ignition coils for each bank of the engine are fused separately. If all DTCs for a single bank are set, there may
be a fault in one of the ignition supply circuits.
• The ignition coils for each bank of the engine have a separate ground connections. If all DTCs for a single bank
are set, there may be a fault in one of the ground circuits.
• For an intermittent fault condition, refer to 5.2 Intermittent Fault Conditions in this Section.
• Since fault condition in a wiring connector may trigger DTCs, always test the connectors related to this diagnostic
procedure for shorted terminals or poor wiring connection before replacing any component. Refer to 8A Electrical -
Body and Chassis for information on electrical fault diagnosis.
• To assist diagnosis, refer to 3 W iring Diagrams and Connector Charts in this Section, for the system wiring
diagram and connector charts.
Test Description
The following numbers refer to the step numbers in the diagnostic table:
3 Determines if there is a fault condition in the ignition voltage supply circuit.
5 Determines if there is a fault condition in the ground circuits of the ignition coil.
6 Tests if the ECM is commanding the ignition coil on and off.
BACK TO CHAPTER INDEX
TO MODEL INDEX
ISUZU KB P190 2007
Page 3398 of 6020
Engine Management – V6 – Diagnostics Page 6C1-2–120
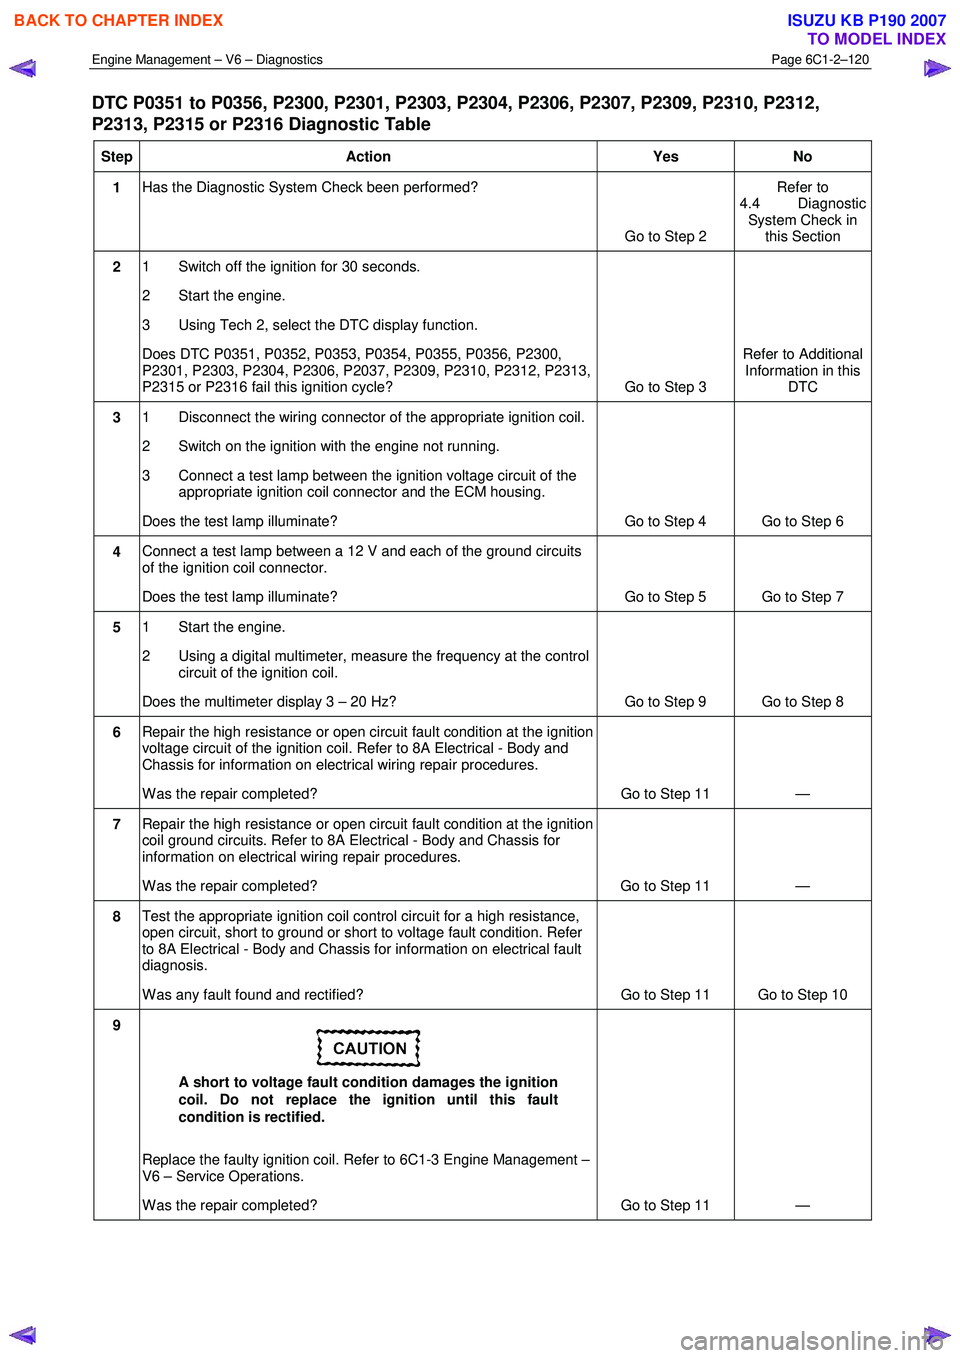
DTC P0351 to P0356, P2300, P2301, P2303, P2304, P2306, P2307, P2309, P2310, P2312,
P2313, P2315 or P2316 Diagnostic Table
Step Action Yes No
1 Has the Diagnostic System Check been performed?
Go to Step 2 Refer to
4.4 Diagnostic System Check in this Section
2 1 Switch off the ignition for 30 seconds.
2 Start the engine.
3 Using Tech 2, select the DTC display function.
Does DTC P0351, P0352, P0353, P0354, P0355, P0356, P2300,
P2301, P2303, P2304, P2306, P2037, P2309, P2310, P2312, P2313,
P2315 or P2316 fail this ignition cycle? Go to Step 3 Refer to Additional
Information in this DTC
3 1 Disconnect the wiring connector of the appropriate ignition coil.
2 Switch on the ignition with the engine not running.
3 Connect a test lamp between the ignition voltage circuit of the appropriate ignition coil connector and the ECM housing.
Does the test lamp illuminate? Go to Step 4 Go to Step 6
4 Connect a test lamp between a 12 V and each of the ground circuits
of the ignition coil connector.
Does the test lamp illuminate? Go to Step 5 Go to Step 7
5 1 Start the engine.
2 Using a digital multimeter, measure the frequency at the control circuit of the ignition coil.
Does the multimeter display 3 – 20 Hz? Go to Step 9 Go to Step 8
6 Repair the high resistance or open circuit fault condition at the ignition
voltage circuit of the ignition coil. Refer to 8A Electrical - Body and
Chassis for information on electrical wiring repair procedures.
W as the repair completed? Go to Step 11 —
7 Repair the high resistance or open circuit fault condition at the ignition
coil ground circuits. Refer to 8A Electrical - Body and Chassis for
information on electrical wiring repair procedures.
W as the repair completed? Go to Step 11 —
8 Test the appropriate ignition coil control circuit for a high resistance,
open circuit, short to ground or short to voltage fault condition. Refer
to 8A Electrical - Body and Chassis for information on electrical fault
diagnosis.
W as any fault found and rectified? Go to Step 11 Go to Step 10
9
A short to voltage fault condition damages the ignition
coil. Do not replace the ignition until this fault
condition is rectified.
Replace the faulty ignition coil. Refer to 6C1-3 Engine Management –
V6 – Service Operations.
W as the repair completed? Go to Step 11 —
BACK TO CHAPTER INDEX
TO MODEL INDEX
ISUZU KB P190 2007
Page 3399 of 6020
Engine Management – V6 – Diagnostics Page 6C1-2–121
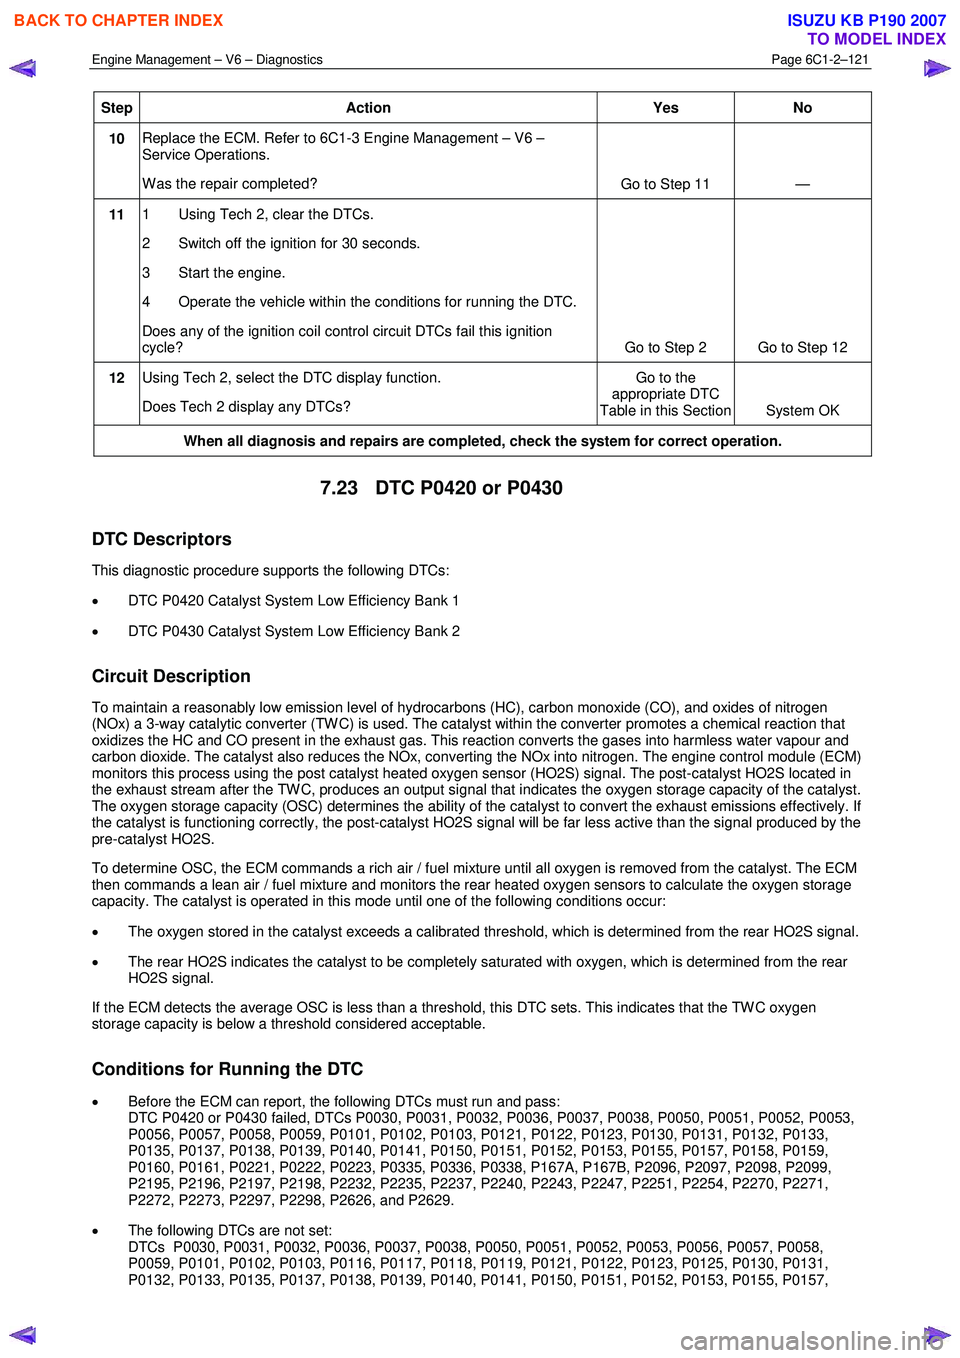
Step Action Yes No
10 Replace the ECM. Refer to 6C1-3 Engine Management – V6 –
Service Operations.
W as the repair completed? Go to Step 11 —
11 1 Using Tech 2, clear the DTCs.
2 Switch off the ignition for 30 seconds.
3 Start the engine.
4 Operate the vehicle within the conditions for running the DTC.
Does any of the ignition coil control circuit DTCs fail this ignition
cycle? Go to Step 2 Go to Step 12
12 Using Tech 2, select the DTC display function.
Does Tech 2 display any DTCs? Go to the
appropriate DTC
Table in this Section System OK
When all diagnosis and repairs are completed, check the system for correct operation.
7.23 DTC P0420 or P0430
DTC Descriptors
This diagnostic procedure supports the following DTCs:
• DTC P0420 Catalyst System Low Efficiency Bank 1
• DTC P0430 Catalyst System Low Efficiency Bank 2
Circuit Description
To maintain a reasonably low emission level of hydrocarbons (HC), carbon monoxide (CO), and oxides of nitrogen
(NOx) a 3-way catalytic converter (TW C) is used. The catalyst within the converter promotes a chemical reaction that
oxidizes the HC and CO present in the exhaust gas. This reaction converts the gases into harmless water vapour and
carbon dioxide. The catalyst also reduces the NOx, converting the NOx into nitrogen. The engine control module (ECM)
monitors this process using the post catalyst heated oxygen sensor (HO2S) signal. The post-catalyst HO2S located in
the exhaust stream after the TW C, produces an output signal that indicates the oxygen storage capacity of the catalyst.
The oxygen storage capacity (OSC) determines the ability of the catalyst to convert the exhaust emissions effectively. If
the catalyst is functioning correctly, the post-catalyst HO2S signal will be far less active than the signal produced by the
pre-catalyst HO2S.
To determine OSC, the ECM commands a rich air / fuel mixture until all oxygen is removed from the catalyst. The ECM
then commands a lean air / fuel mixture and monitors the rear heated oxygen sensors to calculate the oxygen storage
capacity. The catalyst is operated in this mode until one of the following conditions occur:
• The oxygen stored in the catalyst exceeds a calibrated threshold, which is determined from the rear HO2S signal.
• The rear HO2S indicates the catalyst to be completely saturated with oxygen, which is determined from the rear
HO2S signal.
If the ECM detects the average OSC is less than a threshold, this DTC sets. This indicates that the TW C oxygen
storage capacity is below a threshold considered acceptable.
Conditions for Running the DTC
• Before the ECM can report, the following DTCs must run and pass:
DTC P0420 or P0430 failed, DTCs P0030, P0031, P0032, P0036, P0037, P0038, P0050, P0051, P0052, P0053,
P0056, P0057, P0058, P0059, P0101, P0102, P0103, P0121, P0122, P0123, P0130, P0131, P0132, P0133,
P0135, P0137, P0138, P0139, P0140, P0141, P0150, P0151, P0152, P0153, P0155, P0157, P0158, P0159,
P0160, P0161, P0221, P0222, P0223, P0335, P0336, P0338, P167A, P167B, P2096, P2097, P2098, P2099,
P2195, P2196, P2197, P2198, P2232, P2235, P2237, P2240, P2243, P2247, P2251, P2254, P2270, P2271,
P2272, P2273, P2297, P2298, P2626, and P2629.
• The following DTCs are not set:
DTCs P0030, P0031, P0032, P0036, P0037, P0038, P0050, P0051, P0052, P0053, P0056, P0057, P0058,
P0059, P0101, P0102, P0103, P0116, P0117, P0118, P0119, P0121, P0122, P0123, P0125, P0130, P0131,
P0132, P0133, P0135, P0137, P0138, P0139, P0140, P0141, P0150, P0151, P0152, P0153, P0155, P0157,
BACK TO CHAPTER INDEX
TO MODEL INDEX
ISUZU KB P190 2007
Page 3420 of 6020
Engine Management – V6 – Diagnostics Page 6C1-2–142
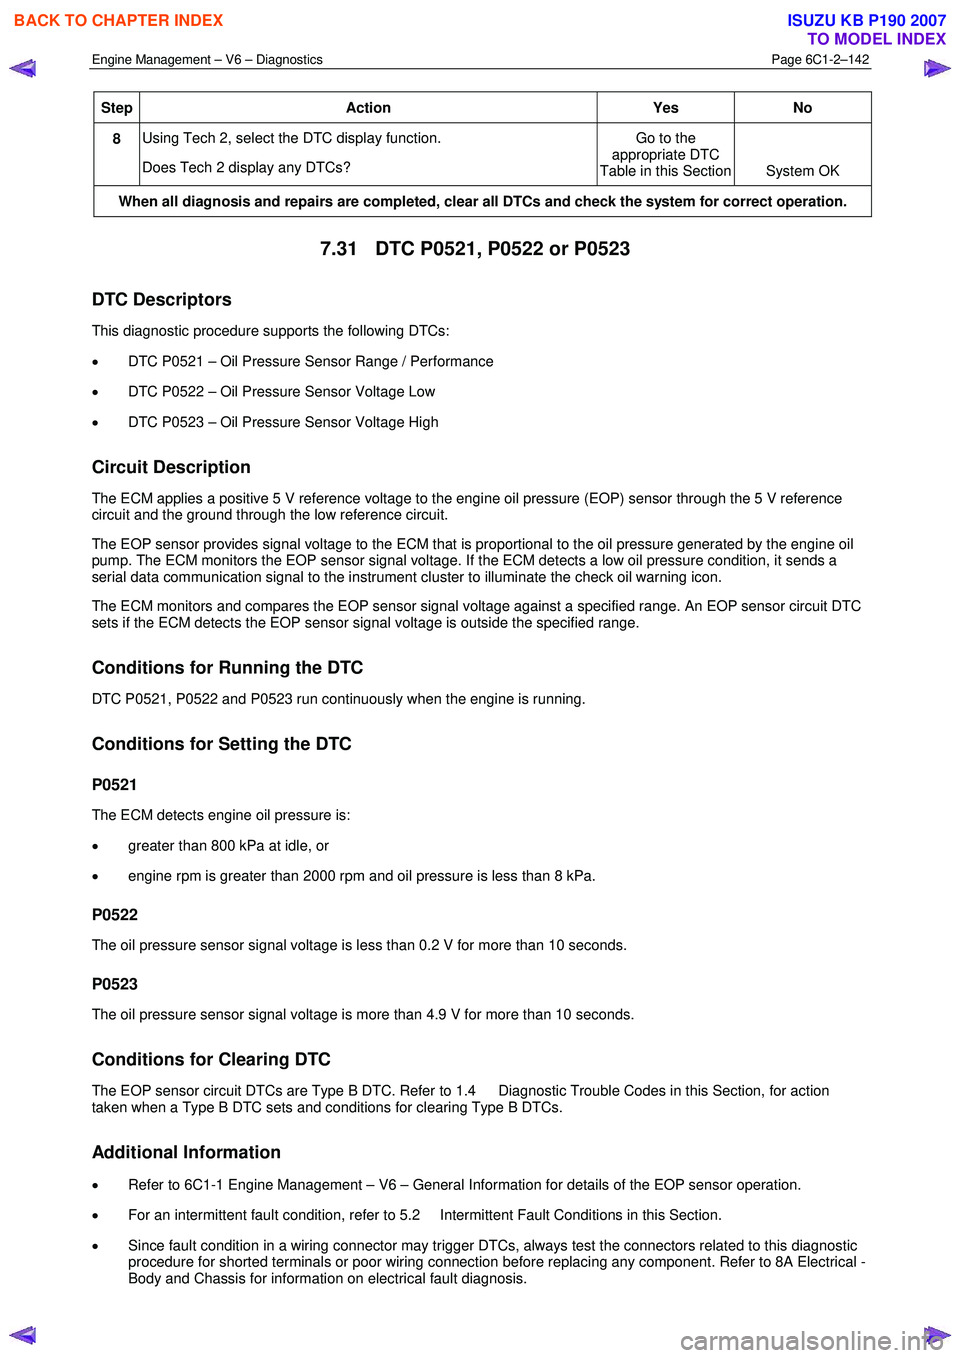
Step Action Yes No
8 Using Tech 2, select the DTC display function.
Does Tech 2 display any DTCs? Go to the
appropriate DTC
Table in this Section System OK
When all diagnosis and repairs are completed, clear all DTCs and check the system for correct operation.
7.31 DTC P0521, P0522 or P0523
DTC Descriptors
This diagnostic procedure supports the following DTCs:
• DTC P0521 – Oil Pressure Sensor Range / Performance
• DTC P0522 – Oil Pressure Sensor Voltage Low
• DTC P0523 – Oil Pressure Sensor Voltage High
Circuit Description
The ECM applies a positive 5 V reference voltage to the engine oil pressure (EOP) sensor through the 5 V reference
circuit and the ground through the low reference circuit.
The EOP sensor provides signal voltage to the ECM that is proportional to the oil pressure generated by the engine oil
pump. The ECM monitors the EOP sensor signal voltage. If the ECM detects a low oil pressure condition, it sends a
serial data communication signal to the instrument cluster to illuminate the check oil warning icon.
The ECM monitors and compares the EOP sensor signal voltage against a specified range. An EOP sensor circuit DTC
sets if the ECM detects the EOP sensor signal voltage is outside the specified range.
Conditions for Running the DTC
DTC P0521, P0522 and P0523 run continuously when the engine is running.
Conditions for Setting the DTC
P0521
The ECM detects engine oil pressure is:
• greater than 800 kPa at idle, or
• engine rpm is greater than 2000 rpm and oil pressure is less than 8 kPa.
P0522
The oil pressure sensor signal voltage is less than 0.2 V for more than 10 seconds.
P0523
The oil pressure sensor signal voltage is more than 4.9 V for more than 10 seconds.
Conditions for Clearing DTC
The EOP sensor circuit DTCs are Type B DTC. Refer to 1.4 Diagnostic Trouble Codes in this Section, for action
taken when a Type B DTC sets and conditions for clearing Type B DTCs.
Additional Information
• Refer to 6C1-1 Engine Management – V6 – General Information for details of the EOP sensor operation.
• For an intermittent fault condition, refer to 5.2 Intermittent Fault Conditions in this Section.
• Since fault condition in a wiring connector may trigger DTCs, always test the connectors related to this diagnostic
procedure for shorted terminals or poor wiring connection before replacing any component. Refer to 8A Electrical -
Body and Chassis for information on electrical fault diagnosis.
BACK TO CHAPTER INDEX
TO MODEL INDEX
ISUZU KB P190 2007