2007 INFINITI QX56 battery
[x] Cancel search: batteryPage 2925 of 3061
TROUBLE DIAGNOSIS FOR SYMPTOMS
TF-103
< SERVICE INFORMATION >
C
E
F
G
H
I
J
K
L
MA
B
TF
N
O
P
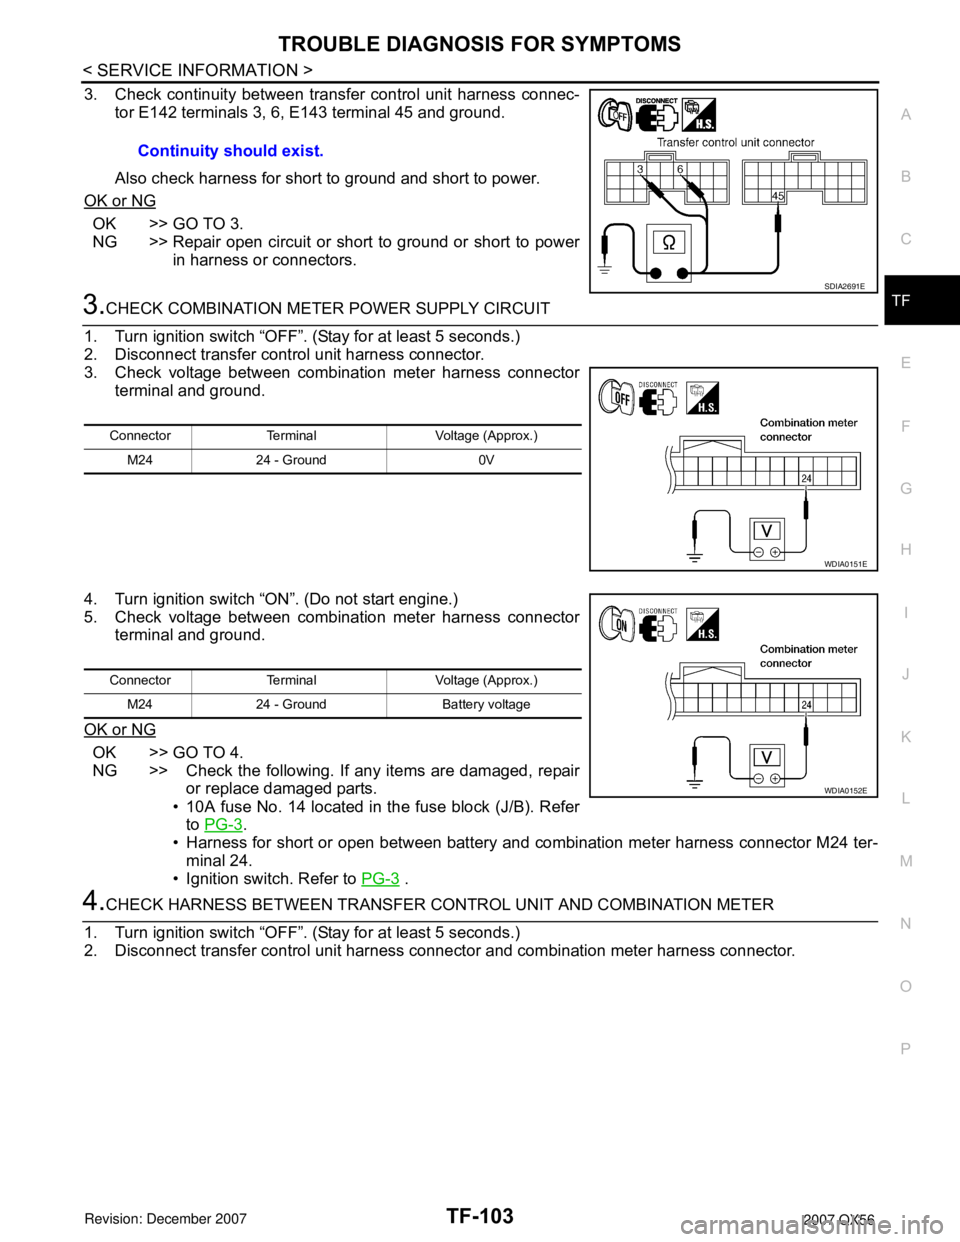
3. Check continuity between transfer control unit harness connec-
tor E142 terminals 3, 6, E143 terminal 45 and ground.
Also check harness for short to ground and short to power.
OK or NG
OK >> GO TO 3.
NG >> Repair open circuit or short to ground or short to power
in harness or connectors.
3.CHECK COMBINATION METER POWER SUPPLY CIRCUIT
1. Turn ignition switch “OFF”. (Stay for at least 5 seconds.)
2. Disconnect transfer control unit harness connector.
3. Check voltage between combination meter harness connector
terminal and ground.
4. Turn ignition switch “ON”. (Do not start engine.)
5. Check voltage between combination meter harness connector
terminal and ground.
OK or NG
OK >> GO TO 4.
NG >> Check the following. If any items are damaged, repair
or replace damaged parts.
• 10A fuse No. 14 located in the fuse block (J/B). Refer
to PG-3
.
• Harness for short or open between battery and combination meter harness connector M24 ter-
minal 24.
• Ignition switch. Refer to PG-3
.
4.CHECK HARNESS BETWEEN TRANSFER CONTROL UNIT AND COMBINATION METER
1. Turn ignition switch “OFF”. (Stay for at least 5 seconds.)
2. Disconnect transfer control unit harness connector and combination meter harness connector.Continuity should exist.
SDIA2691E
Connector Terminal Voltage (Approx.)
M24 24 - Ground 0V
WDIA0151E
Connector Terminal Voltage (Approx.)
M24 24 - Ground Battery voltage
WDIA0152E
Page 2927 of 3061
TROUBLE DIAGNOSIS FOR SYMPTOMS
TF-105
< SERVICE INFORMATION >
C
E
F
G
H
I
J
K
L
MA
B
TF
N
O
P
4WD warning lamp does not turn ON when turning ignition switch to “ON”.
DIAGNOSTIC PROCEDURE
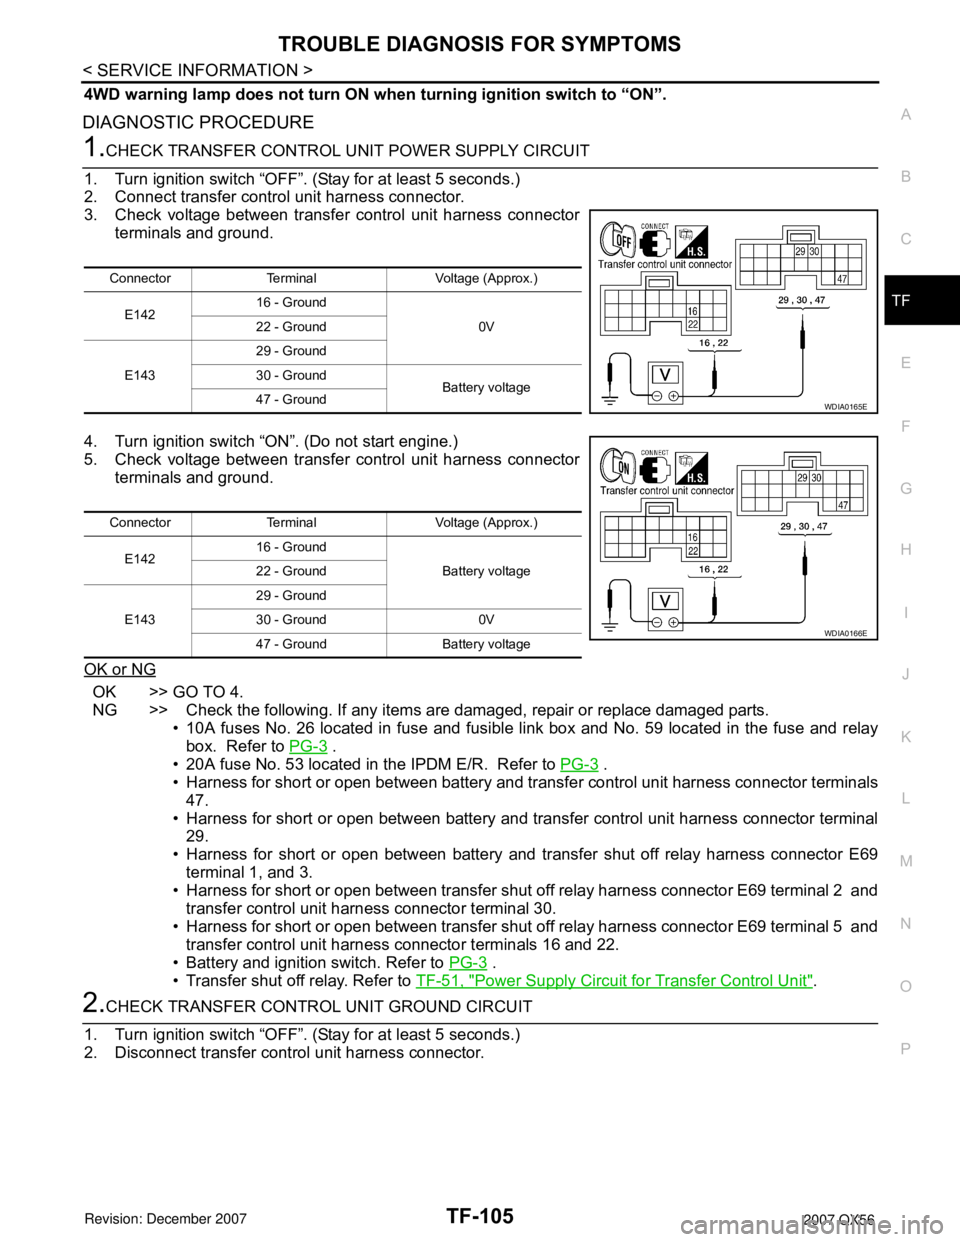
1.CHECK TRANSFER CONTROL UNIT POWER SUPPLY CIRCUIT
1. Turn ignition switch “OFF”. (Stay for at least 5 seconds.)
2. Connect transfer control unit harness connector.
3. Check voltage between transfer control unit harness connector
terminals and ground.
4. Turn ignition switch “ON”. (Do not start engine.)
5. Check voltage between transfer control unit harness connector
terminals and ground.
OK or NG
OK >> GO TO 4.
NG >> Check the following. If any items are damaged, repair or replace damaged parts.
• 10A fuses No. 26 located in fuse and fusible link box and No. 59 located in the fuse and relay
box. Refer to PG-3
.
• 20A fuse No. 53 located in the IPDM E/R. Refer to PG-3
.
• Harness for short or open between battery and transfer control unit harness connector terminals
47.
• Harness for short or open between battery and transfer control unit harness connector terminal
29.
• Harness for short or open between battery and transfer shut off relay harness connector E69
terminal 1, and 3.
• Harness for short or open between transfer shut off relay harness connector E69 terminal 2 and
transfer control unit harness connector terminal 30.
• Harness for short or open between transfer shut off relay harness connector E69 terminal 5 and
transfer control unit harness connector terminals 16 and 22.
• Battery and ignition switch. Refer to PG-3
.
• Transfer shut off relay. Refer to TF-51, "
Power Supply Circuit for Transfer Control Unit".
2.CHECK TRANSFER CONTROL UNIT GROUND CIRCUIT
1. Turn ignition switch “OFF”. (Stay for at least 5 seconds.)
2. Disconnect transfer control unit harness connector.
Connector Terminal Voltage (Approx.)
E14216 - Ground
0V 22 - Ground
E14329 - Ground
30 - Ground
Battery voltage
47 - Ground
WDIA0165E
Connector Terminal Voltage (Approx.)
E14216 - Ground
Battery voltage 22 - Ground
E14329 - Ground
30 - Ground 0V
47 - Ground Battery voltage
WDIA0166E
Page 2928 of 3061
TF-106
< SERVICE INFORMATION >
TROUBLE DIAGNOSIS FOR SYMPTOMS
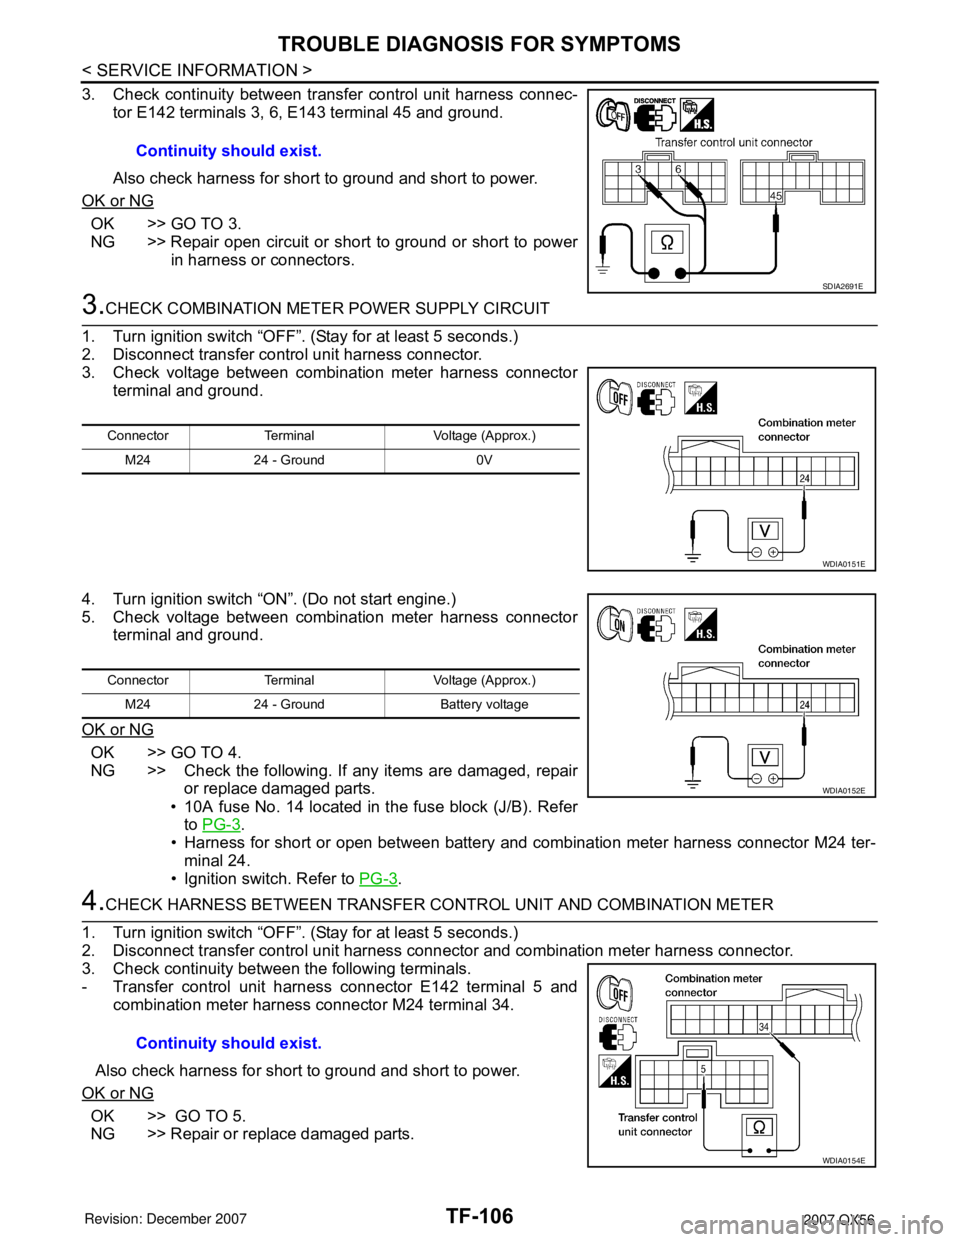
3. Check continuity between transfer control unit harness connec-
tor E142 terminals 3, 6, E143 terminal 45 and ground.
Also check harness for short to ground and short to power.
OK or NG
OK >> GO TO 3.
NG >> Repair open circuit or short to ground or short to power
in harness or connectors.
3.CHECK COMBINATION METER POWER SUPPLY CIRCUIT
1. Turn ignition switch “OFF”. (Stay for at least 5 seconds.)
2. Disconnect transfer control unit harness connector.
3. Check voltage between combination meter harness connector
terminal and ground.
4. Turn ignition switch “ON”. (Do not start engine.)
5. Check voltage between combination meter harness connector
terminal and ground.
OK or NG
OK >> GO TO 4.
NG >> Check the following. If any items are damaged, repair
or replace damaged parts.
• 10A fuse No. 14 located in the fuse block (J/B). Refer
to PG-3
.
• Harness for short or open between battery and combination meter harness connector M24 ter-
minal 24.
• Ignition switch. Refer to PG-3
.
4.CHECK HARNESS BETWEEN TRANSFER CONTROL UNIT AND COMBINATION METER
1. Turn ignition switch “OFF”. (Stay for at least 5 seconds.)
2. Disconnect transfer control unit harness connector and combination meter harness connector.
3. Check continuity between the following terminals.
- Transfer control unit harness connector E142 terminal 5 and
combination meter harness connector M24 terminal 34.
Also check harness for short to ground and short to power.
OK or NG
OK >> GO TO 5.
NG >> Repair or replace damaged parts.Continuity should exist.
SDIA2691E
Connector Terminal Voltage (Approx.)
M24 24 - Ground 0V
WDIA0151E
Connector Terminal Voltage (Approx.)
M24 24 - Ground Battery voltage
WDIA0152E
Continuity should exist.
WDIA0154E
Page 2937 of 3061
TRANSFER CONTROL UNIT
TF-115
< SERVICE INFORMATION >
C
E
F
G
H
I
J
K
L
MA
B
TF
N
O
P
TRANSFER CONTROL UNIT
Removal and InstallationINFOID:0000000003532562
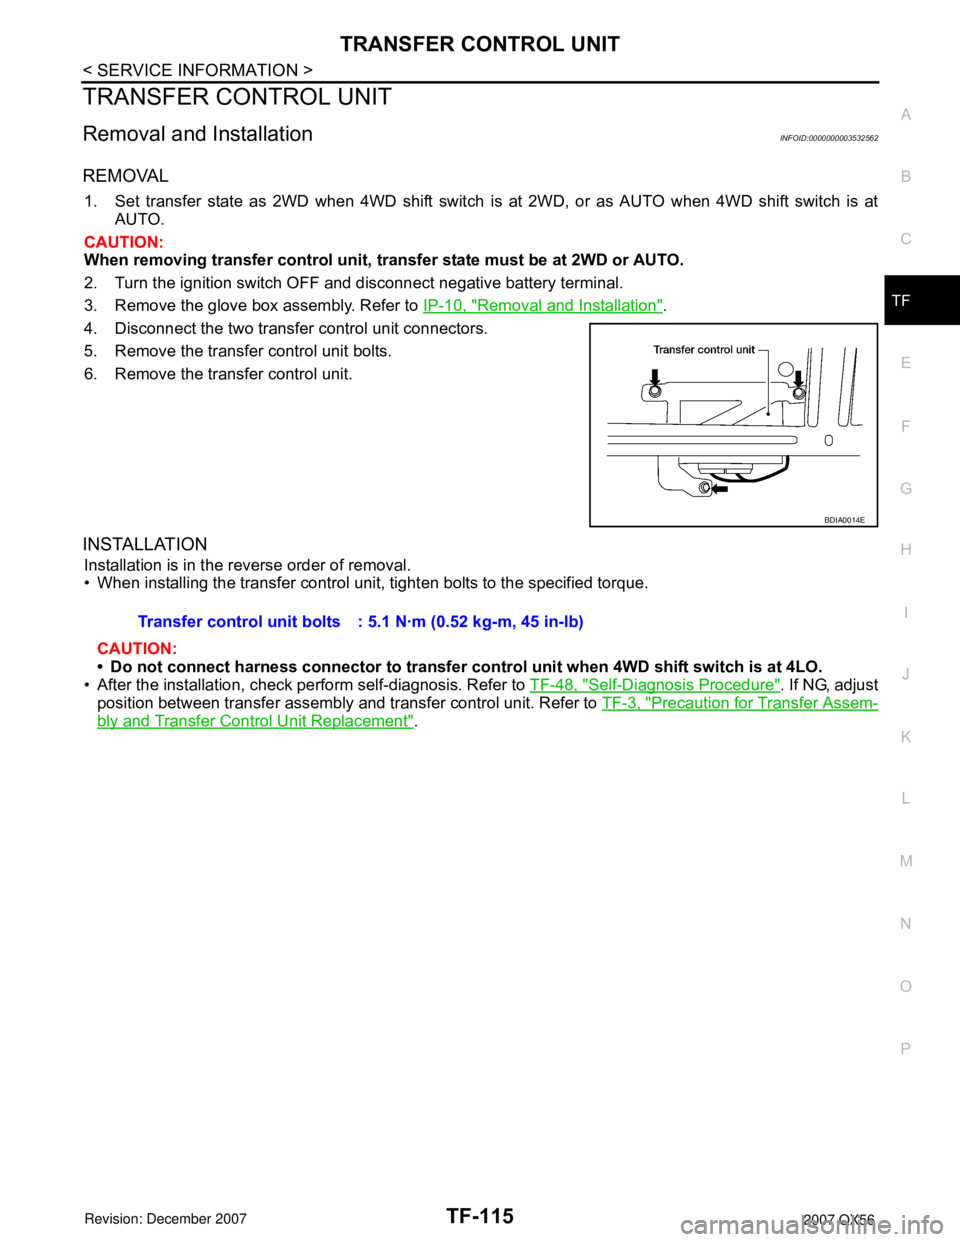
REMOVAL
1. Set transfer state as 2WD when 4WD shift switch is at 2WD, or as AUTO when 4WD shift switch is at
AUTO.
CAUTION:
When removing transfer control unit, transfer state must be at 2WD or AUTO.
2. Turn the ignition switch OFF and disconnect negative battery terminal.
3. Remove the glove box assembly. Refer to IP-10, "
Removal and Installation".
4. Disconnect the two transfer control unit connectors.
5. Remove the transfer control unit bolts.
6. Remove the transfer control unit.
INSTALLATION
Installation is in the reverse order of removal.
• When installing the transfer control unit, tighten bolts to the specified torque.
CAUTION:
• Do not connect harness connector to transfer control unit when 4WD shift switch is at 4LO.
• After the installation, check perform self-diagnosis. Refer to TF-48, "
Self-Diagnosis Procedure". If NG, adjust
position between transfer assembly and transfer control unit. Refer to TF-3, "
Precaution for Transfer Assem-
bly and Transfer Control Unit Replacement".
BDIA0014E
Transfer control unit bolts : 5.1 N·m (0.52 kg-m, 45 in-lb)
Page 3005 of 3061

WT-16
< SERVICE INFORMATION >
TROUBLE DIAGNOSIS
× : Applicable
– : Not applicable
Self-Diagnostic Results Mode
NOTE:
Before performing the self-diagnosis, be sure to register the ID or else the actual malfunction location may be different from that dis-
played on CONSULT-II.
Data Monitor Mode
Rear - Left transmitter××
Rear - Right transmitter××
Warning lamp —×
Vehicle speed××
Buzzer (in combination meter) —×
CAN Communication×× ITEM SELF-DIAGNOSTIC RESULTS DATA MONITOR
Diagnostic item
Diagnostic item is detected when ···Reference
page Program card UED06A or
earlierProgram card UED06B or later
FLAT - TIRE - FL [C1704]
FLAT - TIRE - FR [C1705]
FLAT - TIRE - RR [C1706]
FLAT - TIRE - RL [C1707]LOW - PRESSURE - FL [C1704]
LOW - PRESSURE - FR [C1705]
LOW - PRESSURE - RR [C1706]
LOW - PRESSURE - RL [C1707]FL tire pressure 193 kPa (2.0 kg/cm
2 , 28 psi) or less
FR tire pressure 193 kPa (2.0 kg/cm2 , 28 psi) or less
RR tire pressure 193 kPa (2.0 kg/cm2 , 28 psi) or less
RL tire pressure 193 kPa (2.0 kg/cm2 , 28 psi) or less—
[NO-DATA] - FL [C1708]
[NO-DATA] - FR [C1709]
[NO-DATA] - RR [C1710]
[NO-DATA] - RL [C1711]Data from FL transmitter cannot be received.
Data from FR transmitter cannot be received.
Data from RR transmitter cannot be received.
Data from RL transmitter cannot be received.WT-20
[CHECKSUM- ERR] - FL [C1712]
[CHECKSUM- ERR] - FR [C1713]
[CHECKSUM- ERR] - RR [C1714]
[CHECKSUM- ERR] - RL [C1715]Checksum data from FL transmitter is malfunctioning.
Checksum data from FR transmitter is malfunctioning.
Checksum data from RR transmitter is malfunctioning.
Checksum data from RL transmitter is malfunctioning.WT-20
[PRESSDATA- ERR] - FL [C1716]
[PRESSDATA- ERR] - FR [C1717]
[PRESSDATA- ERR] - RR [C1718]
[PRESSDATA- ERR] - RL [C1719]Air pressure data from FL transmitter is malfunctioning.
Air pressure data from FR transmitter is malfunctioning.
Air pressure data from RR transmitter is malfunctioning.
Air pressure data from RL transmitter is malfunctioning.WT-21
[CODE- ERR] - FL [C1720]
[CODE- ERR] - FR [C1721]
[CODE- ERR] - RR [C1722]
[CODE- ERR] - RL [C1723]Function code data from FL transmitter is malfunctioning.
Function code data from FR transmitter is malfunctioning.
Function code data from RR transmitter is malfunctioning.
Function code data from RL transmitter is malfunctioning.WT-20
[BATT - VOLT - LOW] - FL [C1724]
[BATT - VOLT - LOW] - FR [C1725]
[BATT - VOLT - LOW] - RR [C1726]
[BATT - VOLT - LOW] - RL [C1727]Battery voltage of FL transmitter drops.
Battery voltage of FR transmitter drops.
Battery voltage of RR transmitter drops.
Battery voltage of RL transmitter drops.WT-20
VHCL_SPEED_SIG_ERR [C1729] Vehicle speed signal is in error.WT-21
IGN_CIRCUIT_OPEN [C1735] Vehicle ignition signal is in error.WT-22
MONITOR CONDITION SPECIFICATION
VHCL SPEED Drive vehicle. Vehicle speed (km/h or MPH)
AIR PRESS FL
AIR PRESS FR
AIR PRESS RR
AIR PRESS RL• Drive vehicle for a few minutes.
Tire pressure (kPa or psi) or
• Ignition switch ON and activation tool
is transmitting activation signals.
Page 3007 of 3061
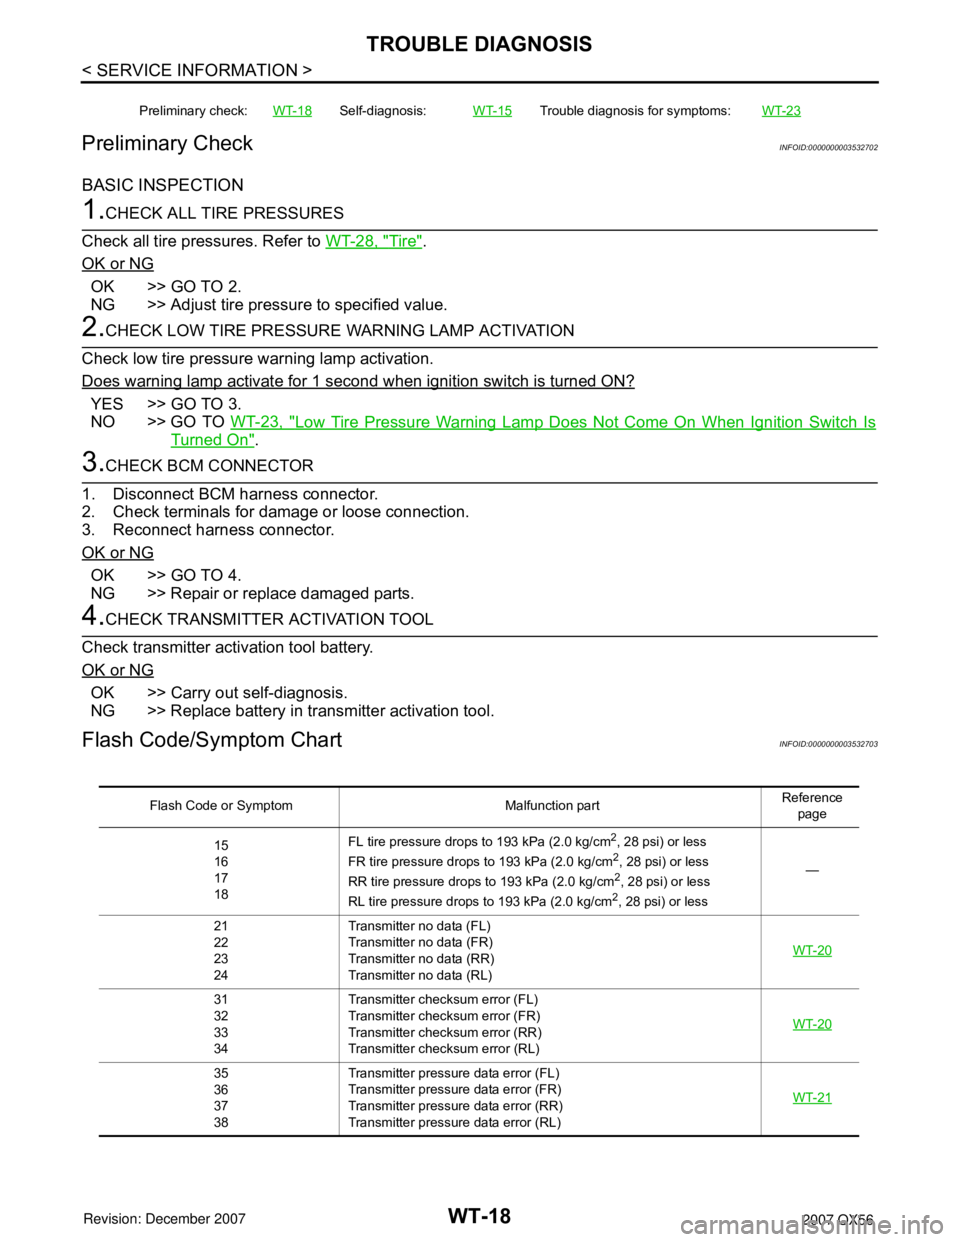
WT-18
< SERVICE INFORMATION >
TROUBLE DIAGNOSIS
Preliminary Check
INFOID:0000000003532702
BASIC INSPECTION
1.CHECK ALL TIRE PRESSURES
Check all tire pressures. Refer to WT-28, "
Tire".
OK or NG
OK >> GO TO 2.
NG >> Adjust tire pressure to specified value.
2.CHECK LOW TIRE PRESSURE WARNING LAMP ACTIVATION
Check low tire pressure warning lamp activation.
Does warning lamp activate for 1 second when ignition switch is turned ON?
YES >> GO TO 3.
NO >> GO TO WT-23, "
Low Tire Pressure Warning Lamp Does Not Come On When Ignition Switch Is
Turned On".
3.CHECK BCM CONNECTOR
1. Disconnect BCM harness connector.
2. Check terminals for damage or loose connection.
3. Reconnect harness connector.
OK or NG
OK >> GO TO 4.
NG >> Repair or replace damaged parts.
4.CHECK TRANSMITTER ACTIVATION TOOL
Check transmitter activation tool battery.
OK or NG
OK >> Carry out self-diagnosis.
NG >> Replace battery in transmitter activation tool.
Flash Code/Symptom ChartINFOID:0000000003532703
Preliminary check:WT-18Self-diagnosis:WT-15Trouble diagnosis for symptoms:WT-23
Flash Code or Symptom Malfunction partReference
page
15
16
17
18FL tire pressure drops to 193 kPa (2.0 kg/cm
2, 28 psi) or less
FR tire pressure drops to 193 kPa (2.0 kg/cm2, 28 psi) or less
RR tire pressure drops to 193 kPa (2.0 kg/cm2, 28 psi) or less
RL tire pressure drops to 193 kPa (2.0 kg/cm2, 28 psi) or less—
21
22
23
24Transmitter no data (FL)
Transmitter no data (FR)
Transmitter no data (RR)
Transmitter no data (RL)WT-20
31
32
33
34Transmitter checksum error (FL)
Transmitter checksum error (FR)
Transmitter checksum error (RR)
Transmitter checksum error (RL)WT-20
35
36
37
38Transmitter pressure data error (FL)
Transmitter pressure data error (FR)
Transmitter pressure data error (RR)
Transmitter pressure data error (RL)WT-21
Page 3008 of 3061

TROUBLE DIAGNOSIS
WT-19
< SERVICE INFORMATION >
C
D
F
G
H
I
J
K
L
MA
B
WT
N
O
P
41
42
43
44Transmitter function code error (FL)
Transmitter function code error (FR)
Transmitter function code error (RR)
Transmitter function code error (RL)WT-20
45
46
47
48Transmitter battery voltage low (FL)
Transmitter battery voltage low (FR)
Transmitter battery voltage low (RR)
Transmitter battery voltage low (RL)WT-20
52 Vehicle speed signalWT-21
54 Vehicle ignition signalWT-22
Low tire pressure warning lamp does
not come on when ignition switch is
turned on.• Fuse or combination meter
• BCM connector or circuit
•BCM WT-23
Low tire pressure warning lamp stays
on when ignition switch is turned on.• Combination meter
• BCM connector or circuit
•BCMWT-23
Low tire pressure warning lamp flashes
when ignition switch is turned on.• BCM harness connector or circuit
•BCM
• Transmitter's mode off
• ID registration not completed yetWT-24
Hazard warning lamps flash when igni-
tion switch is turned on.• BCM harness connector or circuit
•BCMWT-25
ID registration cannot be completed.• Transmitter
• Remote keyless entry receiver harness connector or circuit
• Remote keyless entry receiver
• BCM harness connector or circuit
•BCMWT-25
Flash Code or Symptom Malfunction partReference
page
Page 3012 of 3061
TROUBLE DIAGNOSIS FOR SYMPTOMS
WT-23
< SERVICE INFORMATION >
C
D
F
G
H
I
J
K
L
MA
B
WT
N
O
P
TROUBLE DIAGNOSIS FOR SYMPTOMS
Low Tire Pressure Warning Lamp Does Not Come On When Ignition Switch Is Turned
On
INFOID:0000000003532708
DIAGNOSTIC PROCEDURE
1.SELF-DIAGNOSTIC RESULT CHECK
Using CONSULT-II, check display contents in self-diagnostic results.
Is "CAN COMM CIRCUIT" displayed in the self-diagnosis display items?
YES >> Malfunction in CAN communication system. GO TO LAN-40.
NO >> GO TO 2.
2.CHECK COMBINATION METER
Check combination meter operation. Refer to DI-12, "
Self-Diagnosis Mode of Combination Meter".
Inspection results OK?
OK >> GO TO 3.
NG >> Replace combination meter. Refer to IP-10, "
Removal and Installation".
3.CHECK LOW TIRE PRESSURE WARNING LAMP
Disconnect BCM harness connector.
Does the low tire pressure warning lamp activate?
YES >> Replace BCM. Refer to BCS-24, "BCM".
NO >> Check combination meter operation. Refer to DI-12, "
Self-Diagnosis Mode of Combination
Meter".
Low Tire Pressure Warning Lamp Stays On When Ignition Switch Is Turned On
INFOID:0000000003532709
DIAGNOSTIC PROCEDURE
1.CHECK BCM CONNECTORS
1. Turn ignition switch OFF.
2. Disconnect BCM harness connectors M18 and M20.
3. Check terminals for damage or loose connections.
Inspection results OK?
OK >> GO TO 2.
NG >> Repair or replace damaged parts.
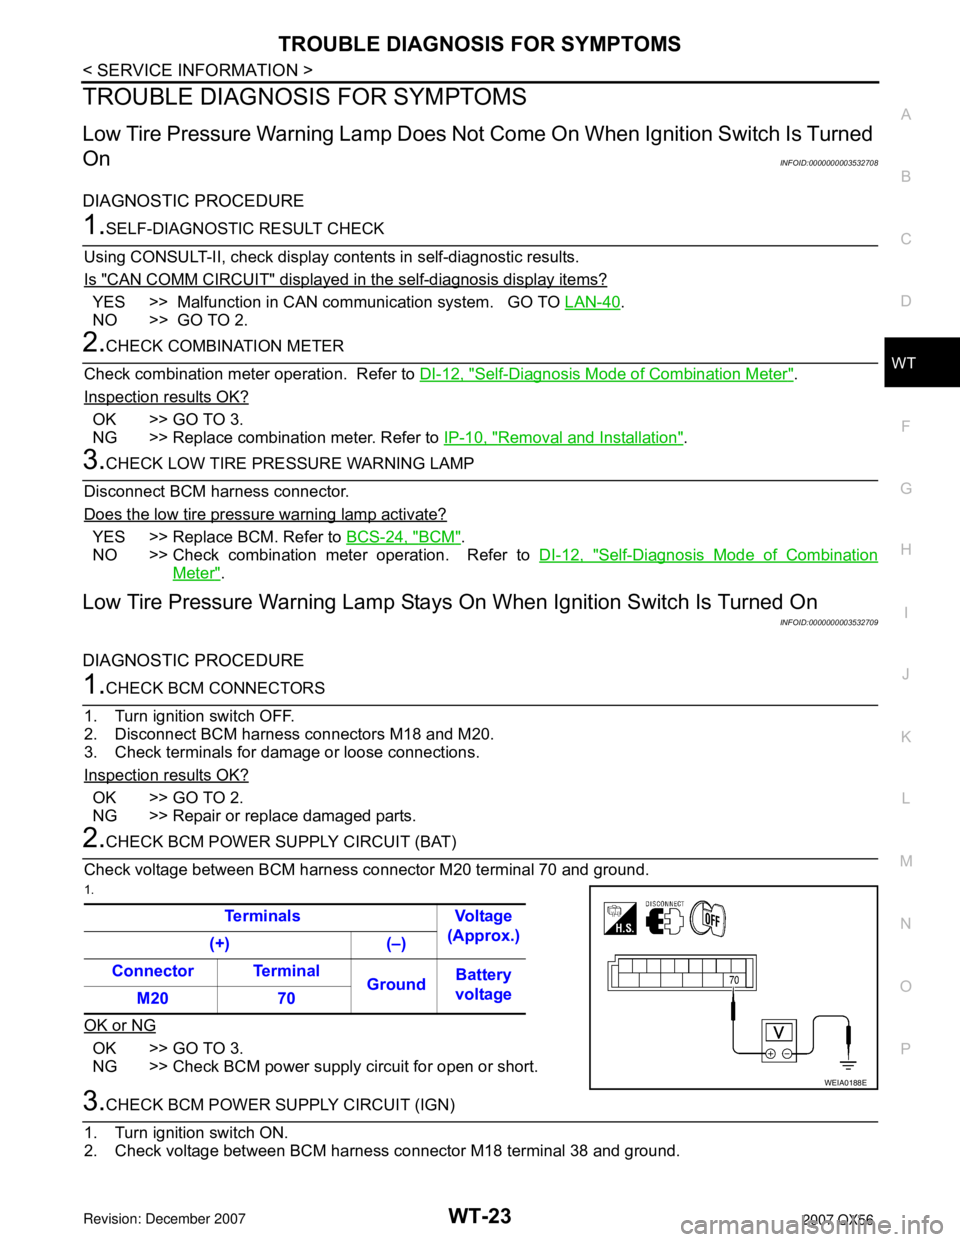
2.CHECK BCM POWER SUPPLY CIRCUIT (BAT)
Check voltage between BCM harness connector M20 terminal 70 and ground.
1.
OK or NG
OK >> GO TO 3.
NG >> Check BCM power supply circuit for open or short.
3.CHECK BCM POWER SUPPLY CIRCUIT (IGN)
1. Turn ignition switch ON.
2. Check voltage between BCM harness connector M18 terminal 38 and ground.Terminals Voltage
(Approx.)
(+) (–)
Connector Terminal
GroundBattery
voltage
M20 70
WEIA0188E