2007 INFINITI QX56 keyless entry
[x] Cancel search: keyless entryPage 2265 of 3061

LT-58
< SERVICE INFORMATION >
TURN SIGNAL AND HAZARD WARNING LAMPS
• to rear combination lamp LH terminal 4
• through rear combination signal lamp LH terminal 6
• to grounds B7 and B19.
BCM sends signal to combination meter through CAN communication lines, and turns on turn signal indicator
lamp within combination meter.
RH Turn
When the turn signal switch is moved to the right position, the BCM, interpreting it as turn signal is ON, outputs
turn signal from BCM terminal 61.
The BCM supplies power
• through BCM terminal 61
• to front turn/fog lamp RH terminal 2
• through front turn/fog lamp RH terminal 3
• to grounds E9, E15 and E24,
• to door mirror RH terminal 15
• through door mirror RH terminal 11
• to grounds M57, M61 and M79 and
• to rear combination lamp RH terminal 4
• through rear combination lamp terminal 6
• to grounds B117 and B132.
BCM sends signal to combination meter through CAN communication lines, and turns on turn signal indicator
lamp within combination meter.
HAZARD LAMP OPERATION
Power is supplied at all times
• through 50A fusible link (letter f , located in the fuse and fusible link box)
• to BCM terminal 70, and
• through 10A fuse [No. 19, located in the fuse block (J/B)]
• to combination meter terminal 8.
Ground is supplied
• to BCM terminal 67 and
• to combination meter terminal 17
• through grounds M57, M61 and M79.
When the hazard switch is depressed, ground is supplied
• to BCM terminal 29
• through hazard switch terminal 2
• through hazard switch terminal 1
• through grounds M57, M61 and M79.
When the hazard switch is depressed, the BCM, interpreting it as hazard warning lamps are ON, outputs turn
signal from BCM terminals 60 and 61.
The BCM supplies power
• through BCM terminals 60 and 61
• to front turn/fog lamp LH and RH terminal 2
• through front turn/fog lamp LH and RH terminal 3
• to grounds E9, E15 and E24,
• to door mirror LH and RH terminal 15
• through door mirror LH and RH terminal 11
• to grounds M57, M61 and M79,
• to rear turn signal lamp LH terminal 1
• through rear turn signal lamp LH terminal 3
• to grounds B7 and B19, and
• to rear turn signal lamp RH terminal 4
• through rear turn signal lamp RH terminal 6
• to grounds B117 and B132.
BCM sends signal to combination meter through CAN communication lines, and turns on turn signal indicator
lamps within combination meter.
REMOTE KEYLESS ENTRY SYSTEM OPERATION
Power is supplied at all times
• through 50A fusible link (letter f , located in the fuse and fusible link box)
• to BCM terminal 70, and
• through 10A fuse [No. 19, located in the fuse block (J/B)]
Page 2266 of 3061
TURN SIGNAL AND HAZARD WARNING LAMPS
LT-59
< SERVICE INFORMATION >
C
D
E
F
G
H
I
J
L
MA
B
LT
N
O
P
• to combination meter terminal 8.
Ground is supplied
• to BCM terminal 67 and
• to combination meter terminal 17
• through grounds M57, M61 and M79.
When the remote keyless entry system is triggered by input from the keyfob, the BCM, interpreting it as turn
signal is ON, outputs turn signal from BCM terminals 60 and 61.
The BCM supplies power
• through BCM terminals 60 and 61
• to front turn/fog lamp LH and RH terminal 2
• through front turn/fog lamp LH and RH terminal 3
• to grounds E9, E15 and E24,
• to door mirror LH and RH terminal 15
• through door mirror LH and RH terminal 11
• to grounds M57, M61 and M79,
• to rear turn signal lamp LH terminal 1
• through rear turn signal lamp LH terminal 3
• to grounds B7 and B19, and
• to rear turn signal lamp RH terminal 4
• through rear turn signal lamp RH terminal 6
• to grounds B117 and B132.
BCM sends signal to combination meter through CAN communication lines, and turns on turn signal indicator
lamps within combination meter.
With power and input supplied, the BCM controls the flashing of the hazard warning lamps when keyfob is
used to activate the remote keyless entry system.
COMBINATION SWITCH READING FUNCTION
Refer to BCS-3, "System Description".
CAN Communication System DescriptionINFOID:0000000003533405
Refer to LAN-4, "CAN Communication System".
Page 2418 of 3061
PG-16
< SERVICE INFORMATION >
POWER SUPPLY ROUTING CIRCUIT
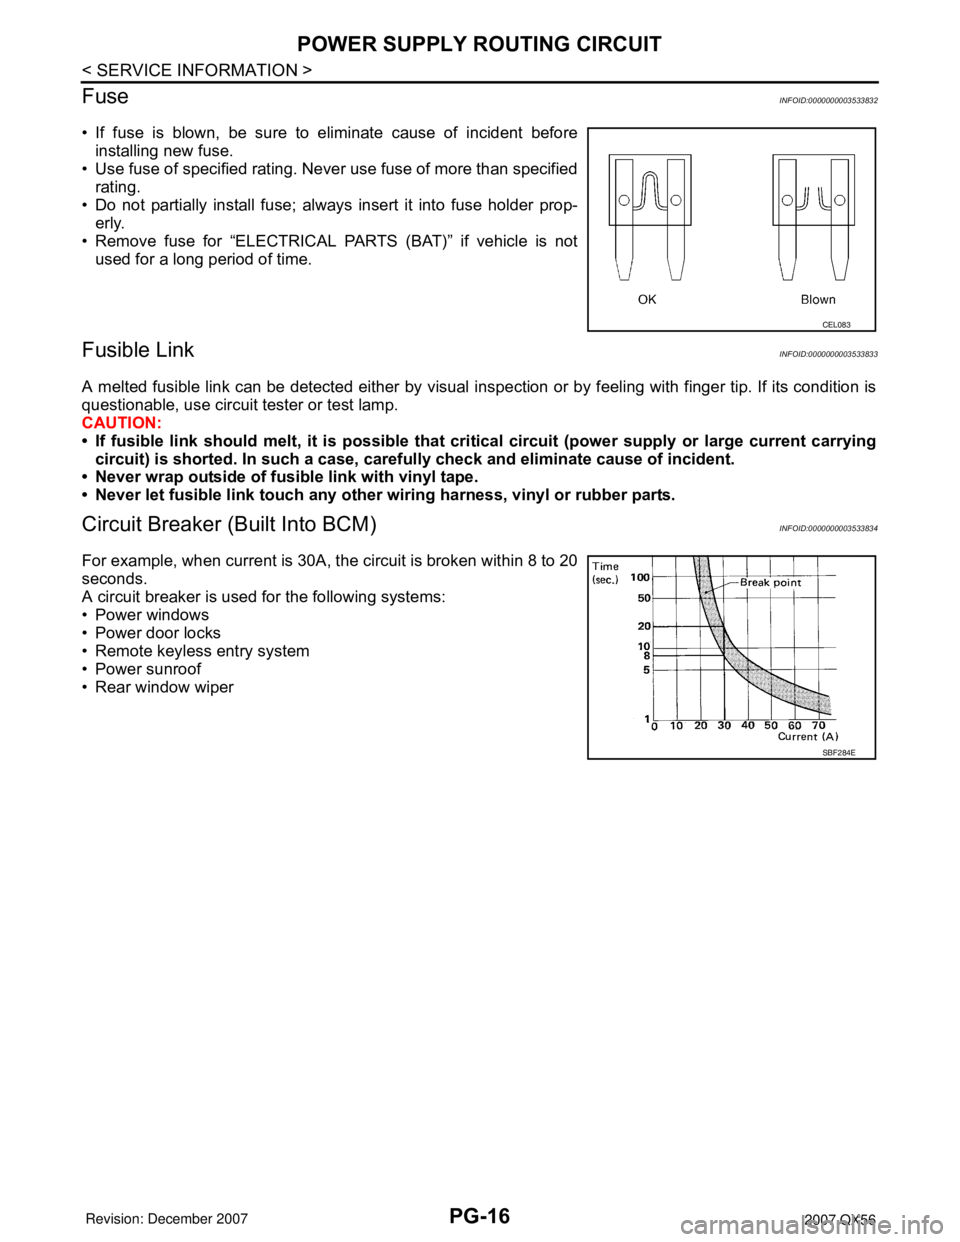
Fuse
INFOID:0000000003533832
• If fuse is blown, be sure to eliminate cause of incident before
installing new fuse.
• Use fuse of specified rating. Never use fuse of more than specified
rating.
• Do not partially install fuse; always insert it into fuse holder prop-
erly.
• Remove fuse for “ELECTRICAL PARTS (BAT)” if vehicle is not
used for a long period of time.
Fusible LinkINFOID:0000000003533833
A melted fusible link can be detected either by visual inspection or by feeling with finger tip. If its condition is
questionable, use circuit tester or test lamp.
CAUTION:
• If fusible link should melt, it is possible that critical circuit (power supply or large current carrying
circuit) is shorted. In such a case, carefully check and eliminate cause of incident.
• Never wrap outside of fusible link with vinyl tape.
• Never let fusible link touch any other wiring harness, vinyl or rubber parts.
Circuit Breaker (Built Into BCM)INFOID:0000000003533834
For example, when current is 30A, the circuit is broken within 8 to 20
seconds.
A circuit breaker is used for the following systems:
• Power windows
• Power door locks
• Remote keyless entry system
• Power sunroof
• Rear window wiper
CEL083
SBF284E
Page 2463 of 3061

HARNESS
PG-61
< SERVICE INFORMATION >
C
D
E
F
G
H
I
J
L
MA
B
PG
N
O
P
ICC/BS EC ICC Steering Switch
ICC/SW EC ICC Brake Switch
I/MIRR GW Inside Mirror (Auto Anti-Dazzling Mirror)
IATS EC Intake Air Temperature Sensor
IGNSYS EC Ignition System
ILL LT Illumination
INJECT EC Injector
INT/L LT Room/Map, Vanity, Cargo, Personal, Foot, Step, and Puddle Lamps
KEYLES BL Remote Keyless Entry System
KS EC Knock Sensor
MAFS EC Mass Air Flow Sensor
MAIN EC Main Power Supply and Ground Circuit
METER DI Speedometer, Tachometer, Temp. and Fuel Gauges
MIL/DL EC Malfunction Indicator Lamp
MIRROR GW Door Mirror
NATS BL Nissan Anti-Theft System
NAVI AV Navigation System
O2H2B1 EC Rear Heated Oxygen Sensor 2 Heater Bank 1
O2H2B2 EC Rear Heated Oxygen Sensor 2 Heater Bank 2
O2S2B1 EC Heated Oxygen Sensor 2 Bank 1
O2S2B2 EC Heated Oxygen Sensor 2 Bank 2
P/SCKT WW Power Socket
PGC/V EC EVAP Canister Purge Volume Control Solenoid Valve
PHASE EC Camshaft Position Sensor (PHASE) (Bank 1)
PNP/SW EC Park/Neutral Position Switch
POS EC Crankshaft Position Sensor (POS)
POWER PG Power Supply Routing
PRE/SE EC EVAP Control System Pressure Sensor
PS/SEN EC Power Steering Pressure Sensor
R/VIEW DI Rear View Monitor
RP/SEN EC Refrigerant Pressure Sensor
SEN/PW EC Sensor Power Supply
SHIFT AT A/T Shift Lock System
SONAR DI Rear Sonar System
SROOF RF Sunroof
SRS SRS Supplemental Restraint System
START SC Starting System
STOP/L LT Stop Lamp
T/TOW LT Trailer Tow
T/WARN WT Low Tire Pressure Warning System
TAIL/L LT Parking, License and Tail Lamps
T/F TF Transfer Case
TPS1 EC Throttle Position Sensor
TPS2 EC Throttle Position Sensor
TPS3 EC Throttle Position Sensor
TRNSCV BL HOMELINK® Universal Transceiver
TURN LT Turn Signal and Hazard Warning Lamps
VDC BRC Vehicle Dynamic Control System
VEHSEC BL Vehicle security (theft warning) system
VENT/V EC EVAP Canister Vent Control Valve
W/ANT AV Audio Antenna
WARN DI Warning Lamps
Page 2997 of 3061

WT-8
< SERVICE INFORMATION >
LOW TIRE PRESSURE WARNING SYSTEM
LOW TIRE PRESSURE WARNING SYSTEM
System ComponentINFOID:0000000003532692
System DescriptionINFOID:0000000003532693
BODY CONTROL MODULE (BCM)
The BCM is shown with the lower instrument panel LH removed. The
BCM reads the air pressure signal received by the remote keyless
entry receiver, and controls the low tire pressure warning lamp as
shown below. It also has a self-diagnosis function to detect a system
malfunction.
TRANSMITTER
A sensor-transmitter integrated with a valve is installed in each
wheel, and transmits a detected air pressure signal in the form of a
radio wave. The radio signal is received by the remote keyless entry
receiver.
WEIA0081E
Condition Low tire pressure warning lamp
System normal On for 1 second after ignition ON
Tire less than 193 kPa (2.0 kg/cm
2 , 28 psi)
[Flat tire]ON
Low tire pressure warning system malfunc-
tionAfter key ON, flashes once per sec-
ond for 1 minute, then stays ON
LEIA0068E
WEIA0137E
Page 2998 of 3061
LOW TIRE PRESSURE WARNING SYSTEM
WT-9
< SERVICE INFORMATION >
C
D
F
G
H
I
J
K
L
MA
B
WT
N
O
P
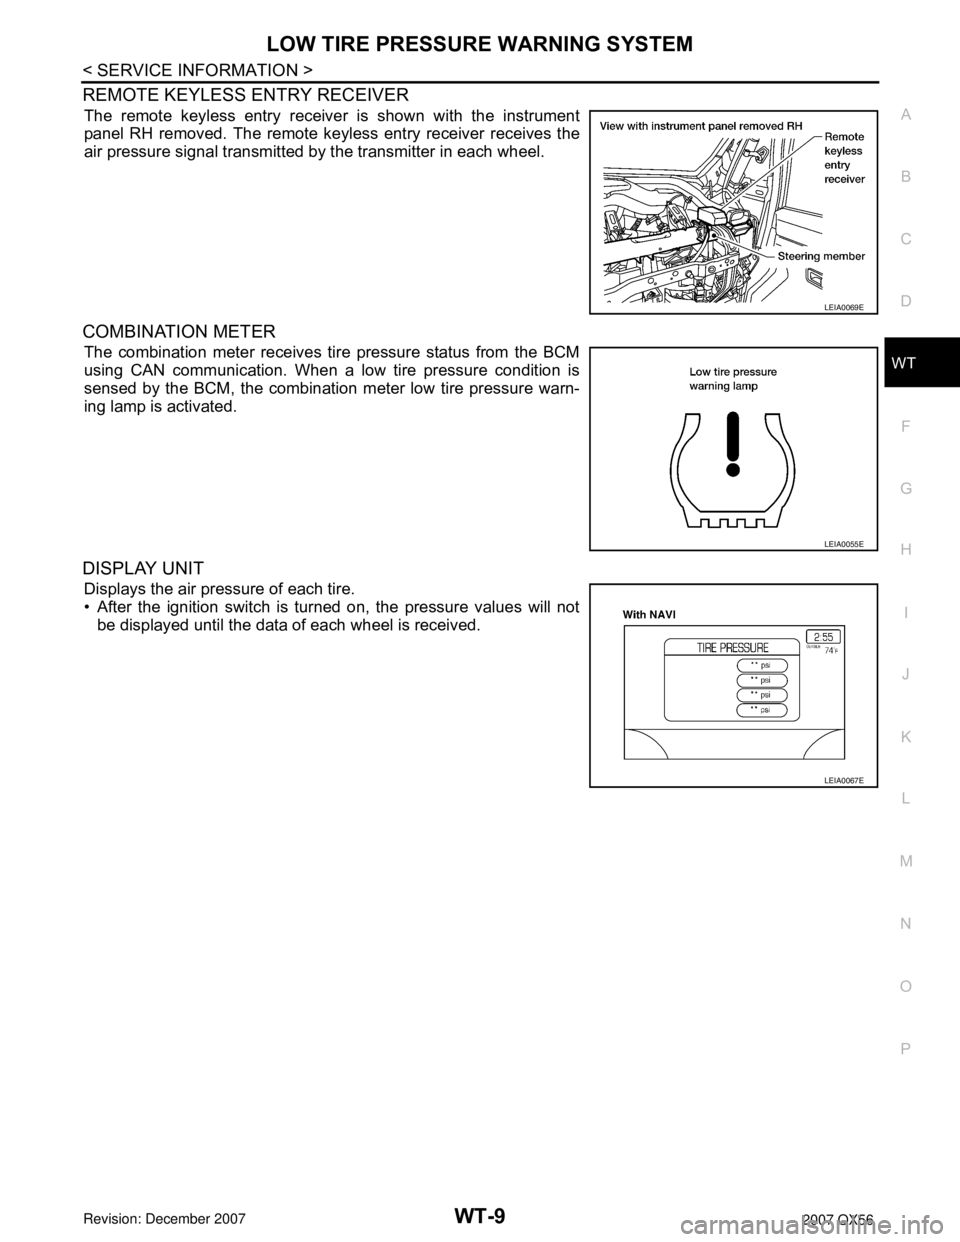
REMOTE KEYLESS ENTRY RECEIVER
The remote keyless entry receiver is shown with the instrument
panel RH removed. The remote keyless entry receiver receives the
air pressure signal transmitted by the transmitter in each wheel.
COMBINATION METER
The combination meter receives tire pressure status from the BCM
using CAN communication. When a low tire pressure condition is
sensed by the BCM, the combination meter low tire pressure warn-
ing lamp is activated.
DISPLAY UNIT
Displays the air pressure of each tire.
• After the ignition switch is turned on, the pressure values will not
be displayed until the data of each wheel is received.
LEIA0069E
LEIA0055E
LEIA0067E
Page 3008 of 3061
TROUBLE DIAGNOSIS
WT-19
< SERVICE INFORMATION >
C
D
F
G
H
I
J
K
L
MA
B
WT
N
O
P
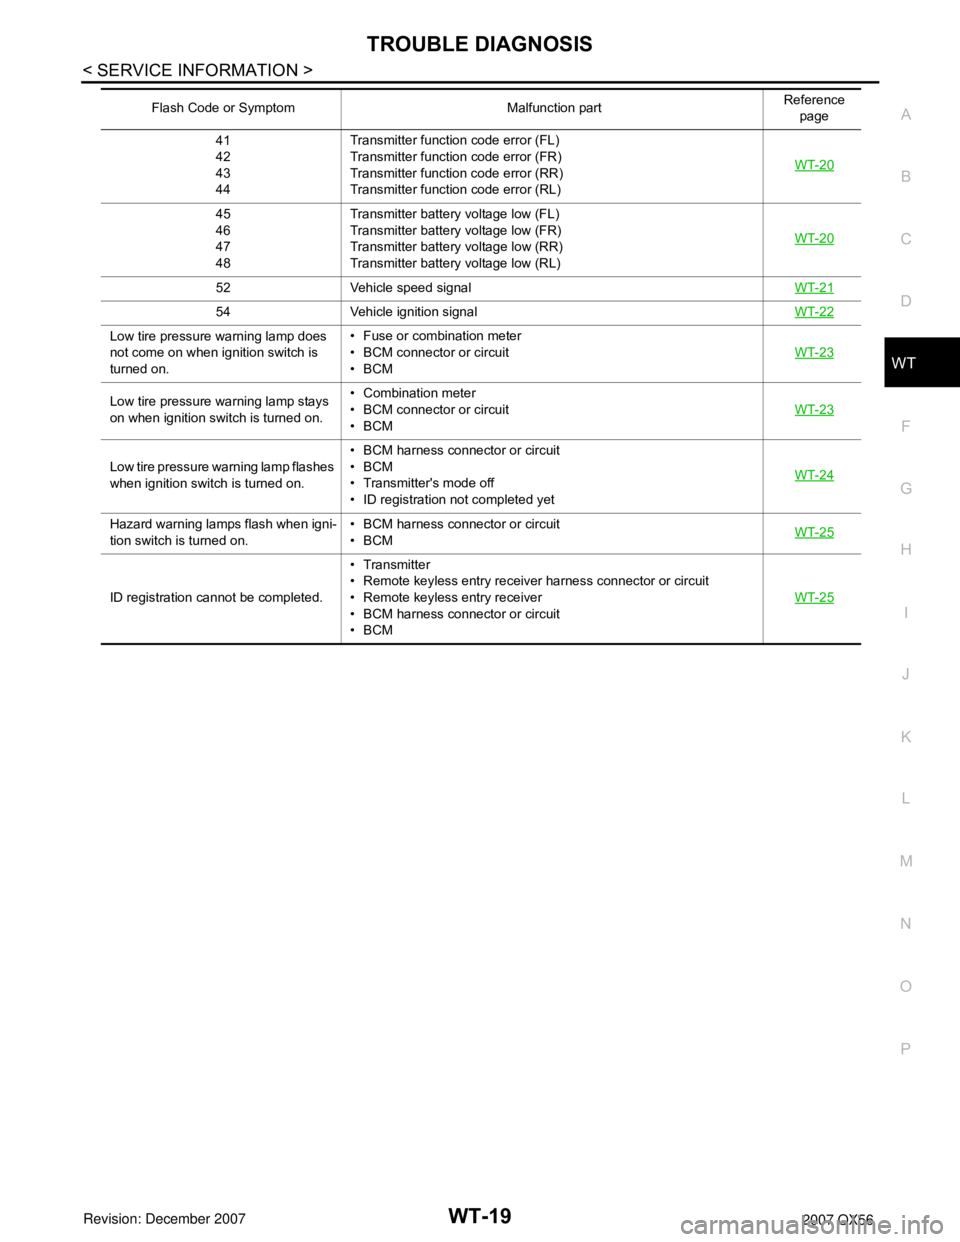
41
42
43
44Transmitter function code error (FL)
Transmitter function code error (FR)
Transmitter function code error (RR)
Transmitter function code error (RL)WT-20
45
46
47
48Transmitter battery voltage low (FL)
Transmitter battery voltage low (FR)
Transmitter battery voltage low (RR)
Transmitter battery voltage low (RL)WT-20
52 Vehicle speed signalWT-21
54 Vehicle ignition signalWT-22
Low tire pressure warning lamp does
not come on when ignition switch is
turned on.• Fuse or combination meter
• BCM connector or circuit
•BCM WT-23
Low tire pressure warning lamp stays
on when ignition switch is turned on.• Combination meter
• BCM connector or circuit
•BCMWT-23
Low tire pressure warning lamp flashes
when ignition switch is turned on.• BCM harness connector or circuit
•BCM
• Transmitter's mode off
• ID registration not completed yetWT-24
Hazard warning lamps flash when igni-
tion switch is turned on.• BCM harness connector or circuit
•BCMWT-25
ID registration cannot be completed.• Transmitter
• Remote keyless entry receiver harness connector or circuit
• Remote keyless entry receiver
• BCM harness connector or circuit
•BCMWT-25
Flash Code or Symptom Malfunction partReference
page
Page 3009 of 3061
WT-20
< SERVICE INFORMATION >
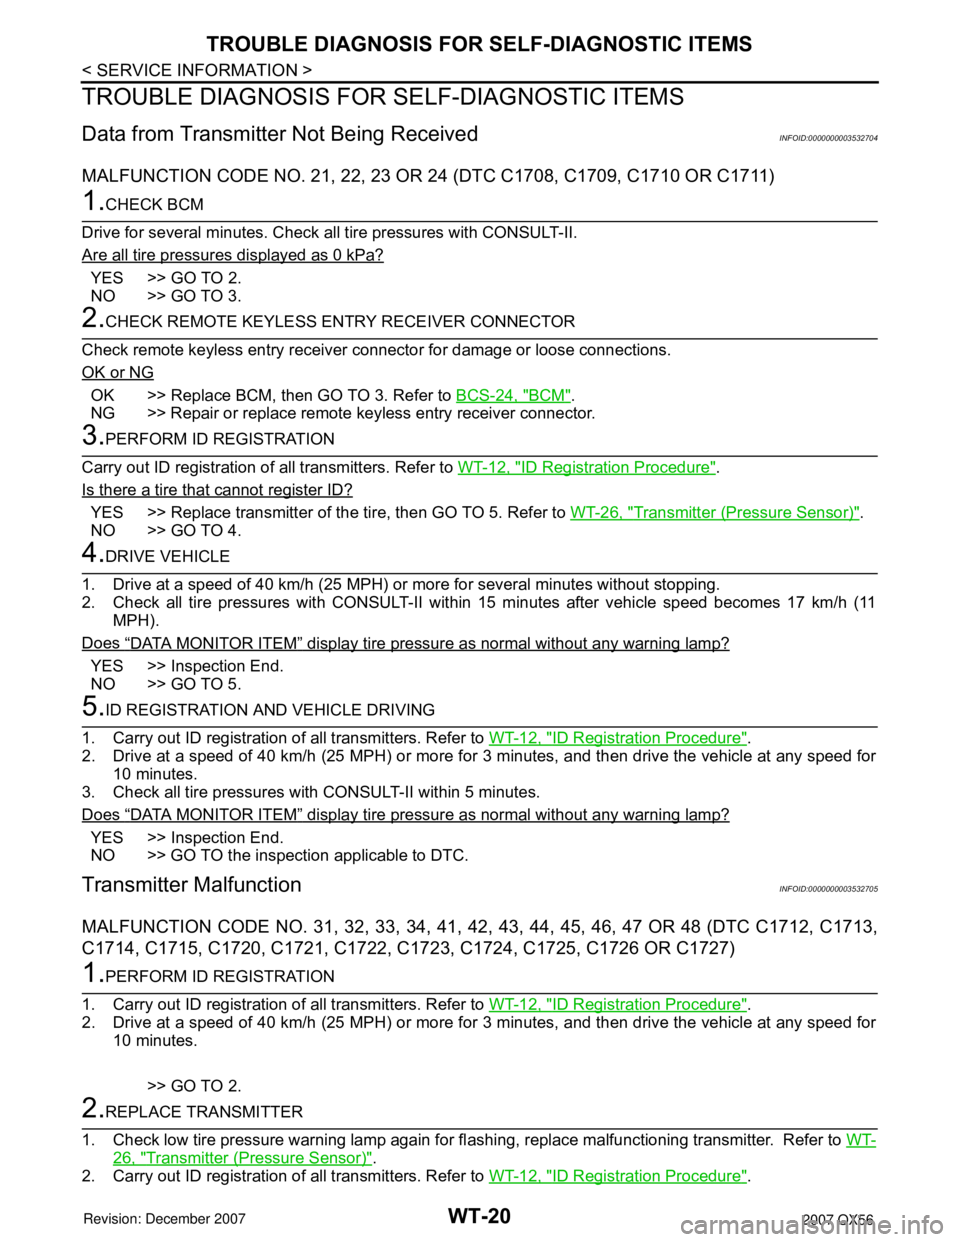
TROUBLE DIAGNOSIS FOR SELF-DIAGNOSTIC ITEMS
TROUBLE DIAGNOSIS FOR SELF-DIAGNOSTIC ITEMS
Data from Transmitter Not Being ReceivedINFOID:0000000003532704
MALFUNCTION CODE NO. 21, 22, 23 OR 24 (DTC C1708, C1709, C1710 OR C1711)
1.CHECK BCM
Drive for several minutes. Check all tire pressures with CONSULT-II.
Are all tire pressures displayed as 0 kPa?
YES >> GO TO 2.
NO >> GO TO 3.
2.CHECK REMOTE KEYLESS ENTRY RECEIVER CONNECTOR
Check remote keyless entry receiver connector for damage or loose connections.
OK or NG
OK >> Replace BCM, then GO TO 3. Refer to BCS-24, "BCM".
NG >> Repair or replace remote keyless entry receiver connector.
3.PERFORM ID REGISTRATION
Carry out ID registration of all transmitters. Refer to WT-12, "
ID Registration Procedure".
Is there a tire that cannot register ID?
YES >> Replace transmitter of the tire, then GO TO 5. Refer to WT-26, "Transmitter (Pressure Sensor)".
NO >> GO TO 4.
4.DRIVE VEHICLE
1. Drive at a speed of 40 km/h (25 MPH) or more for several minutes without stopping.
2. Check all tire pressures with CONSULT-II within 15 minutes after vehicle speed becomes 17 km/h (11
MPH).
Does
“DATA MONITOR ITEM” display tire pressure as normal without any warning lamp?
YES >> Inspection End.
NO >> GO TO 5.
5.ID REGISTRATION AND VEHICLE DRIVING
1. Carry out ID registration of all transmitters. Refer to WT-12, "
ID Registration Procedure".
2. Drive at a speed of 40 km/h (25 MPH) or more for 3 minutes, and then drive the vehicle at any speed for
10 minutes.
3. Check all tire pressures with CONSULT-II within 5 minutes.
Does
“DATA MONITOR ITEM” display tire pressure as normal without any warning lamp?
YES >> Inspection End.
NO >> GO TO the inspection applicable to DTC.
Transmitter MalfunctionINFOID:0000000003532705
MALFUNCTION CODE NO. 31, 32, 33, 34, 41, 42, 43, 44, 45, 46, 47 OR 48 (DTC C1712, C1713,
C1714, C1715, C1720, C1721, C1722, C1723, C1724, C1725, C1726 OR C1727)
1.PERFORM ID REGISTRATION
1. Carry out ID registration of all transmitters. Refer to WT-12, "
ID Registration Procedure".
2. Drive at a speed of 40 km/h (25 MPH) or more for 3 minutes, and then drive the vehicle at any speed for
10 minutes.
>> GO TO 2.
2.REPLACE TRANSMITTER
1. Check low tire pressure warning lamp again for flashing, replace malfunctioning transmitter. Refer to WT-
26, "Transmitter (Pressure Sensor)".
2. Carry out ID registration of all transmitters. Refer to WT-12, "
ID Registration Procedure".