2007 INFINITI QX56 sensor
[x] Cancel search: sensorPage 1144 of 3061

ON BOARD DIAGNOSTIC (OBD) SYSTEM
EC-61
< SERVICE INFORMATION >
C
D
E
F
G
H
I
J
K
L
MA
EC
N
P O
HOW TO ERASE EMISSION-RELATED DIAGNOSTIC INFORMATION
How to Erase DTC
WITH CONSULT-II
The emission related diagnostic information in the ECM can be erased by selecting “ERASE” in the “SELF-
DIAG RESULTS” mode with CONSULT-II.
If DTCs are displayed for both ECM and TCM (Transmission control module), they need to be erased individu-
ally from the ECM and TCM (Transmission control module).
NOTE:
If the DTC is not for A/T related items (see EC-9
), skip steps 2 through 4.
1. If the ignition switch stays ON after repair work, be sure to turn ignition switch OFF once. Wait at least 10
seconds and then turn it ON (engine stopped) again.
2. Turn CONSULT-II ON and touch “A/T”.
3. Touch “SELF-DIAG RESULTS”.
HO2SAir fuel ratio (A/F) sensor 1 (Bank 1)P0131 41H 8EH Min. 5mV
P0132 42H 0EH Max. 5mV
P2A00 43H 0EH Max. 0.002
P2A00 44H 8EH Min. 0.002
P0133 45H 8EH Min. 0.002
P0130 46H 0EH Max. 5mV
P0130 47H 8EH Min. 5mV
P0133 48H 8EH Min. 0.002
Air fuel ratio (A/F) sensor 1 (Bank 2)P0151 4CH 8FH Min. 5mV
P0152 4DH 0FH Max. 5mV
P2A03 4EH 0FH Max. 0.002
P2A03 4FH 8FH Min. 0.002
P0153 50H 8FH Min. 0.002
P0150 51H 0FH Max. 5mV
P0150 52H 8FH Min. 5mV
P0153 53H 8FH Min. 0.002
Heated oxygen sensor 2 (Bank 1)P0139 19H 86H Min. 10mV/500 ms
P0137 1AH 86H Min. 10 mV
P0138 1BH 06H Max. 10 mV
P0138 1CH 06H Max. 10mV
Heated oxygen sensor 2 (Bank 2)P0159 21H 87H Min. 10 mV/500 ms
P0157 22H 87H Min. 10 mV
P0158 23H 07H Max. 10 mV
P0158 24H 07H Max. 10mV
HO2S
HTRA/F sensor 1 heater (Bank 1) P0032 57H 10H Max. 5 mV
P0031 58H 90H Min. 5 mV
A/F sensor 1 heater (Bank 2)P0052 59H 11H Max. 5 mV
P0051 5AH 91H Min. 5 mV
Heated oxygen sensor 2 heater (Bank 1)P0038 2DH 0AH Max. 20 mV
P0037 2EH 8AH Min. 20 mV
Heated oxygen sensor 2 heater (Bank 2)P0058 2FH 0BH Max. 20 mV
P0057 30H 8BH Min. 20 mV Item Self-diagnostic test item DTCTest value (GST display)
Test limit Conversion
TID CID
Page 1147 of 3061
EC-64
< SERVICE INFORMATION >
ON BOARD DIAGNOSTIC (OBD) SYSTEM
When any SRT codes are not set, MIL may flash without DTC. For the details, refer to EC-49, "Emission-
related Diagnostic Information".
HOW TO SWITCH DIAGNOSTIC TEST MODE
NOTE:
•It is better to count the time accurately with a clock.
•It is impossible to switch the diagnostic mode when an accelerator pedal position sensor circuit has
a malfunction.
•Always ECM returns to Diagnostic Test Mode I after ignition switch is turned OFF.
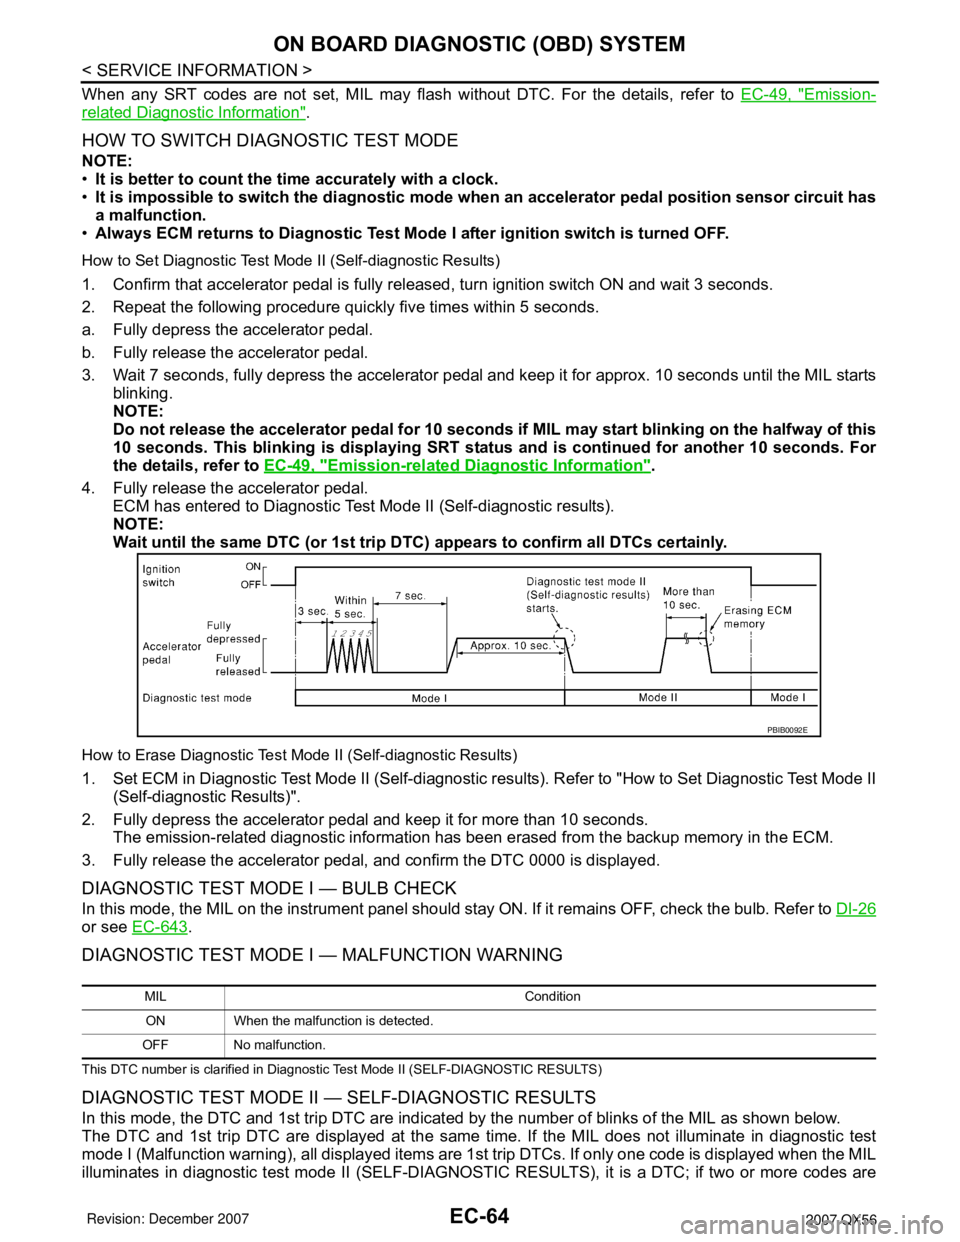
How to Set Diagnostic Test Mode II (Self-diagnostic Results)
1. Confirm that accelerator pedal is fully released, turn ignition switch ON and wait 3 seconds.
2. Repeat the following procedure quickly five times within 5 seconds.
a. Fully depress the accelerator pedal.
b. Fully release the accelerator pedal.
3. Wait 7 seconds, fully depress the accelerator pedal and keep it for approx. 10 seconds until the MIL starts
blinking.
NOTE:
Do not release the accelerator pedal for 10 seconds if MIL may start blinking on the halfway of this
10 seconds. This blinking is displaying SRT status and is continued for another 10 seconds. For
the details, refer to EC-49, "
Emission-related Diagnostic Information".
4. Fully release the accelerator pedal.
ECM has entered to Diagnostic Test Mode II (Self-diagnostic results).
NOTE:
Wait until the same DTC (or 1st trip DTC) appears to confirm all DTCs certainly.
How to Erase Diagnostic Test Mode II (Self-diagnostic Results)
1. Set ECM in Diagnostic Test Mode II (Self-diagnostic results). Refer to "How to Set Diagnostic Test Mode II
(Self-diagnostic Results)".
2. Fully depress the accelerator pedal and keep it for more than 10 seconds.
The emission-related diagnostic information has been erased from the backup memory in the ECM.
3. Fully release the accelerator pedal, and confirm the DTC 0000 is displayed.
DIAGNOSTIC TEST MODE I — BULB CHECK
In this mode, the MIL on the instrument panel should stay ON. If it remains OFF, check the bulb. Refer to DI-26
or see EC-643.
DIAGNOSTIC TEST MODE I — MALFUNCTION WARNING
This DTC number is clarified in Diagnostic Test Mode II (SELF-DIAGNOSTIC RESULTS)
DIAGNOSTIC TEST MODE II — SELF-DIAGNOSTIC RESULTS
In this mode, the DTC and 1st trip DTC are indicated by the number of blinks of the MIL as shown below.
The DTC and 1st trip DTC are displayed at the same time. If the MIL does not illuminate in diagnostic test
mode I (Malfunction warning), all displayed items are 1st trip DTCs. If only one code is displayed when the MIL
illuminates in diagnostic test mode II (SELF-DIAGNOSTIC RESULTS), it is a DTC; if two or more codes are
PBIB0092E
MIL Condition
ON When the malfunction is detected.
OFF No malfunction.
Page 1156 of 3061
BASIC SERVICE PROCEDURE
EC-73
< SERVICE INFORMATION >
C
D
E
F
G
H
I
J
K
L
MA
EC
N
P O
1. Start engine and warm it up to normal operating temperature.
2. Read idle speed in “DATA MONITOR” mode with CONSULT-II.
Refer to EC-75, "
Idle Speed and Ignition Timing Check" .
Without CONSULT-II
1. Start engine and warm it up to normal operating temperature.
2. Check idle speed.
Refer to EC-75, "
Idle Speed and Ignition Timing Check" .
OK or NG
OK >> GO TO 10.
NG >> GO TO 8.
8.DETECT MALFUNCTIONING PART
Check the following.
• Check camshaft position sensor (PHASE) and circuit. Refer to EC-342
.
• Check crankshaft position sensor (POS) and circuit. Refer to EC-336
.
OK or NG
OK >> GO TO 9.
NG >> 1. Repair or replace.
2. GO TO 4.
9.CHECK ECM FUNCTION
1. Substitute another known-good ECM to check ECM function. (ECM may be the cause of an incident, but
this is a rare case.)
2. Perform initialization of IVIS (NATS) system and registration of all IVIS (NATS) ignition key IDs. Refer to
BL-117, "
ECM Re-communicating Function".
>> GO TO 4.
10.CHECK IGNITION TIMING
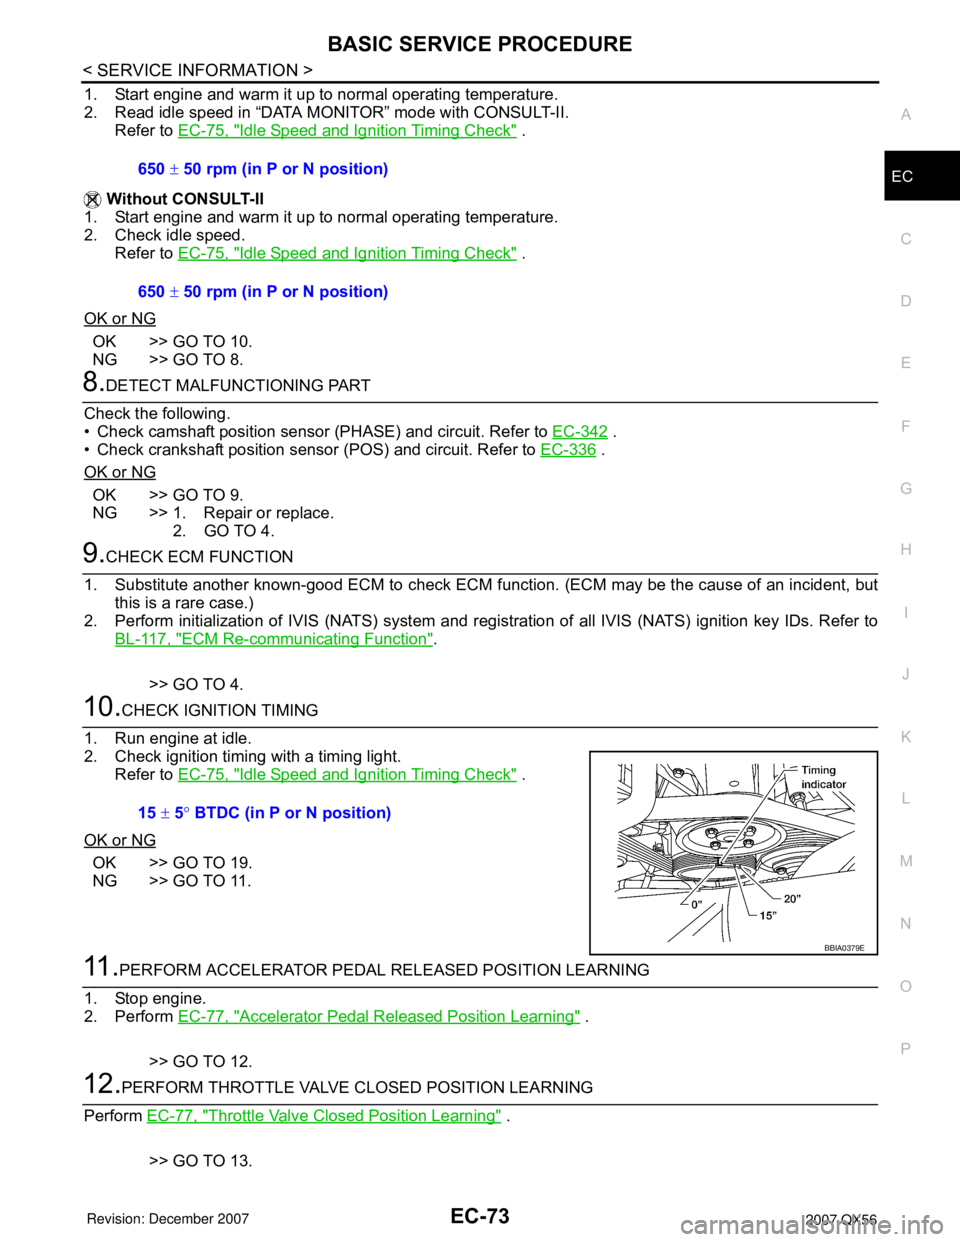
1. Run engine at idle.
2. Check ignition timing with a timing light.
Refer to EC-75, "
Idle Speed and Ignition Timing Check" .
OK or NG
OK >> GO TO 19.
NG >> GO TO 11.
11 .PERFORM ACCELERATOR PEDAL RELEASED POSITION LEARNING
1. Stop engine.
2. Perform EC-77, "
Accelerator Pedal Released Position Learning" .
>> GO TO 12.
12.PERFORM THROTTLE VALVE CLOSED POSITION LEARNING
Perform EC-77, "
Throttle Valve Closed Position Learning" .
>> GO TO 13. 650 ± 50 rpm (in P or N position)
650 ± 50 rpm (in P or N position)
15 ± 5° BTDC (in P or N position)
BBIA0379E
Page 1157 of 3061
EC-74
< SERVICE INFORMATION >
BASIC SERVICE PROCEDURE
13.PERFORM IDLE AIR VOLUME LEARNING
Refer to EC-78, "
Idle Air Volume Learning" .
Is Idle Air Volume Learning carried out successfully?
Ye s o r N o
Yes >> GO TO 14.
No >> 1. Follow the instruction of Idle Air Volume Learning.
2. GO TO 4.
14.CHECK TARGET IDLE SPEED AGAIN
With CONSULT-II
1. Start engine and warm it up to normal operating temperature.
2. Read idle speed in “DATA MONITOR” mode with CONSULT-II.
Refer to EC-75, "
Idle Speed and Ignition Timing Check" .
Without CONSULT-II
1. Start engine and warm it up to normal operating temperature.
2. Check idle speed.
Refer to EC-75, "
Idle Speed and Ignition Timing Check" .
OK or NG
OK >> GO TO 15.
NG >> GO TO 17.
15.CHECK IGNITION TIMING AGAIN
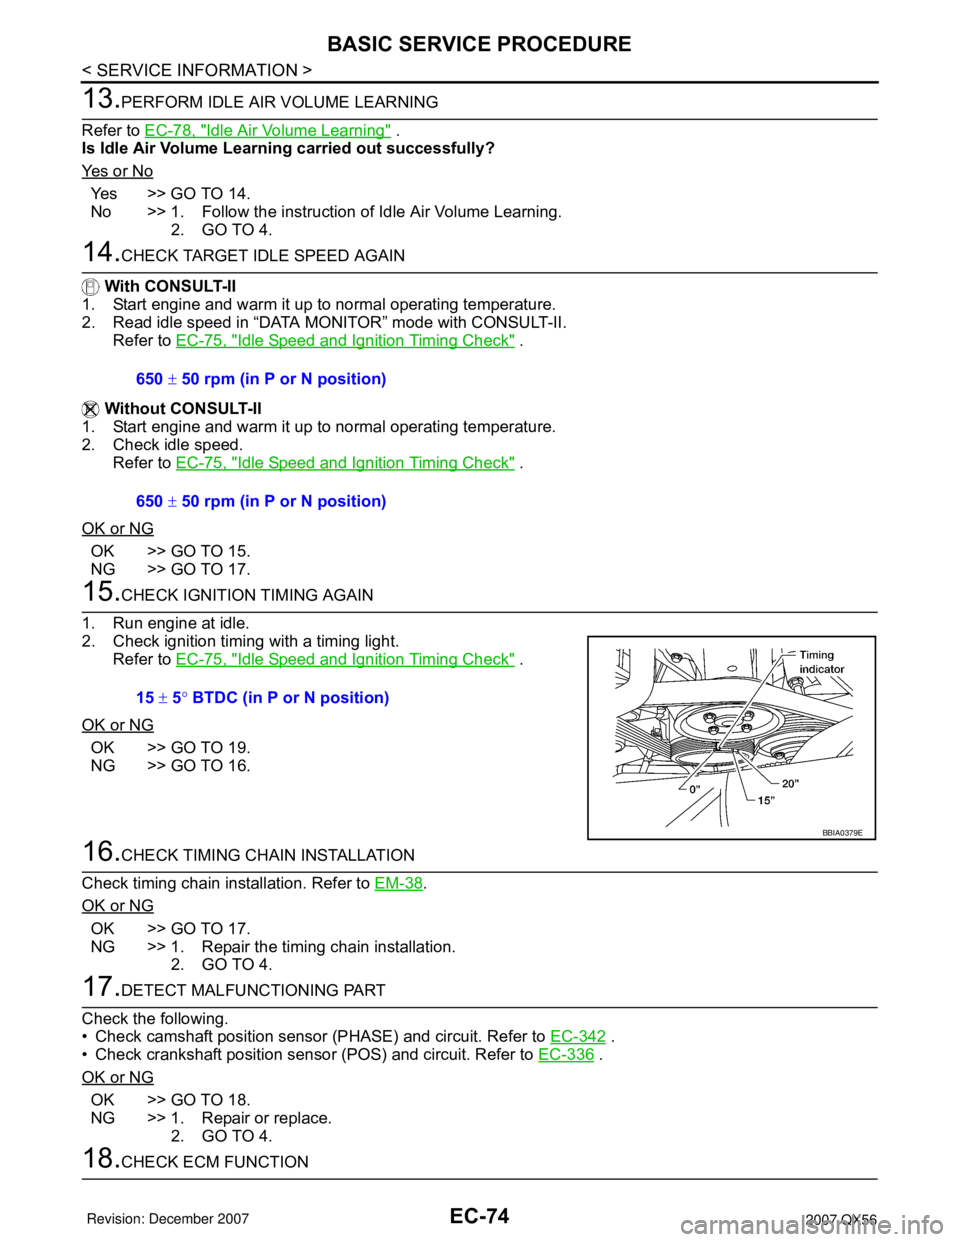
1. Run engine at idle.
2. Check ignition timing with a timing light.
Refer to EC-75, "
Idle Speed and Ignition Timing Check" .
OK or NG
OK >> GO TO 19.
NG >> GO TO 16.
16.CHECK TIMING CHAIN INSTALLATION
Check timing chain installation. Refer to EM-38
.
OK or NG
OK >> GO TO 17.
NG >> 1. Repair the timing chain installation.
2. GO TO 4.
17.DETECT MALFUNCTIONING PART
Check the following.
• Check camshaft position sensor (PHASE) and circuit. Refer to EC-342
.
• Check crankshaft position sensor (POS) and circuit. Refer to EC-336
.
OK or NG
OK >> GO TO 18.
NG >> 1. Repair or replace.
2. GO TO 4.
18.CHECK ECM FUNCTION 650 ± 50 rpm (in P or N position)
650 ± 50 rpm (in P or N position)
15 ± 5° BTDC (in P or N position)
BBIA0379E
Page 1160 of 3061
BASIC SERVICE PROCEDURE
EC-77
< SERVICE INFORMATION >
C
D
E
F
G
H
I
J
K
L
MA
EC
N
P O
Procedure After Replacing ECMINFOID:0000000003531611
When replacing ECM, the following procedure must be performed.
1. Perform initialization of IVIS (NATS) system and registration of all IVIS (NATS) ignition key IDs.
Refer to BL-117, "
ECM Re-communicating Function".
2. Perform EC-77, "
VIN Registration".
3. Perform EC-77, "
Accelerator Pedal Released Position Learning".
4. Perform EC-77, "
Throttle Valve Closed Position Learning".
5. Perform EC-78, "
Idle Air Volume Learning".
VIN RegistrationINFOID:0000000003531612
DESCRIPTION
VIN Registration is an operation to registering VIN in ECM. It must be performed each time ECM is replaced.
NOTE:
Accurate VIN which is registered in ECM may be required for Inspection & Maintenance (I/M).
OPERATION PROCEDURE
With CONSULT-II
1. Check the VIN of the vehicle and note it. Refer to GI-46.
2. Turn ignition switch ON and engine stopped.
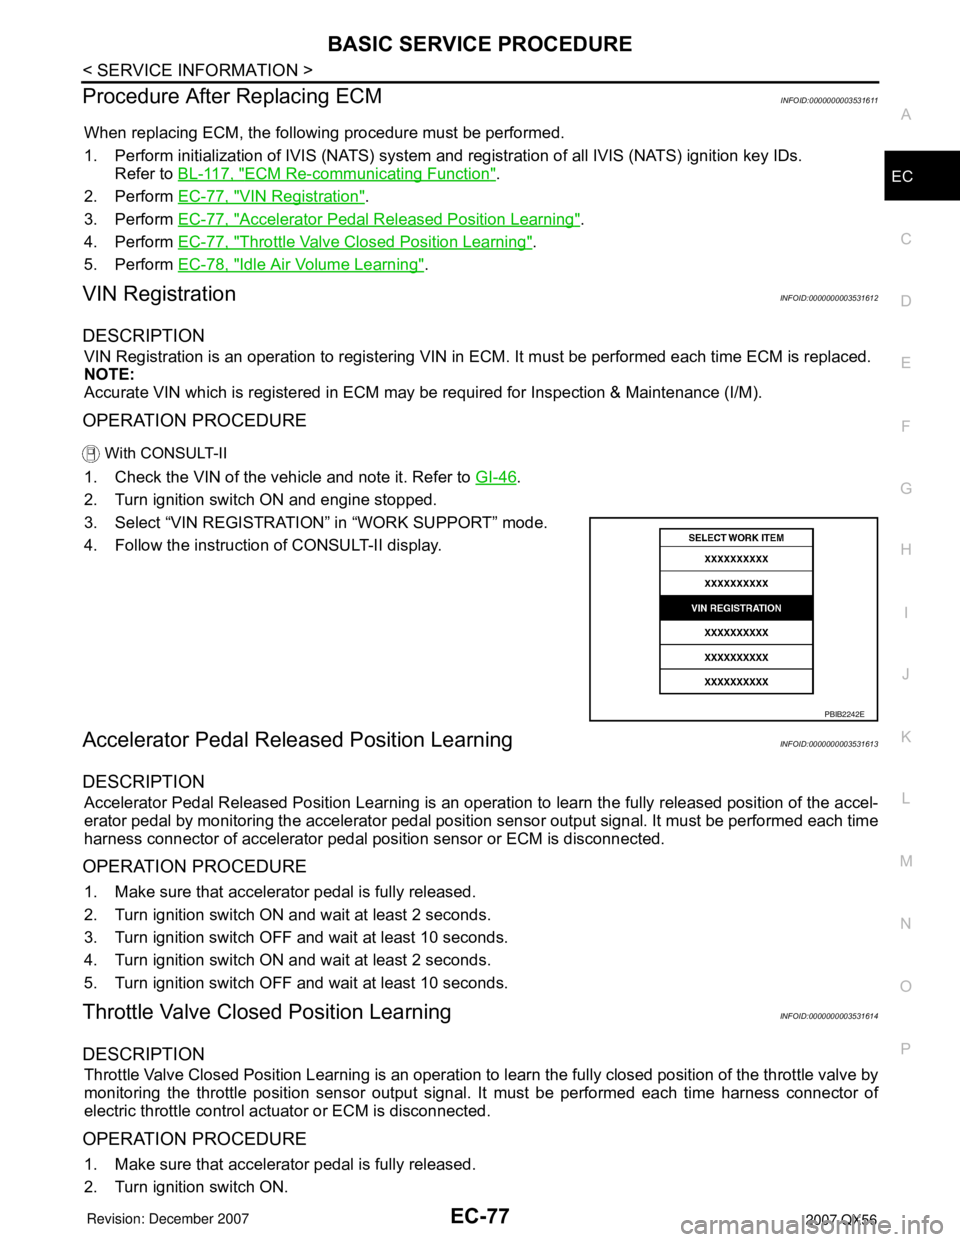
3. Select “VIN REGISTRATION” in “WORK SUPPORT” mode.
4. Follow the instruction of CONSULT-II display.
Accelerator Pedal Released Position LearningINFOID:0000000003531613
DESCRIPTION
Accelerator Pedal Released Position Learning is an operation to learn the fully released position of the accel-
erator pedal by monitoring the accelerator pedal position sensor output signal. It must be performed each time
harness connector of accelerator pedal position sensor or ECM is disconnected.
OPERATION PROCEDURE
1. Make sure that accelerator pedal is fully released.
2. Turn ignition switch ON and wait at least 2 seconds.
3. Turn ignition switch OFF and wait at least 10 seconds.
4. Turn ignition switch ON and wait at least 2 seconds.
5. Turn ignition switch OFF and wait at least 10 seconds.
Throttle Valve Closed Position LearningINFOID:0000000003531614
DESCRIPTION
Throttle Valve Closed Position Learning is an operation to learn the fully closed position of the throttle valve by
monitoring the throttle position sensor output signal. It must be performed each time harness connector of
electric throttle control actuator or ECM is disconnected.
OPERATION PROCEDURE
1. Make sure that accelerator pedal is fully released.
2. Turn ignition switch ON.
PBIB2242E
Page 1162 of 3061
BASIC SERVICE PROCEDURE
EC-79
< SERVICE INFORMATION >
C
D
E
F
G
H
I
J
K
L
MA
EC
N
P O
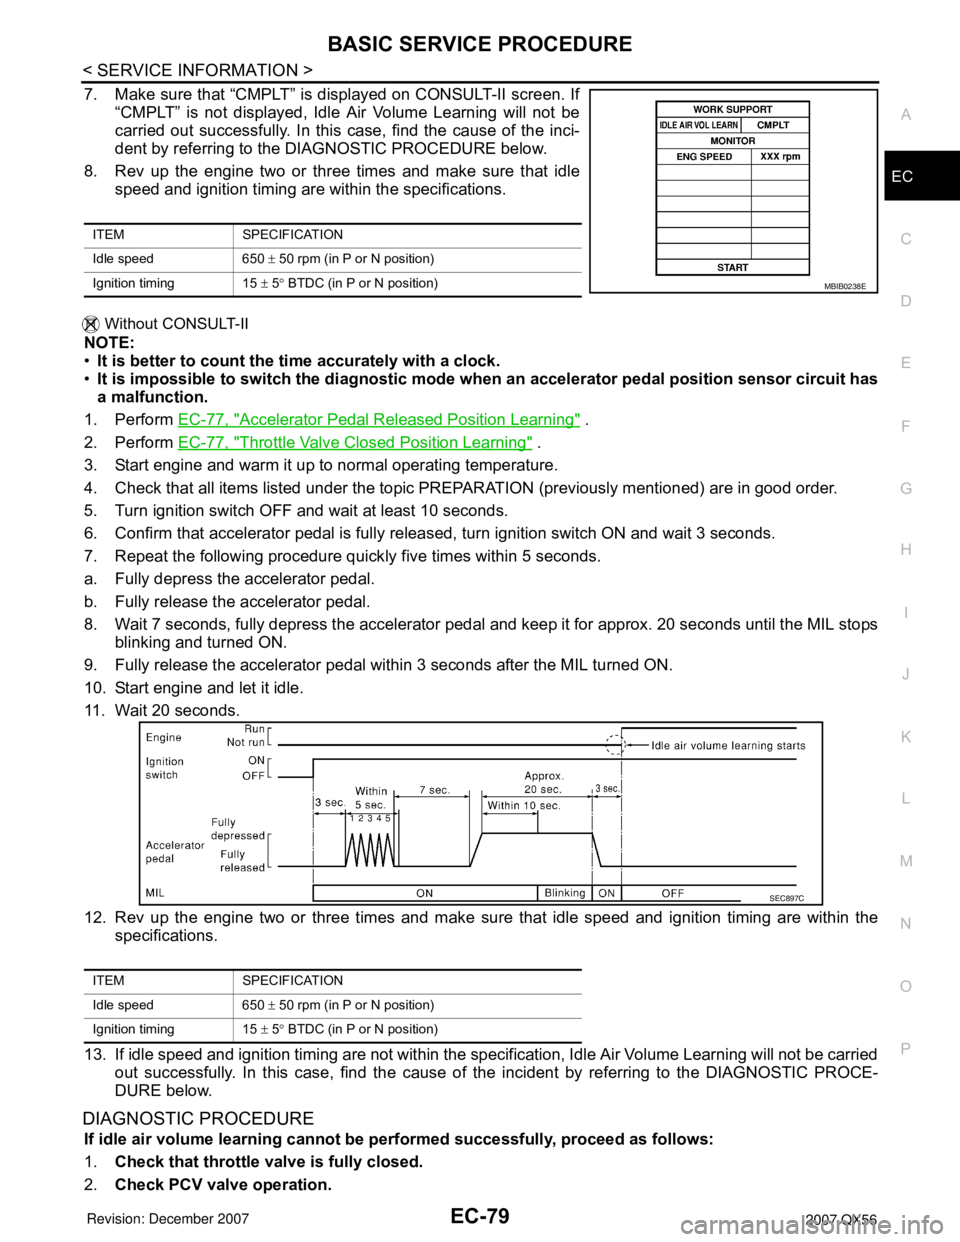
7. Make sure that “CMPLT” is displayed on CONSULT-II screen. If
“CMPLT” is not displayed, Idle Air Volume Learning will not be
carried out successfully. In this case, find the cause of the inci-
dent by referring to the DIAGNOSTIC PROCEDURE below.
8. Rev up the engine two or three times and make sure that idle
speed and ignition timing are within the specifications.
Without CONSULT-II
NOTE:
•It is better to count the time accurately with a clock.
•It is impossible to switch the diagnostic mode when an accelerator pedal position sensor circuit has
a malfunction.
1. Perform EC-77, "
Accelerator Pedal Released Position Learning" .
2. Perform EC-77, "
Throttle Valve Closed Position Learning" .
3. Start engine and warm it up to normal operating temperature.
4. Check that all items listed under the topic PREPARATION (previously mentioned) are in good order.
5. Turn ignition switch OFF and wait at least 10 seconds.
6. Confirm that accelerator pedal is fully released, turn ignition switch ON and wait 3 seconds.
7. Repeat the following procedure quickly five times within 5 seconds.
a. Fully depress the accelerator pedal.
b. Fully release the accelerator pedal.
8. Wait 7 seconds, fully depress the accelerator pedal and keep it for approx. 20 seconds until the MIL stops
blinking and turned ON.
9. Fully release the accelerator pedal within 3 seconds after the MIL turned ON.
10. Start engine and let it idle.
11. Wait 20 seconds.
12. Rev up the engine two or three times and make sure that idle speed and ignition timing are within the
specifications.
13. If idle speed and ignition timing are not within the specification, Idle Air Volume Learning will not be carried
out successfully. In this case, find the cause of the incident by referring to the DIAGNOSTIC PROCE-
DURE below.
DIAGNOSTIC PROCEDURE
If idle air volume learning cannot be performed successfully, proceed as follows:
1.Check that throttle valve is fully closed.
2.Check PCV valve operation.
ITEM SPECIFICATION
Idle speed 650 ± 50 rpm (in P or N position)
Ignition timing 15 ± 5° BTDC (in P or N position)
MBIB0238E
ITEM SPECIFICATION
Idle speed 650 ± 50 rpm (in P or N position)
Ignition timing 15 ± 5° BTDC (in P or N position)
SEC897C
Page 1165 of 3061
EC-82
< SERVICE INFORMATION >
TROUBLE DIAGNOSIS
TROUBLE DIAGNOSIS
Trouble Diagnosis IntroductionINFOID:0000000003531617
INTRODUCTION
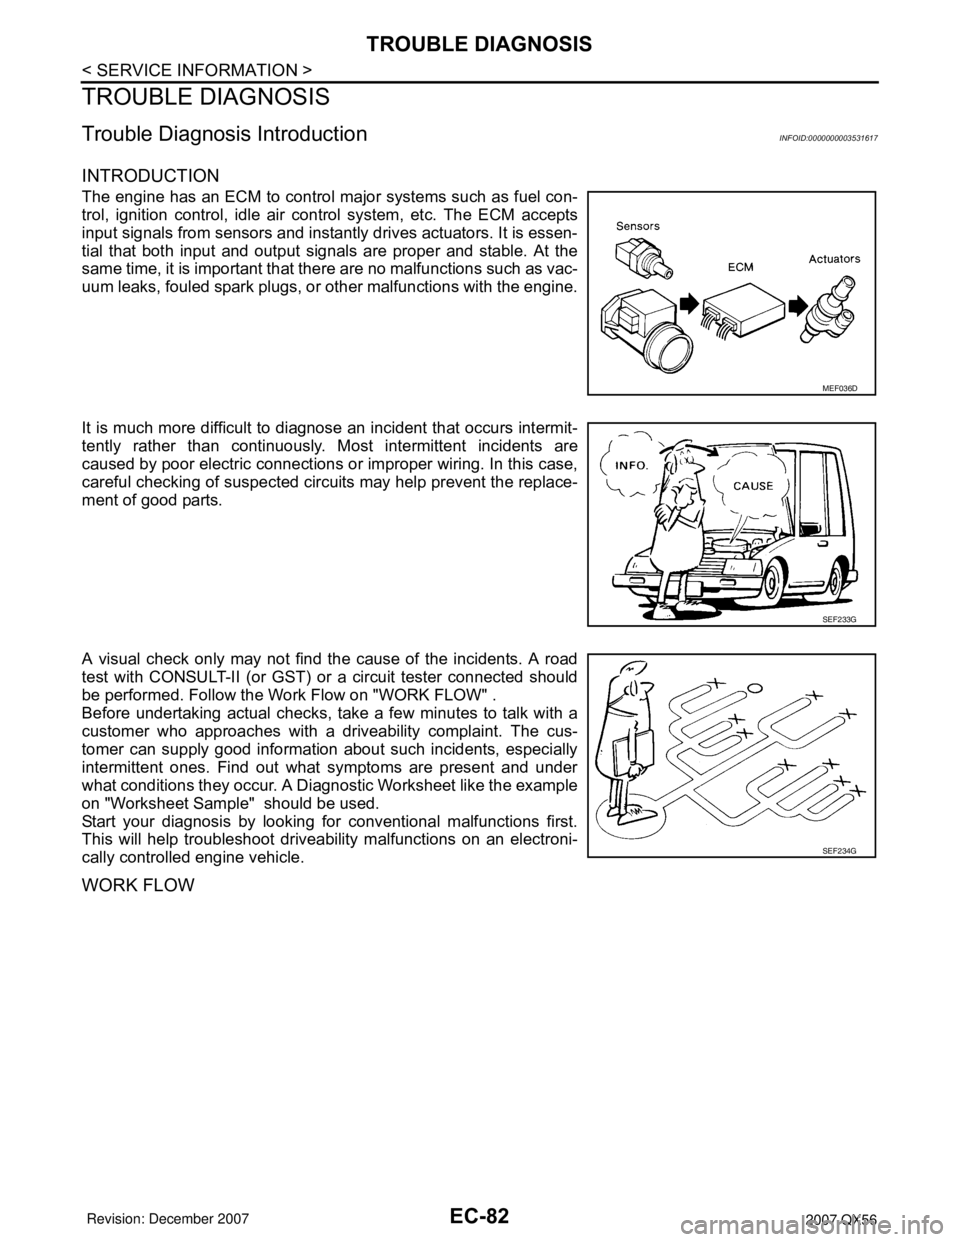
The engine has an ECM to control major systems such as fuel con-
trol, ignition control, idle air control system, etc. The ECM accepts
input signals from sensors and instantly drives actuators. It is essen-
tial that both input and output signals are proper and stable. At the
same time, it is important that there are no malfunctions such as vac-
uum leaks, fouled spark plugs, or other malfunctions with the engine.
It is much more difficult to diagnose an incident that occurs intermit-
tently rather than continuously. Most intermittent incidents are
caused by poor electric connections or improper wiring. In this case,
careful checking of suspected circuits may help prevent the replace-
ment of good parts.
A visual check only may not find the cause of the incidents. A road
test with CONSULT-II (or GST) or a circuit tester connected should
be performed. Follow the Work Flow on "WORK FLOW" .
Before undertaking actual checks, take a few minutes to talk with a
customer who approaches with a driveability complaint. The cus-
tomer can supply good information about such incidents, especially
intermittent ones. Find out what symptoms are present and under
what conditions they occur. A Diagnostic Worksheet like the example
on "Worksheet Sample" should be used.
Start your diagnosis by looking for conventional malfunctions first.
This will help troubleshoot driveability malfunctions on an electroni-
cally controlled engine vehicle.
WORK FLOW
MEF036D
SEF233G
SEF234G
Page 1168 of 3061
TROUBLE DIAGNOSIS
EC-85
< SERVICE INFORMATION >
C
D
E
F
G
H
I
J
K
L
MA
EC
N
P O
7.PERFORM DATA MONITOR (SPEC) MODE
With CONSULT-II
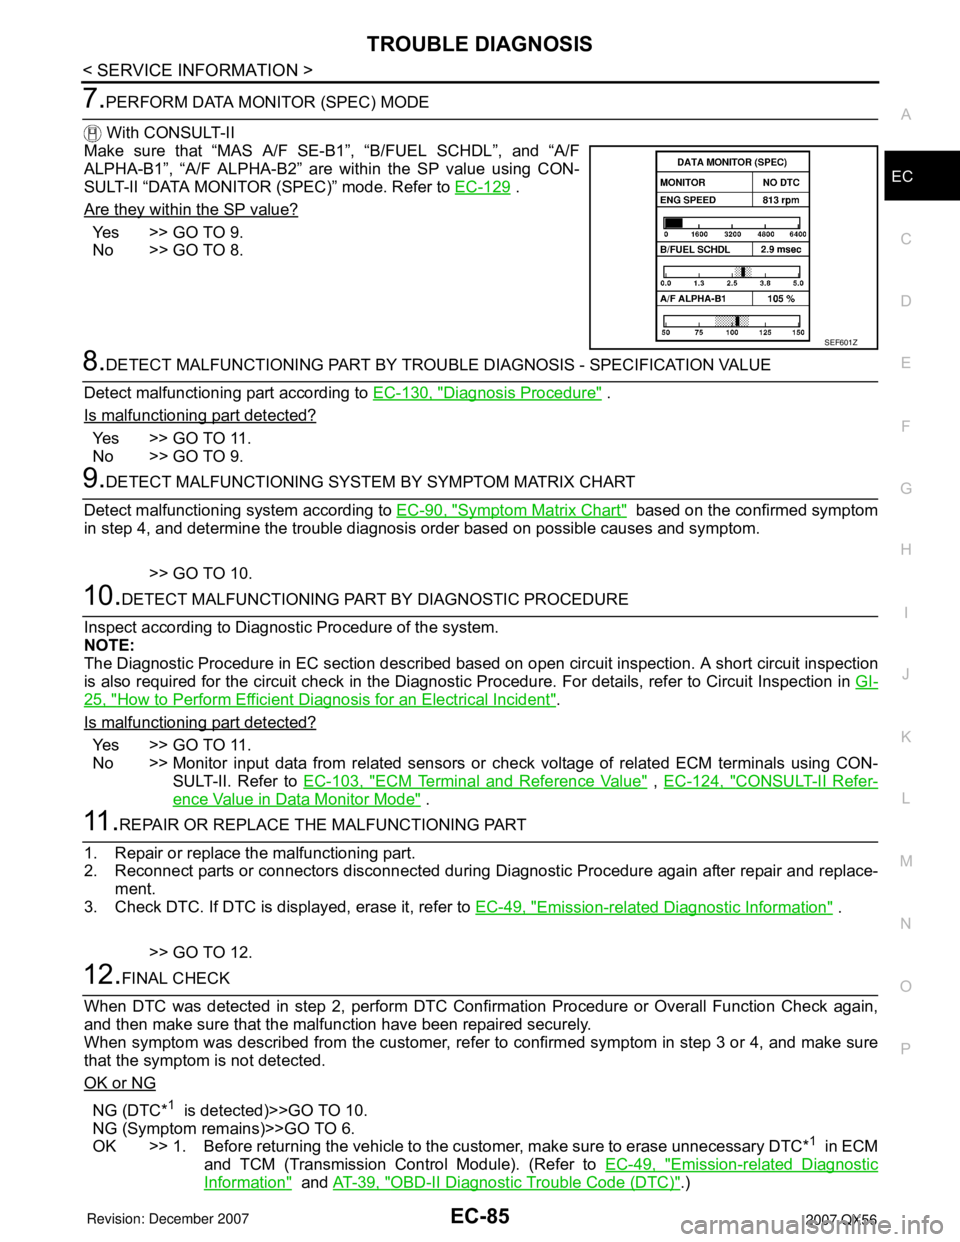
Make sure that “MAS A/F SE-B1”, “B/FUEL SCHDL”, and “A/F
ALPHA-B1”, “A/F ALPHA-B2” are within the SP value using CON-
SULT-II “DATA MONITOR (SPEC)” mode. Refer to EC-129
.
Are they within the SP value?
Yes >> GO TO 9.
No >> GO TO 8.
8.DETECT MALFUNCTIONING PART BY TROUBLE DIAGNOSIS - SPECIFICATION VALUE
Detect malfunctioning part according to EC-130, "
Diagnosis Procedure" .
Is malfunctioning part detected?
Yes >> GO TO 11.
No >> GO TO 9.
9.DETECT MALFUNCTIONING SYSTEM BY SYMPTOM MATRIX CHART
Detect malfunctioning system according to EC-90, "
Symptom Matrix Chart" based on the confirmed symptom
in step 4, and determine the trouble diagnosis order based on possible causes and symptom.
>> GO TO 10.
10.DETECT MALFUNCTIONING PART BY DIAGNOSTIC PROCEDURE
Inspect according to Diagnostic Procedure of the system.
NOTE:
The Diagnostic Procedure in EC section described based on open circuit inspection. A short circuit inspection
is also required for the circuit check in the Diagnostic Procedure. For details, refer to Circuit Inspection in GI-
25, "How to Perform Efficient Diagnosis for an Electrical Incident".
Is malfunctioning part detected?
Yes >> GO TO 11.
No >> Monitor input data from related sensors or check voltage of related ECM terminals using CON-
SULT-II. Refer to EC-103, "
ECM Terminal and Reference Value" , EC-124, "CONSULT-II Refer-
ence Value in Data Monitor Mode" .
11 .REPAIR OR REPLACE THE MALFUNCTIONING PART
1. Repair or replace the malfunctioning part.
2. Reconnect parts or connectors disconnected during Diagnostic Procedure again after repair and replace-
ment.
3. Check DTC. If DTC is displayed, erase it, refer to EC-49, "
Emission-related Diagnostic Information" .
>> GO TO 12.
12.FINAL CHECK
When DTC was detected in step 2, perform DTC Confirmation Procedure or Overall Function Check again,
and then make sure that the malfunction have been repaired securely.
When symptom was described from the customer, refer to confirmed symptom in step 3 or 4, and make sure
that the symptom is not detected.
OK or NG
NG (DTC*1 is detected)>>GO TO 10.
NG (Symptom remains)>>GO TO 6.
OK >> 1. Before returning the vehicle to the customer, make sure to erase unnecessary DTC*
1 in ECM
and TCM (Transmission Control Module). (Refer to EC-49, "
Emission-related Diagnostic
Information" and AT-39, "OBD-II Diagnostic Trouble Code (DTC)".)
SEF601Z