Page 1684 of 3061

ASCD BRAKE SWITCH
EC-601
< SERVICE INFORMATION >
C
D
E
F
G
H
I
J
K
L
MA
EC
N
P O
• Harness connectors M31, E152
• Fuse block (J/B) connector M4
• 10A fuse
• Harness for open or short between ASCD brake switch and fuse
>> Repair open circuit or short to ground or short to power in harness or connectors.
5.CHECK ASCD BRAKE SWITCH INPUT SIGNAL CIRCUIT FOR OPEN AND SHORT
1. Turn ignition switch OFF.
2. Disconnect ECM harness connector.
3. Check harness continuity between ECM terminal 108 and ASCD brake switch terminal 2.
Refer to Wiring Diagram.
4. Also check harness for short to ground and short to power.
OK or NG
OK >> GO TO 6.
NG >> Repair open circuit or short to ground or short to power in harness or connectors.
6.CHECK ASCD BRAKE SWITCH
Refer to EC-602, "
Component Inspection" .
OK or NG
OK >> GO TO 11.
NG >> Replace ASCD brake switch.
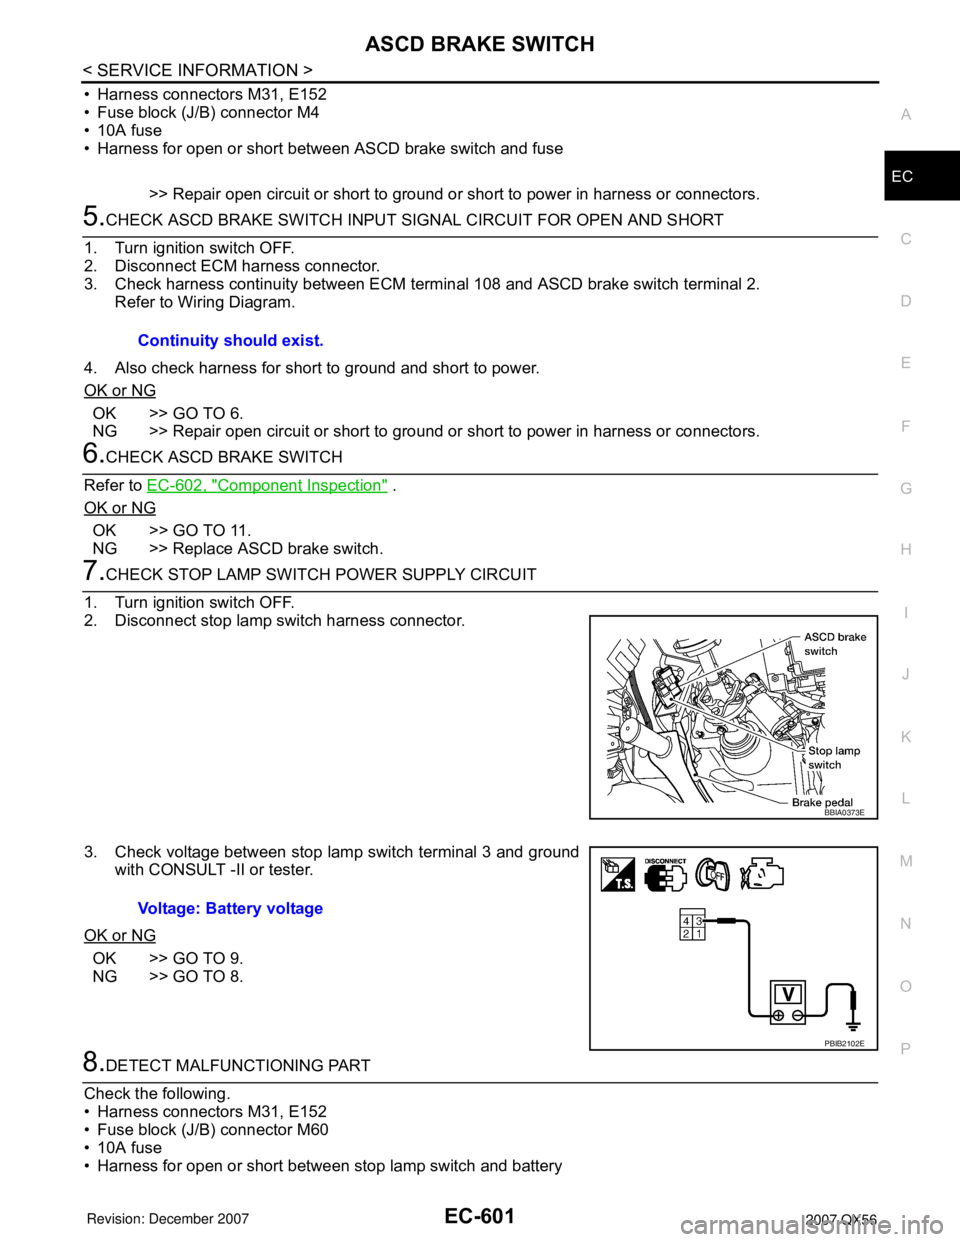
7.CHECK STOP LAMP SWITCH POWER SUPPLY CIRCUIT
1. Turn ignition switch OFF.
2. Disconnect stop lamp switch harness connector.
3. Check voltage between stop lamp switch terminal 3 and ground
with CONSULT -II or tester.
OK or NG
OK >> GO TO 9.
NG >> GO TO 8.
8.DETECT MALFUNCTIONING PART
Check the following.
• Harness connectors M31, E152
• Fuse block (J/B) connector M60
• 10A fuse
• Harness for open or short between stop lamp switch and batteryContinuity should exist.
BBIA0373E
Voltage: Battery voltage
PBIB2102E
Page 1685 of 3061

EC-602
< SERVICE INFORMATION >
ASCD BRAKE SWITCH
>> Repair open circuit or short to ground or short to power in harness or connectors.
9.CHECK STOP LAMP SWITCH INPUT SIGNAL CIRCUIT FOR OPEN AND SHORT
1. Disconnect ECM harness connector.
2. Check harness continuity between ECM terminal 101 and stop lamp switch terminal 4.
Refer to Wiring Diagram.
3. Also check harness for short to ground and short to power.
OK or NG
OK >> GO TO 10.
NG >> Repair open circuit or short to ground or short to power in harness or connectors.
10.CHECK STOP LAMP SWITCH
Refer to EC-602, "
Component Inspection" .
OK or NG
OK >> GO TO 11.
NG >> Replace stop lamp switch.
11 .CHECK INTERMITTENT INCIDENT
Refer to EC-138
.
>>INSPECTION END
Component InspectionINFOID:0000000003532152
ASCD BRAKE SWITCH
1. Turn ignition switch OFF.
2. Disconnect ASCD brake switch harness connector.
3. Check harness continuity between ASCD brake switch terminals
1 and 2 under the following conditions.
If NG, adjust ASCD brake switch installation, refer to BR-5
, and
perform step 3 again.
STOP LAMP SWITCH
1. Turn ignition switch OFF.
2. Disconnect stop lamp switch harness connector.
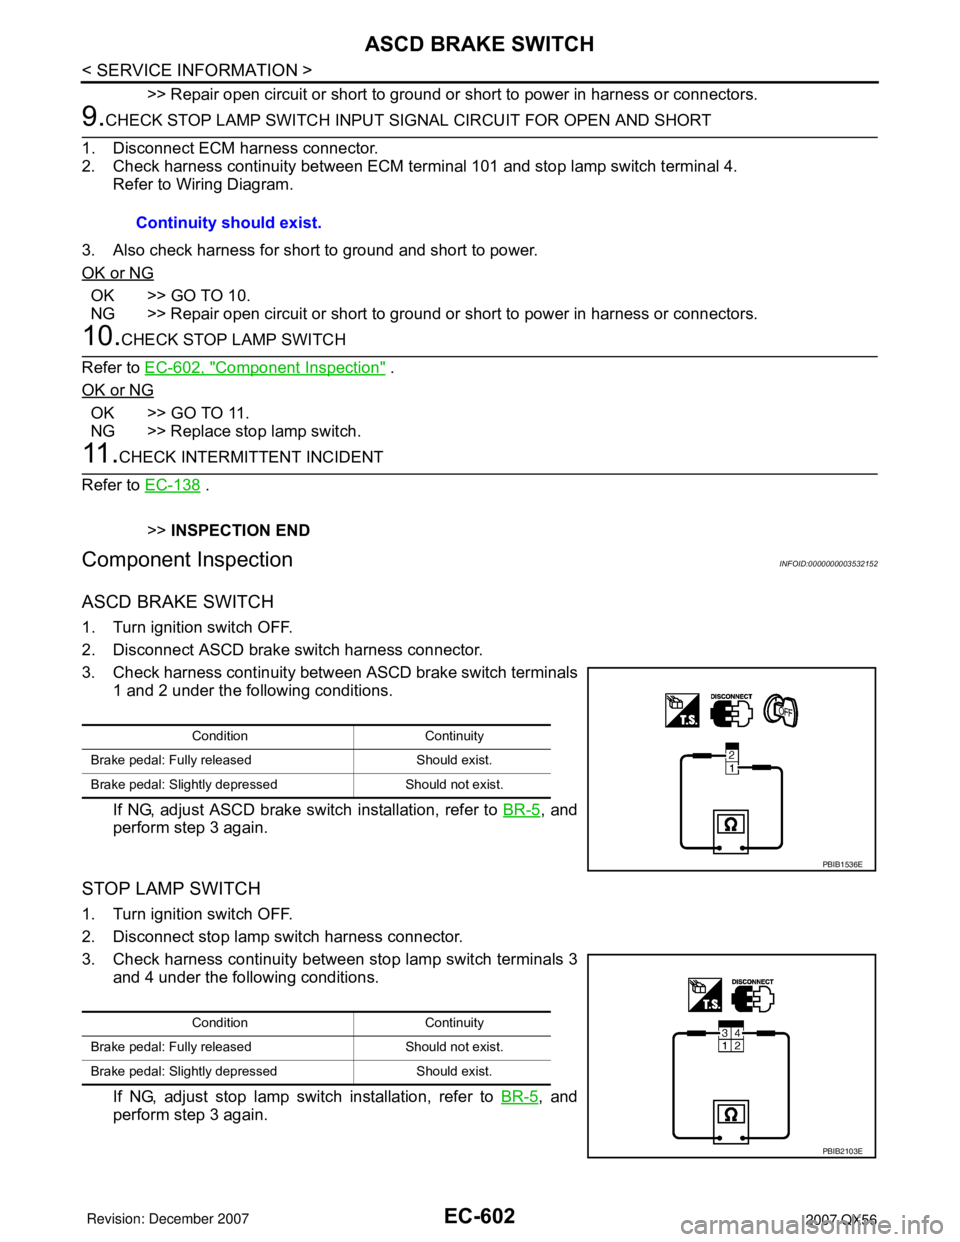
3. Check harness continuity between stop lamp switch terminals 3
and 4 under the following conditions.
If NG, adjust stop lamp switch installation, refer to BR-5
, and
perform step 3 again.Continuity should exist.
Condition Continuity
Brake pedal: Fully released Should exist.
Brake pedal: Slightly depressed Should not exist.
PBIB1536E
Condition Continuity
Brake pedal: Fully released Should not exist.
Brake pedal: Slightly depressed Should exist.
PBIB2103E
Page 1686 of 3061

ASCD INDICATOR
EC-603
< SERVICE INFORMATION >
C
D
E
F
G
H
I
J
K
L
MA
EC
N
P O
ASCD INDICATOR
Component DescriptionINFOID:0000000003532153
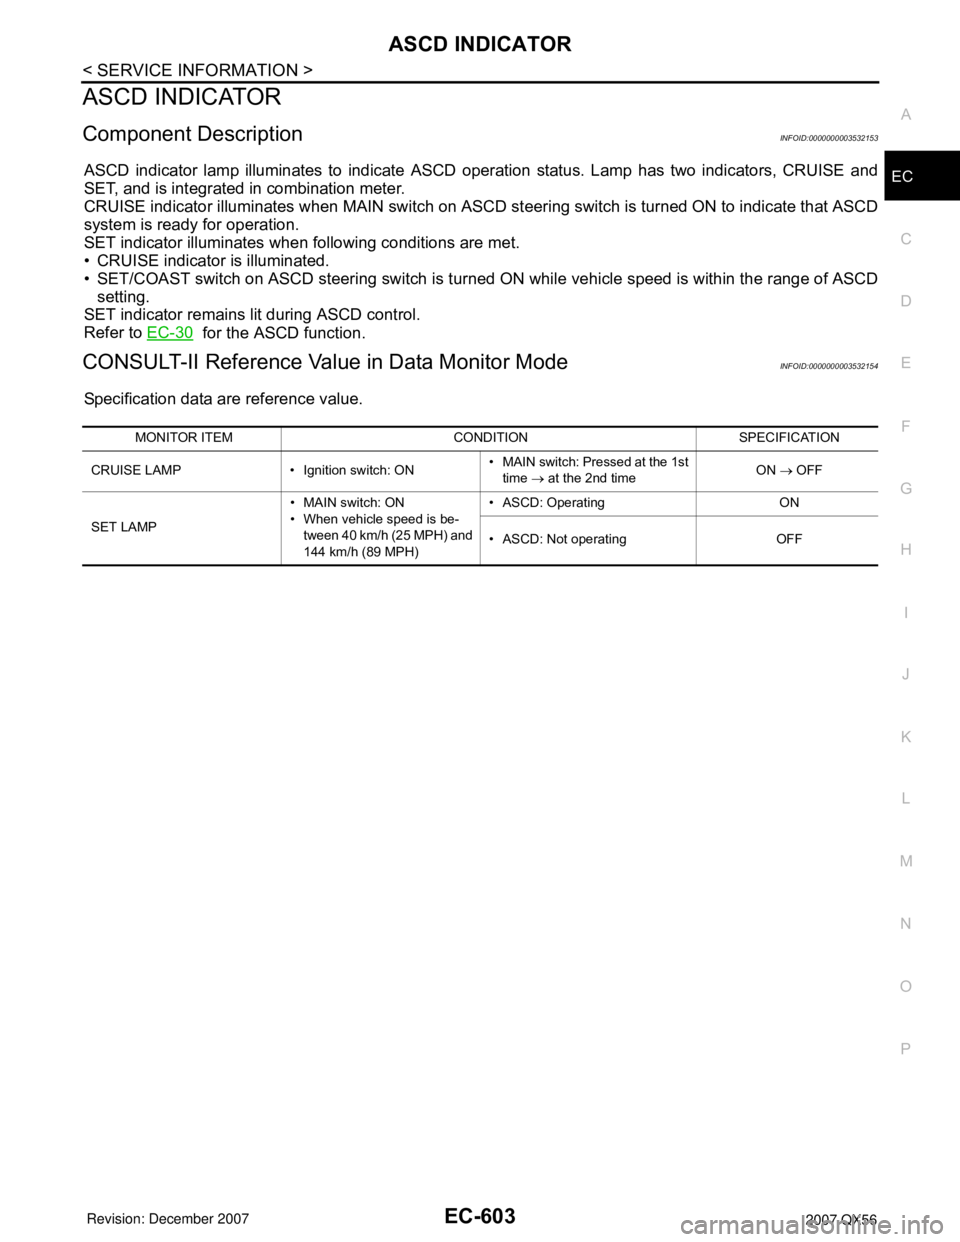
ASCD indicator lamp illuminates to indicate ASCD operation status. Lamp has two indicators, CRUISE and
SET, and is integrated in combination meter.
CRUISE indicator illuminates when MAIN switch on ASCD steering switch is turned ON to indicate that ASCD
system is ready for operation.
SET indicator illuminates when following conditions are met.
• CRUISE indicator is illuminated.
• SET/COAST switch on ASCD steering switch is turned ON while vehicle speed is within the range of ASCD
setting.
SET indicator remains lit during ASCD control.
Refer to EC-30
for the ASCD function.
CONSULT-II Reference Value in Data Monitor ModeINFOID:0000000003532154
Specification data are reference value.
MONITOR ITEM CONDITION SPECIFICATION
CRUISE LAMP • Ignition switch: ON• MAIN switch: Pressed at the 1st
time → at the 2nd timeON → OFF
SET LAMP• MAIN switch: ON
• When vehicle speed is be-
tween 40 km/h (25 MPH) and
144 km/h (89 MPH)• ASCD: Operating ON
• ASCD: Not operating OFF
Page 1687 of 3061
EC-604
< SERVICE INFORMATION >
ASCD INDICATOR
Wiring Diagram
INFOID:0000000003532155
Diagnosis ProcedureINFOID:0000000003532156
1.CHECK OVERALL FUNCTION
Check ASCD indicator under the following conditions.
BBWA2109E
Page 1688 of 3061
ASCD INDICATOR
EC-605
< SERVICE INFORMATION >
C
D
E
F
G
H
I
J
K
L
MA
EC
N
P O
OK or NG
OK >>INSPECTION END
NG >> GO TO 2.
2.CHECK DTC
Check that DTC U1000 or U1001 is not displayed.
OK or NG
OK >> GO TO 3.
NG >> Perform trouble diagnosis for DTC U1000, U1001. Refer to EC-145
.
3.CHECK COMBINATION METER FUNCTION
Refer to DI-5
.
OK or NG
OK >> GO TO 4.
NG >> Go to DI-5
.
4.CHECK INTERMITTENT INCIDENT
Refer to EC-138
.
>>INSPECTION END
ASCD INDICATOR CONDITION SPECIFICATION
CRUISE LAMP • Ignition switch: ON• MAIN switch: Pressed at the 1st
time → at the 2nd timeON → OFF
SET LAMP• MAIN switch: ON
• When vehicle speed is between
40 km/h (25 MPH) and 144 km/h
(89 MPH)•ASCD: Operating ON
• ASCD: Not operating OFF
Page 1689 of 3061

EC-606
< SERVICE INFORMATION >
ELECTRICAL LOAD SIGNAL
ELECTRICAL LOAD SIGNAL
DescriptionINFOID:0000000003532157
The electrical load signal (Headlamp switch signal, rear window defogger switch signal, etc.) is transferred
through the CAN communication line from BCM to ECM via IPDM E/R.
CONSULT-II Reference Value in Data Monitor ModeINFOID:0000000003532158
Specification data are reference values.
Diagnosis ProcedureINFOID:0000000003532159
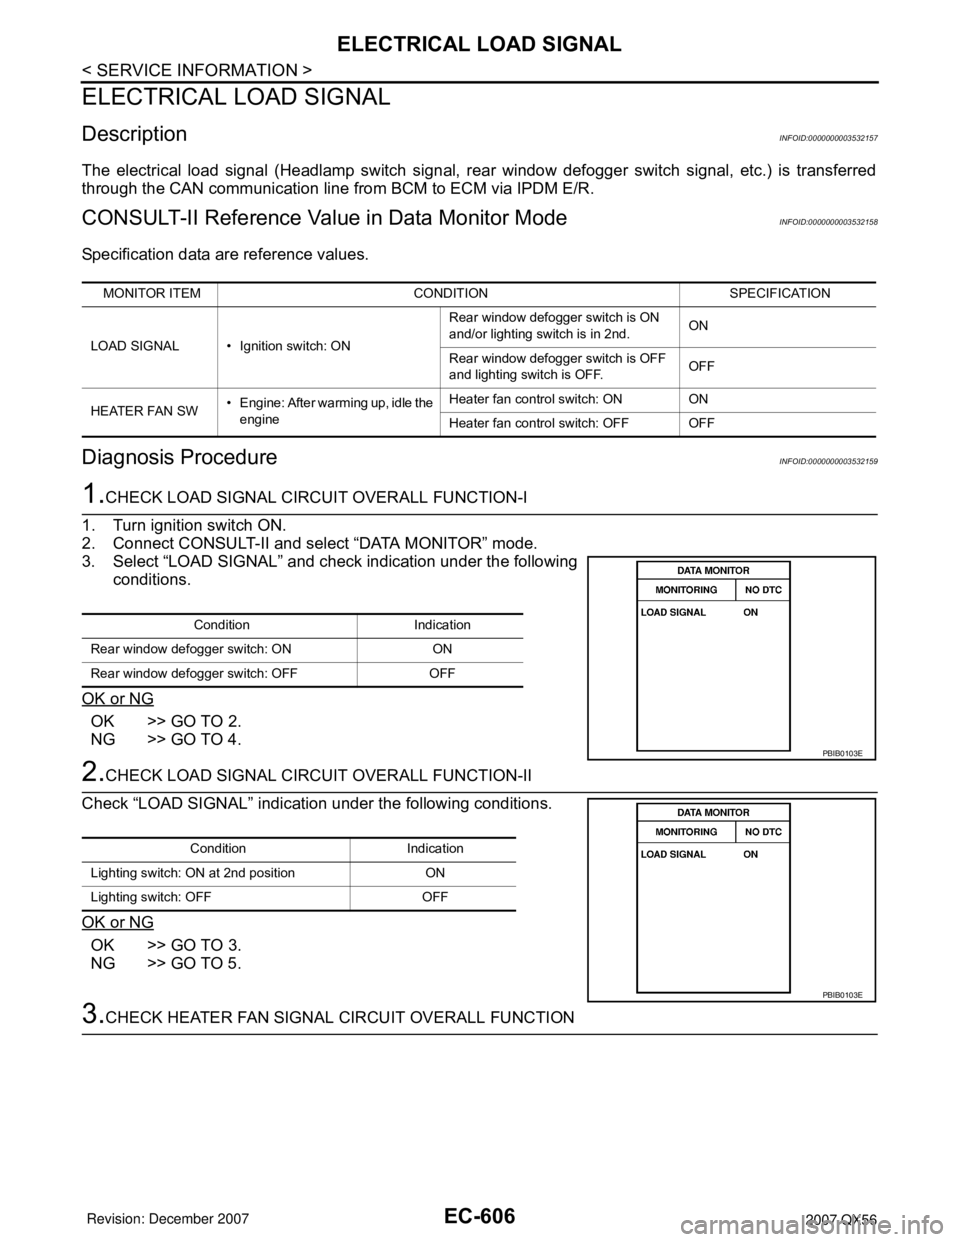
1.CHECK LOAD SIGNAL CIRCUIT OVERALL FUNCTION-I
1. Turn ignition switch ON.
2. Connect CONSULT-II and select “DATA MONITOR” mode.
3. Select “LOAD SIGNAL” and check indication under the following
conditions.
OK or NG
OK >> GO TO 2.
NG >> GO TO 4.
2.CHECK LOAD SIGNAL CIRCUIT OVERALL FUNCTION-II
Check “LOAD SIGNAL” indication under the following conditions.
OK or NG
OK >> GO TO 3.
NG >> GO TO 5.
3.CHECK HEATER FAN SIGNAL CIRCUIT OVERALL FUNCTION
MONITOR ITEM CONDITION SPECIFICATION
LOAD SIGNAL • Ignition switch: ONRear window defogger switch is ON
and/or lighting switch is in 2nd.ON
Rear window defogger switch is OFF
and lighting switch is OFF.OFF
HEATER FAN SW• Engine: After warming up, idle the
engineHeater fan control switch: ON ON
Heater fan control switch: OFF OFF
Condition Indication
Rear window defogger switch: ON ON
Rear window defogger switch: OFF OFF
PBIB0103E
Condition Indication
Lighting switch: ON at 2nd position ON
Lighting switch: OFF OFF
PBIB0103E
Page 1690 of 3061
ELECTRICAL LOAD SIGNAL
EC-607
< SERVICE INFORMATION >
C
D
E
F
G
H
I
J
K
L
MA
EC
N
P O
Select “HEATER FAN SW” and check indication under the following
conditions.
OK or NG
OK >>INSPECTION END
NG >> GO TO 6.
4.CHECK REAR WINDOW DEFOGGER SYSTEM
Refer to GW-68
.
>>INSPECTION END
5.CHECK HEADLAMP SYSTEM
Refer to LT- 5
, or LT- 2 4.
>>INSPECTION END
6.CHECK HEATER FAN CONTROL SYSTEM
Refer to AT C - 3 0
.
>>INSPECTION END
Condition Indication
Heater fan control switch: ON ON
Heater fan control switch: OFF OFF
PBIB0103E
Page 1691 of 3061
EC-608
< SERVICE INFORMATION >
FUEL INJECTOR
FUEL INJECTOR
Component DescriptionINFOID:0000000003532160
The fuel injector is a small, precise solenoid valve. When the ECM
supplies a ground to the fuel injector circuit, the coil in the fuel injec-
tor is energized. The energized coil pulls the ball valve back and
allows fuel to flow through the fuel injector into the intake manifold.
The amount of fuel injected depends upon the injection pulse dura-
tion. Pulse duration is the length of time the fuel injector remains
open. The ECM controls the injection pulse duration based on
engine fuel needs.
CONSULT-II Reference Value in Data Monitor ModeINFOID:0000000003532161
Specification data are reference values.
SEF375Z
MONITOR ITEM CONDITION SPECIFICATION
B/FUEL SCHDL See EC-129
.
INJ PULSE-B1
INJ PULSE-B2• Engine: After warming up
• Air conditioner switch: OFF
• Selector lever: P or N
•No loadIdle 2.0 - 2.8 msec
2,000 rpm 1.9 - 2.9 msec