2007 INFINITI QX56 battery
[x] Cancel search: batteryPage 1022 of 3061
COMBINATION METERSDI-11
< SERVICE INFORMATION >
C
DE
F
G H
I
J
L
M A
B
DI
N
O P
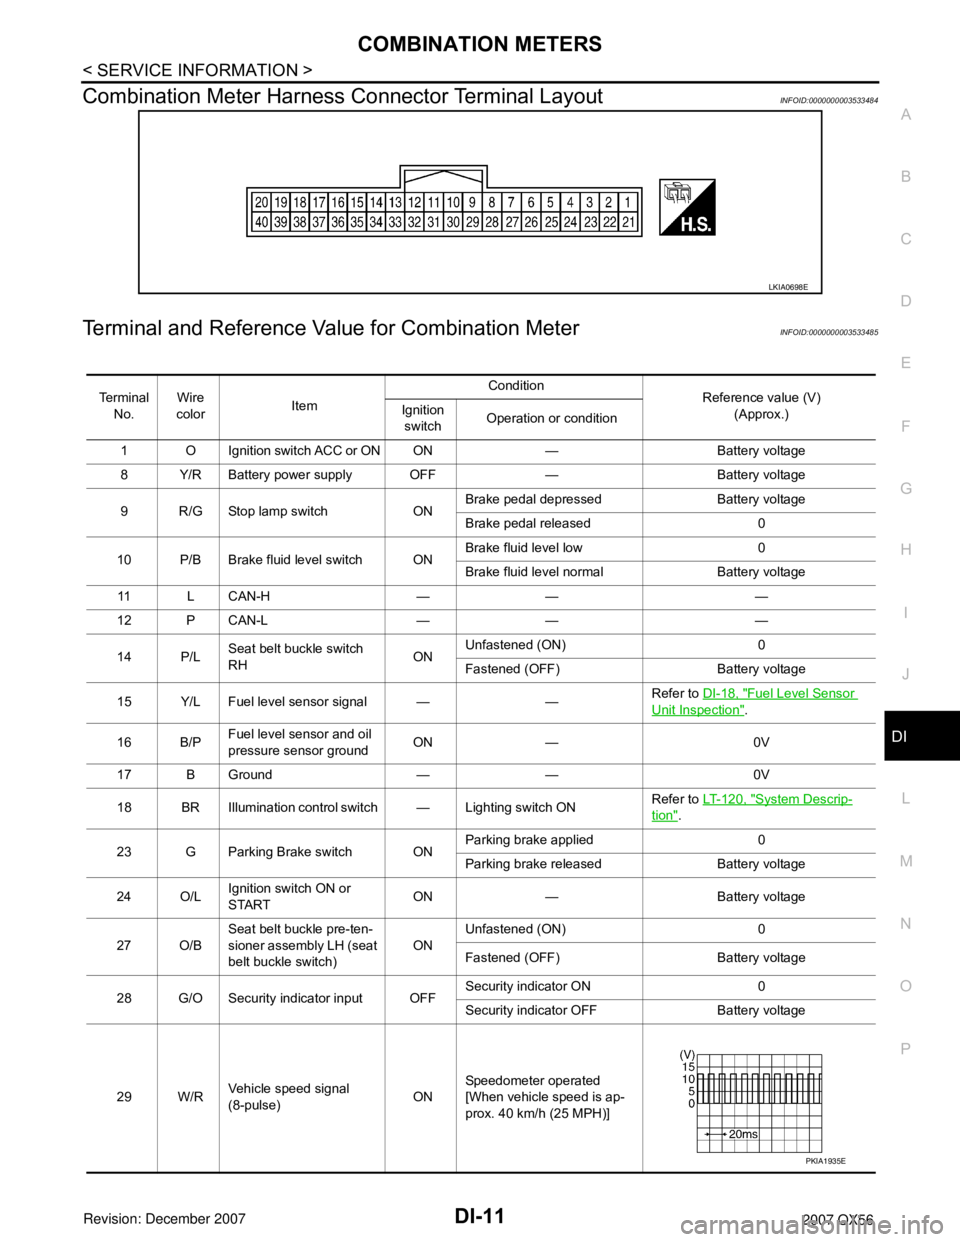
Combination Meter Harness Connector Terminal LayoutINFOID:0000000003533484
Terminal and Reference Va lue for Combination MeterINFOID:0000000003533485
LKIA0698E
Te r m i n a l
No. Wire
color Item Condition
Reference value (V)
(Approx.)
Ignition
switch Operation or condition
1 O Ignition switch ACC or ON ON — Battery voltage
8 Y/R Battery power supply OFF — Battery voltage
9 R/G Stop lamp switch ON Brake pedal depressed Battery voltage
Brake pedal released 0
10 P/B Brake fluid level switch ON Brake fluid level low 0
Brake fluid level normal Battery voltage
11 L C A N - H — — —
12 P CAN-L — — —
14 P/L Seat belt buckle switch
RH ONUnfastened (ON) 0
Fastened (OFF) Battery voltage
15 Y/L Fuel level sensor signal — — Refer to
DI-18, "
Fuel Level Sensor
Unit Inspection".
16 B/P Fuel level sensor and oil
pressure sensor ground ON — 0V
17 B Ground — — 0V
18 BR Illumination control switch — Lighting switch ON Refer to
LT- 1 2 0 , "
System Descrip-
tion".
23 G Parking Brake switch ON Parking brake applied 0
Parking brake released Battery voltage
24 O/L Ignition switch ON or
START ON — Battery voltage
27 O/B Seat belt buckle pre-ten-
sioner assembly LH (seat
belt buckle switch) ON
Unfastened (ON) 0
Fastened (OFF) Battery voltage
28 G/O Security indicator input OFF Security indicator ON 0
Security indicator
OFF Battery voltage
29 W/R Vehicle speed signal
(8-pulse) ONSpeedometer operated
[When vehicle speed is ap-
prox. 40 km/h (25 MPH)]
PKIA1935E
Page 1023 of 3061

DI-12
< SERVICE INFORMATION >
COMBINATION METERS
Self-Diagnosis Mode of Combination Meter
INFOID:0000000003533486
SELF-DIAGNOSIS FUNCTION
The following items can be checked during Combination Meter Self-Diagnosis Mode.
• Gauge sweep and present gauge values.
• Illuminates all odometer, fuel, and engine temperature segments.
• Illuminates all micro controlled lamps/LE D's regardless of switch configuration.
• Displays estimated present battery voltage.
• Displays seat belt buckle switch LH status.
HOW TO INITIATE COMBINATION METER SELF- DIAGNOSIS MODE
NOTE:
Once entered, Combination Meter Self-Diagnosis Mode will function with the ignition switch in ON or START.
Combination Meter Self-Diagnosis Mode will exit upon turning the ignition switch to OFF or ACC.
To initiate Combination Meter Self-Diagnosis Mode, refer to the following procedure.
1. Turn the ignition switch ON, while holding the odom eter/trip meter switch for 5 - 8 seconds. When the
diagnosis function is activated the odometer/trip meter will display tESt.
NOTE:
Check combination meter power supply and ground ci rcuit when self-diagnosis mode of combination
meter does not start. Refer to DI-16, "
Power Supply and Ground Circuit Inspection". Replace combination
meter if normal. Refer to IP-10, "
Removal and Installation".
COMBINATION METER SELF-DIAGNOSIS MODE FUNCTIONS
To interpret Combination Meter Self-Diagnosis Mode functions, refer to the following table.
37 W/L Washer fluid level switch ON Washer fluid level low 0
Washer fluid level normal Battery voltage
Te r m i n a l
No. Wire
color Item Condition
Reference value (V)
(Approx.)
Ignition
switch Operation or condition
Event Odometer Display Description of Test/Data Notes:
Odometer/trip meter A/B
switch held from 5 to 8
seconds (or until re-
leased) tESt Initiating self-diagnosis mode
Odometer/trip meter A/B
switch engaged and re-
leased = next test re-
quested rXXXX, FAILReturn to normal opera-
tion of all lamps/LEDs and
displays hex ROM rev. If a
ROM checksum fault ex-
ists, display alternates be-
tween "r XXXX" and
"FAIL".
Next test requested nrXXXX Displays hex ROM rev as
stored in NVM.
Next test requested Sc1XX Displays 8-bit software
configuration value in Hex
format.Bit Coding
7-3 = reserved for future use
2 = TCS/VDC 0 = not present
1 = present
1 = Shift type 0 = Column shift
1 = Floor shift
0 = ICC 0 = not present
1 = present
Next test requested Sc2XX Displays 8-bit software
configuration value in Hex
format.Bit coding
7-0 = Reserved for future use
Page 1025 of 3061

DI-14
< SERVICE INFORMATION >
COMBINATION METERS
Next test requested ot0XXDisplays oil pressure tell-
tale "off" threshold in A/D
counts in Hex format.$00 - $FF
Next test requested XXXXX Raw uncompensated en-
glish speed value in hun-
dredths of MPH.
Speedometer indicates
present speed.Will display "-----"
if message is
not received. Will display
"99999" if data received is in-
valid
Next test requested XXXXX Raw uncompensated
metric speed value in hun-
dredths of KPH. Speed-
ometer indicates present
speed.Will display "-----"
if message is
not received. Will display
"99999" if data received is in-
valid
Next test requested tXXXX Tachometer value in
RPM. Tachometer indi-
cates present RPM.Will display "-----"
if message is
not received.
Next test requested F1 XXXX Present ratioed fuel level
A/D input 1 in decimal for-
mat. Fuel gauge indicates
present filtered level.000-009 = Short circuit
010-254 = Normal range
255 = Open circuit
--- = Missing 5 seconds
Next test requested F2 XXX Present FLPS. 010-254 normal range
Next test requested FS X Fuel filter rate 0 = Normal
1 = Fast
Next test requested XXXC Last temperature gauge
input value in degrees C.
Temperature gauge indi-
cates present filtered tem-
perature.Will display "---"
C if message is
not received.
Will display "999" if data re-
ceived is invalid.
Next test requested BAtXX.X Estimated present battery
voltage.
Next test requested rES -X Seat belt buckle switch LH
status.0 = Unbuckled
1 = Buckled
Next test requested PA -XX Hex value port A.
Next test requested Pb -XX Hex value port B.
Next test requested PE -XX Hex value port E.
Next test requested PL -XX Hex value port L.
Next test requested P6 -XX Hex value port K.
Next test requested Pn -XX Hex value port M.
Next test requested PP -XX Hex value port P.
Next test requested PS -XX Hex value port S.
Next test requested Pt -XX Hex value port T.
Next test requested Pu -XX Hex value port U.
Next test requested P4 -XX Hex value port V.
Next test requested Puu -XX Hex value port W.
Next test requested A00XXX A/D port A/D value (non-
ratioed).0-255
Next test requested A01XXX A/D port A/D value (non-
ratioed).
0-255
Next test requested A02XXX A/D port A/D value (non-
ratioed).0-255
Next test requested A03XXX A/D port A/D value (non-
ratioed).0-255
Event Odometer Display Description of Test/Data Notes:
Page 1028 of 3061
COMBINATION METERSDI-17
< SERVICE INFORMATION >
C
DE
F
G H
I
J
L
M A
B
DI
N
O P
Refer to DI-9, "Wiring Diagram - METER -".
OK or NG
OK >> GO TO 2.
NG >> If fuse is blown, be sure to eliminate caus e of malfunction before installing new fuse. Refer to PG-
3.
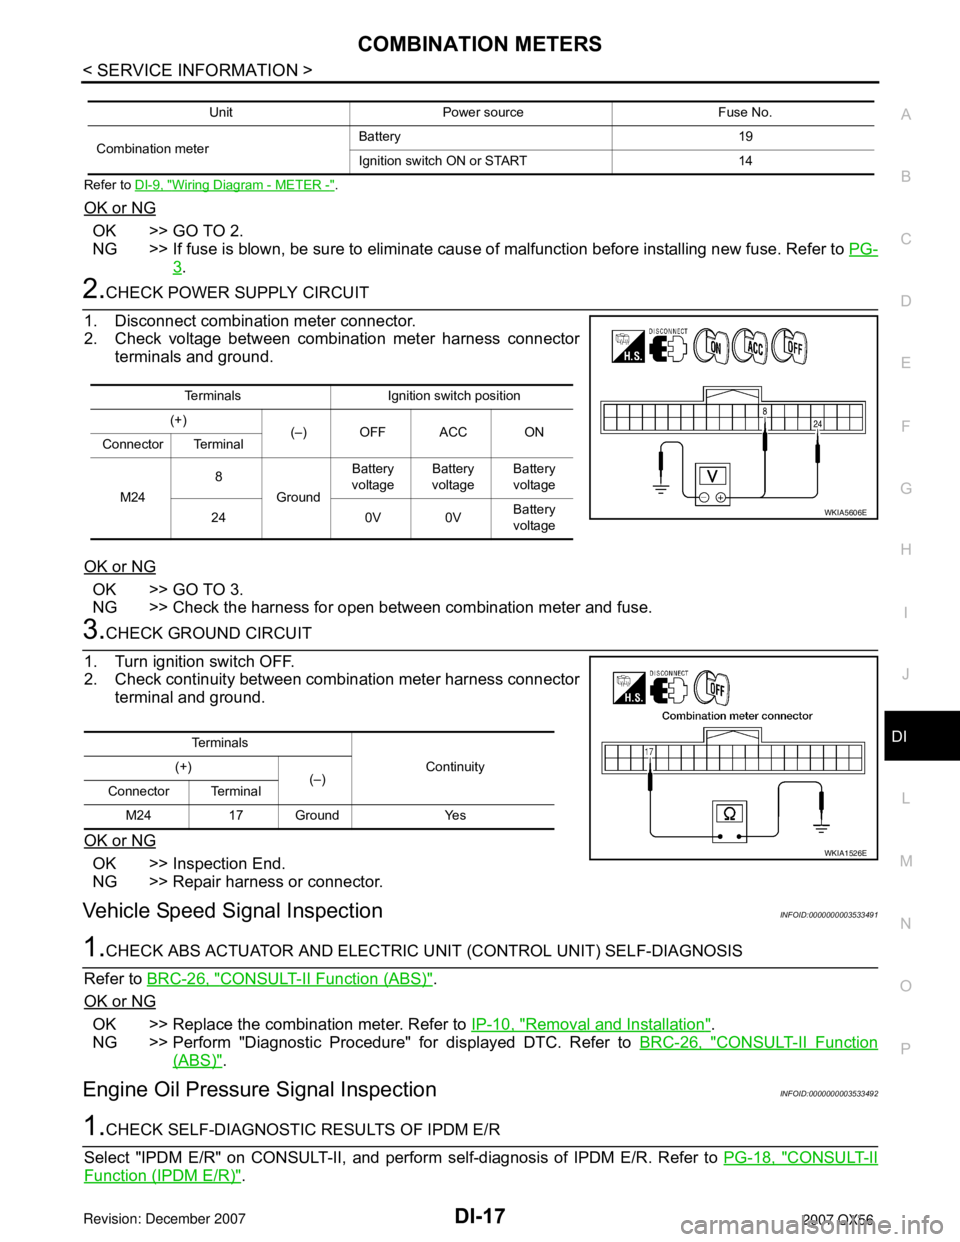
2.CHECK POWER SUPPLY CIRCUIT
1. Disconnect combination meter connector.
2. Check voltage between combination meter harness connector terminals and ground.
OK or NG
OK >> GO TO 3.
NG >> Check the harness for open between combination meter and fuse.
3.CHECK GROUND CIRCUIT
1. Turn ignition switch OFF.
2. Check continuity between combination meter harness connector terminal and ground.
OK or NG
OK >> Inspection End.
NG >> Repair harness or connector.
Vehicle Speed Signal InspectionINFOID:0000000003533491
1.CHECK ABS ACTUATOR AND ELECTRIC UNIT (CONTROL UNIT) SELF-DIAGNOSIS
Refer to BRC-26, "
CONSULT-II Function (ABS)".
OK or NG
OK >> Replace the combination meter. Refer to IP-10, "Removal and Installation".
NG >> Perform "Diagnostic Procedure" for displayed DTC. Refer to BRC-26, "
CONSULT-II Function
(ABS)".
Engine Oil Pressure Signal InspectionINFOID:0000000003533492
1.CHECK SELF-DIAGNOSTIC RESULTS OF IPDM E/R
Select "IPDM E/R" on CONSULT-II, and perform self-diagnosis of IPDM E/R. Refer to PG-18, "
CONSULT-II
Function (IPDM E/R)".
Unit Power source Fuse No.
Combination meter Battery 19
Ignition switch ON or START 14
Terminals Ignition switch position
(+) (–) OFF ACC ON
Connector Terminal
M24 8
Ground Battery
voltage Battery
voltage Battery
voltage
24 0V 0V Battery
voltage
WKIA5606E
Te r m i n a l s
Continuity
(+)
(–)
Connector Terminal
M24 17 Ground Yes
WKIA1526E
Page 1030 of 3061
COMBINATION METERSDI-19
< SERVICE INFORMATION >
C
DE
F
G H
I
J
L
M A
B
DI
N
O P
• Depending on vehicle position or driving circumstance, the fuel in the tank shifts and the indication may fluc-
tuate.
• If the vehicle is fueled with the ignition switch ON, the indication will update slowly.
• If the vehicle is tilted when the ignition switch is turned ON, fuel in the tank may flow to one direction result-
ing in a change of reading.
LOW-FUEL WARNING LAMP
Depending on vehicle posture or driving circumstances, the fuel level in the tank varies, and the warning lamp
ON timing may be changed.
1.CHECK SELF-DIAGNOSIS
Perform the combination meter self-diagnosis. Refer to DI-12, "
Self-Diagnosis Mode of Combination Meter".
OK or NG
OK >> GO TO 2.
NG >> Replace the combination meter. Refer to IP-10, "
Removal and Installation".
2.CHECK HARNESS CONNECTOR
1. Turn the ignition switch OFF.
2. Check combination meter and fuel level sensor unit and fuel pump terminals (meter-side, and harness-
side) for poor connection.
OK or NG
OK >> GO TO 3.
NG >> Repair or replace terminals or connectors.
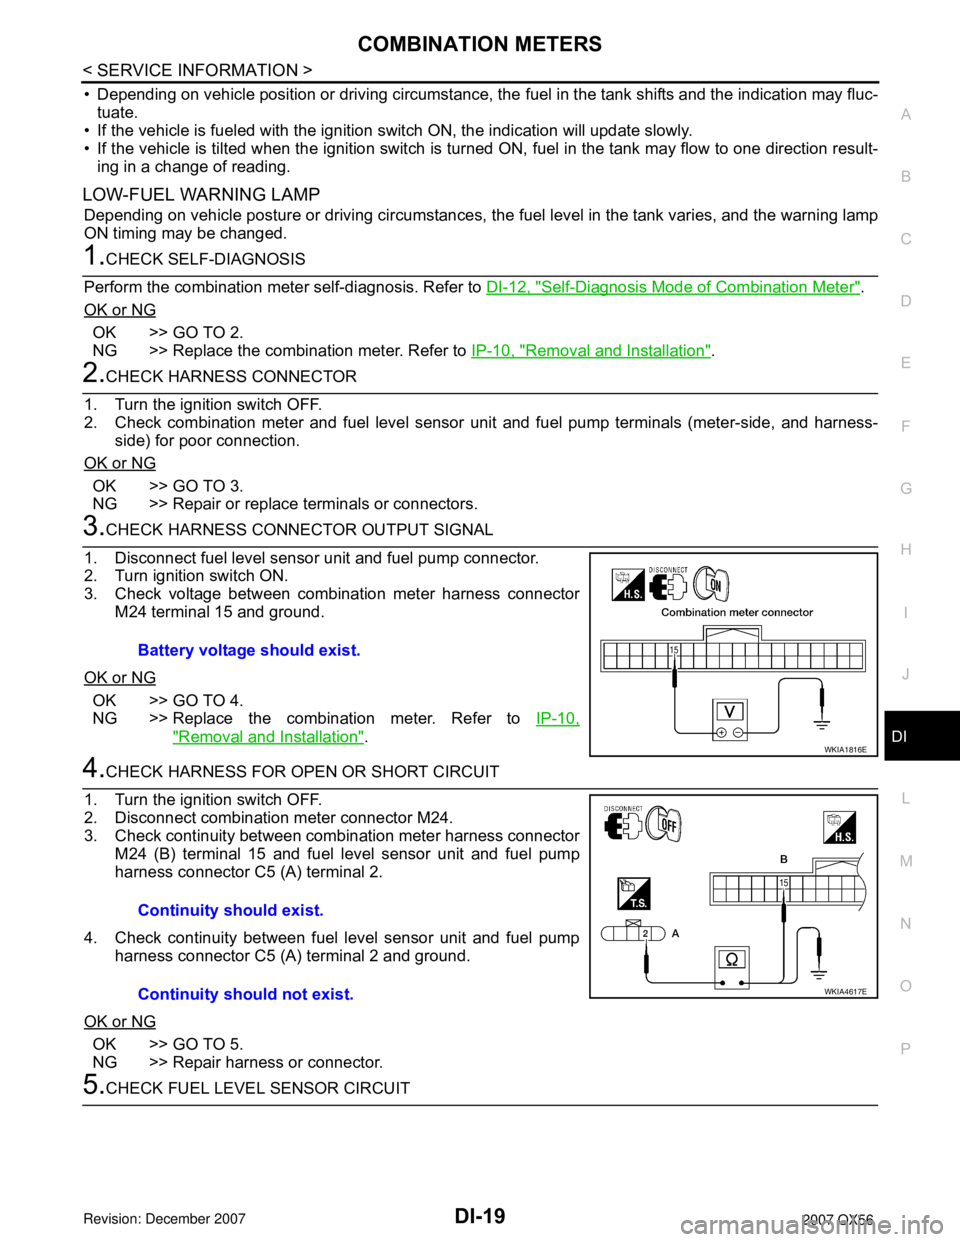
3.CHECK HARNESS CONNECTOR OUTPUT SIGNAL
1. Disconnect fuel level sensor unit and fuel pump connector.
2. Turn ignition switch ON.
3. Check voltage between combination meter harness connector M24 terminal 15 and ground.
OK or NG
OK >> GO TO 4.
NG >> Replace the combination meter. Refer to IP-10,
"Removal and Installation".
4.CHECK HARNESS FOR OPEN OR SHORT CIRCUIT
1. Turn the ignition switch OFF.
2. Disconnect combination meter connector M24.
3. Check continuity between combination meter harness connector M24 (B) terminal 15 and fuel level sensor unit and fuel pump
harness connector C5 (A) terminal 2.
4. Check continuity between fuel level sensor unit and fuel pump harness connector C5 (A) terminal 2 and ground.
OK or NG
OK >> GO TO 5.
NG >> Repair harness or connector.
5.CHECK FUEL LEVEL SENSOR CIRCUIT Battery voltage should exist.
WKIA1816E
Continuity should exist.
Continuity should not exist.
WKIA4617E
Page 1035 of 3061

DI-24
< SERVICE INFORMATION >
COMPASS AND THERMOMETER
1. Turn the ignition switch to the ON position.
2. Cool down ambient sensor 2 with water or ice.
Does the indicated temperature drop?
YES >> GO TO 2.
NO >> The system is malfunctioning. Check the system following “INSPECTION/COMPASS AND THER-
MOMETER”. Refer to "INSPECTION/COMPASS AND THERMOMETER".
2.WARM UP CHECK
1. Leave the vehicle for 10 minutes.
2. With the ignition switch in the ON position, disconnect and reconnect ambient sensor 2 connector.
Does the indicated temperature rise?
YES >> The system is OK.
NO >> The system is malfunctioning. Check the system following “INSPECTION/COMPASS AND THER-
MOMETER”. Refer to "INSPECTION/COMPASS AND THERMOMETER".
INSPECTION/COMPASS AND THERMOMETER
Calibration Procedure for CompassINFOID:0000000003533503
The difference between magnetic North and geographical North can sometimes be great enough to cause
false compass readings. In order for the compass to operate accurately in a particular zone, it must be cali-
brated using the following procedure.
Symptom Possible causes Repair order
No display at all 1. 10A fuse.
2. Ground circuit.
3. auto anti-dazzling inside mirror.1. Check 10A fuse [No. 12, located in fuse block (J/B)].
Turn the ignition switch ON and verify that battery positive
voltage is at terminal 6 of auto anti-dazzling inside mirror.
2. Check ground circuit for auto anti-dazzling inside mirror.
3. Replace auto anti-dazzling inside mirror.
Forward direction indi-
cation slips off the mark
or incorrect.1. In manual correction mode (Bar
and display vanish).
2. Zone variation change is not
done.1. Drive the vehicle and turn at an angle of 90°.
2. Perform the zone variation change.
Displays wrong temper-
ature when ambient
temperature is between
−40°C (−40°F) and
55°C (130°F)1. Check operation.
2. Ambient sensor 2 circuit.
3. Ambient sensor 2.
4. Auto anti-dazzling inside mirror.1. Perform preliminary check shown above.
2. Check harness for open or short between ambient sensor 2
and auto anti-dazzling inside mirror.
3. Replace ambient sensor 2.
4. Replace auto anti-dazzling inside mirror.
Displays SC or OC 1. Ambient sensor 2 circuit.
2. Ambient sensor 2.
3. Auto anti-dazzling inside mirror.1. Check harness for open or short between ambient sensor 2
and auto anti-dazzling inside mirror.
2. Replace ambient sensor 2.
3. Replace auto anti-dazzling inside mirror.
Page 1048 of 3061
WARNING CHIME
DI-37
< SERVICE INFORMATION >
C
D
E
F
G
H
I
J
L
MA
B
DI
N
O
P
• to key switch and key lock solenoid terminal 3.
With ignition switch in ON or START position, power is supplied
• through 10A fuse (No. 59, located in the fuse and relay box)
• to BCM terminal 38.
Ground is supplied
• to BCM terminal 67
• through body grounds M57, M61, and M79.
NOTE:
When ignition key warning chime, light warning chime, and seat belt warning chime are required at the same
time, the priorities for each chime are the following.
1. Light warning chime
2. Ignition key warning chime
3. Seat belt warning chime
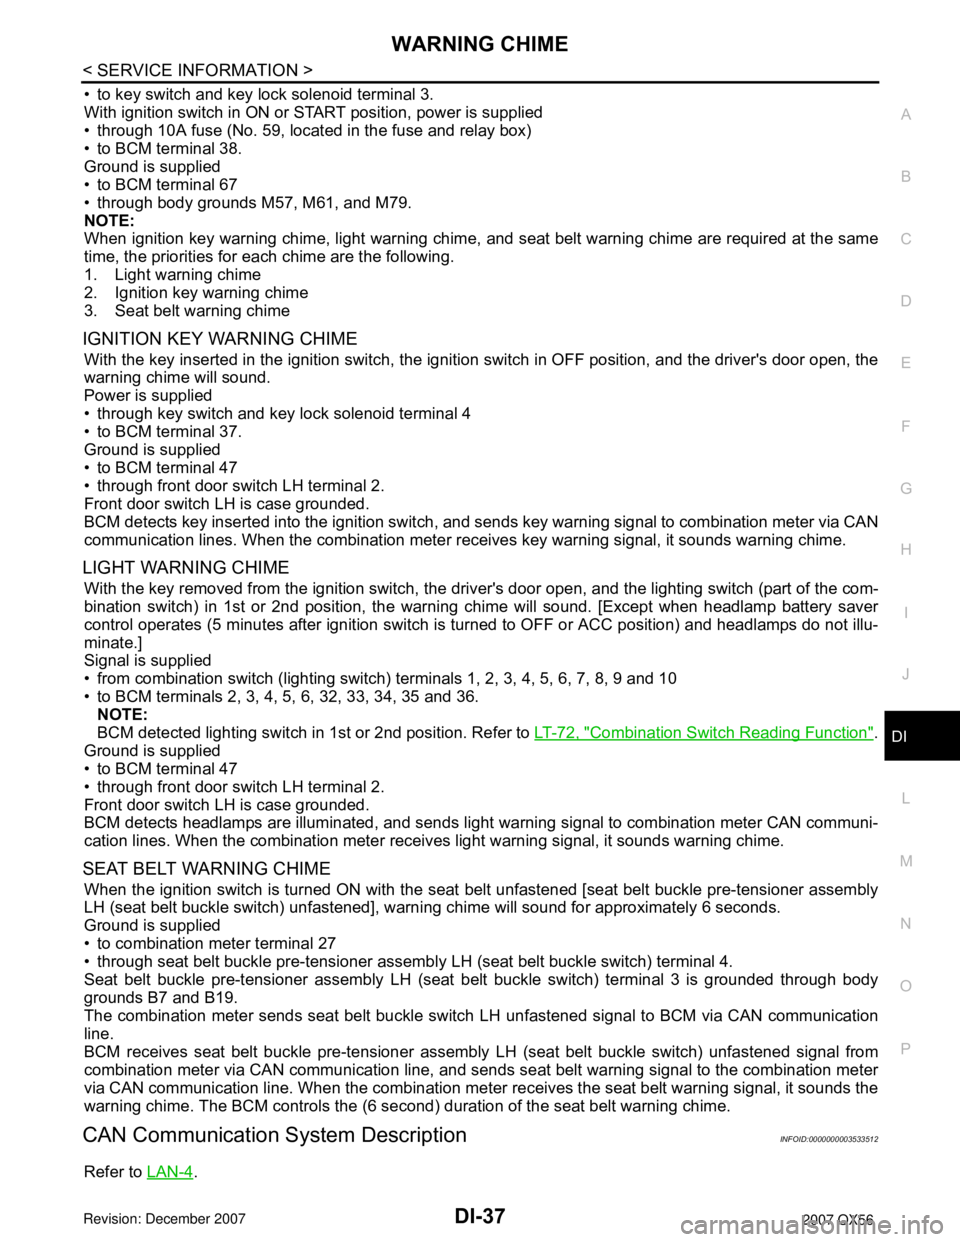
IGNITION KEY WARNING CHIME
With the key inserted in the ignition switch, the ignition switch in OFF position, and the driver's door open, the
warning chime will sound.
Power is supplied
• through key switch and key lock solenoid terminal 4
• to BCM terminal 37.
Ground is supplied
• to BCM terminal 47
• through front door switch LH terminal 2.
Front door switch LH is case grounded.
BCM detects key inserted into the ignition switch, and sends key warning signal to combination meter via CAN
communication lines. When the combination meter receives key warning signal, it sounds warning chime.
LIGHT WARNING CHIME
With the key removed from the ignition switch, the driver's door open, and the lighting switch (part of the com-
bination switch) in 1st or 2nd position, the warning chime will sound. [Except when headlamp battery saver
control operates (5 minutes after ignition switch is turned to OFF or ACC position) and headlamps do not illu-
minate.]
Signal is supplied
• from combination switch (lighting switch) terminals 1, 2, 3, 4, 5, 6, 7, 8, 9 and 10
• to BCM terminals 2, 3, 4, 5, 6, 32, 33, 34, 35 and 36.
NOTE:
BCM detected lighting switch in 1st or 2nd position. Refer to LT-72, "
Combination Switch Reading Function".
Ground is supplied
• to BCM terminal 47
• through front door switch LH terminal 2.
Front door switch LH is case grounded.
BCM detects headlamps are illuminated, and sends light warning signal to combination meter CAN communi-
cation lines. When the combination meter receives light warning signal, it sounds warning chime.
SEAT BELT WARNING CHIME
When the ignition switch is turned ON with the seat belt unfastened [seat belt buckle pre-tensioner assembly
LH (seat belt buckle switch) unfastened], warning chime will sound for approximately 6 seconds.
Ground is supplied
• to combination meter terminal 27
• through seat belt buckle pre-tensioner assembly LH (seat belt buckle switch) terminal 4.
Seat belt buckle pre-tensioner assembly LH (seat belt buckle switch) terminal 3 is grounded through body
grounds B7 and B19.
The combination meter sends seat belt buckle switch LH unfastened signal to BCM via CAN communication
line.
BCM receives seat belt buckle pre-tensioner assembly LH (seat belt buckle switch) unfastened signal from
combination meter via CAN communication line, and sends seat belt warning signal to the combination meter
via CAN communication line. When the combination meter receives the seat belt warning signal, it sounds the
warning chime. The BCM controls the (6 second) duration of the seat belt warning chime.
CAN Communication System DescriptionINFOID:0000000003533512
Refer to LAN-4.
Page 1054 of 3061
WARNING CHIME
DI-43
< SERVICE INFORMATION >
C
D
E
F
G
H
I
J
L
MA
B
DI
N
O
P
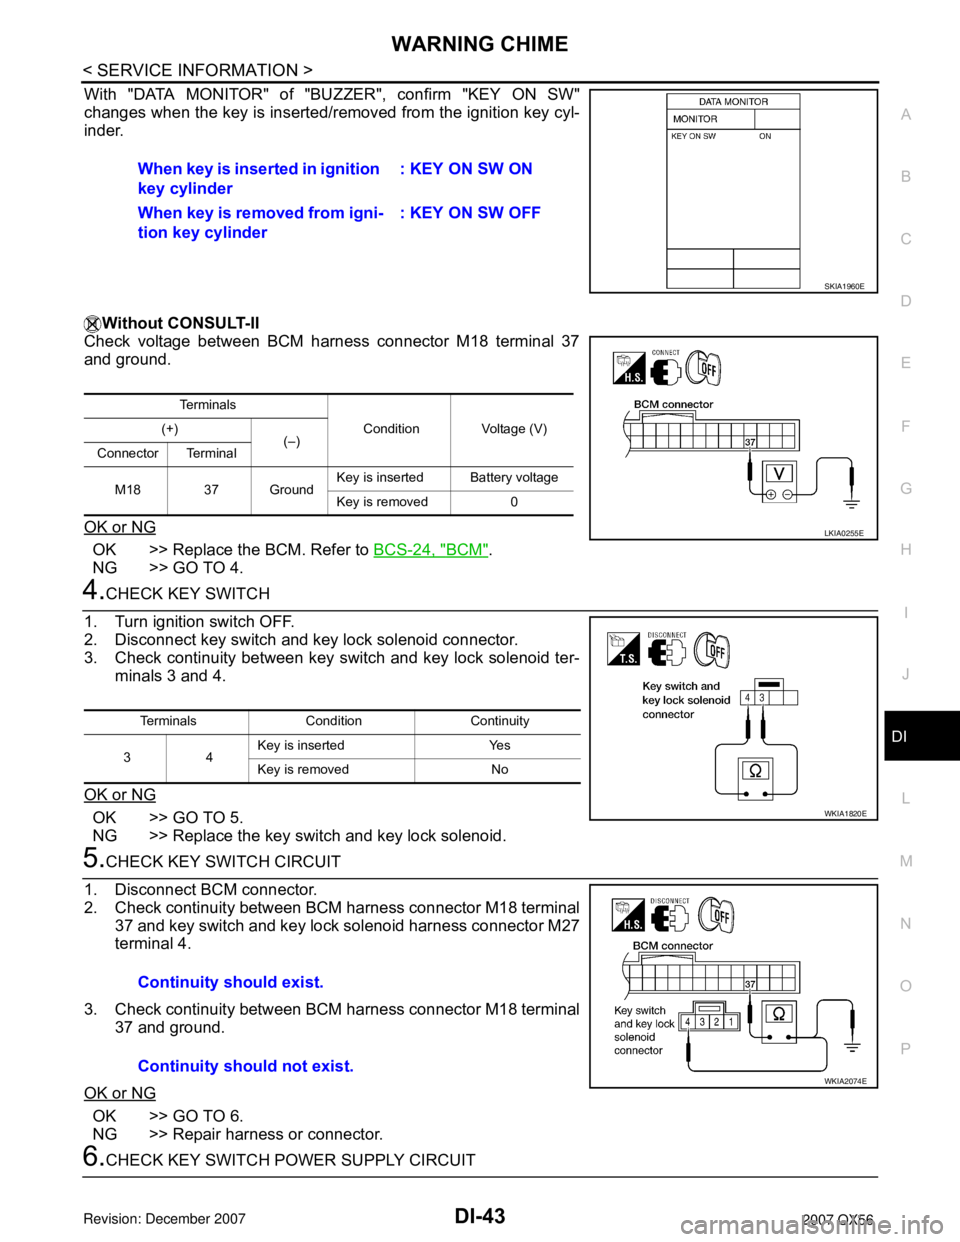
With "DATA MONITOR" of "BUZZER", confirm "KEY ON SW"
changes when the key is inserted/removed from the ignition key cyl-
inder.
Without CONSULT-II
Check voltage between BCM harness connector M18 terminal 37
and ground.
OK or NG
OK >> Replace the BCM. Refer to BCS-24, "BCM".
NG >> GO TO 4.
4.CHECK KEY SWITCH
1. Turn ignition switch OFF.
2. Disconnect key switch and key lock solenoid connector.
3. Check continuity between key switch and key lock solenoid ter-
minals 3 and 4.
OK or NG
OK >> GO TO 5.
NG >> Replace the key switch and key lock solenoid.
5.CHECK KEY SWITCH CIRCUIT
1. Disconnect BCM connector.
2. Check continuity between BCM harness connector M18 terminal
37 and key switch and key lock solenoid harness connector M27
terminal 4.
3. Check continuity between BCM harness connector M18 terminal
37 and ground.
OK or NG
OK >> GO TO 6.
NG >> Repair harness or connector.
6.CHECK KEY SWITCH POWER SUPPLY CIRCUITWhen key is inserted in ignition
key cylinder: KEY ON SW ON
When key is removed from igni-
tion key cylinder: KEY ON SW OFF
SKIA1960E
Te r m i n a l s
Condition Voltage (V) (+)
(–)
Connector Terminal
M18 37 GroundKey is insertedBattery voltage
Key is removed 0
LKIA0255E
Terminals Condition Continuity
34Key is inserted Yes
Key is removed No
WKIA1820E
Continuity should exist.
Continuity should not exist.
WKIA2074E