Page 4361 of 4647

SE-162
HEATED SEAT
Revision: 2007 April2007 M35/M45
3. CHECK REAR SEAT HEATER CIRCUIT
1. Connect rear seat control unit and rear seat cushion heater connector.
2. Turn ignition switch ON.
3. Check voltage between rear seat cushion heater connector and
ground.
OK or NG
OK >> Check the condition of the harness and connector.
NG >> Replace rear seat cushion heater.
Check Rear Seatback Heater CircuitNIS0028D
1. CHECK REAR SEAT HEATER CIRCUIT
1. Turn ignition switch ON.
2. Check voltage between rear seat cushion heater connector and
ground.
OK or NG
OK >> GO TO 2.
NG >> Replace rear seat cushion heater.
Terminal
ConditionVoltage (V)
(Approx.) (+)
(–) Rear seat
cushion heater
connectorTerminal
B309 (LH)
B359 (RH)3 GroundRear heated
seat switchHIGH Battery voltage
LOW 6
Other than above. 0
PIIB6012E
Terminal
ConditionVoltage (V)
(Approx.) (+)
(–) Rear seat
cushion heater
connectorTerminal
B309 (LH)
B359 (RH)3 GroundRear heated
seat switchHIGH Battery voltage
LOW 6
Other than above. 0
PIIB6012E
Page 4364 of 4647

7. Headr")
FRONT SEAT
SE-165
C
D
E
F
G
H
J
K
L
MA
B
SE
Revision: 2007 April2007 M35/M45
1. Front leg cover 2. Rear leg cover 3. Headrest
4. Seatback board 5. Seat speaker grill 6. Headrest holder (free)
7. Headrest holder (locked) 8. Seatback upper finisher 9. Side air bag module
10. Reclining device cover 11. Seatback trim 12. Seatback pad
13. Seatback frame 14. Seat speaker 15. Seatback thermal electrical device
(TED) assembly
16. Seat cushion rear finisher
(Climate controlled seat model)17. Seat cushion front finisher 18. Seat slide switch knob
19. Seat reclining switch knob 20. Seat cushion outer finisher 21. Lumber support switch assembly
22. Seat cushion lower finisher 23. Seat cushion inner finisher 24. Seat cushion pad
25. Seat cushion trim 26. Seat cushion finisher B 27. Seat cushion frame
28. Seat cushion thermal electrical
device (TED) assembly29. Blower motor assembly 30. Climate controlled seat control unit
31. Seat control switch 32. Driver seat control unit 33. Seat cushion finisher C
34. Seat harness 35. Seat belt buckle 36. Seat adjuster assembly
Page 4366 of 4647
FRONT SEAT
SE-167
C
D
E
F
G
H
J
K
L
MA
B
SE
Revision: 2007 April2007 M35/M45
1. Front leg cover 2. Rear leg cover 3. Headrest
4. Seatback board 5. Seat speaker grill 6. Headrest holder (free)
7. Headrest holder (locked) 8. Seatback upper finisher 9. Side air bag module
10. Reclining device cover 11. Seatback trim 12. Seatback pad
13. Seatback frame 14. Seat speaker 15. Seatback thermal electrical device
(TED) assembly
16. Seat cushion rear finisher
(Climate controlled seat model)17. Seat cushion front finisher 18. Seat cushion slide switch
19. Seat reclining switch 20. Seat cushion outer finisher 21. Lumber support switch assembly
22. Seat inner finisher 23. Seat cushion finisher B 24. Blower motor assembly
25. Seat cushion thermal electrical
device (TED) assembly26. Climate controlled seat control unit 27. Seat cushion finisher C
28. Seat harness assembly 29. Seat belt buckle 30. Seat cushion assembly
Page 4369 of 4647

SE-170
FRONT SEAT
Revision: 2007 April2007 M35/M45
�Remove the bracket mounting nuts.
�Remove seatback trim and pad from seatback frame.
�Remove the hog rings to separate the trim and pad.
2. Remove seatback frame.
�Remove seat speaker. (Applied 5.1 ch BOSE studio surround® system models) Refer to AV- 2 7 9 , "Seat
Speaker" .
�Remove the bands, and then remove seatback thermal electrical device (TED) assembly.
�Remove the seat harness assembly from seatback assembly.
�Remove the bolts, and then remove seatback frame from seat cushion frame.
Assembly
Assemble in the reverse order of disassembly. Be careful of the following one point.
Install the hog rings of seat cushion trim in position, and then
securely connect the trim or trim code with the pad side wire.
SEAT CUSHION
Disassembly
1. Remove the seatback trim and seatback pad.
�Remove the retainer from the lower side of seatback board.
�Disconnect the clip and pawl, and then remove seatback
board.
: Pawl
: Clip
�Remove the screws and disconnect the clips, and then
remove the seat cushion rear finisher. (Climate controlled
seat model)
PIIB3356J
PIIB3344J
PIIB3345J
Page 4370 of 4647

FRONT SEAT
SE-171
C
D
E
F
G
H
J
K
L
MA
B
SE
Revision: 2007 April2007 M35/M45
�Remove the seat cushion front finisher.
: Pawl
: Clip
�Remove the seat reclining switch knob and seat slide switch
knob.
�Pull seat cushion outer finisher forward, and then disconnect
the pawls and clips.
: Pawl
: Clip
�Lift the rear part of the seat cushion outer finisher backward,
and then remove the seat cushion outer finisher.
�Remove the harness connector clamp of lumber support switch.
�Removal the lumber support switch.
�Remove the seat cushion inner finisher.
: Pawl
�Remove the retainers from the lower side of front seat. (Driver's seat only)
�Remove the hog rings to separate the trim and pad. (Driver's seat only)
2. Remove the nuts, and then remove the seat cushion frame. (Driver's seat only)
3. Remove each unit which is attached to seat cushion frame and seat adjuster assembly.
�Remove the screws, and then remove the climate controlled seat control unit.
�Remove the screws, and then remove the blower motor.
�Remove the bands, and then remove the seat cushion thermal electrical device (TED) assembly.
PIIB3346J
PIIB3348J
PIIB3350J
PIIB3351J
Page 4371 of 4647
SE-172
FRONT SEAT
Revision: 2007 April2007 M35/M45
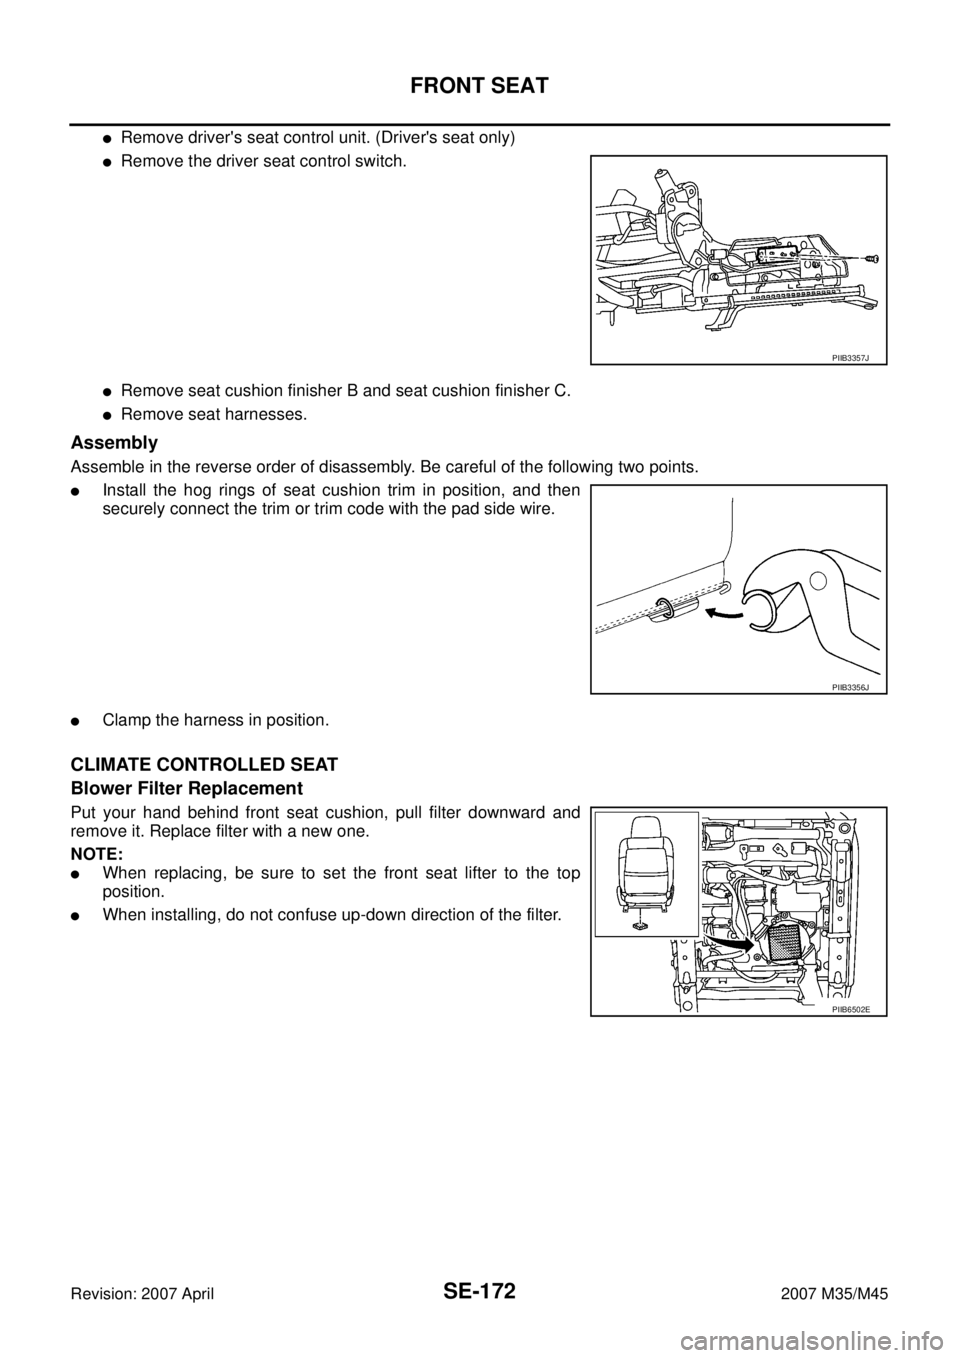
�Remove driver's seat control unit. (Driver's seat only)
�Remove the driver seat control switch.
�Remove seat cushion finisher B and seat cushion finisher C.
�Remove seat harnesses.
Assembly
Assemble in the reverse order of disassembly. Be careful of the following two points.
�Install the hog rings of seat cushion trim in position, and then
securely connect the trim or trim code with the pad side wire.
�Clamp the harness in position.
CLIMATE CONTROLLED SEAT
Blower Filter Replacement
Put your hand behind front seat cushion, pull filter downward and
remove it. Replace filter with a new one.
NOTE:
�When replacing, be sure to set the front seat lifter to the top
position.
�When installing, do not confuse up-down direction of the filter.
PIIB3357J
PIIB3356J
PIIB6502E
Page 4375 of 4647
SE-176
REAR SEAT
Revision: 2007 April2007 M35/M45
1. Seat cushion side trim 2. Seat cushion center trim 3. Seat cushion side pad
4. Seat cushion center pad 5. Seatback trim 6. Seatback pad
7. Seatback center 8. Headrest (right) 9. Headrest (left)
10. Headrest (center) 11. Headrest holder (free) 12. Headrest holder (locked)
13. Seat belt guide 14. Rear seat frame 15. Rear seat control unit
16. Rear seat harness 17. Seatback hook 18. Seat cushion hook
Page 4379 of 4647

SE-180
REAR SEAT
Revision: 2007 April2007 M35/M45
�Pull the rear seat box rearward and lift up, and then remove
rear seat box from the armrest assembly.
CAUTION:
�When removing, check that front tab is not damaged.
�If the tab is damaged when removing the rear seat box,
replace rear seat box with a new one.
Assembly of Armrest
Assemble in the reverse order of disassembly.
POWER SEAT
Disassembly of Seat Cushion
Remove the hog rings to separate the trim and pad.
Assembly of Seat Cushion
Assemble in the reverse order of disassembly.
Disassembly of Seatback
1. Remove the headrest holder.
2. Remove the seat belt guide.
3. Remove the hog rings to separate the trim and pad.
Assembly of Seatback
Assemble in the reverse order of disassembly. Be careful of the following one point.
Install hog rings of seat cushion trim in position, and then securely
connect the trim or trim code with the pad side wire.
Disassembly of Seat Frame
1. Disconnect the harness connectors, remove the screws,and then remove the rear seat control unit.
2. Remove the seatback hook and seat cushion hook.
Assembly of Seat Frame
Assemble in the reverse order of removal.
Disassembly of Armrest
1. Remove the armrest from seatback center.
�Remove the retainer from the side of armrest lid in the back.
�Remove the armrest mounting nuts on the back of seatback.
PIIB4686J
PIIB4084J
PIIB3356J

7. Headr")