Page 3226 of 4647
![INFINITI M35 2007 Factory Service Manual POWER WINDOW SYSTEM
GW-27
C
D
E
F
G
H
J
K
L
MA
B
GW
Revision: 2007 April2007 M35/M45
Terminal and Reference Value for BCMNIS0021L
Te r m i -
nalWire
colorItemSignal
Input/
OutputConditionVoltage [V]
INFINITI M35 2007 Factory Service Manual POWER WINDOW SYSTEM
GW-27
C
D
E
F
G
H
J
K
L
MA
B
GW
Revision: 2007 April2007 M35/M45
Terminal and Reference Value for BCMNIS0021L
Te r m i -
nalWire
colorItemSignal
Input/
OutputConditionVoltage [V]](/manual-img/42/57024/w960_57024-3225.png)
POWER WINDOW SYSTEM
GW-27
C
D
E
F
G
H
J
K
L
MA
B
GW
Revision: 2007 April2007 M35/M45
Terminal and Reference Value for BCMNIS0021L
Te r m i -
nalWire
colorItemSignal
Input/
OutputConditionVoltage [V]
(Approx.)
12 PFront door switch
passenger side signalInputON (Open) 0
OFF (Close) Battery voltage
22 G Power window serial link Input/
OutputIGN SW ON or power window
timer operating.
38 W Ignition switch (ON or START) InputIgnition switch
(ON or START position)Battery voltage
39 L CAN - HInput/
Output——
40 P CAN - LInput/
Output——
42 P Power source (Fuse) Input — Battery voltage
52 B Ground — — 0
53 BR Rap signal OutputIGN SW ON Battery voltage
Within 45 second after ignition
switch is turned to OFFBattery voltage
When driver side or passenger
side door is opened daring
retained power operation0
54 O Power window power supply Output — Battery voltage
55 W Power source (Fusible link) Input — Battery voltage
62 VFront door switch
driver side signalInputON (Open) 0
OFF (Close) Battery voltage
PIIA2344J
Page 3227 of 4647
![INFINITI M35 2007 Factory Service Manual GW-28
POWER WINDOW SYSTEM
Revision: 2007 April2007 M35/M45
Terminal and Reference Value for Power Window Main SwitchNIS0021M
Te r m i -
nalWire
colorItemSignal
Input/
OutputConditionVoltage [V]
(Appr INFINITI M35 2007 Factory Service Manual GW-28
POWER WINDOW SYSTEM
Revision: 2007 April2007 M35/M45
Terminal and Reference Value for Power Window Main SwitchNIS0021M
Te r m i -
nalWire
colorItemSignal
Input/
OutputConditionVoltage [V]
(Appr](/manual-img/42/57024/w960_57024-3226.png)
GW-28
POWER WINDOW SYSTEM
Revision: 2007 April2007 M35/M45
Terminal and Reference Value for Power Window Main SwitchNIS0021M
Te r m i -
nalWire
colorItemSignal
Input/
OutputConditionVoltage [V]
(Approx.)
2 W/B Encoder ground — — 0
4BRDoor key cylinder switch
LOCK signalInputKey position
(Neutral → Locked)5 → 0
6V/RDoor key cylinder switch
UNLOCK signalInputKey position
(Neutral → Unlocked)5 → 0
8LFront driver side power window
motor UP signalOutputWhen front LH switch in
power window main switch is
UP at operated. Battery voltage
9 G/W Encoder pulse signal 2 InputWhen power window motor oper-
ates.
10 Y/B Rap signal InputIGN SW ON Battery voltage
Within 45 second after ignition
switch is turned to OFFBattery voltage
When driver side or passenger
side door is opened daring
retained power operation0
11 GFront driver side power window
motor DOWN signalOutputWhen front LH switch in
power window main switch is
DOWN at operated. Battery voltage
13 G/Y Encoder pulse signal 1 InputWhen power window motor oper-
ates.
14 Y Power window serial linkInput/
OutputIGN SW ON or power window
timer operating.
15 G/R Encoder power supply OutputWhen ignition switch ON or power
window timer operates.10
17 B Ground — — 0
19 W/B Battery power supply Input — Battery voltage
OCC3383D
OCC3383D
PIIA2344J
Page 3229 of 4647

GW-30
POWER WINDOW SYSTEM
Revision: 2007 April2007 M35/M45
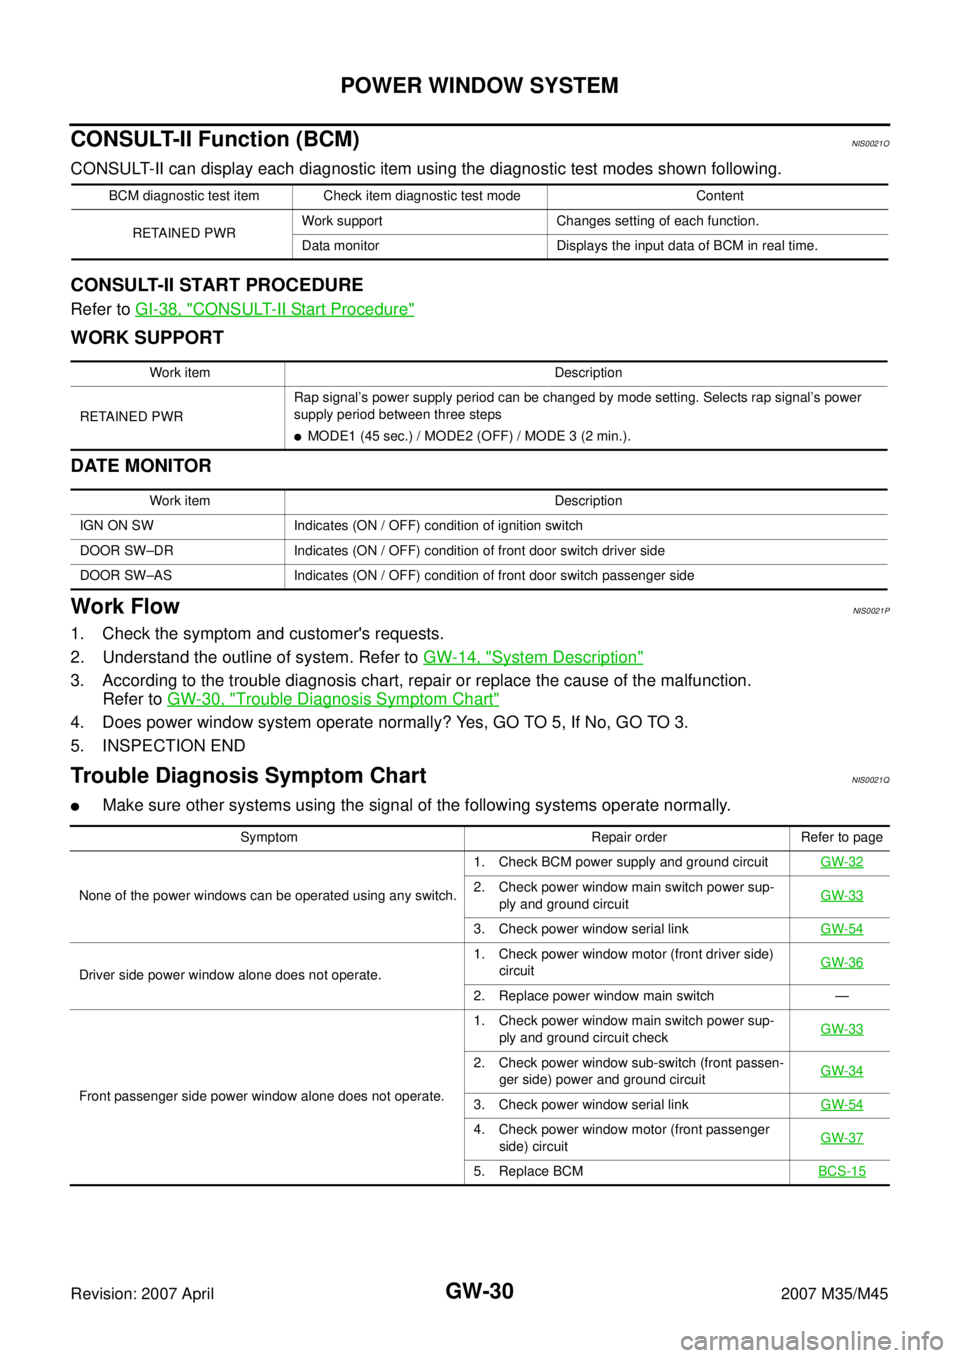
CONSULT-II Function (BCM)NIS0021O
CONSULT-II can display each diagnostic item using the diagnostic test modes shown following.
CONSULT-II START PROCEDURE
Refer to GI-38, "CONSULT-II Start Procedure"
WORK SUPPORT
DATE MONITOR
Work FlowNIS0021P
1. Check the symptom and customer's requests.
2. Understand the outline of system. Refer to GW-14, "
System Description"
3. According to the trouble diagnosis chart, repair or replace the cause of the malfunction.
Refer to GW-30, "
Trouble Diagnosis Symptom Chart"
4. Does power window system operate normally? Yes, GO TO 5, If No, GO TO 3.
5. INSPECTION END
Trouble Diagnosis Symptom ChartNIS0021Q
�Make sure other systems using the signal of the following systems operate normally.
BCM diagnostic test item Check item diagnostic test mode Content
RETAINED PWRWork support Changes setting of each function.
Data monitor Displays the input data of BCM in real time.
Work item Description
RETAINED PWRRap signal’s power supply period can be changed by mode setting. Selects rap signal’s power
supply period between three steps
�MODE1 (45 sec.) / MODE2 (OFF) / MODE 3 (2 min.).
Work item Description
IGN ON SW Indicates (ON / OFF) condition of ignition switch
DOOR SW–DR Indicates (ON / OFF) condition of front door switch driver side
DOOR SW–AS Indicates (ON / OFF) condition of front door switch passenger side
Symptom Repair order Refer to page
None of the power windows can be operated using any switch.1. Check BCM power supply and ground circuit GW-32
2. Check power window main switch power sup-
ply and ground circuit GW-33
3. Check power window serial link GW-54
Driver side power window alone does not operate.1. Check power window motor (front driver side)
circuit GW-36
2. Replace power window main switch —
Front passenger side power window alone does not operate.1. Check power window main switch power sup-
ply and ground circuit checkGW-33
2. Check power window sub-switch (front passen-
ger side) power and ground circuit GW-34
3. Check power window serial link GW-54
4. Check power window motor (front passenger
side) circuit GW-37
5. Replace BCMBCS-15
Page 3230 of 4647

POWER WINDOW SYSTEM
GW-31
C
D
E
F
G
H
J
K
L
MA
B
GW
Revision: 2007 April2007 M35/M45
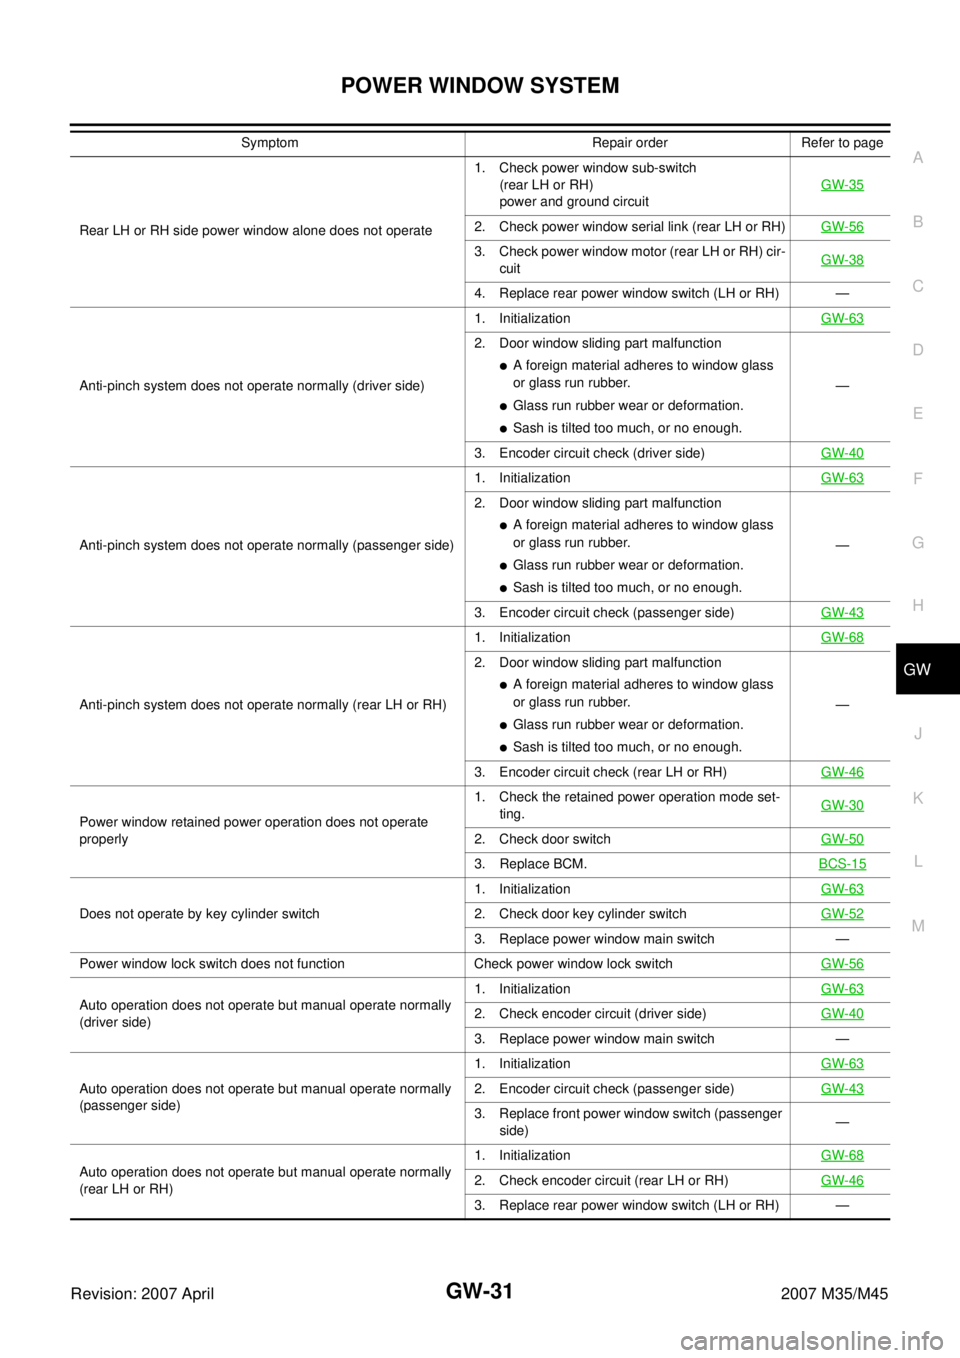
Rear LH or RH side power window alone does not operate1. Check power window sub-switch
(rear LH or RH)
power and ground circuit GW-352. Check power window serial link (rear LH or RH)GW-56
3. Check power window motor (rear LH or RH) cir-
cuit GW-38
4. Replace rear power window switch (LH or RH) —
Anti-pinch system does not operate normally (driver side)1. InitializationGW-63
2. Door window sliding part malfunction
�A foreign material adheres to window glass
or glass run rubber.
�Glass run rubber wear or deformation.
�Sash is tilted too much, or no enough.—
3. Encoder circuit check (driver side)GW-40
Anti-pinch system does not operate normally (passenger side)1. InitializationGW-63
2. Door window sliding part malfunction
�A foreign material adheres to window glass
or glass run rubber.
�Glass run rubber wear or deformation.
�Sash is tilted too much, or no enough.—
3. Encoder circuit check (passenger side)GW-43
Anti-pinch system does not operate normally (rear LH or RH)1. InitializationGW-68
2. Door window sliding part malfunction
�A foreign material adheres to window glass
or glass run rubber.
�Glass run rubber wear or deformation.
�Sash is tilted too much, or no enough.—
3. Encoder circuit check (rear LH or RH)GW-46
Power window retained power operation does not operate
properly1. Check the retained power operation mode set-
ting.GW-30
2. Check door switch GW-50
3. Replace BCM.BCS-15
Does not operate by key cylinder switch1. InitializationGW-632. Check door key cylinder switch GW-52
3. Replace power window main switch —
Power window lock switch does not function Check power window lock switch GW-56
Auto operation does not operate but manual operate normally
(driver side)1. InitializationGW-632. Check encoder circuit (driver side)GW-40
3. Replace power window main switch —
Auto operation does not operate but manual operate normally
(passenger side)1. InitializationGW-63
2. Encoder circuit check (passenger side)GW-43
3. Replace front power window switch (passenger
side)—
Auto operation does not operate but manual operate normally
(rear LH or RH)1. InitializationGW-68
2. Check encoder circuit (rear LH or RH)GW-46
3. Replace rear power window switch (LH or RH) — Symptom Repair order Refer to page
Page 3251 of 4647

GW-52
POWER WINDOW SYSTEM
Revision: 2007 April2007 M35/M45
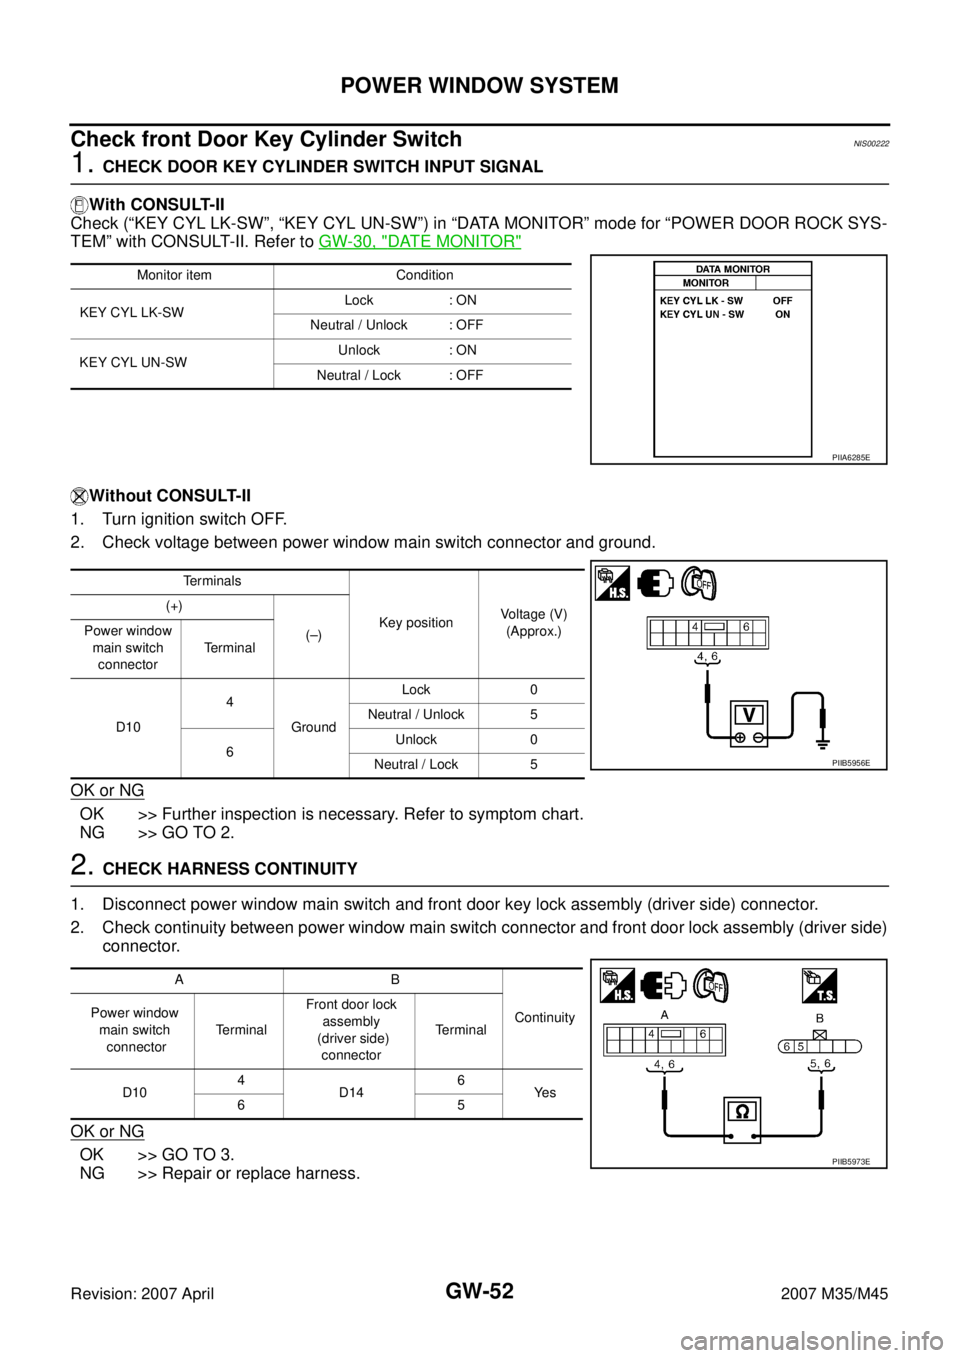
Check front Door Key Cylinder Switch NIS00222
1. CHECK DOOR KEY CYLINDER SWITCH INPUT SIGNAL
With CONSULT-II
Check (“KEY CYL LK-SW”, “KEY CYL UN-SW”) in “DATA MONITOR” mode for “POWER DOOR ROCK SYS-
TEM” with CONSULT-II. Refer to GW-30, "
DATE MONITOR"
Without CONSULT-II
1. Turn ignition switch OFF.
2. Check voltage between power window main switch connector and ground.
OK or NG
OK >> Further inspection is necessary. Refer to symptom chart.
NG >> GO TO 2.
2. CHECK HARNESS CONTINUITY
1. Disconnect power window main switch and front door key lock assembly (driver side) connector.
2. Check continuity between power window main switch connector and front door lock assembly (driver side)
connector.
OK or NG
OK >> GO TO 3.
NG >> Repair or replace harness.
Monitor item Condition
KEY CYL LK-SWLock : ON
Neutral / Unlock : OFF
KEY CYL UN-SWUnlock : ON
Neutral / Lock : OFF
PIIA6285E
Te r m i n a l s
Key positionVoltage (V)
(Approx.) (+)
(–) Power window
main switch
connectorTerminal
D104
GroundLock 0
Neutral / Unlock 5
6Unlock 0
Neutral / Lock 5
PIIB5956E
AB
Continuity Power window
main switch
connectorTe r m i n a lFront door lock
assembly
(driver side)
connectorTerminal
D104
D146
Ye s
65
PIIB5973E
Page 3252 of 4647
POWER WINDOW SYSTEM
GW-53
C
D
E
F
G
H
J
K
L
MA
B
GW
Revision: 2007 April2007 M35/M45
3. CHECK DOOR KEY CYLINDER SWITCH GROUND
Check continuity between front door lock assembly (driver side) connector ground.
OK or NG
OK >> GO TO 4.
NG >> Repair or replace harness.
4. CHECK DOOR KEY CYLINDER SWITCH
Check front door lock assembly (driver side).
OK or NG
OK >> Further inspection is necessary. Refer to symptom
chart.
NG >> Replace front door key cylinder (driver side) switch.
Front door lock
assembly
(driver side)
connectorTerminal
GroundContinuity
D14 4 Yes
PIIB5974E
Te r m i n a l
Key position Continuity
Front door lock assembly
(driver side)
5
4Unlock Yes
Neutral / Lock No
6Lock Yes
Neutral / Unlock No
PIIB5975E
Page 3260 of 4647
FRONT DOOR GLASS AND REGULATOR
GW-61
C
D
E
F
G
H
J
K
L
MA
B
GW
Revision: 2007 April2007 M35/M45
FRONT DOOR GLASS AND REGULATORPFP:80300
Removal and InstallationNIS00228
DOOR GLASS
Removal
1. Remove the front door finisher. Refer to EI-34, "DOOR FINISHER" .
2. Remove the front door sash cover inner. Refer to EI-36, "
FRONT DOOR SASH COVER INNER" .
3. Operate the power window main switch to raise/lower the door
window until the glass mounting bolts can be seen.
4. Remove the glass mounting bolts.
1. Door glass 2. Module assembly 3. Power window motor
4. Regulator assembly 5. Door glass run
PIIB3287J
PIIB3288J
Page 3261 of 4647
GW-62
FRONT DOOR GLASS AND REGULATOR
Revision: 2007 April2007 M35/M45
5. While holding the door glass, raise it at the rear end to pull the
glass out of the sash toward the inside of the door.
Installation
Install in the reverse order of removal.
REGULATOR ASSEMBLY
Removal
1. Remove the front door finisher. Refer to EI-34, "DOOR FINISHER" .
2. Operate the power window main switch to raise/lower the door
window until the glass mounting bolts can be seen.
3. Remove the glass mounting bolts.
4. Raise up the door glass and hold with a suction lifter A.
5. Remove the mounting bolts, and remove the module assembly.
6. Disconnect the harness connector for the module assembly, and unclip the harness from the inside.
Installation
Install in the reverse order of removal.
SIIA1779J
PIIB3288J
PIIB3510J