Page 3576 of 4366
LT-120
COMBINATION SWITCH
Revision: 2006 July 2007 FX35/FX45
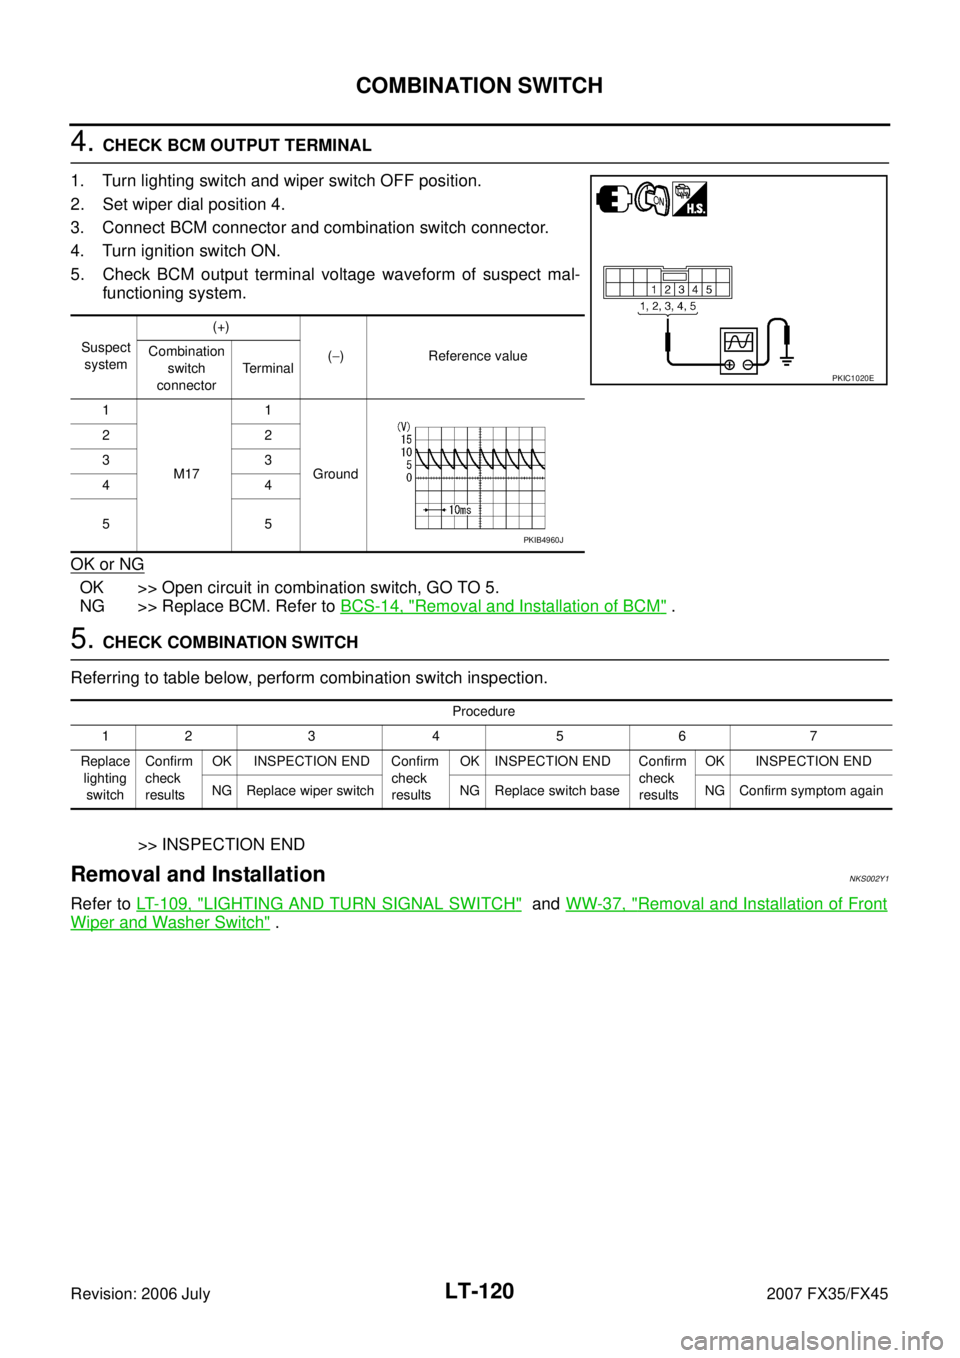
4. CHECK BCM OUTPUT TERMINAL
1. Turn lighting switch and wiper switch OFF position.
2. Set wiper dial position 4.
3. Connect BCM connector and combination switch connector.
4. Turn ignition switch ON.
5. Check BCM output terminal voltage waveform of suspect mal- functioning system.
OK or NG
OK >> Open circuit in combination switch, GO TO 5.
NG >> Replace BCM. Refer to BCS-14, "
Removal and Installation of BCM" .
5. CHECK COMBINATION SWITCH
Referring to table below, perform combination switch inspection.
>> INSPECTION END
Removal and InstallationNKS002Y1
Refer to LT- 1 0 9 , "LIGHTING AND TURN SIGNAL SWITCH" and WW-37, "Removal and Installation of Front
Wiper and Washer Switch" .
Suspect
system (+)
( − ) Reference value
Combination
switch
connector Terminal
1
M17 1
Ground
22
33
44
55
PKIC1020E
PKIB4960J
Procedure
12 3 4 5 6 7
Replace lighting switch Confirm
check
results OK INSPECTION END Confirm
check
results OK INSPECTION END Confirm
check
results OK INSPECTION END
NG Replace wiper switch NG Replace switch base NG Confirm symptom again
Page 3582 of 4366
LT-126
STOP LAMP
Revision: 2006 July 2007 FX35/FX45
Terminals and Reference Value for Rear Combination Lamp Control UnitNKS003N9
Refer to LT- 1 2 6 , "Terminals and Reference Value for Rear Combination Lamp Control Unit" .
Stop Lamp Does Not OperateNKS002Y6
1. CHECK TAIL LAMP AND TURN SIGNAL LAMP
Make sure tail lamps and turn signal lamps is illuminated.
OK or NG
OK >> GO TO 2.
NG >> GO TO 6.
2. CHECK FUSE
Check fuse No.20 is blow out.
OK or NG
OK >> GO TO 3.
NG >> If fuse is blow out, be sure to eliminate cause of problem before installing new fuse.
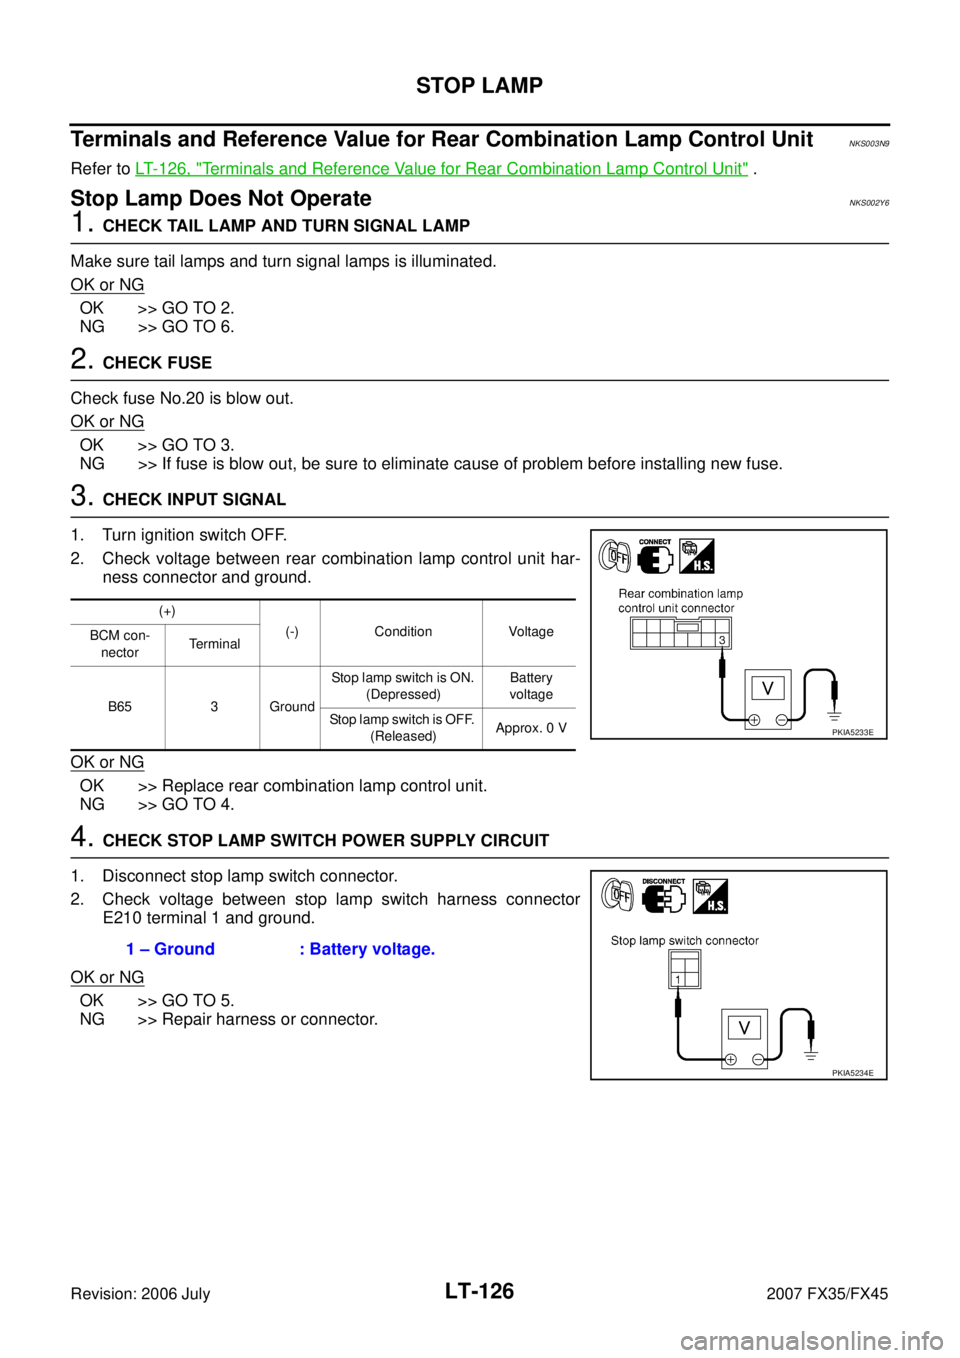
3. CHECK INPUT SIGNAL
1. Turn ignition switch OFF.
2. Check voltage between rear combination lamp control unit har- ness connector and ground.
OK or NG
OK >> Replace rear combination lamp control unit.
NG >> GO TO 4.
4. CHECK STOP LAMP SWITCH POWER SUPPLY CIRCUIT
1. Disconnect stop lamp switch connector.
2. Check voltage between stop lamp switch harness connector E210 terminal 1 and ground.
OK or NG
OK >> GO TO 5.
NG >> Repair harness or connector.
(+)
(-) Condition Voltage
BCM con-
nector Terminal
B65 3 Ground Stop lamp switch is ON.
(Depressed) Battery
voltage
Stop lamp switch is OFF. (Released) Approx. 0 V
PKIA5233E
1 – Ground : Battery voltage.
PKIA5234E
Page 3584 of 4366
LT-128
STOP LAMP
Revision: 2006 July 2007 FX35/FX45
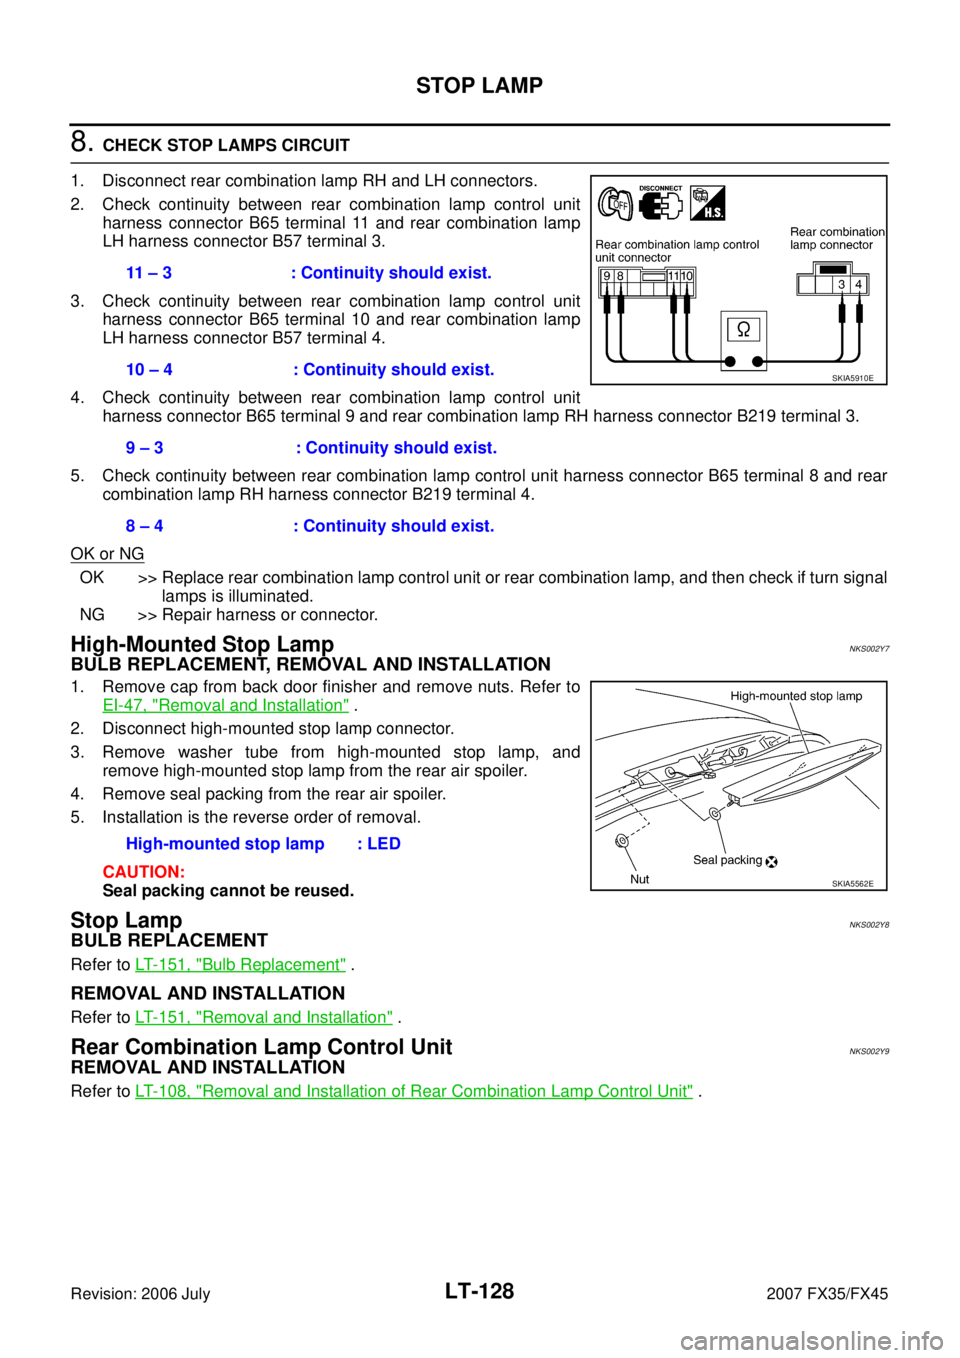
8. CHECK STOP LAMPS CIRCUIT
1. Disconnect rear combination lamp RH and LH connectors.
2. Check continuity between rear combination lamp control unit harness connector B65 terminal 11 and rear combination lamp
LH harness connector B57 terminal 3.
3. Check continuity between rear combination lamp control unit harness connector B65 terminal 10 and rear combination lamp
LH harness connector B57 terminal 4.
4. Check continuity between rear combination lamp control unit harness connector B65 terminal 9 and rear combination lamp RH harness connector B219 terminal 3.
5. Check continuity between rear combination lamp control unit harness connector B65 terminal 8 and rear combination lamp RH harness connector B219 terminal 4.
OK or NG
OK >> Replace rear combination lamp control unit or rear combination lamp, and then check if turn signal lamps is illuminated.
NG >> Repair harness or connector.
High-Mounted Stop LampNKS002Y7
BULB REPLACEMENT, REMOVAL AND INSTALLATION
1. Remove cap from back door finisher and remove nuts. Refer to EI-47, "
Removal and Installation" .
2. Disconnect high-mounted stop lamp connector.
3. Remove washer tube from high-mounted stop lamp, and remove high-mounted stop lamp from the rear air spoiler.
4. Remove seal packing from the rear air spoiler.
5. Installation is the reverse order of removal.
CAUTION:
Seal packing cannot be reused.
Stop LampNKS002Y8
BULB REPLACEMENT
Refer to LT- 1 5 1 , "Bulb Replacement" .
REMOVAL AND INSTALLATION
Refer to LT- 1 5 1 , "Removal and Installation" .
Rear Combination Lamp Control UnitNKS002Y9
REMOVAL AND INSTALLATION
Refer to LT- 1 0 8 , "Removal and Installation of Rear Combination Lamp Control Unit" .
11 – 3 : Continuity should exist.
10 – 4 : Continuity should exist.
9 – 3 : Continuity should exist.
8 – 4 : Continuity should exist.
SKIA5910E
High-mounted stop lamp : LED
SKIA5562E
Page 3587 of 4366
PARKING, LICENSE PLATE AND TAIL LAMPS LT-131
C
D E
F
G H
I
J
L
M A
B
LT
Revision: 2006 July 2007 FX35/FX45
PARKING, LICENSE PLATE AND TAIL LAMPSPFP:26550
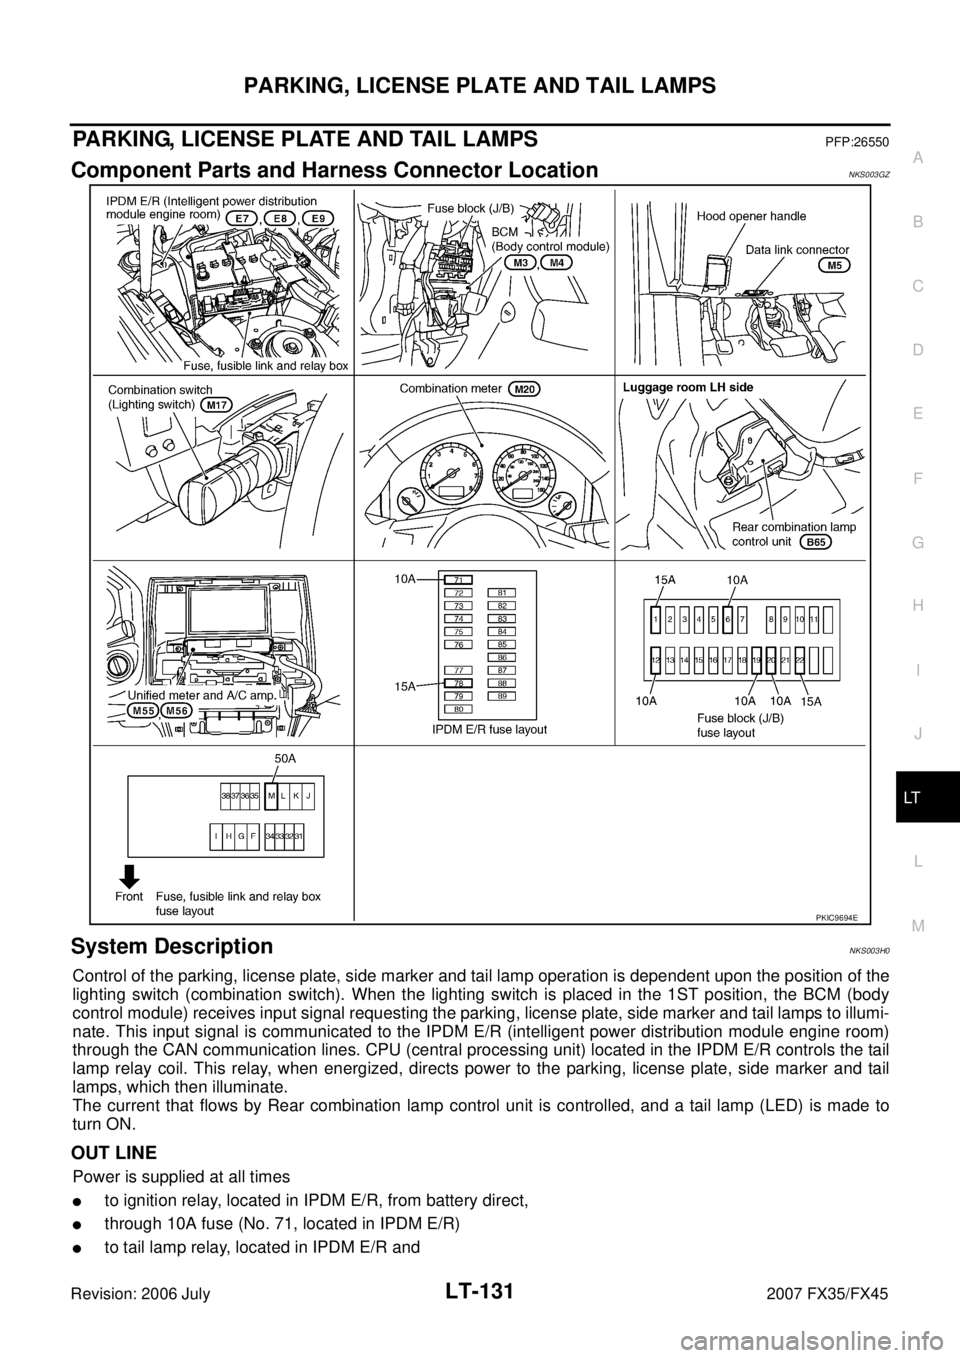
Component Parts and Harness Connector LocationNKS003GZ
System DescriptionNKS003H0
Control of the parking, license plate, side marker and tail lamp operation is dependent upon the position of the
lighting switch (combination switch). When the lighting switch is placed in the 1ST position, the BCM (body
control module) receives input signal requesting the parking, license plate, side marker and tail lamps to illumi-
nate. This input signal is communicated to the IPDM E/R (intelligent power distribution module engine room)
through the CAN communication lines. CPU (central processing unit) located in the IPDM E/R controls the tail
lamp relay coil. This relay, when energized, directs power to the parking, license plate, side marker and tail
lamps, which then illuminate.
The current that flows by Rear combination lamp control unit is controlled, and a tail lamp (LED) is made to
turn ON.
OUT LINE
Power is supplied at all times
�to ignition relay, located in IPDM E/R, from battery direct,
�through 10A fuse (No. 71, located in IPDM E/R)
�to tail lamp relay, located in IPDM E/R and
PKIC9694E
Page 3596 of 4366
LT-140
PARKING, LICENSE PLATE AND TAIL LAMPS
Revision: 2006 July 2007 FX35/FX45
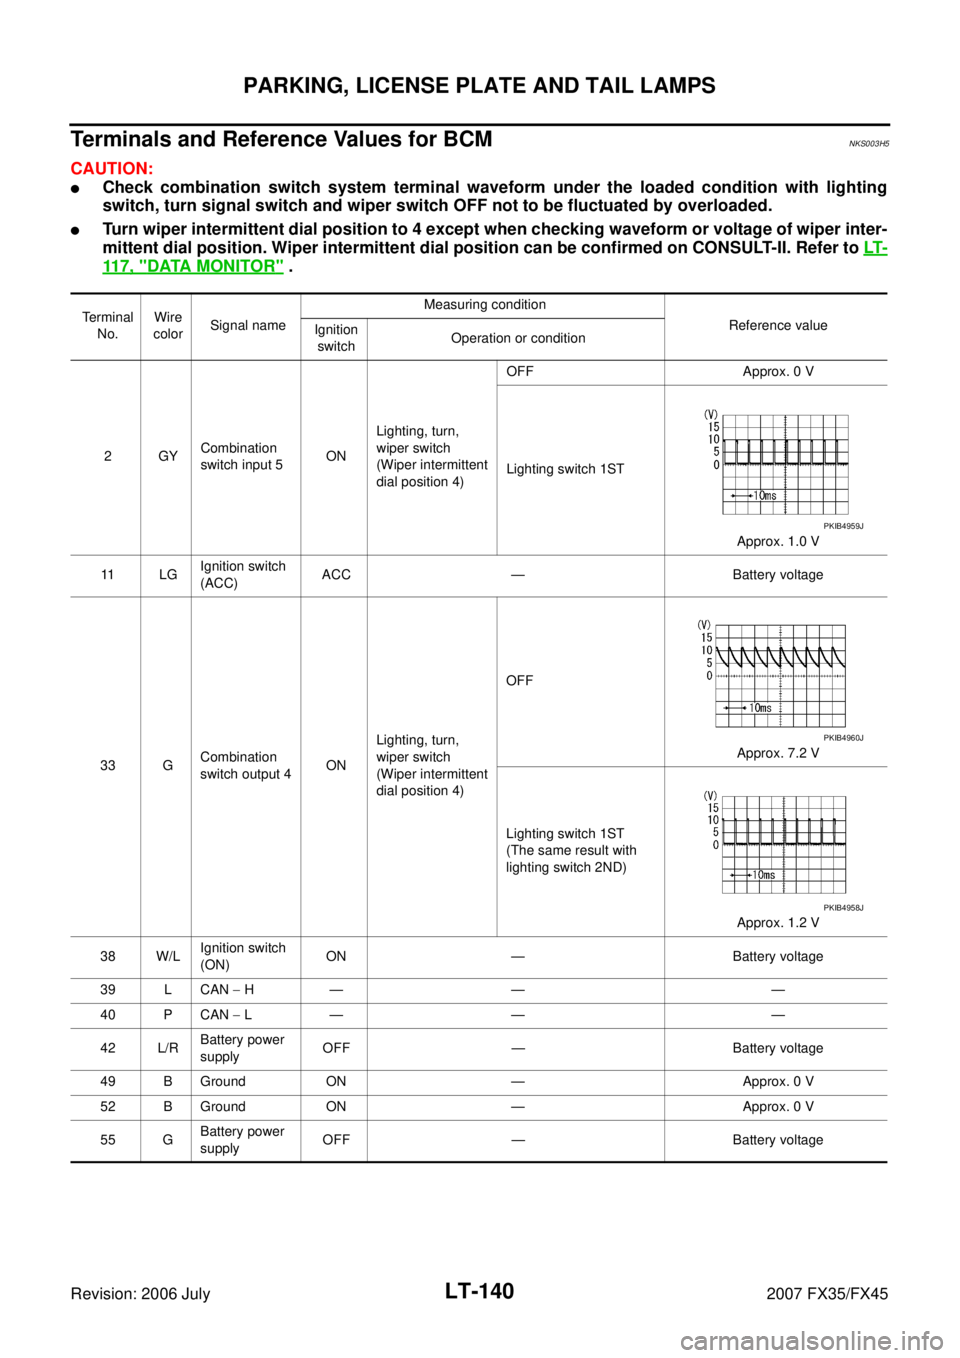
Terminals and Reference Values for BCMNKS003H5
CAUTION:
�Check combination switch system terminal waveform under the loaded condition with lighting
switch, turn signal switch and wiper switch OFF not to be fluctuated by overloaded.
�Turn wiper intermittent dial position to 4 except when checking waveform or voltage of wiper inter-
mittent dial position. Wiper intermittent dial position can be confirmed on CONSULT-II. Refer to LT-
11 7 , "DATA MONITOR" .
Terminal
No. Wire
color Signal name Measuring condition
Reference value
Ignition
switch Operation or condition
2GY Combination
switch input 5 ON Lighting, turn,
wiper switch
(Wiper intermittent
dial position 4) OFF Approx. 0 V
Lighting switch 1ST Approx. 1.0 V
11 L G Ignition switch
(ACC) ACC — Battery voltage
33 G Combination
switch output 4 ON Lighting, turn,
wiper switch
(Wiper intermittent
dial position 4) OFF
Approx. 7.2 V
Lighting switch 1ST
(The same result with
lighting switch 2ND)
Approx. 1.2 V
38 W/L Ignition switch
(ON) ON — Battery voltage
39 L CAN − H— — —
40 P CAN − L— — —
42 L/R Battery power
supply OFF — Battery voltage
49 B Ground ON — Approx. 0 V
52 B Ground ON — Approx. 0 V
55 G Battery power
supply OFF — Battery voltage
PKIB4959J
PKIB4960J
PKIB4958J
Page 3599 of 4366
PARKING, LICENSE PLATE AND TAIL LAMPS LT-143
C
D E
F
G H
I
J
L
M A
B
LT
Revision: 2006 July 2007 FX35/FX45
Parking, License Plate and Side Marker Lamps Do Not IlluminateNKS003HB
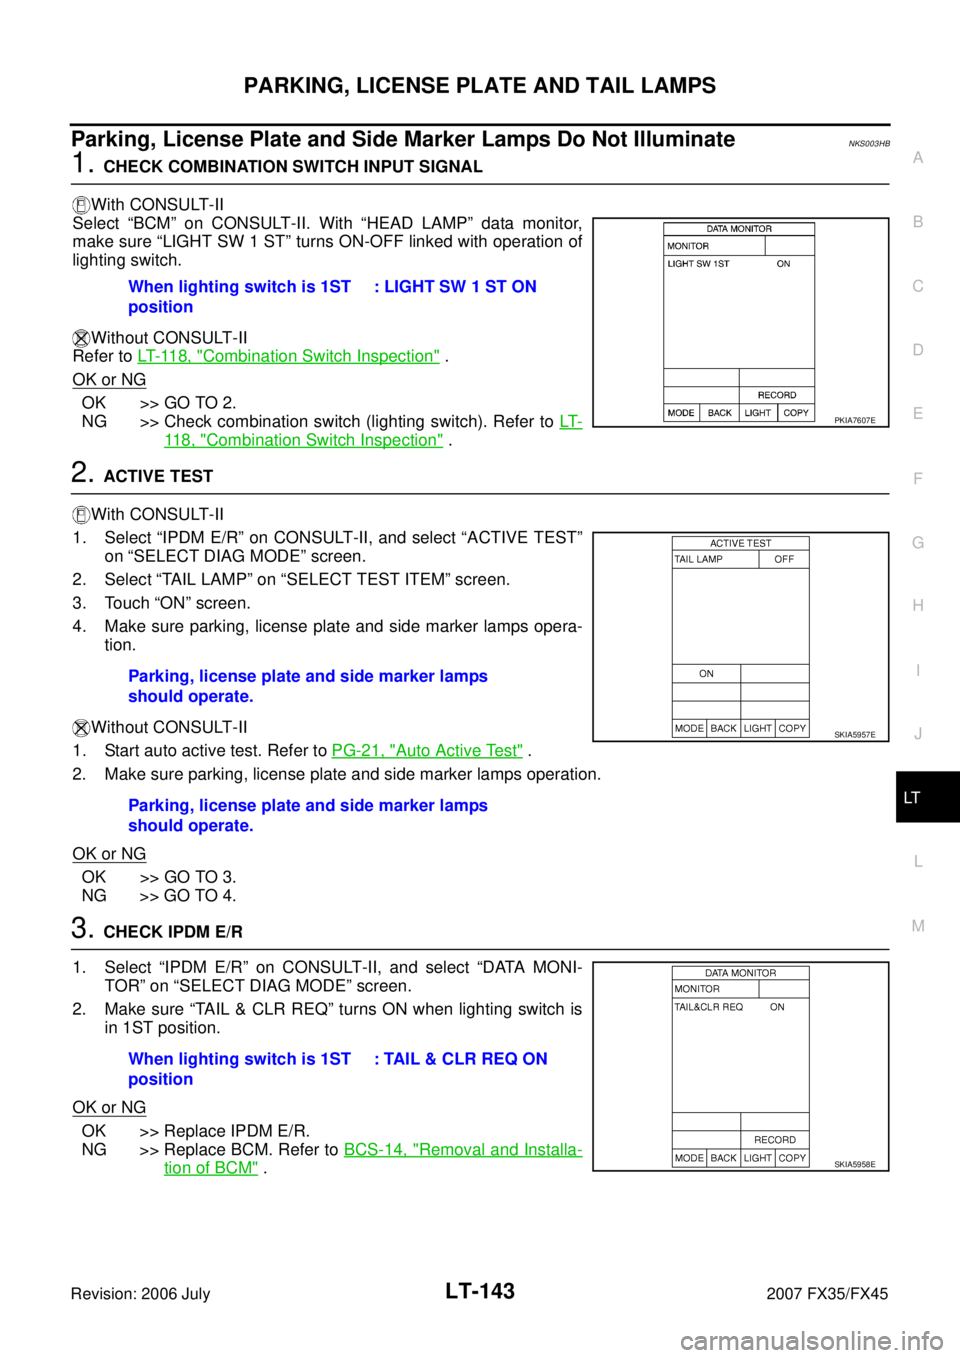
1. CHECK COMBINATION SWITCH INPUT SIGNAL
With CONSULT-II
Select “BCM” on CONSULT-II. With “HEAD LAMP” data monitor,
make sure “LIGHT SW 1 ST” turns ON-OFF linked with operation of
lighting switch.
Without CONSULT-II
Refer to LT- 11 8 , "
Combination Switch Inspection" .
OK or NG
OK >> GO TO 2.
NG >> Check combination switch (lighting switch). Refer to LT-
11 8 , "Combination Switch Inspection" .
2. ACTIVE TEST
With CONSULT-II
1. Select “IPDM E/R” on CONSULT-II, and select “ACTIVE TEST” on “SELECT DIAG MODE” screen.
2. Select “TAIL LAMP” on “SELECT TEST ITEM” screen.
3. Touch “ON” screen.
4. Make sure parking, license plate and side marker lamps opera- tion.
Without CONSULT-II
1. Start auto active test. Refer to PG-21, "
Auto Active Test" .
2. Make sure parking, license plate and side marker lamps operation.
OK or NG
OK >> GO TO 3.
NG >> GO TO 4.
3. CHECK IPDM E/R
1. Select “IPDM E/R” on CONSULT-II, and select “DATA MONI- TOR” on “SELECT DIAG MODE” screen.
2. Make sure “TAIL & CLR REQ” turns ON when lighting switch is in 1ST position.
OK or NG
OK >> Replace IPDM E/R.
NG >> Replace BCM. Refer to BCS-14, "
Removal and Installa-
tion of BCM" .
When lighting switch is 1ST
position : LIGHT SW 1 ST ON
PKIA7607E
Parking, license plate and side marker lamps
should operate.
Parking, license plate and side marker lamps
should operate.
SKIA5957E
When lighting switch is 1ST
position : TAIL & CLR REQ ON
SKIA5958E
Page 3600 of 4366
LT-144
PARKING, LICENSE PLATE AND TAIL LAMPS
Revision: 2006 July 2007 FX35/FX45
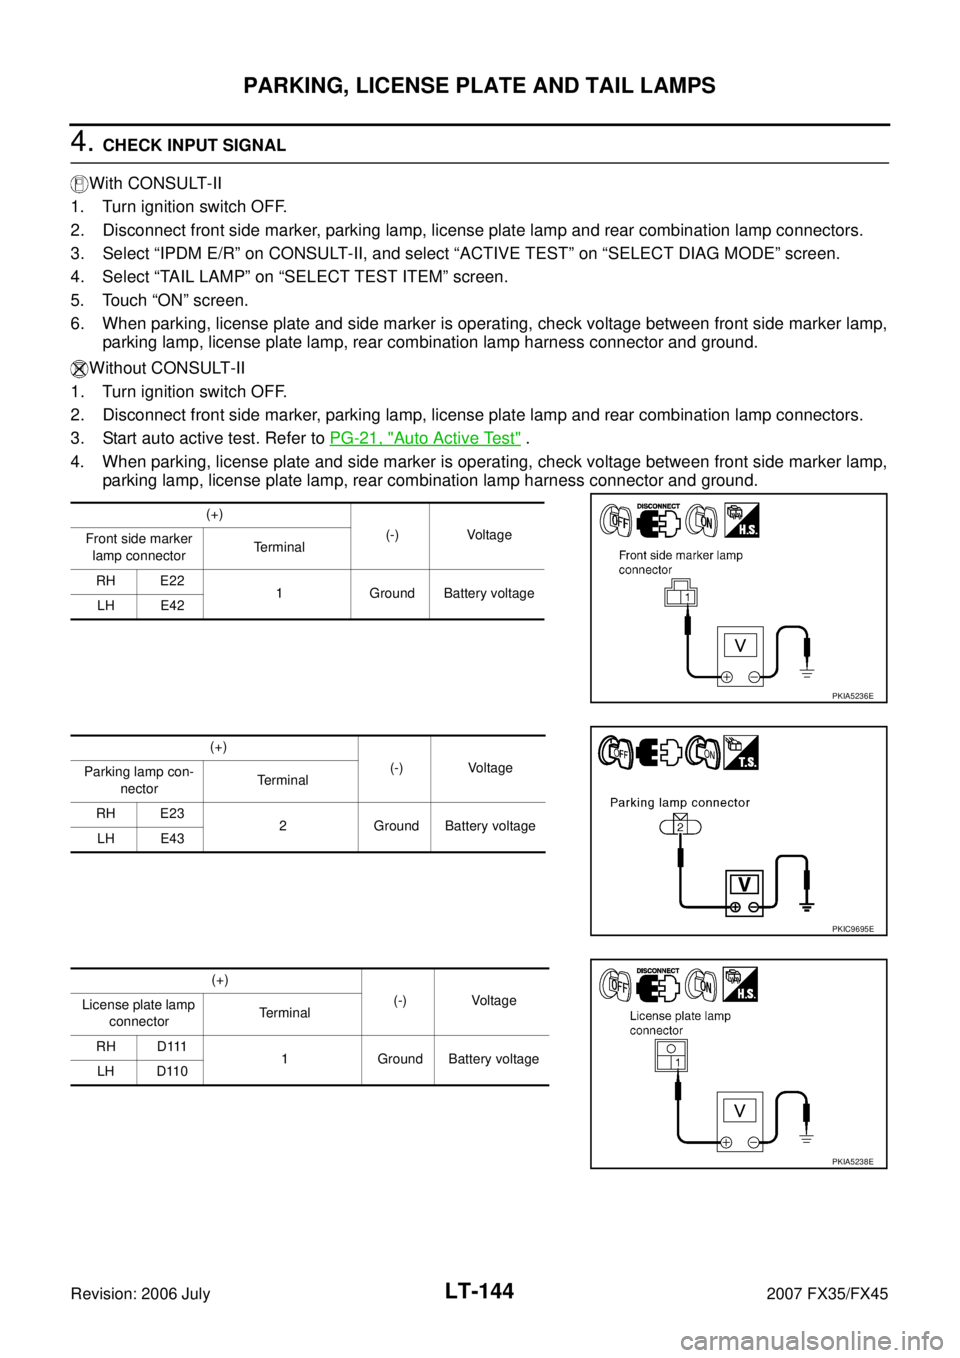
4. CHECK INPUT SIGNAL
With CONSULT-II
1. Turn ignition switch OFF.
2. Disconnect front side marker, parking lamp, license plate lamp and rear combination lamp connectors.
3. Select “IPDM E/R” on CONSULT-II, and select “ACTIVE TEST” on “SELECT DIAG MODE” screen.
4. Select “TAIL LAMP” on “SELECT TEST ITEM” screen.
5. Touch “ON” screen.
6. When parking, license plate and side marker is operating, check voltage between front side marker lamp, parking lamp, license plate lamp, rear combination lamp harness connector and ground.
Without CONSULT-II
1. Turn ignition switch OFF.
2. Disconnect front side marker, parking lamp, license plate lamp and rear combination lamp connectors.
3. Start auto active test. Refer to PG-21, "
Auto Active Test" .
4. When parking, license plate and side marker is operating, check voltage between front side marker lamp, parking lamp, license plate lamp, rear combination lamp harness connector and ground.
(+)
(-) Voltage
Front side marker
lamp connector Terminal
RH E22 1 Ground Battery voltage
LH E42
PKIA5236E
(+)
(-) Voltage
Parking lamp con-
nector Terminal
RH E23 2 Ground Battery voltage
LH E43
PKIC9695E
(+)
(-) Voltage
License plate lamp
connector Te r m i n a l
RH D111 1 Ground Battery voltage
LH D110
PKIA5238E
Page 3603 of 4366
PARKING, LICENSE PLATE AND TAIL LAMPS LT-147
C
D E
F
G H
I
J
L
M A
B
LT
Revision: 2006 July 2007 FX35/FX45
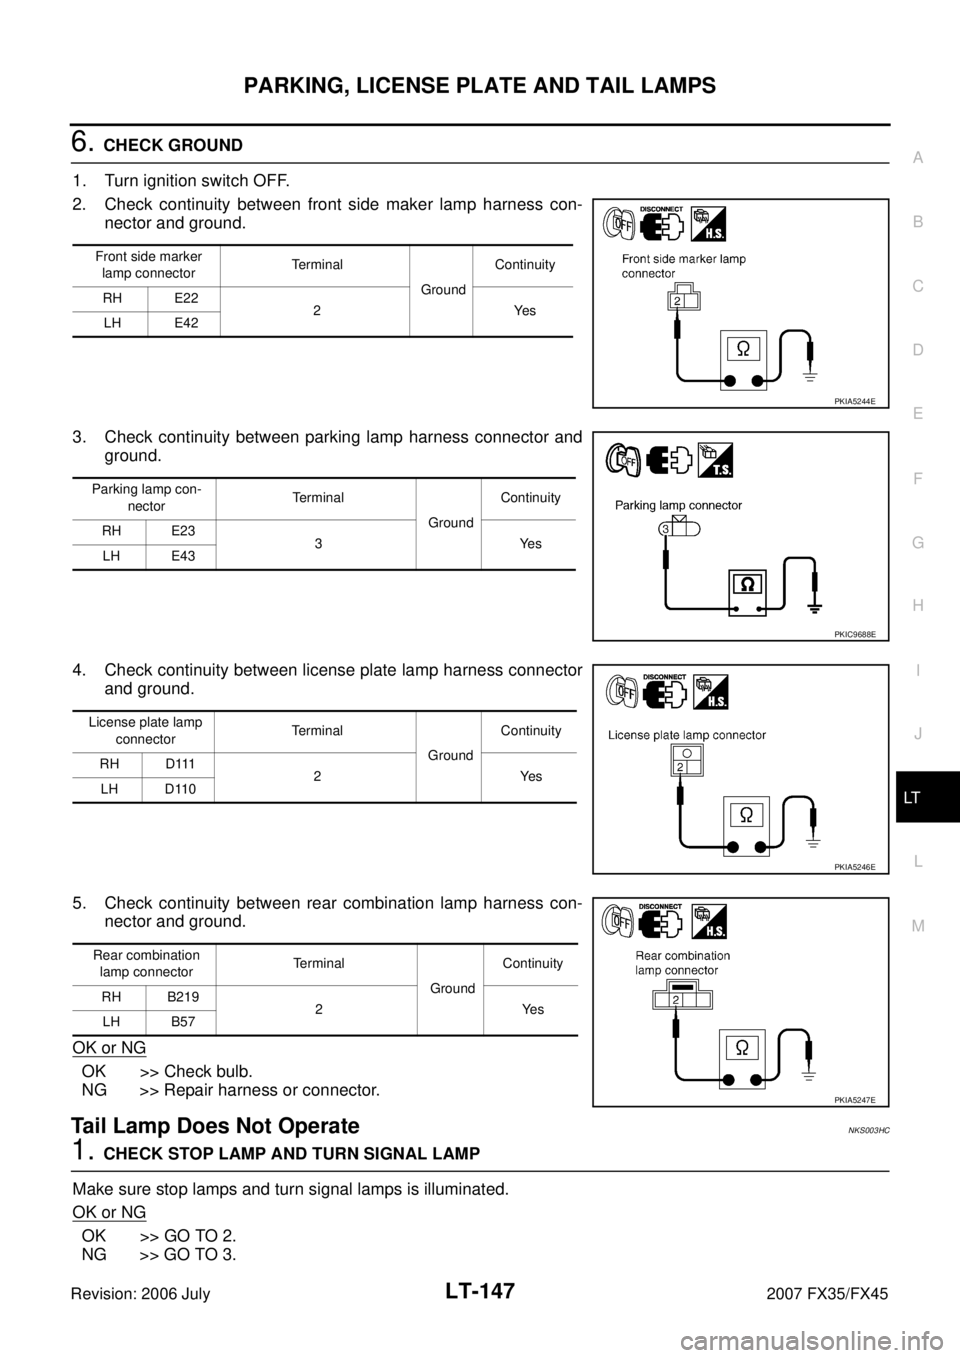
6. CHECK GROUND
1. Turn ignition switch OFF.
2. Check continuity between front side maker lamp harness con- nector and ground.
3. Check continuity between parking lamp harness connector and ground.
4. Check continuity between license plate lamp harness connector and ground.
5. Check continuity between rear combination lamp harness con- nector and ground.
OK or NG
OK >> Check bulb.
NG >> Repair harness or connector.
Tail Lamp Does Not OperateNKS003HC
1. CHECK STOP LAMP AND TURN SIGNAL LAMP
Make sure stop lamps and turn signal lamps is illuminated.
OK or NG
OK >> GO TO 2.
NG >> GO TO 3.
Front side marker
lamp connector Terminal
Ground Continuity
RH E22 2Yes
LH E42
PKIA5244E
Parking lamp con-
nector Terminal
Ground Continuity
RH E23 3Yes
LH E43
PKIC9688E
License plate lamp
connector Terminal
Ground Continuity
RH D111 2Yes
LH D110
PKIA5246E
Rear combination
lamp connector Terminal
Ground Continuity
RH B219 2Yes
LH B57
PKIA5247E