Page 1009 of 1226

Automatic Transmission/Transaxle -
Vehicles With: 4-Speed Automatic
307-01 49 Transmission (AW81-40) 307-01 -49
DIAGNOSIS AND TESTING
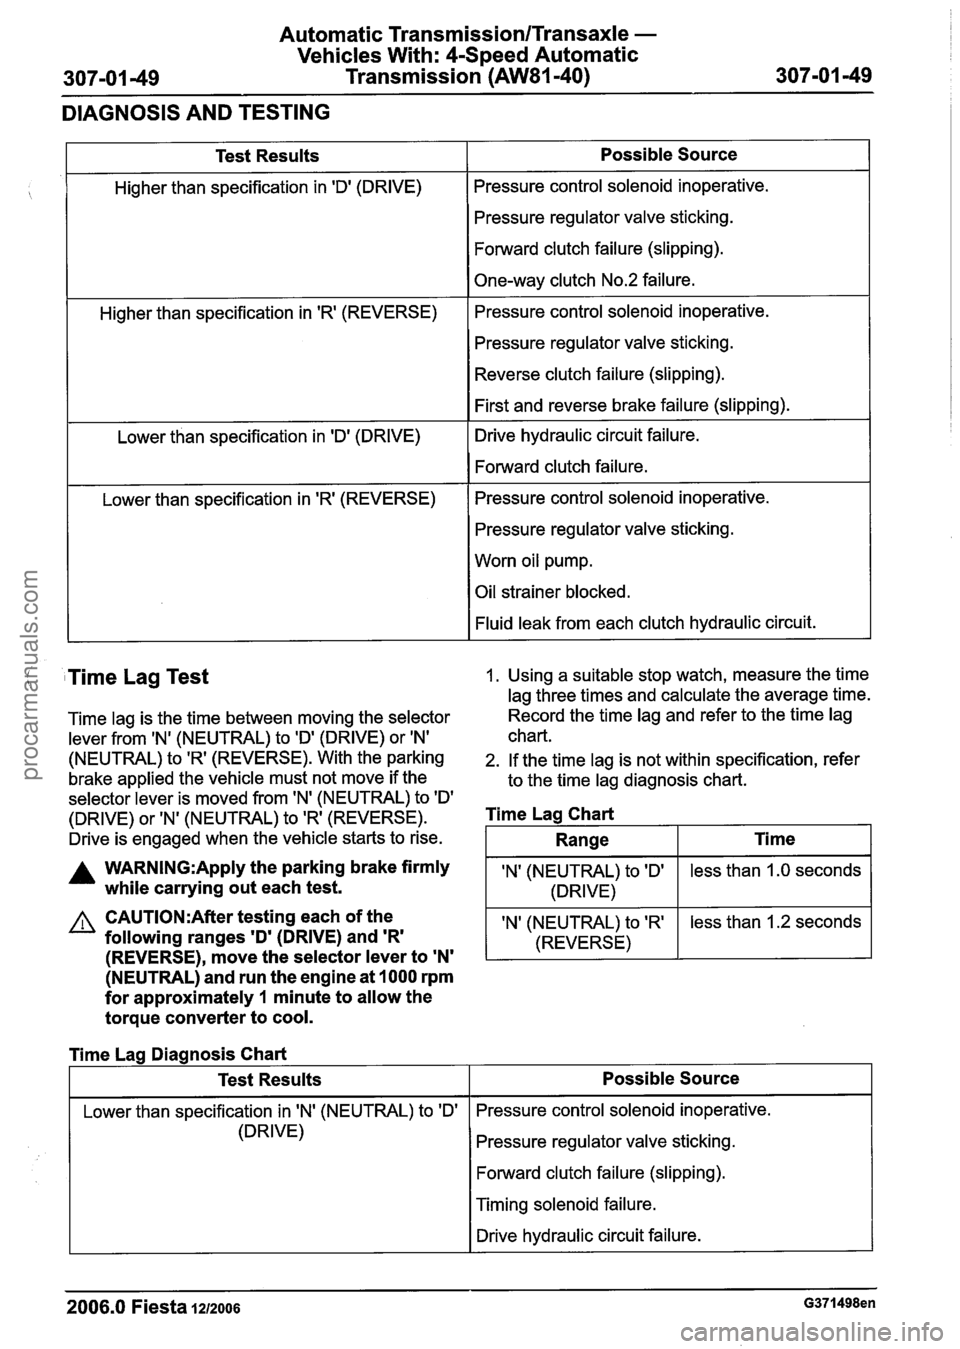
Test Results
Higher than specification in 'Dl (DRIVE)
Higher than specification in
'R' (REVERSE)
Lower than specification in 'D' (DRIVE)
Lower than specification in
'R' (REVERSE)
Possible Source
Pressure control solenoid inoperative.
Pressure regulator valve sticking.
Forward clutch failure (slipping).
One-way clutch No.2 failure.
Pressure control solenoid inoperative.
Pressure regulator valve sticking.
Reverse clutch failure (slipping).
First and reverse brake failure (slipping).
Drive hydraulic circuit failure.
Forward clutch failure.
Pressure control solenoid inoperative.
Pressure regulator valve sticking.
Worn oil pump.
Oil strainer blocked.
Fluid leak from each clutch hydraulic circuit.
( Time Lag Test 1. Using a suitable stop watch, measure the time
lag three times and calculate the average time.
Time lag is the time between moving the selector Record the
time lag and refer to the time lag
lever from
IN' (NEUTRAL) to ID' (DRIVE) or IN' chart.
(NEUTRAL) to 'R' (REVERSE). With the parking 2. If the time lag is not within specification, refer
brake applied the vehicle must not move if the
to the time lag diagnosis chart.
selector lever is moved from 'N' (NEUTRAL) to
ID'
(DRIVE) or 'N' (NEUTRAL) to 'R' (REVERSE). Time Lag Chart
Drive is engaged when the vehicle starts to rise.
A WARN1NG:Apply the parking brake firmly IN' (NEUTRAL) to ID' while carrying out each test. 1 (DRIVE)
(NEUTRAL) and run the engine at 1000 rpm
for approximately
1 minute to allow the
torque converter to cool.
less than 1.0 seconds
CAUTI0N:After testing each of the
following ranges
'D' (DRIVE) and 'R'
Range
I Lower than specification in IN' (NEUTRAL) to 'Dl I Pressure control solenoid inoperative.
Ti me
(REVERSE), move the selector lever to 'N'
'N' (NEUTRAL) to 'R'
(REVERSE)
Time Lag Diagnosis Chart
(DRIVE) less
than 1.2 seconds
Test Results
Pressure regulator valve sticking.
Forward clutch failure (slipping).
Possible Source
I Timing solenoid failure.
I I Drive hydraulic circuit failure. I
2006.0 Fiesta IZIZOO~ G371498en
procarmanuals.com
Page 1011 of 1226

Automatic Transmission/Transaxle -
Vehicles With: 4-Speed Automatic
307-01 -51 Transmission (AW81-40) 307-01 -51 -
GENERAL PROCEDURES
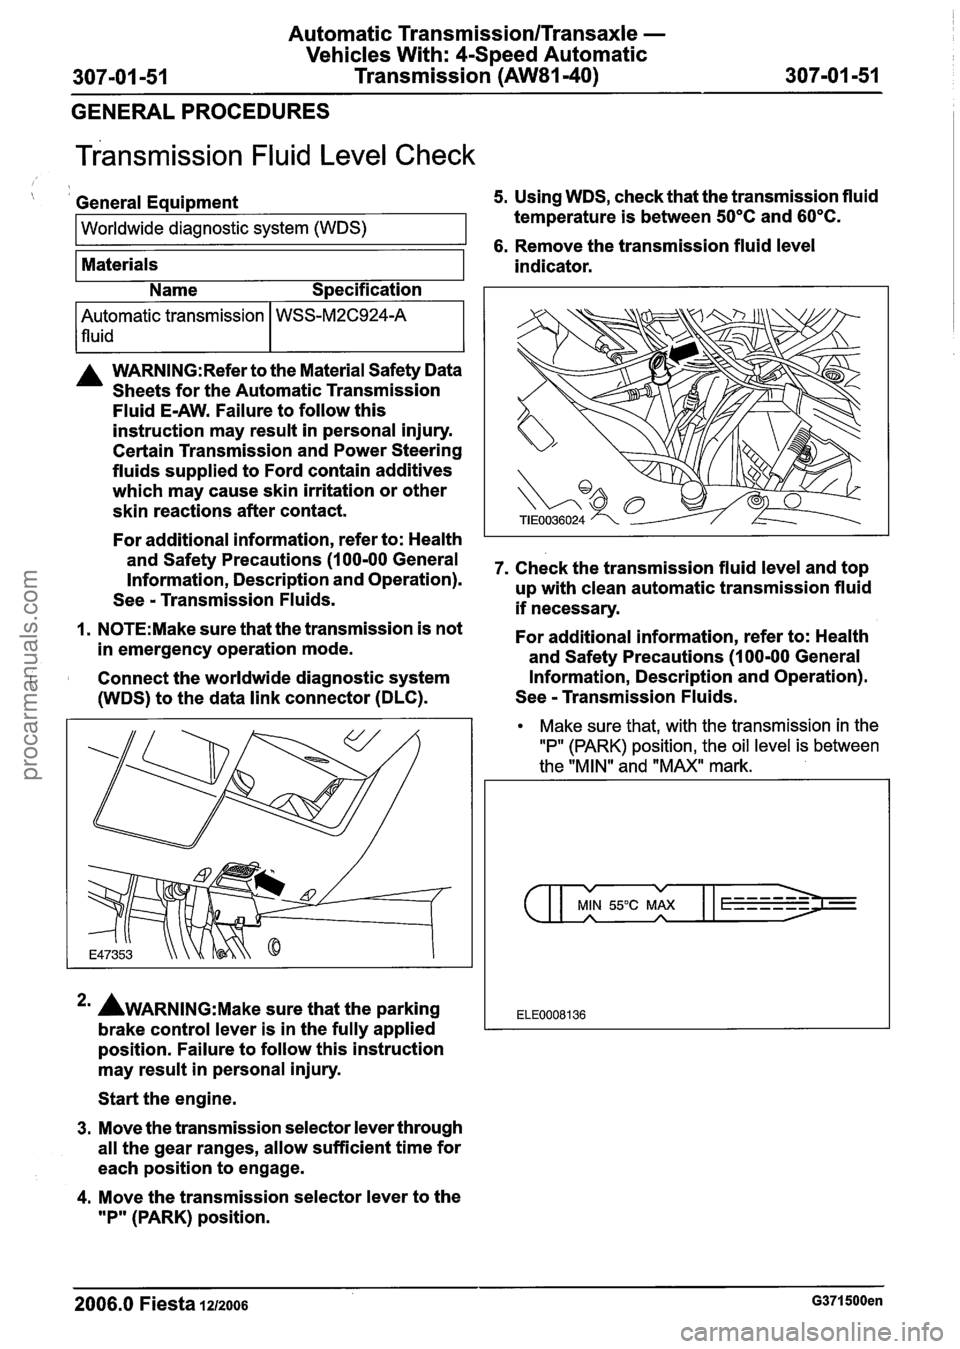
~ransmission Fluid Level Check
( I General Equipment 5. Using WDS, check that the transmission fluid
Worldwide diagnostic system (WDS) temperature is between 50°C and 60°C.
1 6. Remove the transmission fluid level
Materials
A WARN1NG:Refer to the Material Safety Data
Sheets for the Automatic Transmission
Fluid
E-AW. Failure to follow this
instruction may result in personal injury.
Certain Transmission and Power Steering
fluids supplied to Ford contain additives
which may cause skin irritation or other
skin reactions after contact.
For additional information, refer to: Health
and Safety Precautions (1 00-00 General
Information, Description and Operation).
See
- Transmission Fluids.
1. N0TE:Make sure that the transmission is not
in emergency operation mode.
Connect the worldwide diagnostic system
(WDS) to the data link connector (DLC). indicator.
Automatic transmission
lfluid
*' AWARNING:M~~~ sure that
the parking
brake control lever is in the fully applied
position. Failure to follow this instruction
may result in personal injury.
Name
Specification
WSS-M2C924-A
Start the engine.
3. Move the transmission selector lever through
all the gear ranges, allow sufficient time for
each position to engage.
4. Move the transmission selector lever to the
"P" (PARK) position. 7.
Check the transmission fluid level and top
up with clean automatic transmission fluid
if necessary.
For additional information, refer to: Health
and Safety Precautions (1 00-00 General
Information, Description and Operation).
See
- Transmission Fluids.
Make sure that, with the transmission in the
"P" (PARK) position, the oil level is between
the "MIN" and "MAX" mark.
v v
MIN 55°C MAX A A
ELE0008136
2006.0 Fiesta 1212006 G371500en
procarmanuals.com
Page 1012 of 1226
Automatic Transmission/Transaxle -
Vehicles With: CSpeed Automatic
307-01 -52 Transmission (AW81-40) 307-01 -52
GENERAL PROCEDURES
8. Install the transmission fluid level indicator.
9. Switch the engine off.
10. Disconnect the WDS from the DLC.
2006.0 Fiesta 1212006 G371500en
procarmanuals.com
Page 1022 of 1226

Automatic Transmission/Transaxle -
Vehicles With: 4-Speed Automatic
307-01 -62 Transmission (AW81-40) 307-01 -62
REMOVAL AND INSTALLATION
Transaxle
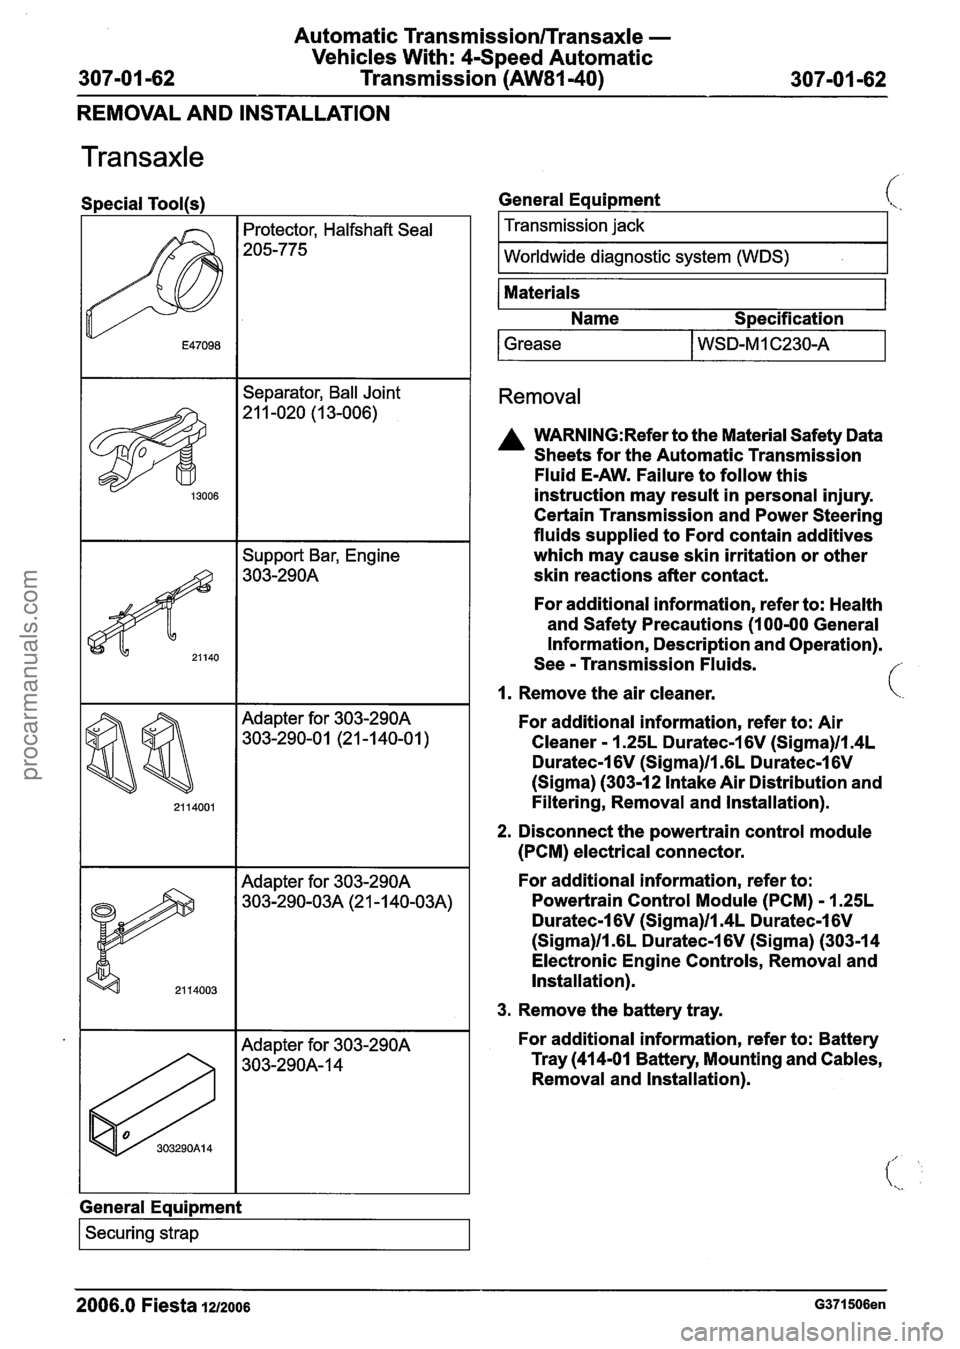
Special Tool(s)
I I Separator, Ball Joint
Support Bar, Engine
303-290A
Adapter for 303-290A
303-290-01 (21 -1 40-01
)
General Eaui~ment
I Securing strap I
General Equipment
Transmission jack
I Worldwide diagnostic system (WDS) I
Materials
Name S~ecification
1 Grease I WSD-MI C230-A I
Removal
A WARN1NG:Refer to the Material Safety Data
Sheets for the Automatic Transmission
Fluid E-AW. Failure to follow this
instruction may
result in personal injury.
Certain Transmission and Power Steering
fluids supplied to Ford contain additives
which may cause skin irritation or other
skin reactions after contact.
For
additional information, refer to: Health
and Safety Precautions (1 00-00 General
Information, Description and Operation).
See
- Transmission Fluids. f
1. Remove the air cleaner. \.
For additional information, refer to: Air
Cleaner - 1.25L Duratec-1 6V (Sigma)/ln4L
Duratec-1 6V (Sigma)ll .6L Duratec-1 6V
(Sigma) (303-12 Intake Air Distribution and
Filtering, Removal and Installation).
2. Disconnect the powertrain control module
(PCM) electrical connector.
For
additional information, refer to:
Powertrain
Control Module (PCM) - 1.25L
Duratec-1 6V (Sigma)ll.4L Duratec-1 6V
(Sigma)ll .6L Duratec-1 6V (Sigma) (303-1 4
Electronic Engine Controls, Removal and
Installation).
3. Remove the battery tray.
For
additional information, refer to: Battery
Tray (41 4-01 Battery, Mounting and
Cables,
Removal and Installation).
2006.0 Fiesta 1212006 G371506en
procarmanuals.com
Page 1023 of 1226
Automatic Transmission/Transaxle -
Vehicles With: 4-Speed Automatic
Transmission (AW81-40)
REMOVAL AND INSTALLATION
4. Loosen the strut and spring assembly top 7. Detach the ground cable from the transaxle.
mount nuts by three turns on both sides.
8. Disconnect the turbine shaft speed (TSS)
5. Detach the engine ground cable from the sensor
electrical connector.
transaxle.
9. Disconnect the transaxle breather hose.
6. Remove the transaxle upper retaining bolts.
Detach the engine wiring harness bracket
from the transaxle.
2006.0 Fiesta 1212006 G371506en
procarmanuals.com
Page 1025 of 1226
Automatic Transmission/Transaxle -
Vehicles With: 4-Speed Automatic
Transmission (AW81-40)
REMOVAL AND INSTALLATION
17. Disconnect the ignition switch to starter Support
the exhaust flexible pipe with a
motor solenoid and battery to starter motor suitable
support wrap or suitable splint.
solenoid cables.
21. Detach the exhaust flexible pipe from the
18. Remove the accessory drive belt cover. catalytic
converter.
Discard the nuts and the gasket.
19. Remove the engine support insulator.
22m &AUTION:L~~~~ the tie-rod end retaining
nut in place to protect the ball joint stud.
N0TE:Use a 5mm Allen key to prevent the ball
joint stud from rotating.
20m ACAUTION:~~~~ bending of the exhaust
flexible pipe may cause damage resulting
in failure. Loosen
the right-hand tie-rod end retaining
nut.
2006.0 Fiesta 1212006 G371506en
procarmanuals.com
Page 1027 of 1226

Automatic Transmission/Transaxle -
Vehicles With: 4-Speed Automatic
307-01 -67 Transmission (AW81-40) 307-01 -67
REMOVAL AND INSTALLATION
See - Transmission Fluids.
27. Lower the vehicle.
28. Remove the battery tray support bracket.
Allow the fluid to drain into a suitable
container.
For additional information, refer to: Health
and Safety Precautions
(1 00-00 General
Information, Description and Operation).
See
- Transmission Fluids.
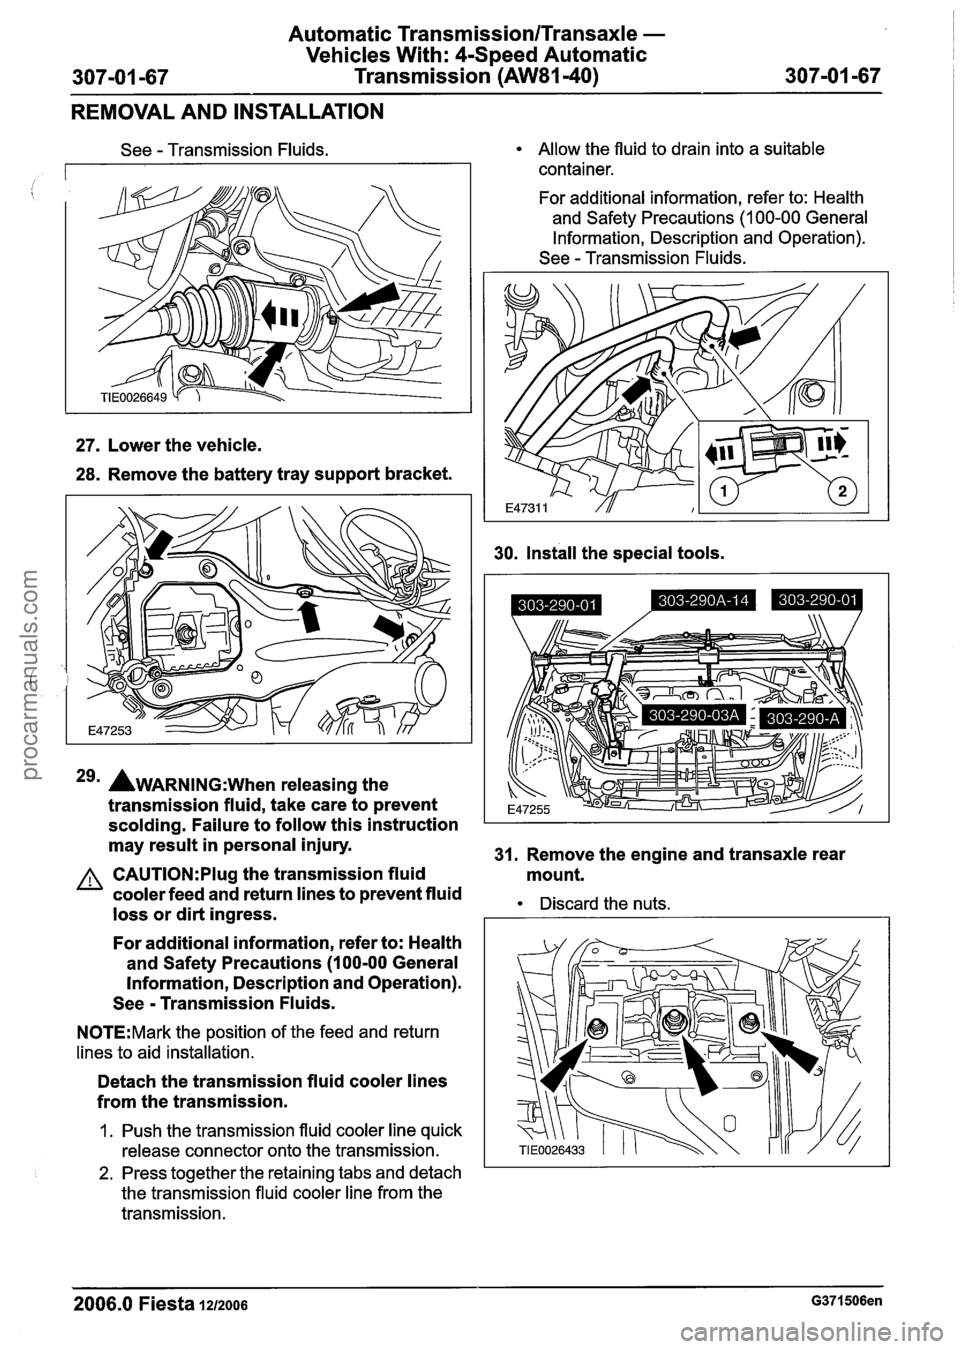
30.
Install the special tools.
29m AWARNING:~~~~ releasing the
transmission fluid, take care to prevent
scolding. Failure to follow this instruction
may result in personal injury.
31. Remove the engine and transaxle rear
A CAUTI0N:Plug the transmission fluid
mount.
cooler feed and return lines to prevent fluid
loss or dirt ingress.
Discard the nuts.
For additional information, refer to: Health
and Safety Precautions
(1 00-00 General
Information, Description and Operation).
See
- Transmission Fluids.
N0TE:Mark the position of the feed and return
lines to aid installation.
Detach the transmission fluid cooler lines
from the transmission.
1. Push the transmission fluid cooler line quick
release connector onto the transmission.
2. Press together the retaining tabs and detach
the transmission fluid cooler line from the
transmission.
2006.0 Fiesta 1212006 G371506en
procarmanuals.com
Page 1028 of 1226
Automatic Transmission/Transaxle -
Vehicles With: CSpeed Automatic
Transmission
(AW81-40)
REMOVAL AND INSTALLATION
32. Using the special tools, lower the engine Rotate the torque converter to gain access
and transaxle assembly. to the nuts.
Discard the nuts.
33. Remove the engine and transaxle rear
mount retaining bracket.
37. Remove the transaxle lower retaining bolts.
34. Raise and support the vehicle. 38. N0TE:Secure the transaxle with a securing
strap to the transmission jack.
For additional information, refer to: Lifting
(1 00-02 Jacking and Lifting, Description Using
a suitable transmission jack, support
and Operation). the transaxle.
35. Remove the starter motor.
36. Remove the torque converter retaining
nuts.
2006.0 Fiesta 1212006 G371506en
procarmanuals.com