Page 1029 of 1226

Automatic Transmission/Transaxle -
Vehicles With: 4-Speed Automatic
REMOVAL AND INSTALLATION
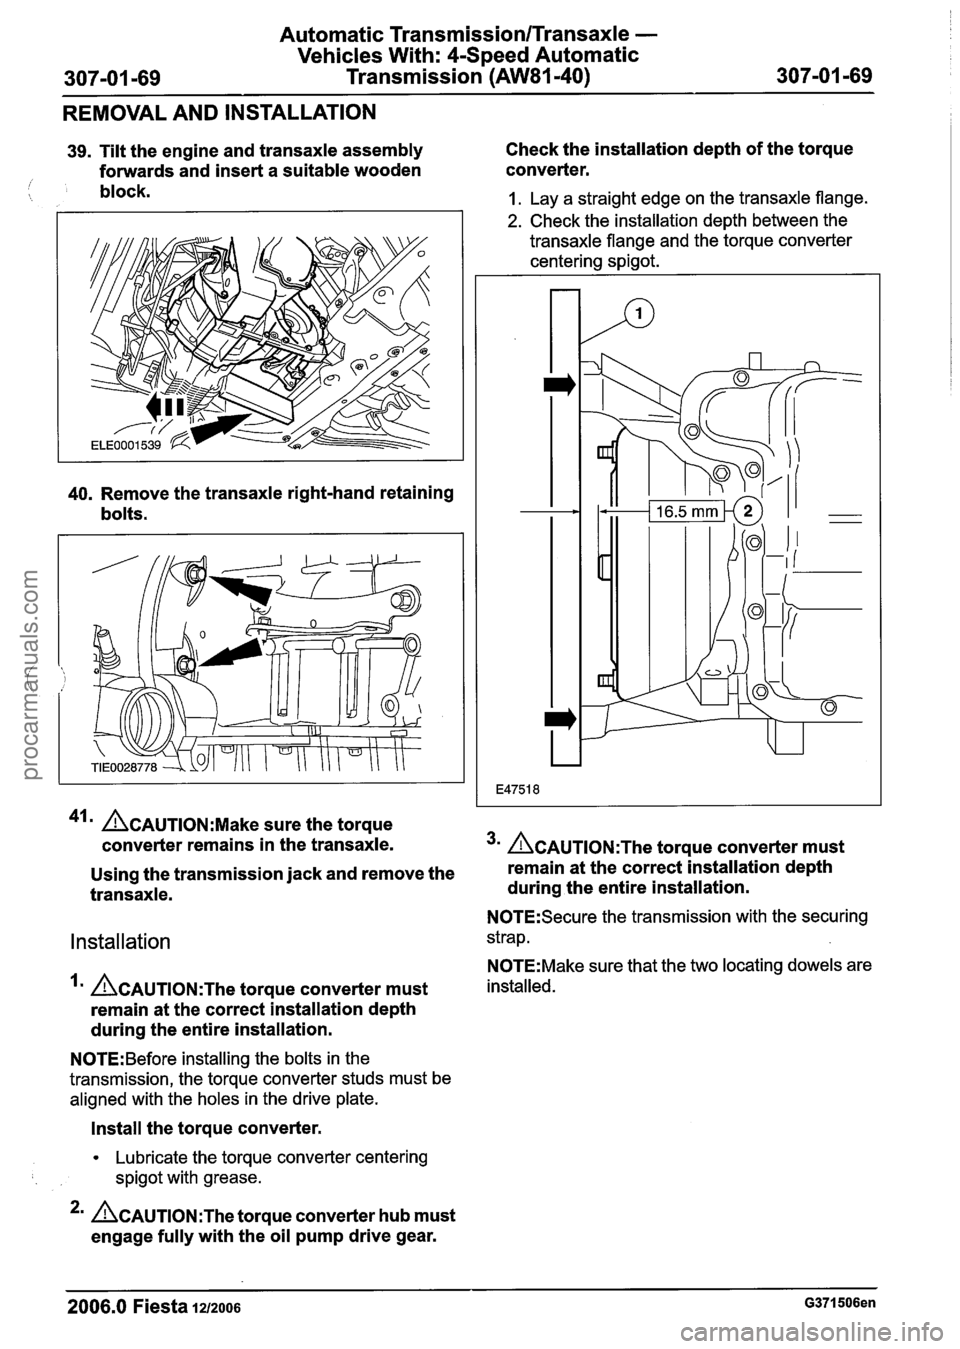
39. Tilt the engine and transaxle assembly Check
the installation depth of the torque
forwards and insert a suitable wooden converter.
/ block. 1. Lay
a straight edge on the transaxle flange.
2. Check the installation depth between the
transaxle flange and the torque converter
centering spigot.
40. Remove the transaxle right-hand retaining
bolts.
41m ~CAUTION:M~~~ sure the torque
converter remains in the transaxle.
3m ~CAUTION:T~~ torque converter must
Using the transmission jack and remove the remain
at the correct installation depth
transaxle. during the entire installation.
N0TE:Secure the transmission with the securing
Installation strap.
N0TE:Make sure that the two locating dowels are
ACAUTION:T~~ torque converter must installed.
remain at the correct installation depth
during the entire installation.
N0TE:Before installing the bolts in the
transmission, the torque converter studs must be
aligned with the holes in the drive plate.
Install the torque converter.
Lubricate the torque converter centering
spigot with grease.
*' ACAUTION:T~~ torque converter hub must
engage fully with the oil pump drive gear.
2006.0 Fiesta 1212006 G371506en
procarmanuals.com
Page 1030 of 1226
Automatic Transmission/Transaxle -
Vehicles With: 4-Speed Automatic
Transmission
(AW81-40)
REMOVAL AND INSTALLATION
Using a suitable transmission jack, install
the transaxle. 1. Rotate the torque converter to gain access
to the nut bolts.
/I
4. Install the transaxle right-hand retaining 10. Install the starter motor.
bolts.
11. Lower the vehicle.
5. Remove the wooden block. 12. Install the engine and transaxle rear mount
6. Remove the securing strap. retaining
bracket.
7. Remove the transmission jack.
8. lnstall the transaxle lower retaining bolts.
9. N0TE:lnstall new torque converter retaining
nuts.
lnstall the torque converter retaining nuts.
2006.0 Fiesta 1212006 G371506en
procarmanuals.com
Page 1031 of 1226

Automatic Transmission/Transaxle -
Vehicles With: 4-Speed Automatic
307-01 -71 Transmission (AW81-40) 307-01 -71
REMOVAL AND INSTALLATION
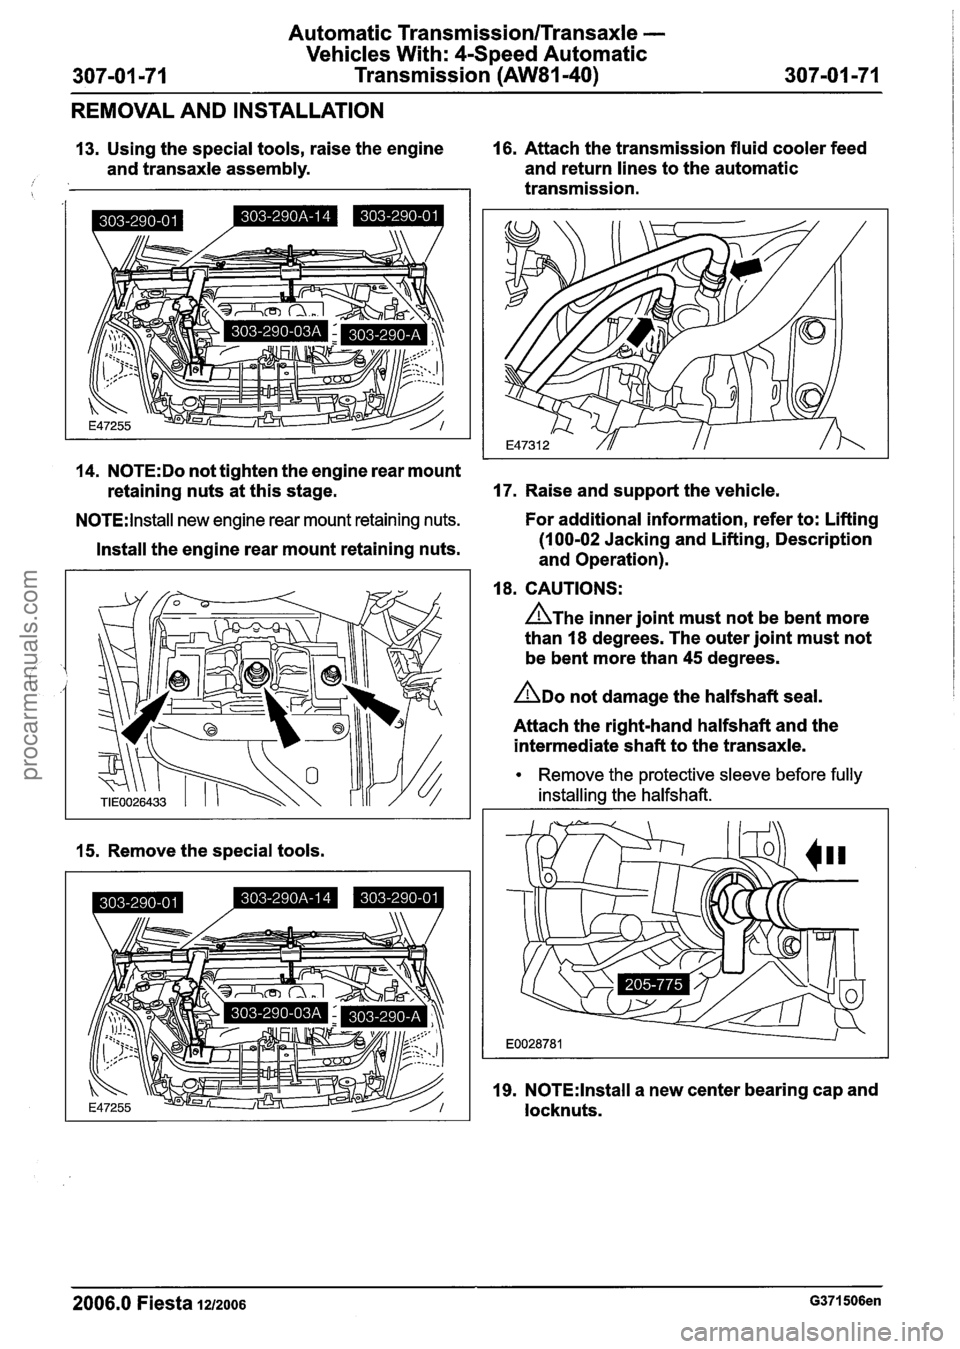
13. Using the special tools, raise the engine 16. Attach the transmission fluid cooler feed
and transaxle assembly. and
return lines to the automatic
I I transmission.
14. N0TE:Do not tighten the engine rear mount
retaining nuts at this stage.
17. Raise and support the vehicle.
N0TE:lnstall new engine rear mount retaining nuts. For
additional information, refer to: Lifting - -
Install the engine rear mount retaining nuts.
15. Remove the special tools.
(1 00-02 Jacking and Lifting, Description
and Operation).
18. CAUTIONS:
A~he inner joint must not be bent more
than
18 degrees. The outer joint must not
be bent more than
45 degrees.
ADO not damage the halfshaft seal.
Attach the right-hand halfshaft and the
intermediate shaft to the transaxle.
Remove the protective sleeve before fully
installing the halfshaft.
19. N0TE:lnstall a new center bearing cap and
locknuts.
2006.0 Fiesta 1212006 G371506en
procarmanuals.com
Page 1033 of 1226
Automatic Transmission/Transaxle -
Vehicles With: 4-Speed Automatic
Transmission (AW81-40)
REMOVAL AND INSTALLATION
24. Remove the exhaust flexible pipe support. Install
the transmission fluid level indicator
, 25. Install the engine support insulator. tube
to the transaxle.
26. Install the accessory drive belt cover. 29.
Attach the selector lever cable retaining
bracket to the transaxle.
27. Connect the ignition switch to starter motor
30, Attach the selector lever cable to the solenoid and battery to starter motor
solenoid cables. manual
shift lever.
31. Adjust the selector lever cable.
28m ACAUTION:M~~~ sure the transmission
fluid level indicator tube is fully located in For
additional information, refer to: Selector
the transmission housing. Lever Cable
Adjustment (307-05 f Automatic Transmission/Transaxle
External Controls - Vehicles With:
4Speed Automatic Transmission
(AW81-40), General Procedures).
2006.0 Fiesta 1212006 G371506en
procarmanuals.com
Page 1035 of 1226
Automatic Transmission/Transaxle -
Vehicles With: 4-Speed Automatic
Transmission (AW81-40)
REMOVAL AND INSTALLATION
39. Install the engine wiring harness support 42. Tighten the engine rear mount center
brackets. retaining nut.
40. Attach the engine ground cable to the 43. Install the battery tray support bracket.
transaxle.
44. Tighten the strut and spring assembly top
41. Tighten the engine rear mount outer mount
retaining nuts on both sides.
retaining nuts.
45. Install the front wheels and tires.
For additional information, refer to: Wheel
and Tire
(204-04 Wheels and Tires,
Removal and Installation).
2006.0 Fiesta 1212006 G371506en
procarmanuals.com
Page 1036 of 1226

Automatic Transmission/Transaxle -
Vehicles With: 4-Speed Automatic
307-01 -76 Transmission
(AW81-40) 307-01 -76
REMOVAL AND INSTALLATION
46. Install the battery tray.
For
additional information, refer to: Battery
Tray (414-01 Battery, Mounting and
Cables, Removal and Installation).
47. Connect the powertrain control module
(PCM) electrical connector to the PCM.
For
additional information, refer to:
Powertrain
Control Module (PCM) - 1.25L
Duratec-1 6V (Sigma)ll.4L Duratec-1 6V
(Sigma)ll .6L Duratec-1 6V (Sigma) (303-1 4
Electronic Engine Controls, Removal and
Installation).
48. Install the air cleaner.
For additional information, refer to: Air
Cleaner - 1.25L Duratec-1 6V (Sigma)ll.4L
Duratec-1 6V (Sigma)ll.GL Duratec-1 6V
(Sigma) (303-1 2 Intake Air Distribution
and
Filtering, Removal and Installation).
49. Check the transmission fluid level and top
up with
clean automatic transmission fluid
if necessary.
For
additional information, refer to:
Transmission
Fluid Level Check (307-01
Automatic
Transmission/Transaxle -
Vehicles With: 4-Speed Automatic
Transmission
(AW81-40), General
Procedures).
50.
N0TE:Only carry out the following step
when a new
transaxle has been installed.
Using worldwide diagnostic system (WDS),
reset the transmission control module (TCM).
2006.0 Fiesta 1212006 G371506en
procarmanuals.com
Page 1049 of 1226

Automatic Transmission/Transaxle External
Controls -Vehicles With: 4-Speed Automatic
307-05-5 Transmission (AW81-40) 307-05-5
GENERAL PROCEDURES
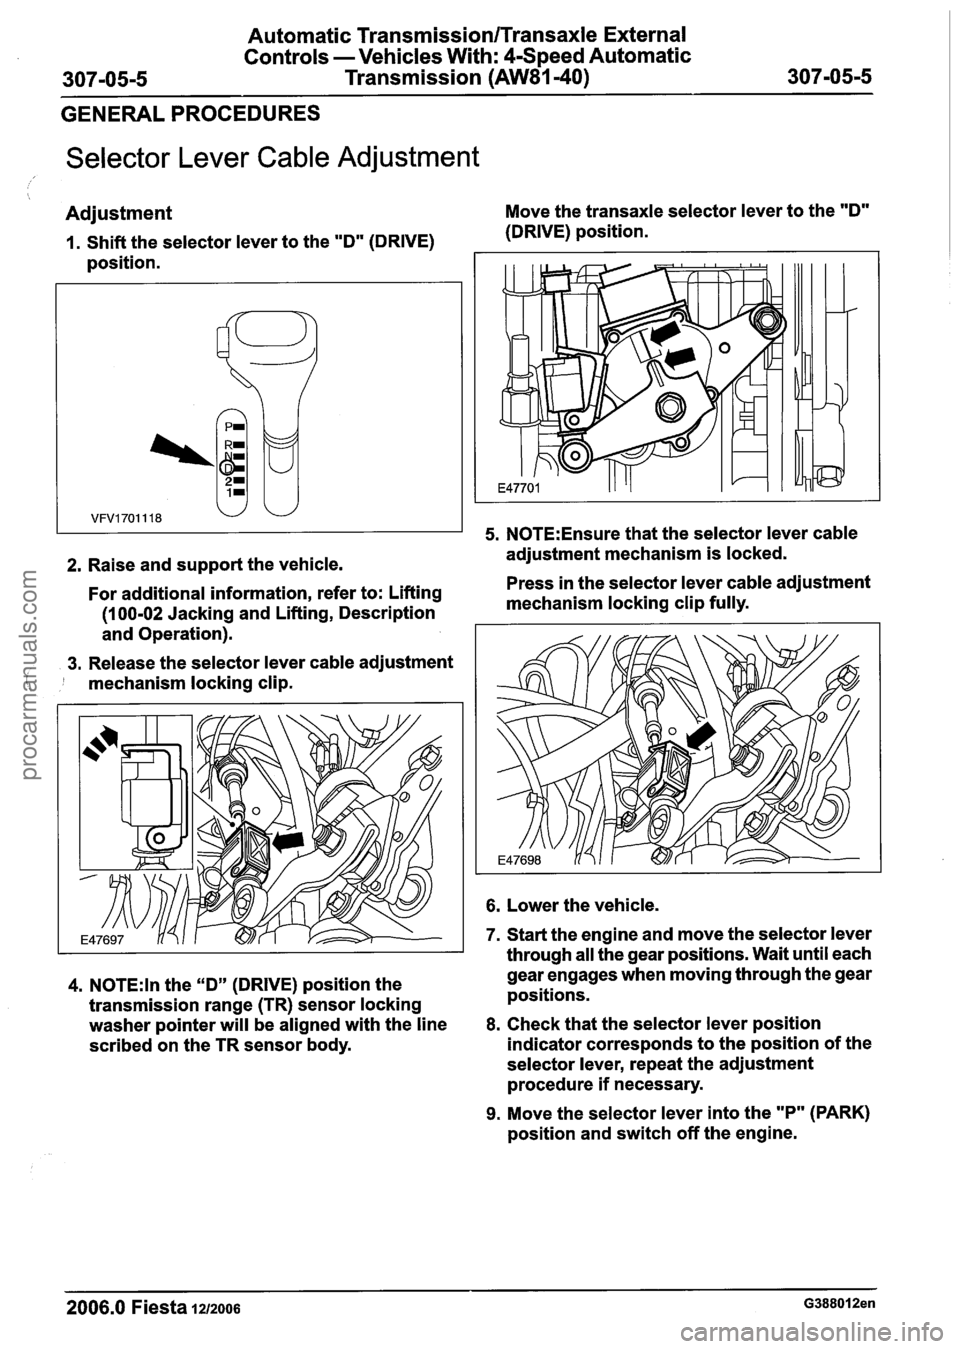
Selector Lever Cable Adjustment
Adjustment Move the transaxle selector lever to the "D"
1. Shift the selector lever to the "D" (DRIVE) (DRIVE) position.
position.
2. Raise and support the vehicle.
5. N0TE:Ensure that the selector lever cable
adjustment mechanism is locked.
- -
For additional information, refer to: Lifting Press
in the selector lever cable adjustment
(1 00-02 Jacking and Lifting, Description mechanism
locking clip fully.
and Operation).
3. Release the selector lever cable adjustment
1, ' mechanism locking clip.
6. Lower the vehicle.
7. Start the engine and move the selector lever
through all the gear positions. Wait until each
4. N0TE:ln the "D" (DRIVE) position the gear engages
when moving through the gear
transmission range (TR) sensor locking positions.
washer pointer will be aligned with the line
8. Check that the selector lever position
scribed on the TR sensor body. indicator corresponds to the position of the
selector lever, repeat the adjustment
procedure if necessary.
9. Move the selector lever into the "P" (PARK)
position and switch off the engine.
2006.0 Fiesta 1212006 G388012en
procarmanuals.com
Page 1061 of 1226

Manual Transmission/Transaxle and Clutch -
308-00-3 General Information 308-00-3
DIAGNOSIS AND TESTING
Manual Transaxle and Clutch
lnspection and Verification
General Equipment selected with the engine running and the parking
brake applied, without any concerns, the clutch
2. If the gear@) cannot be selected, REFER to
Symptom Chart.
Ultraviolet
fluid leak detection equipment
1. Verify the customer concern.
Transaxle noise concerns
2. Visually inspect for obvious signs of mechanical is
OK.
damage. 1. Check the engine and transaxle support for
Oil leaks.
Visibly damaged or worn components.
Visual lnspection Chart insufficient gap between the transaxle and the
body.
REFER to:
RoadlRoller Testing (1 00-00 General
Information, Description and Operation).
Mechanical 2. Road test the vehicle.
4. If the cause is not evident, verify the symptom
and REFER to Symptom Chart.
Oil leakage concerns
Loose or missing nuts or bolts.
( I The following checks should be carried out before
repairing or installing a new transaxle. 1.
Check the transaxle fluid level. If necessary,
3. If a noise occurs in various gears at the same
- - drain off any excess fluid.
The inspection and verification of manual transaxle
concerns can be considered in three main areas. 2. Clean the transaxle and the adjacent areas
carefully and road test the vehicle.
engine speed,
check if the noise also occurs in
3. If an obvious cause for an observed or reported the neutral position.
If it does, the noise is not
concern is found, correct the cause (if possible) caused
by the transaxle.
before proceeding to the next step. 4.
REFER to Symptom Chart.
Gear shifting concerns REFER to: RoadlRoller Testing (1 00-00 General
Information, Description and Operation).
1, Check the operation of the clutch: Lay a block 3. U~ing suitable ultraviolet fluid leak detection
of wood approximately
25 mm thick under the equipment, locate
the leak and check whether
clutch pedal and depress the clutch pedal as the leaking fluid
is transaxle fluid, brake fluid
far as the stop. If first or second gear can be (from the hydraulically operated clutch)
or
engine oil.
4. REFER to Symptom Chart.
Symptom Chart
Symptom Possible Sources Action
I
Clutch slippage Clutch master
cylinder.
Clutch slave cylinder.
Clutch pressure plate.
Clutch disc.
Engine or transaxle housing oil
or fluid
leak@).
GO to Pinpoint Test A.
Clutch chatter or shudder Engine and transaxle
mounts. REFER to:
Noise, Vibration and
Harshness (NVH) (1 00-04,
Diagnosis and Testing).
Clutch pressure plate.
Clutch disc.
Flywheel.
--
GO to Pinpoint Test B.
- -
2006.0 Fiesta 1212006 G25629en
procarmanuals.com