2007 FORD FIESTA lock
[x] Cancel search: lockPage 1006 of 1226
Automatic Transmission/Transaxle -
Vehicles With: 4Speed Automatic
307-01 -46 Transmission
(AW81-40) 307101 -46
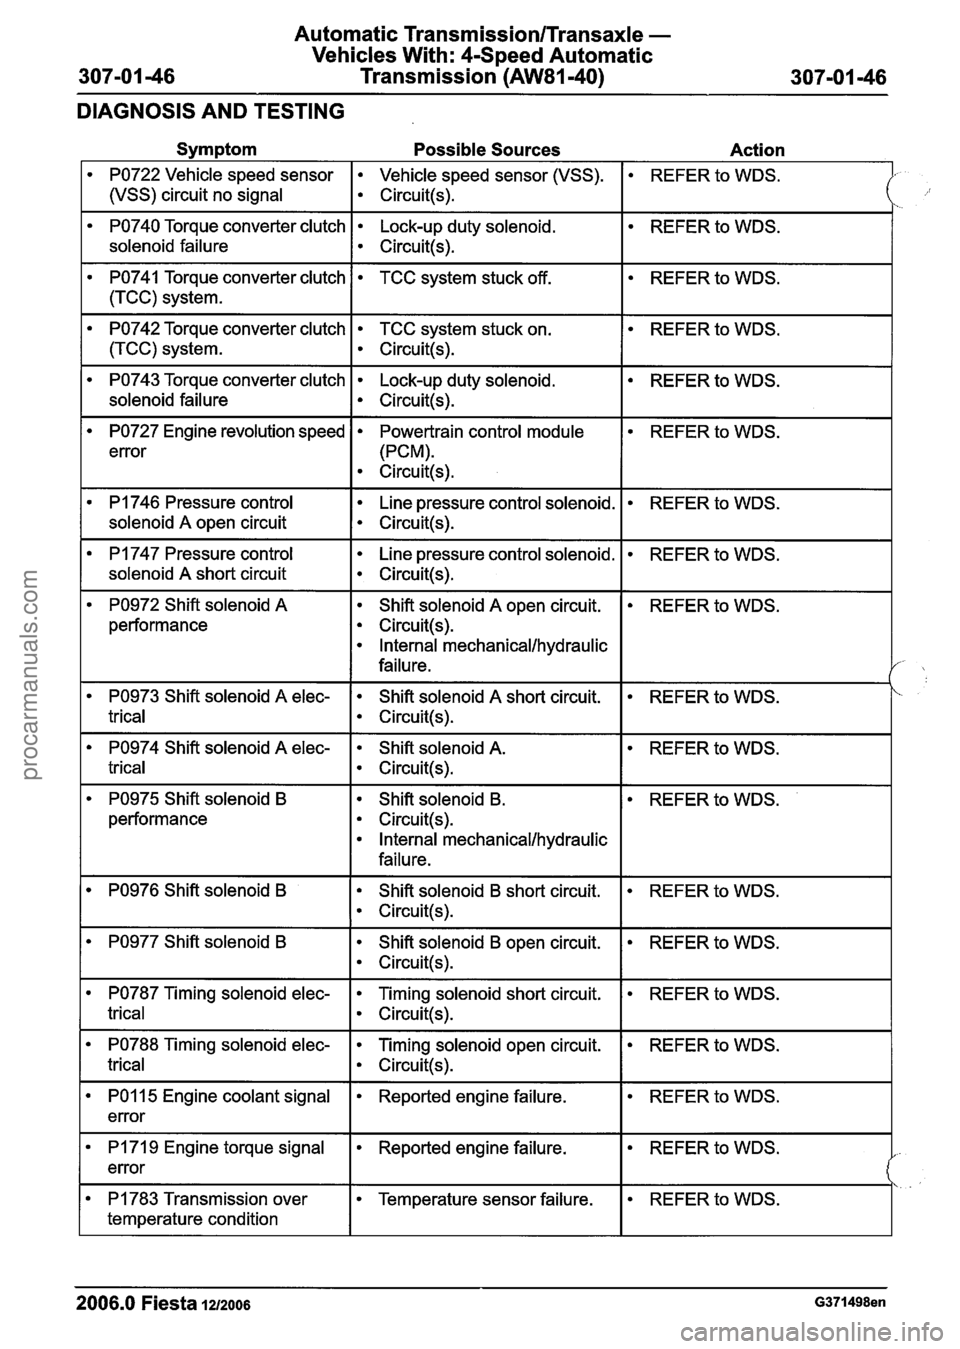
DIAGNOSIS AND TESTING
Symptom Possible Sources Action
PO722 Vehicle speed sensor Vehicle speed sensor (VSS).
1 (vSS) circuit no signal I circuit(+
REFER to WDS.
PO740 Torque converter clutch Lock-up duty solenoid.
solenoid failure
I ~ircuit(s).
REFER to WDS.
REFER to WDS.
PO741 Torque converter clutch
1 (TCC) system.
PO742 Torque converter clutch TCC system stuck on.
I circuit(s).
TCC system stuck off.
REFER to WDS.
PO743 Torque converter clutch Lock-up duty solenoid.
solenoid failure
I circuit(s).
REFER to WDS.
REFER to WDS.
PO727 Engine revolution speed
error
PI 746 Pressure control
I solenoid A open circuit
Powertrain control module
(PCM).
Circuit(s).
I
Line pressure control solenoid.
Circuit(s).
REFER to WDS.
PI 747 Pressure control
solenoid
A short circuit
Line pressure control solenoid.
Circuit(s).
REFER to WDS.
PO972 Shift solenoid A
performance Shift solenoid
A open
circuit.
Circuit(s).
Internal mechanical/hydraulic
failure.
REFER to WDS.
REFER to WDS.
PO974 Shift solenoid A elec- Shift solenoid A.
trical I circuit(!+
PO973 Shift solenoid A elec-
trical
REFER to WDS. Shift solenoid A short circuit.
Circuit(s).
PO975 Shift solenoid B
performance Shift solenoid
B.
Circuit(s).
Internal mechanical/hydraulic
failure.
REFER
to WDS.
PO976 Shift solenoid B Shift solenoid B short circuit.
Circuit(s).
REFER to WDS.
PO977 Shift solenoid B Shift solenoid B open circuit.
Circuit(s).
REFER to WDS.
PO787 Timing solenoid elec- Timing solenoid short circuit.
trical I circuit(s).
REFER to WDS.
REFER to WDS. PO788 Timing solenoid elec-
trical
-- - -
Timing solenoid open circuit.
Circuit(s).
REFER to WDS. PO1 15 Engine coolant signal
error Reported engine failure.
REFER to WDS. I PI 71 9 Engine torque signal
error Reported engine failure.
REFER to WDS. PI 783 Transmission over
temperature condition
2006.0 Fiesta 12/2006 G371498en
Temperature sensor failure.
procarmanuals.com
Page 1008 of 1226
Automatic TransmissionlTransaxle -
Vehicles With: 4-Speed Automatic
307-01 -48 Transmission (AW81-40) 307-01 -48
DIAGNOSIS AND TESTING
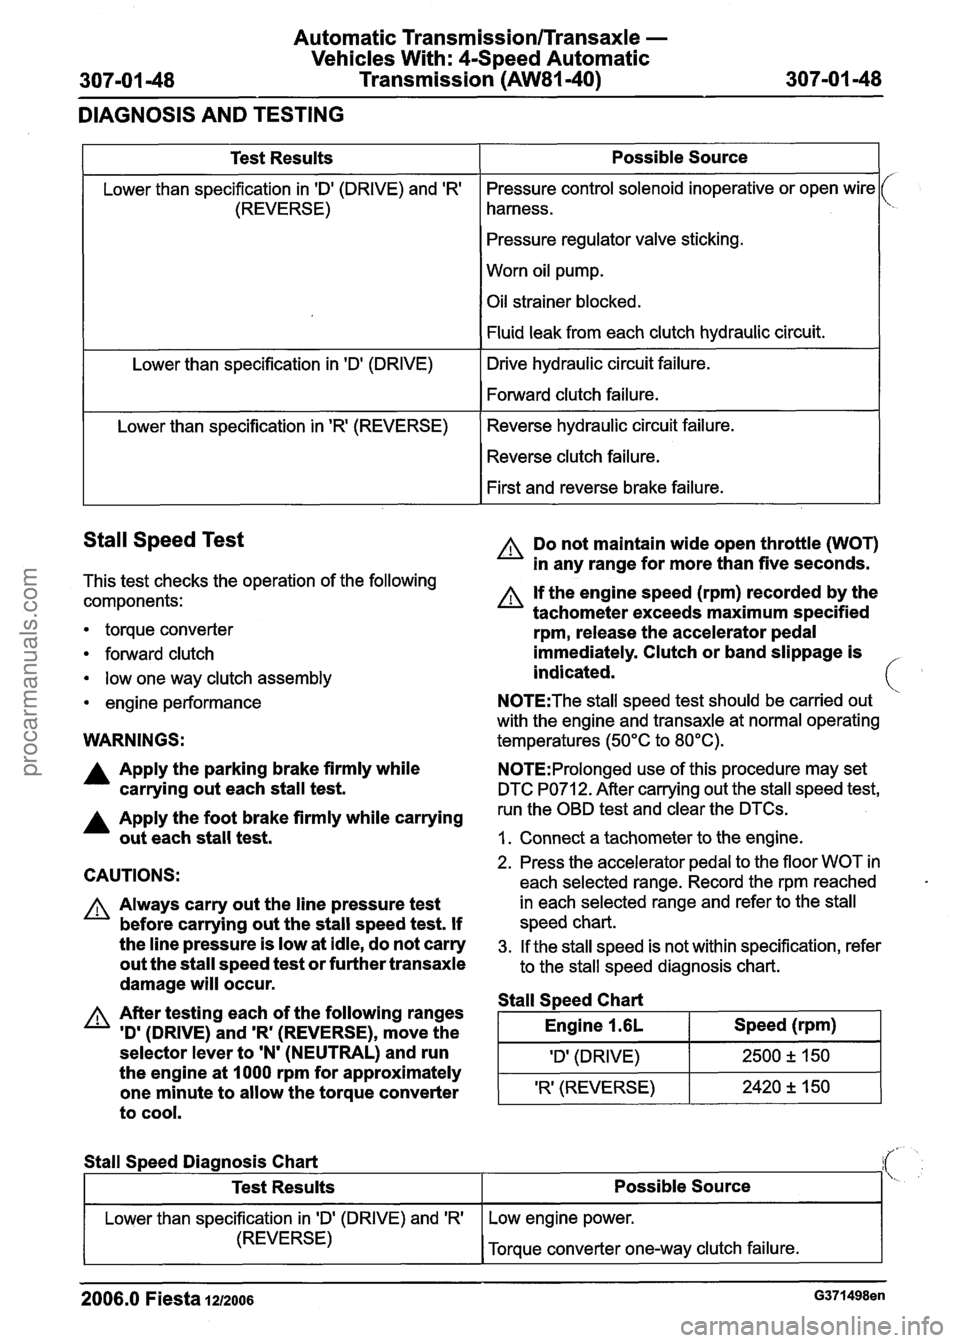
Stall Speed Test
This test checks the operation of the following
components:
1
Test Results
Lower than specification in 'Dl (DRIVE) and 'R'
(REVERSE)
Lower than specification in
'Dl (DRIVE)
Lower than specification in
'R' (REVERSE)
torque converter
forward clutch
low one way clutch assembly
engine performance
Possible Source
Pressure control solenoid inoperative or open wire
harness.
Pressure regulator valve sticking.
Worn oil pump.
Oil strainer blocked.
Fluid leak from each clutch hydraulic circuit.
Drive hydraulic circuit failure.
Forward clutch failure.
Reverse hydraulic circuit failure. Reverse clutch failure.
First and reverse brake failure.
WARNINGS:
A Do not maintain wide open throttle (WOT)
in any range for more than five seconds.
A If the engine speed (rpm) recorded by the
tachometer exceeds maximum specified
rpm, release the accelerator pedal
immediately. Clutch or band slippage is
indicated.
N0TE:The stall speed test should be carried out
with the engine and transaxle at normal operating
temperatures (50°C to 80°C).
A Apply the parking brake firmly while N0TE:Prolonged use of this procedure may set
carrying out each stall test. DTC PO71 2. After carrying out the stall speed test,
A Apply the foot brake firmly while carrying run the OBD test and clear the DTCs.
out each stall test. I. Connect a tachometer to the engine.
CAUTIONS:
A Always carry out the line pressure test
before carrying out the stall speed test. If
the line pressure is low at idle, do not carry
out the stall speed test or further transaxle
damage will occur.
A After testing each of the following ranges
'D'
(DRIVE) and 'R' (REVERSE), move the
selector lever to
'N' (NEUTRAL) and run
the engine at 1000 rpm for approximately
one minute to allow the torque converter
to cool.
2. Press the accelerator pedal to the floor WOT in
each selected range. Record the rpm reached
in each selected range and refer to the stall
speed chart.
3. If the stall speed is not within specification, refer
to the stall speed diagnosis chart.
Stall S~eed Chart
I Engine 1.6L I Speed (rpm) I
I 'Dl (DRIVE) I 2500 2 150 1
'R' (REVERSE) 2420 +, 150 -
Stall
Speed Diagnosis Chart
2006.0 Fiesta 1212006 G371498en
Test Results
Lower than specification in ID' (DRIVE) and 'R'
(REVERSE)
Possible Source
Low engine power.
Torque converter one-way clutch failure.
procarmanuals.com
Page 1009 of 1226
Automatic Transmission/Transaxle -
Vehicles With: 4-Speed Automatic
307-01 49 Transmission (AW81-40) 307-01 -49
DIAGNOSIS AND TESTING
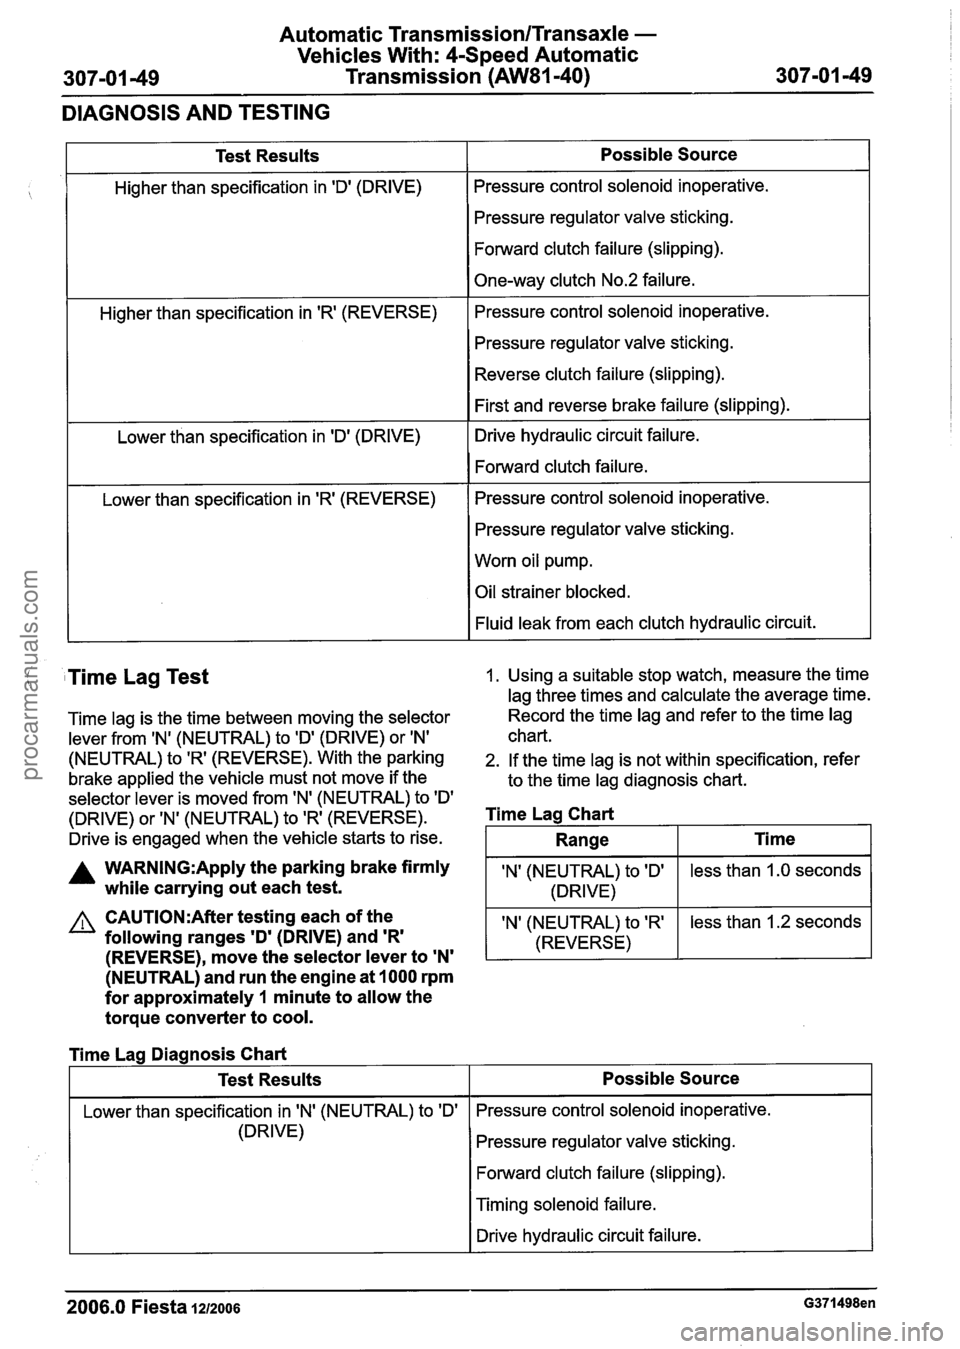
Test Results
Higher than specification in 'Dl (DRIVE)
Higher than specification in
'R' (REVERSE)
Lower than specification in 'D' (DRIVE)
Lower than specification in
'R' (REVERSE)
Possible Source
Pressure control solenoid inoperative.
Pressure regulator valve sticking.
Forward clutch failure (slipping).
One-way clutch No.2 failure.
Pressure control solenoid inoperative.
Pressure regulator valve sticking.
Reverse clutch failure (slipping).
First and reverse brake failure (slipping).
Drive hydraulic circuit failure.
Forward clutch failure.
Pressure control solenoid inoperative.
Pressure regulator valve sticking.
Worn oil pump.
Oil strainer blocked.
Fluid leak from each clutch hydraulic circuit.
( Time Lag Test 1. Using a suitable stop watch, measure the time
lag three times and calculate the average time.
Time lag is the time between moving the selector Record the
time lag and refer to the time lag
lever from
IN' (NEUTRAL) to ID' (DRIVE) or IN' chart.
(NEUTRAL) to 'R' (REVERSE). With the parking 2. If the time lag is not within specification, refer
brake applied the vehicle must not move if the
to the time lag diagnosis chart.
selector lever is moved from 'N' (NEUTRAL) to
ID'
(DRIVE) or 'N' (NEUTRAL) to 'R' (REVERSE). Time Lag Chart
Drive is engaged when the vehicle starts to rise.
A WARN1NG:Apply the parking brake firmly IN' (NEUTRAL) to ID' while carrying out each test. 1 (DRIVE)
(NEUTRAL) and run the engine at 1000 rpm
for approximately
1 minute to allow the
torque converter to cool.
less than 1.0 seconds
CAUTI0N:After testing each of the
following ranges
'D' (DRIVE) and 'R'
Range
I Lower than specification in IN' (NEUTRAL) to 'Dl I Pressure control solenoid inoperative.
Ti me
(REVERSE), move the selector lever to 'N'
'N' (NEUTRAL) to 'R'
(REVERSE)
Time Lag Diagnosis Chart
(DRIVE) less
than 1.2 seconds
Test Results
Pressure regulator valve sticking.
Forward clutch failure (slipping).
Possible Source
I Timing solenoid failure.
I I Drive hydraulic circuit failure. I
2006.0 Fiesta IZIZOO~ G371498en
procarmanuals.com
Page 1015 of 1226
Automatic Transmission/Transaxle -
Vehicles With: 4-Speed Automatic
307101 -55 Transmission (AW81-40) 307-01 -55
IN-VEHICLE REPAIR
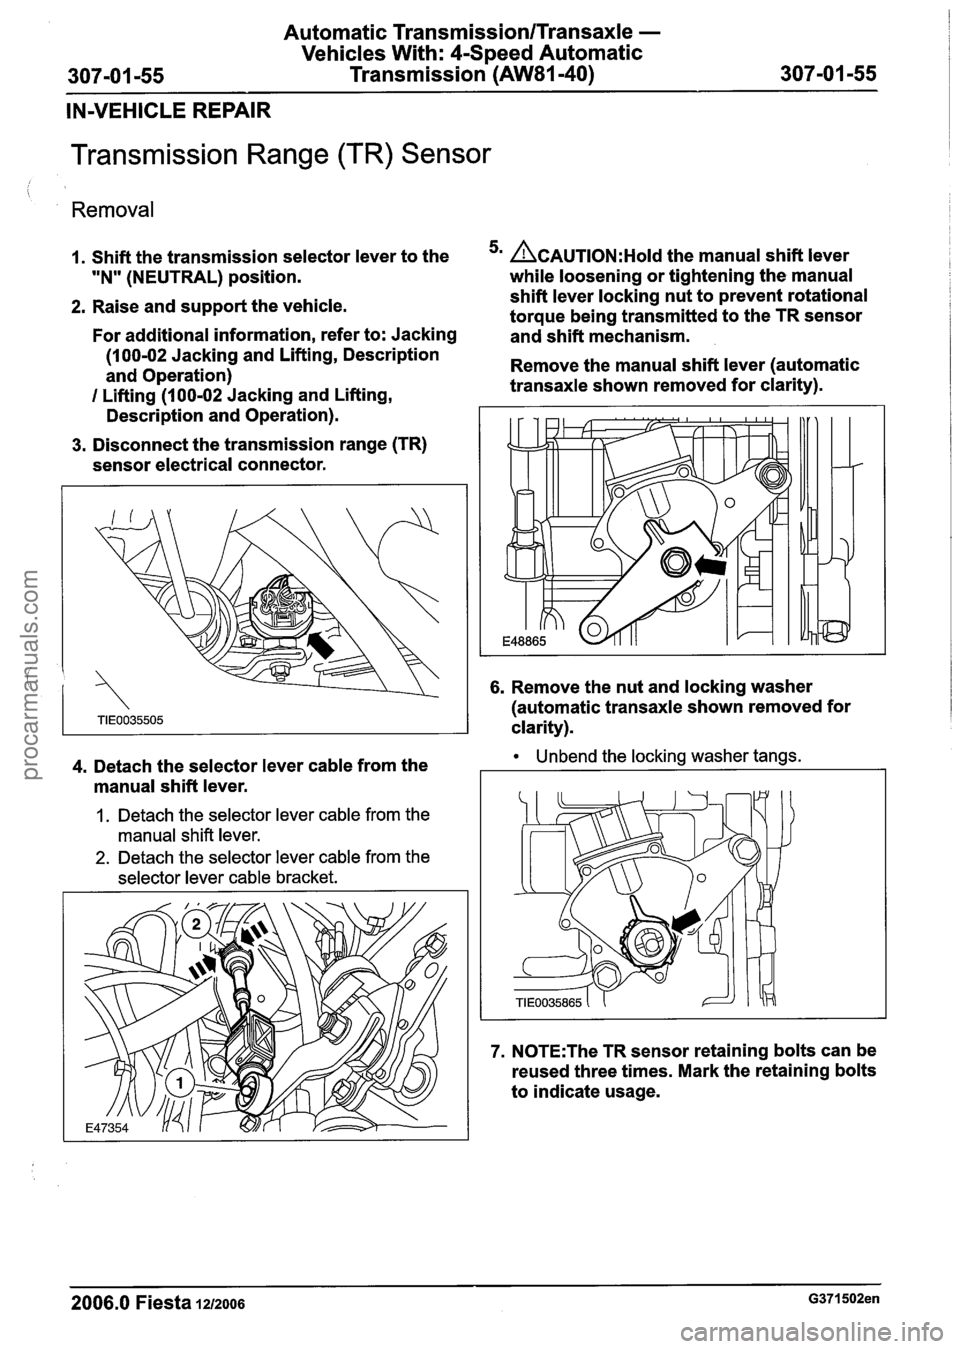
Transmission Range (TR) Sensor
Removal
1. Shift the transmission selector lever to the ACAUTION:H~I~ the manual shift lever
"N" (NEUTRAL) position. while loosening
or tightening the manual - -
2. Raise and support the vehicle. shift
lever locking nut to prevent rotational
torque being transmitted to the TR sensor
For additional information, refer to: Jacking
and shift mechanism.
(1
00-02 Jacking and Lifting, Description
and Operation) Remove
the manual shift lever (automatic
I Lifting (1 00-02 Jacking and Lifting, transaxle
shown removed for clarity).
Description and Operation).
3. Disconnect the transmission range (TR)
sensor electrical connector.
6. Remove the nut and locking washer
(automatic transaxle shown removed for
clarity).
4. Detach the selector lever cable from the Unbend the locking washer tangs.
manual shift lever.
1. Detach the selector lever cable from the
manual shift lever.
2. Detach the selector lever cable from the
selector lever cable bracket.
7. N0TE:The TR sensor retaining bolts can be
reused three times. Mark the retaining bolts
to indicate usage.
2006.0 Fiesta 1212006 G371502en
procarmanuals.com
Page 1016 of 1226
Automatic Transmission/Transaxle -
Vehicles With: 4Speed Automatic
307-01 -56 Transmission (AW81-40) 307-01 -56
IN-VEHICLE REPAIR
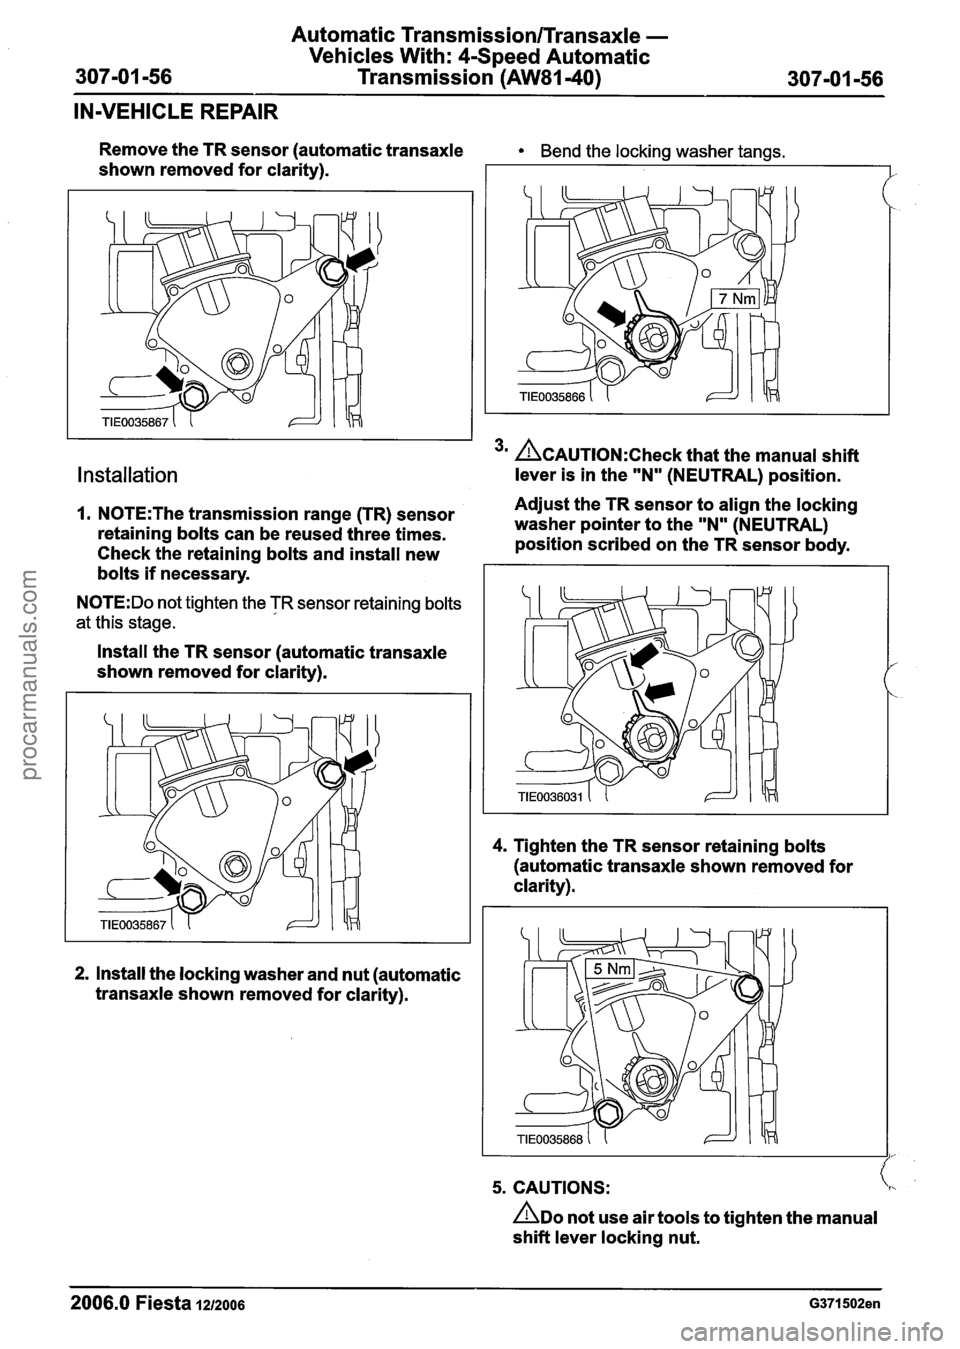
Remove the TR sensor (automatic transaxle Bend the locking washer tangs.
shown removed for clarity).
Installation
3m &LCAUTION:C~~~~ that the manual shift
lever is in the "N" (NEUTRAL) position.
1. N0TE:The transmission range (TR) sensor Adjust
the TR sensor to align the locking
retaining bolts can be reused three times. washer
pointer to the "N" (NEUTRAL)
Check the retaining bolts and install new position scribed on the
TR sensor body.
bolts
if necessary.
N0TE:Do not tighten the TR sensor retaining bolts
at this stage.
Install the TR sensor (automatic transaxle
shown removed for clarity).
4. Tighten the TR sensor retaining bolts
(automatic transaxle shown removed for
clarity).
2. Install the locking washer and nut (automatic
transaxle shown removed for clarity).
I
5. CAUTIONS:
ADO not use air tools to tighten the manual
shift lever locking nut.
--
2006.0 Fiesta 1212006 G371502en
procarmanuals.com
Page 1017 of 1226
Automatic Transmission/Transaxle -
Vehicles With: 4-Speed Automatic
307-01 -57 Transmission (AW81-40) 307-01 -57
IN-VEHICLE REPAIR
A~old the manual shift lever while 8. Lower the vehicle.
' tightening the manual shift lever locking nut 9. Check the selector lever cable adjustment to prevent rotational torque being by
moving the transmission selector lever
transmitted to the
TR sensor and shift through
all gear ranges.
mechanism.
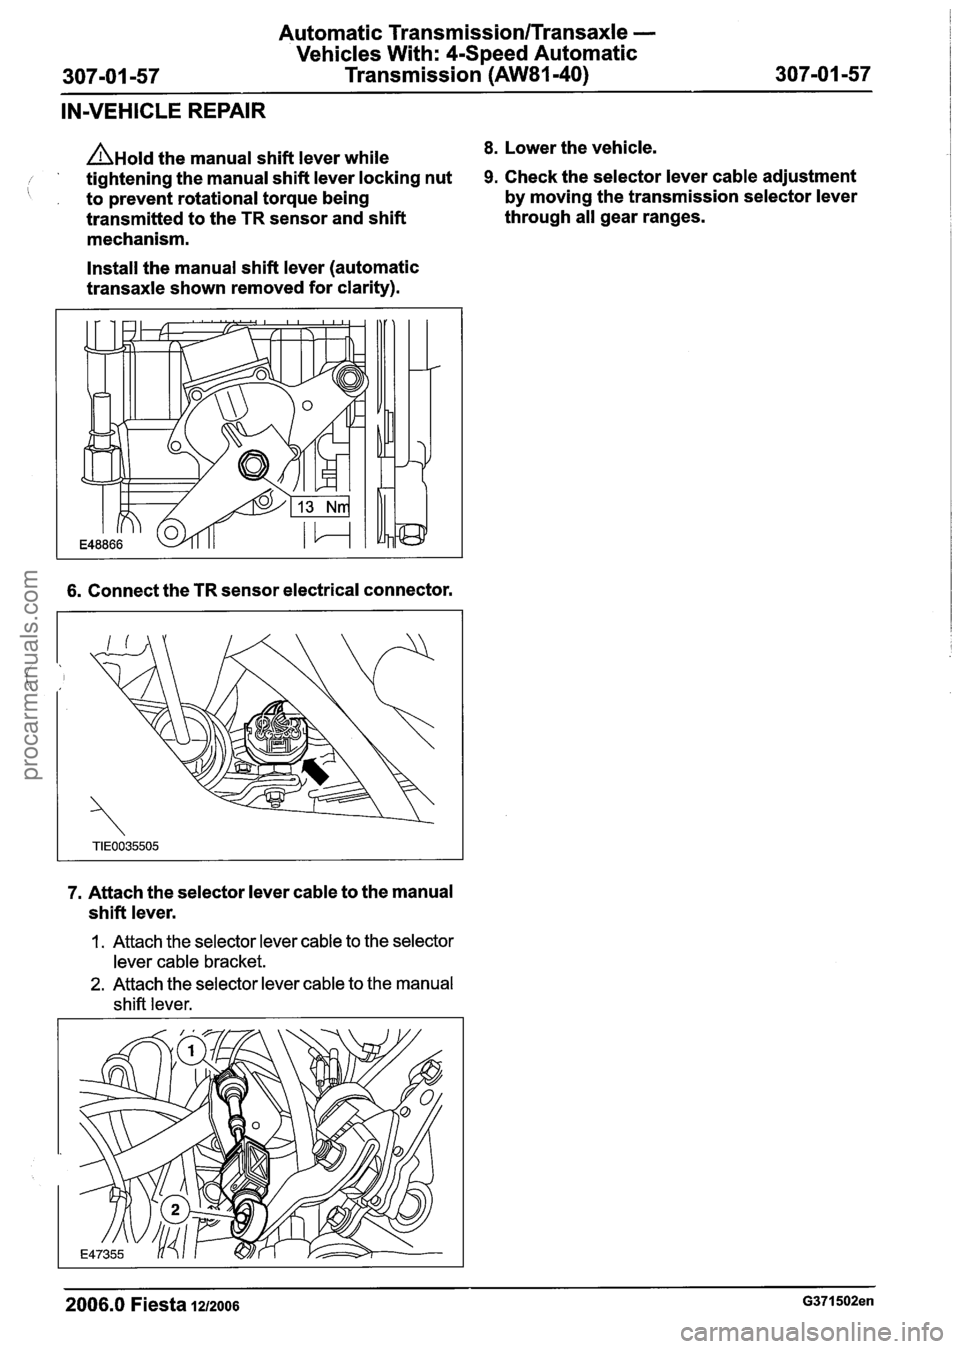
Install the manual shift lever (automatic
transaxle shown removed for clarity).
6. Connect the TR sensor electrical connector.
7. Attach the selector lever cable to the manual
shift lever.
1. Attach the selector lever cable to the selector
lever cable bracket.
2. Attach the selector lever cable to the manual
shift lever.
2006.0 Fiesta 1212006 G371502en
procarmanuals.com
Page 1026 of 1226
Automatic Transmission/Transaxle -
Vehicles With: 4-Speed Automatic
307-01 -66 Transmission (AW81-40) 307-01 -66
REMOVAL AND INSTALLATION
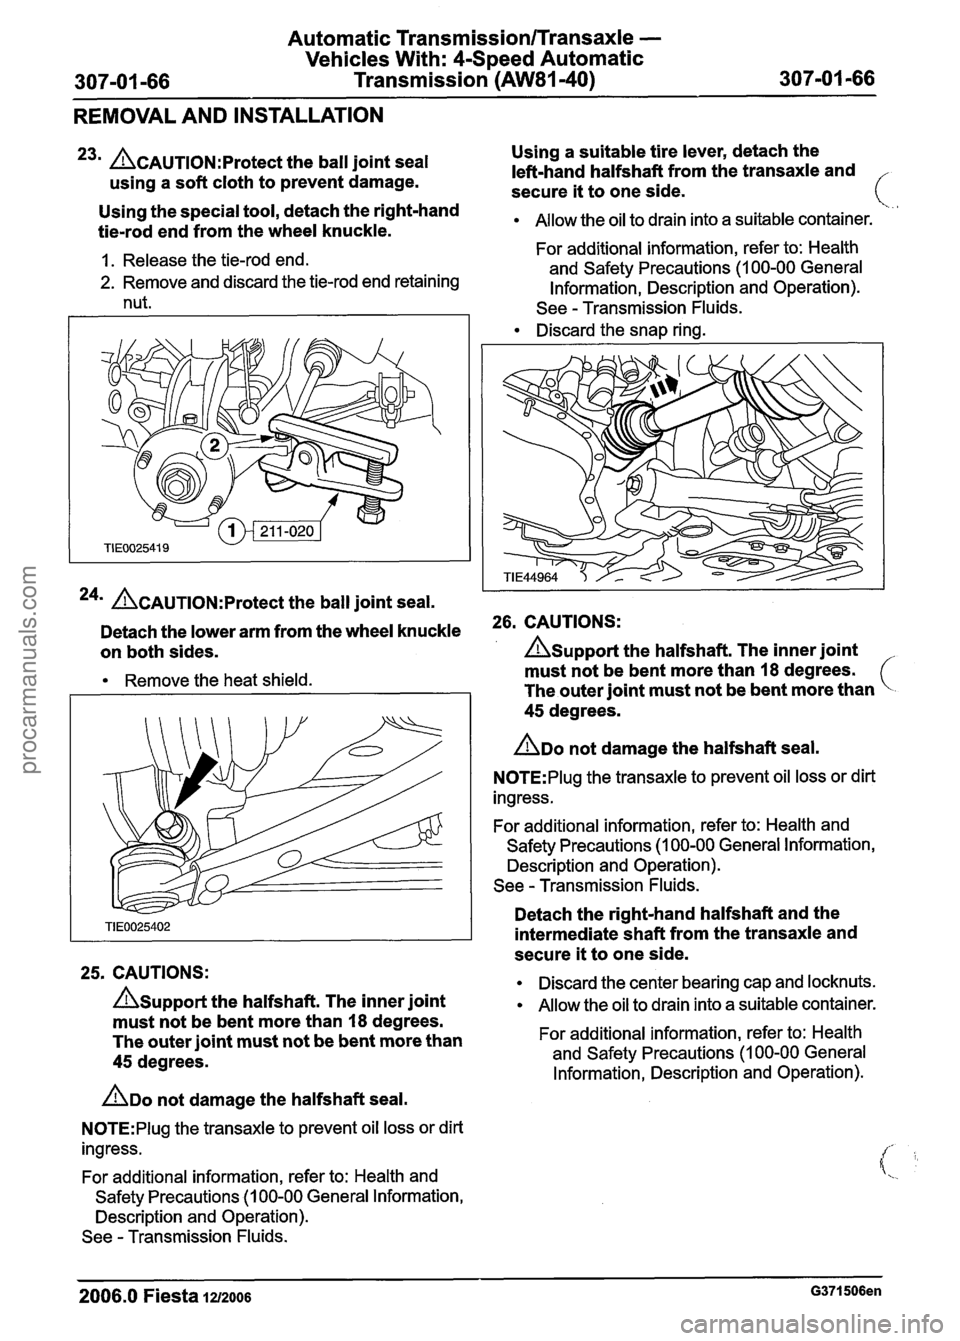
23m ACAUTION:P~~~~~~ the ball joint seal
using a soft cloth to prevent damage. Using
a suitable tire lever, detach the
left-hand halfshaft from the transaxle and
secure
it to one side.
Using the special tool, detach the right-hand
tie-rod end from the wheel knuckle.
Allow the oil to drain into a suitable container. --- --.
For additional information, refer to: Health
1. Release the tie-rod end.
and Safety Precautions
(1 00-00 General 2. Remove and discard the tie-rod end retaining
Information, Description and Operation).
nut. See
- Transmission Fluids.
Discard the snap ring.
24* &AUTION:P~~~~~~ the ball joint seal.
I I
Detach the lower arm from the wheel knuckle 26. CAUTIONS:
on both sides.
A~upport the halfshaft. The inner joint
Remove the heat shield. must
not be bent more than 18 degrees.
The outer joint must not be bent more than
45 degrees.
ADO not damage the halfshaft seal.
N0TE:Plug the transaxle to prevent oil loss or dirt
ingress.
For additional information, refer to: Health and
Safety Precautions (1 00-00 General Information,
Description and Operation).
See
- Transmission Fluids.
25. CAUTIONS:
A~upport the halfshaft. The inner joint
must not be bent more than 18 degrees.
The outer joint must not be bent more than
45 degrees.
ADO not damage the halfshaft seal.
N0TE:PIug the transaxle to prevent oil loss or dirt
ingress.
For additional information, refer to: Health and
Safety Precautions
(1 00-00 General Information,
Description and Operation).
See
- Transmission Fluids. Detach
the right-hand halfshaft and the
intermediate shaft from the transaxle and
secure
it to one side.
Discard the center bearing cap and locknuts.
Allow the oil to drain into a suitable container.
For additional information, refer to: Health
and Safety Precautions (1 00-00 General
Information, Description and Operation).
2006.0 Fiesta 1212006 G371506en
procarmanuals.com
Page 1029 of 1226
Automatic Transmission/Transaxle -
Vehicles With: 4-Speed Automatic
REMOVAL AND INSTALLATION
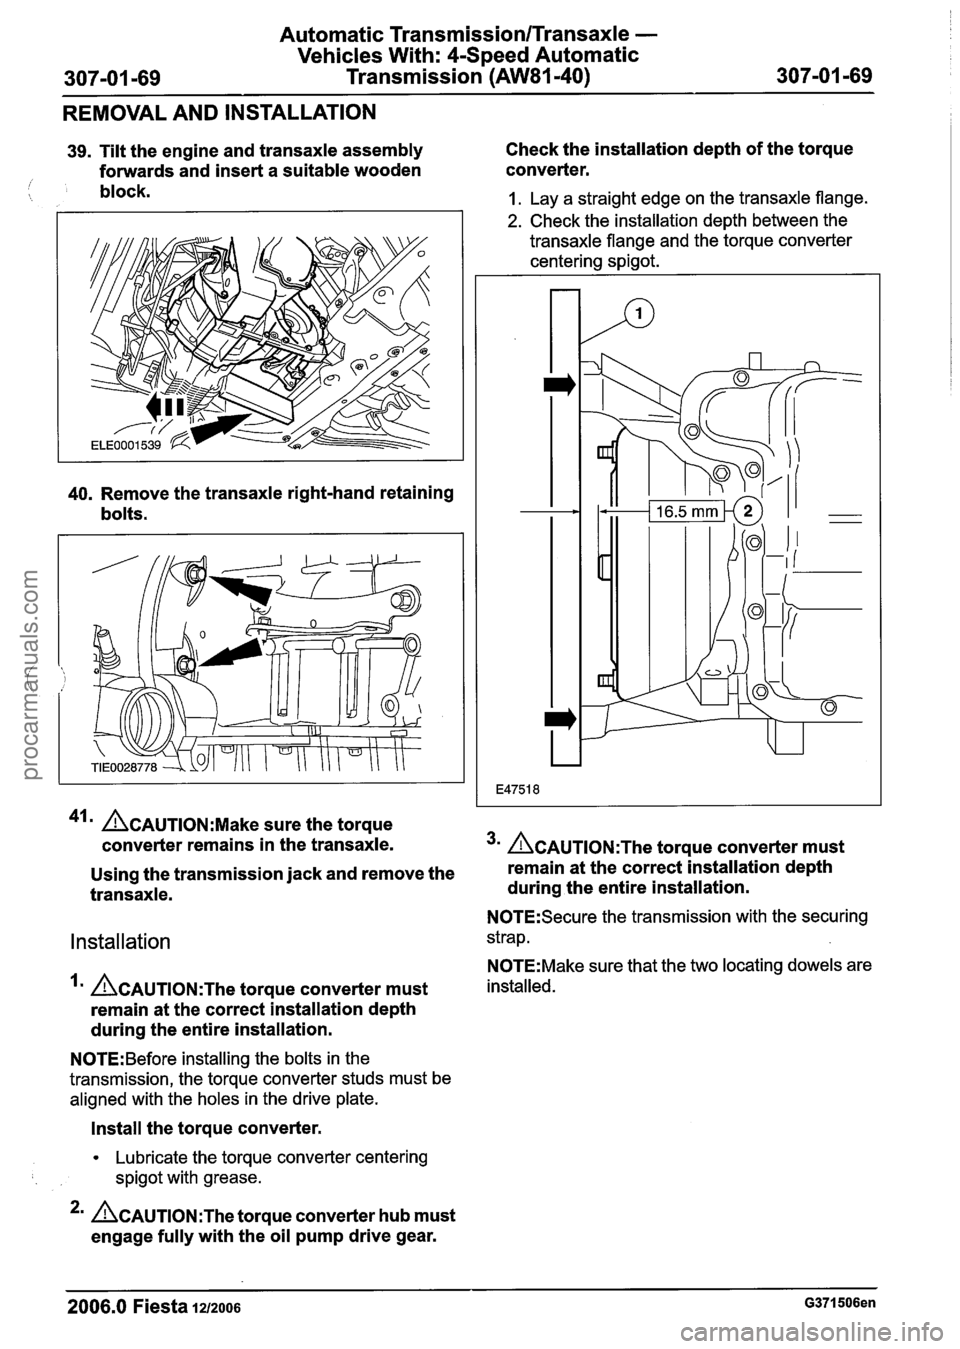
39. Tilt the engine and transaxle assembly Check
the installation depth of the torque
forwards and insert a suitable wooden converter.
/ block. 1. Lay
a straight edge on the transaxle flange.
2. Check the installation depth between the
transaxle flange and the torque converter
centering spigot.
40. Remove the transaxle right-hand retaining
bolts.
41m ~CAUTION:M~~~ sure the torque
converter remains in the transaxle.
3m ~CAUTION:T~~ torque converter must
Using the transmission jack and remove the remain
at the correct installation depth
transaxle. during the entire installation.
N0TE:Secure the transmission with the securing
Installation strap.
N0TE:Make sure that the two locating dowels are
ACAUTION:T~~ torque converter must installed.
remain at the correct installation depth
during the entire installation.
N0TE:Before installing the bolts in the
transmission, the torque converter studs must be
aligned with the holes in the drive plate.
Install the torque converter.
Lubricate the torque converter centering
spigot with grease.
*' ACAUTION:T~~ torque converter hub must
engage fully with the oil pump drive gear.
2006.0 Fiesta 1212006 G371506en
procarmanuals.com