Page 329 of 446

6. Turn on the low-beam headlamps and place a
piece of cardboard or equivalent in front of the
headlamp not being adjusted. Do not place
directly on the headlamp. This allows only the
beam of light from the headlamp being
adjusted to be seen on the �at surface.
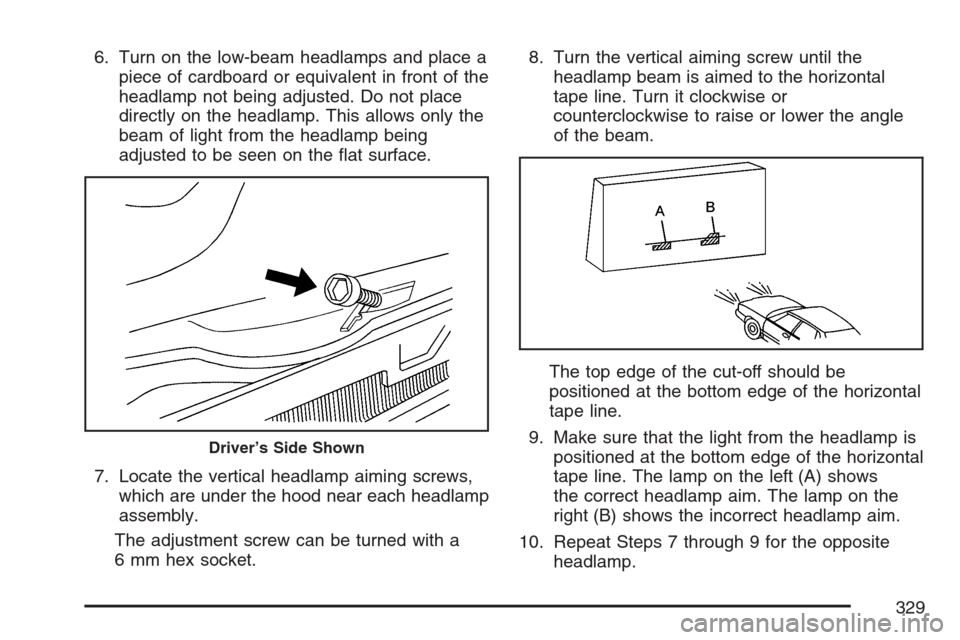
7. Locate the vertical headlamp aiming screws,
which are under the hood near each headlamp
assembly.
The adjustment screw can be turned with a
6 mm hex socket.8. Turn the vertical aiming screw until the
headlamp beam is aimed to the horizontal
tape line. Turn it clockwise or
counterclockwise to raise or lower the angle
of the beam.
The top edge of the cut-off should be
positioned at the bottom edge of the horizontal
tape line.
9. Make sure that the light from the headlamp is
positioned at the bottom edge of the horizontal
tape line. The lamp on the left (A) shows
the correct headlamp aim. The lamp on the
right (B) shows the incorrect headlamp aim.
10. Repeat Steps 7 through 9 for the opposite
headlamp.
Driver’s Side Shown
329
Page 330 of 446
Bulb Replacement
For the proper type of replacement bulbs, see
Replacement Bulbs on page 334.
For any bulb changing procedure not listed in this
section, contact your dealer.
Halogen Bulbs
{CAUTION:
Halogen bulbs have pressurized gas
inside and can burst if you drop or
scratch the bulb. You or others could be
injured. Be sure to read and follow the
instructions on the bulb package.
Headlamps, Front Turn Signal, and
Parking Lamps
A. Headlamp
B. Turn Signal/Parking Lamp
330
Page 331 of 446
To replace the headlamp, turn signal, or parking
lamp bulb, do the following:
1. Turn the wheel to access the wheel well.
2. Remove the fasteners to access the headlamp
and the turn signal/parking lamp bulbs.
3. Reach in behind the wheel well liner and
locate the bulb you need to change.
4. Turn the bulb socket counterclockwise to
remove.5. Pull the old bulb out of the socket.
6. Install a new bulb.
7. Reverse Steps 1 through 4 to reinstall.
Center High-Mounted Stoplamp
(CHMSL)
To replace the center high-mounted stoplamp
bulb, do the following:
1. Open the liftgate. SeeLiftgate on page 106
for more information.
2. Remove the center trim located near the top
of the liftgate.
331
Page 334 of 446
License Plate Lamp
To replace one of these bulbs, do the following:
1. Remove the two screws holding each of
the license plate lamps to the fascia.
2. Turn and pull the license plate lamp forward
through the fascia opening.3. Turn the bulb socket counterclockwise and
pull the bulb straight out of the socket.
4. Install the new bulb.
5. Reverse Steps 1 through 3 to reinstall the
license plate lamp.
Replacement Bulbs
Exterior Lamp Bulb Number
Back-up Lamp and CHMSL 921
Front Turn Signal and
Parking Lamp 3157KX
Headlamp High/Low-Beam H13
Stoplamp/Taillamp/Turn Signal 3057KX
For replacement bulbs not listed here, contact
your dealer.
334
Page 352 of 446

Wheel Replacement
Replace any wheel that is bent, cracked, or badly
rusted or corroded. If wheel nuts keep coming
loose, the wheel, wheel bolts, and wheel
nuts should be replaced. If the wheel leaks air,
replace it (except some aluminum wheels,
which can sometimes be repaired). See your
dealer if any of these conditions exist.
Your dealer will know the kind of wheel you need.
Each new wheel should have the same
load-carrying capacity, diameter, width, offset and
be mounted the same way as the one it
replaces.
If you need to replace any of your wheels, wheel
bolts, or wheel nuts, replace them only with
new GM original equipment parts. This way, you
will be sure to have the right wheel, wheel
bolts, and wheel nuts for your vehicle.{CAUTION:
Using the wrong replacement wheels,
wheel bolts, or wheel nuts on your vehicle
can be dangerous. It could affect the
braking and handling of your vehicle,
make your tires lose air and make you
lose control. You could have a collision in
which you or others could be injured.
Always use the correct wheel, wheel bolts,
and wheel nuts for replacement.
Notice:The wrong wheel can also cause
problems with bearing life, brake cooling,
speedometer or odometer calibration,
headlamp aim, bumper height, vehicle ground
clearance, and tire or tire chain clearance
to the body and chassis.
SeeChanging a Flat Tire on page 355for more
information.
352
Page 380 of 446

Electrical System
Add-On Electrical Equipment
Notice:Do not add anything electrical to your
vehicle unless you check with your dealer
�rst. Some electrical equipment can damage
your vehicle and the damage would not
be covered by your warranty. Some add-on
electrical equipment can keep other
components from working as they should.
Add-on equipment can drain your vehicle’s battery,
even if your vehicle is not operating.
Your vehicle has an airbag system. Before
attempting to add anything electrical to your
vehicle, seeServicing Your Airbag-Equipped
Vehicle on page 88.
Headlamp Wiring
The headlamp wiring is protected by fuses. Should
your headlamps fail to function, have your
headlamp system checked right away.
Windshield Wiper Fuses
The windshield wiper motor is protected by a
circuit breaker and a fuse. If the motor overheats
due to heavy snow or ice, the wiper will stop
until the motor cools. If the overload is caused by
some electrical problem, have it �xed.
Power Windows and Other Power
Options
Fuses in the fuse block protect the power windows.
When the current load is too heavy, the fuse opens
protecting the circuit until the problem is �xed.
380
Page 385 of 446
Fuses Usage
58 Windshield Wiper Diode
59 Windshield Wiper
60 Horn
61 Anti-lock Brake System (Option)
62 Instrument Panel, Ignition
63 Driver’s Side High-Beam
64 Canister Vent
65 Driver’s Side Low-Beam
66 Passenger’s Side Low-Beam
67 Passenger’s Side High-Beam
69 Parking Lamps
Relays Usage
14 Rear Defogger Relay
15 Air Conditioning Clutch
16 Empty
17 Rear Wiper
18 Liftgate Release
Relays Usage
19 Fuel Pump
24 Empty
26 Powertrain
28 Daytime Running Lamps
34 Starting System
35 Empty
38 Empty
39 Windshield Washer Pump
48 Rear Windshield Washer
50 Cooling Fan
51 Run, Crank
52 Windshield Wiper
54 Fog Lamps (Option)
55 Horn
68 Parking Lamps
70 Windshield Wipers
71 Headlamp Low-Beam
72 Headlamp High-Beam
An OnStar®mini-fuse is located near the battery
in the rear of the vehicle.
385
Page 434 of 446

Audio System(s) (cont.)
Fixed Mast Antenna................................. 236
Radio with CD................................210, 215
Setting the Time..............................207, 208
Theft-Deterrent Feature............................ 233
Understanding Radio Reception............... 234
XM™ Satellite Radio Antenna System...... 236
Automatic Door Lock................................... 105
Automatic Headlamp System....................... 165
Automatic Transaxle
Fluid........................................................ 305
Operation................................................. 122
B
Battery........................................................ 320
Electric Power Management..................... 168
Run-Down Protection............................... 168
Before Leaving on a Long Trip.................... 260
Brake
Anti-Lock Brake System (ABS)................. 243
Emergencies............................................ 245
Parking.................................................... 127
System Warning Light.............................. 185
Brakes........................................................ 317
Braking....................................................... 242
Braking in Emergencies............................... 245Break-In, New Vehicle................................. 115
Bulb Replacement....................................... 330
Center High-Mounted
Stoplamp (CHMSL)............................... 331
Halogen Bulbs......................................... 330
Headlamp Aiming..................................... 327
Headlamps, Front Turn Signal, and
Parking Lamps..................................... 330
License Plate Lamps................................ 334
Replacement Bulbs.................................. 334
Taillamps, Turn Signal, Stoplamps
and Back-up Lamps.............................. 332
Buying New Tires........................................ 347C
Calibration..........................................134, 136
California Fuel............................................. 292
California Proposition 65 Warning................ 290
Canadian Owners........................................... 3
Capacities and Speci�cations...................... 386
Carbon Monoxide......................106, 132, 264,
276, 277
Care of
Safety Belts............................................. 373
Your CD Player........................................ 235
Your CDs ................................................. 235
CD, MP3 ..................................................... 226
434