Page 96 of 173

If the front wheel lifts clear of the
ground under severe accelera-
tion, the ASC reduces engine
torque until the front wheel re-
gains contact with the ground.
Under these circumstances,
BMW Motorrad recommends
rolling the throttle slightly closed
so as to restore stability with the
least possible delay.
When riding on a slippery sur-
face, never snap the throttle
twistgrip fully closed without
pulling the clutch at the same
time. Engine braking torque can
cause the rear wheel to lock, with
a corresponding loss of stability.
The BWM Motorrad ASC is un-
able to control a situation of this
nature.
Tyre pressure
monitoring RDC
OE
FunctionA sensor integrated into each
tyre measures the air temperat-
ure and the air pressure inside
the tyre and transmits this in-
formation to the control unit.
Each sensor has a centrifugal-
force tripswitch that does not
enable transmission of the meas-
ured values until the motorcycle
has accelerated to about 30 km/
h. The display shows
--
for
each tyre until the tyre-pressure
signal is received for the first
time. The sensors continue to
transmit the measured-value sig-
nals for approximately 15 minutes
after the motorcycle comes to a
stop.
The control unit can adminis-
trate four sensors, so two dif-
ferent sets of wheels with RDC
sensors can be alternated on the motorcycle. An error mes-
sage is issued if wheels without
sensors are fitted to a motorcycle
equipped with an RDC control
unit.
Temperature
compensationThe tyre-pressure readings
shown by the multifunction
display are temperature-
compensated; the reference tyre
temperature for these readings
is always 20 °C. The air lines
available to the public in petrol
stations and motorway service
areas almost invariably show
temperature-dependent tyre
pressures, so in most instances
these gauge readings will not
tally with the readings shown by
the multifunction display.
694zEngineering details
Page 108 of 173

General instructionsThe Maintenance chapter de-
scribes straightforward proced-
ures for checking and replacing
certain wear parts.
Special tightening torques are lis-
ted as applicable. The tightening
torques for the threaded fasten-
ers on your motorcycle are listed
in the section entitled "Technical
data".
You will find information on more
extensive maintenance and re-
pair work in the Repair Manual
on DVD/CD-ROM (RepROM) for
your motorcycle, which is avail-
able from your authorised BMW
Motorrad dealer.
Some of the work calls for spe-
cial tools and a thorough know-
ledge of motorcycles. If you
are in doubt consult a specialist
workshop, preferably your author-
ised BMW Motorrad dealer.
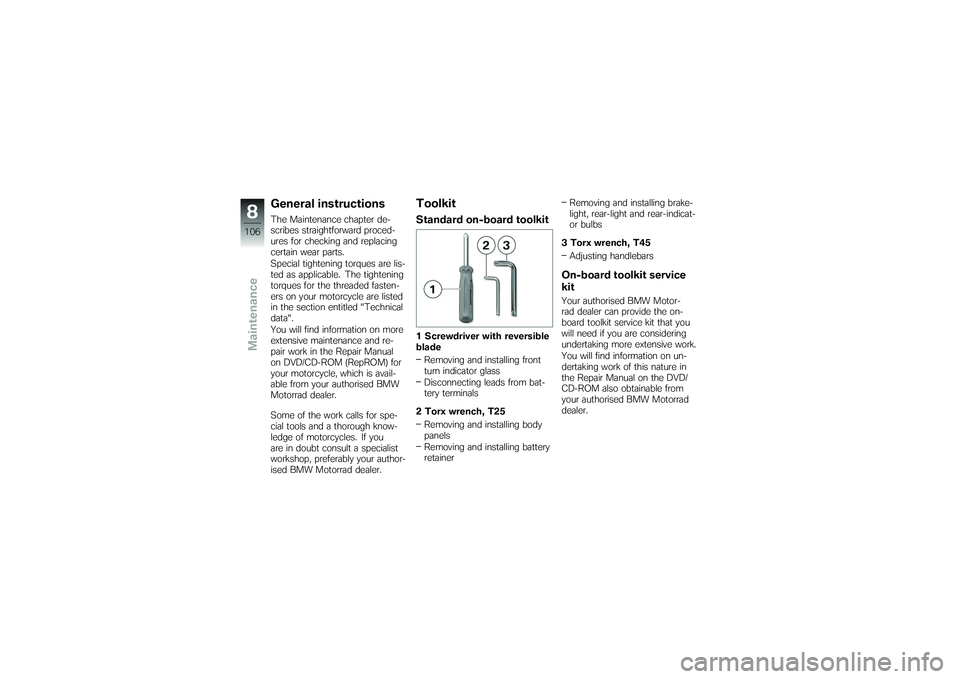
ToolkitStandard on-board toolkit1 Screwdriver with reversible
bladeRemoving and installing front
turn indicator glass
Disconnecting leads from bat-
tery terminals
2 Torx wrench, T25 Removing and installing body
panels
Removing and installing battery
retainer Removing and installing brake-
light, rear-light and rear-indicat-
or bulbs
3 Torx wrench, T45 Adjusting handlebars
On-board toolkit service
kitYour authorised BMW Motor-
rad dealer can provide the on-
board toolkit service kit that you
will need if you are considering
undertaking more extensive work.
You will find information on un-
dertaking work of this nature in
the Repair Manual on the DVD/
CD-ROM also obtainable from
your authorised BMW Motorrad
dealer.
8106zMaintenance
Page 117 of 173
Remove screws1on left and
right.
Pull the front mudguard for-
ward to remove. Once the calipers have
been removed, there is
a risk of the brake pads being
pressed together to the extent
that they cannot be slipped back
over the brake disc on reas-
sembly.
Do not operate the handbrake
lever when the brake calipers
have been removed.
Remove securing screws 2of
the left and right brake calipers. Force the brake pads slightly
apart by rocking brake
calipers
3back and forth A
against brake discs 4.
Mask off the parts of the wheel
rim that could be scratched in
the process of removing the
brake calipers.
Carefully pull the brake calipers
back and out until clear of the
brake discs.
When removing the left brake
caliper, take care not to dam-
age the ABS sensor cable.
When removing the right brake
caliper, take care not to alter
8115zMaintenance
Page 125 of 173

BulbsGeneral instructionsThe failure of a bulb is signalled
in the display by the defect-
ive lamp symbol. The bulbs for
brake light and rear light are the
same; the brightness of the light
is regulated in accordance with
the application.A defective bulb places
your safety at risk because
it is easier for other users to
oversee the motorcycle.
Replace defective bulbs as
soon as possible; always carry a
complete set of spare bulbs if
possible.
The bulb is pressurised and
can cause injury if dam-
aged.
Wear protective goggles and
gloves when changing bulbs. The types of bulb fitted to
your motorcycle are listed
in the section entitled "Technical
data".
Do not touch the glass of
new bulbs with your fingers.
Use a clean, dry cloth to hold
the bulbs when handling them.
Dirt deposits, in particular oil and
grease, interfere with heat radi-
ation from the bulb. This leads
to overheating and shortens the
bulb's operating life.
Replacing low-beam and
high-beam headlight bulb
If it is not standing firmly,
the motorcycle could topple
in the course of the operations
described below.
Always make sure that the
motorcycle is stable and firmly
supported. with OE Xenon lights:
Xenon lights operate with
high voltage; incorrect
working procedures can result in
fatalities.
Have all work on the xenon light
system, including the work in-
volved in replacing bulbs, per-
formed by a specialist work-
shop, preferably by an authorised
BMW Motorrad dealer.
For the time being, ride with
the high-beam headlight
switched on.
In order not to dazzle oncom-
ing traffic, set the headlight
beam throw adjuster to the po-
sition for riding with maximum
payload.
Have the bulb replaced as
soon as possible by a specialist
workshop, preferably an author-
ised BMW Motorrad dealer.
8123zMaintenance
Page 126 of 173
Make sure the ground is level
and firm and place the motor-
cycle on its stand.
Switch off the ignition.
Remove cover1(low-beam
headlight) or covers 2(high-
beam headlight).
Remove the covers of the
high-beam headlight bulbs
by turning them counter-
clockwise. To remove the cover of the
low-beam headlight bulb, push
locking lever
3down, swing the
cover down and remove.
Disconnect plug 4. Disengage spring clip
5from
the latches and swing it up.
The spring clip might face
in a direction other than
that shown here, depending on
the light.
8124zMaintenance
Page 127 of 173
Remove bulb6.
Replace the defective bulb.
Bulb for high-beam
headlight
H7/12V/55W Bulb for low-beam head-
light
H7/12V/55W
with OE Xenon lights: D2R / 35 W
Use a clean, dry cloth to hold
the new bulb. Install bulb
6.
Close and lock spring clips 5. Connect plug
4.
Install cover 1(low-beam head-
light) or covers 2(high-beam
headlight).
8125zMaintenance
Page 128 of 173
Replacing parking-light
bulbs
If it is not standing firmly,
the motorcycle could topple
in the course of the operations
described below.
Always make sure that the
motorcycle is stable and firmly
supported.
Make sure the ground is level
and firm and place the motor-
cycle on its stand.
Switch off the ignition.
Parking light, right: disconnect
plug 1. Parking light, left: disconnect
plug
2.
Remove the bulb socket by
turning lever Acounter-clock-
wise. Remove bulb
3from the bulb
holder.
Replace the defective bulb.
Bulb for parking light
W5W / 12 V / 5 W
Use a clean, dry cloth to hold
the new bulb.
8126zMaintenance
Page 129 of 173
Insert bulb3into the bulb
socket.
Turn the bulb socket clockwise
to install.
Parking light, left: connect
plug 2. Parking light, right: connect
plug
1.
Replacing brake-light,
rear light and rear-
indicator bulbs
If it is not standing firmly,
the motorcycle could topple
in the course of the operations
described below.
Always make sure that the
motorcycle is stable and firmly
supported.
Make sure the ground is level
and firm and place the motor-
cycle on its stand. Switch off the ignition.
Remove screws
1.
Pull the bulb housing to the
rear until it is clear of the hold-
ers.
8127zMaintenance