Page 49 of 231
52
II
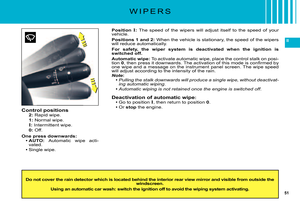
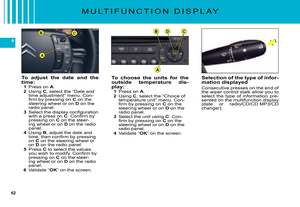
W I P E R S
Screen wash
Pull the screen wipe control stalk towards you.
The screen wash is accompanied by a timed wipe sequence. If the dipped beams are on, it is also accompanied by a timed headlamp wash.
Check that the wipers can operate freely in freezing temperatures.
Remove any accumulation of snow at the base of the windsc reen.
Changing the wiper blades
If changing the wiper blades, they must be stopped in the maintenance posi-tion. For this, switch off the ignition and then within one minute move the wiper control stalk. The wipers stand up vertically.
After replacement, switch on the ignition and move the wiper control stalk so that the wipers resume their normal position.
Remark: The maintenance position can also be used in snowy conditio ns to avoid a build up of snow.
Page 50 of 231
53
II
A
Anti-pinch
An anti-pinch device stops the window from rising. If it meets an obstacle, it goes back down.
If there is a malfunction, sequen-tial operation is deactivated. When raise the window again, press the control each time the window stops until you reach the desired posi-tion. You must then re-initialise the function for each electric window:Lower the window fully using the control, then close. It will rise only a few centimetres. Press repeatedly on the control until the window is fully closed.
Keep the control pressed down for at least 1 second having closed the window.
Page 51 of 231
54
II
A
S T E E R I N G C O L U M N A D J U S T M E N T –
S E A T B E L T H E I G H T A D J U S T M E N T
Adjustment of height and reach of steering wheel
With the vehicle at rest, unlock the steering wheel by pushing con-trol A forwards.
Adjust the height and the reach of the steering wheel, then lock the position by pulling the lever upwards.
As a matter of safety, the adjustments in your driving position must be made only while the vehicle is stationary.
First adjust your seat to the most suitable position, then a djust the position of the steering wheel. See “Driving position”.
Seat belt height adjustment
The correct positioning of the belt strap is through the middle of the shoulder. See “Seat belts”.
To adjust the seat belt for height, compress the control and slide it in the desired direction.
Page 52 of 231

55
II
A
5
43
2
1
6
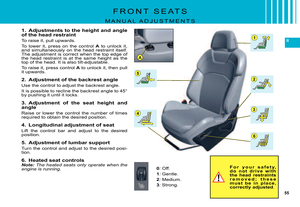
F R O N T S E A T S
M A N U A L A D J U S T M E N T S
1. Adjustments to the height and angle of the head restraint
To raise it, pull upwards.
To lower it, press on the control A to unlock it, and simultaneously on the head restraint itself. The adjustment is correct when the top edge of the head restraint is at the same height as the top of the head. It is also tilt-adjustable.
To raise it, press control A to unlock it, then pull it upwards.
2. Adjustment of the backrest angle
Use the control to adjust the backrest angle.
It is possible to recline the backrest angle to 45° by pushing it until it locks.
3. Adjustment of the seat height and angle
Raise or lower the control the number of times required to obtain the desired position.
4. Longitudinal adjustment of seat
Lift the control bar and adjust to the desired position.
5. Adjustment of lumbar support
Turn the control and adjust to the desired posi-tion.
6. Heated seat controlsNote: The heated seats only operate when the engine is running.0: Off.
1: Gentle.
2: Medium.
3: Strong.
F o r y o u r s a f e t y, d o n o t d r i v e w i t h the head restraints r e m o v e d ; t h e s e m u s t b e i n p l a c e , correctly adjusted.
Page 53 of 231

56
II
2
1
34
a
b
c
d
F R O N T S E A T S
E L E C T R I C A L A D J U S T M E N T S
To adjust the electrical seats, switch on the ignition or start the engine if the vehicle has gone into economy mode.
1. Adjustment of the seat height and angle, and longitudinal adjustmenta Raise or lower the front of the control in order to raise or lower the front of the seat.b Raise or lower the rear of the control in order to raise or lower the rear of the seat.c Simultaneously raise or lower the front and rear of the control in order to raise or lower the entire seat.d Slide the control forwards or backwards to move the seat forwards or backwards.
2. Adjustment of the backrest angle
Move the control forwards or backwards to adjust the back-rest angle.
3. Adjustment of the angle of the top of the back-rest
Move the control forwards or backwards to adjust the angle of the top of the backrest.
4. Adjustment of lumbar support
This function allows you to independently adjust the height and level of lumbar support.
Move the control:Forwards or backwards to increase or reduce the lumbar support.
Upwards or downwards to raise or lower the lumbar support zone.Note: Seat adjustments are also possible for a short period after open ing one of the front doors or switching off the ignition.
Page 54 of 231

57
II
C
B
D
A
F R O N T S E A T S
E L E C T R I C A L A D J U S T M E N T S
The Welcome function
When the driver's door is opened and the ignition is off, the seat moves to ease accessing or leav-ing the vehicle.
You may activate or deactivate this function using the “Main Menu” on the instrument panel screen. To do so, select “Vehicle parameters / Comfort / Driver welcome”.
Head restraint height and angle adjustments on elec-tric seats
To adjust the angle of the head restraint, push back or pull forward section C of the head restraint until you reach the desired position.
To raise it, pull upwards.
To lower it, press on the control Dto unlock it, and simultaneously on the head restraint itself.
To raise it, press control D to unlock it, then pull it upwards.
0: Off.
1: Gentle.
2: Medium.
3: Strong.
Controls for the heated seats
The front seats can be heated indi-vidually. With the engine running, use control A, located beside the seats to choose between three heating levels:
Massage function
This function provides the driver with a back massage.
To activate the massage, with the engine runnuing, press on but-ton B. The warning lamp comes on and the massage function is acti-vated for a period of 1 hour. During this time, massage is performed in cycles of 6 minutes (4 minutes of massage followed by 2 minutes break). In total, the system will per-form 10 cycles.
After 1 hour, the function is deacti-vated. The warning lamp goes out.
You can deactivate the massage function at any time by pressing on button B.
Page 55 of 231
59
II
1
2
R E A R V I E W M I R R O R S
Functioning of the interior and exterior rear view mir-rors
Press on button 1.Warning lamp 2 on: automatic mode.
Warning lamp 2 off: automatic mode stopped. The mirror r e m a i n s i n i t s l i g h t e s t d e fi n i t i o n .Note: In order to ensure optimal visibility when manoeuvring, the interior and exterior rear view mir-rors lighten when reverse gear is engaged.
Page 56 of 231

60
II
1
2
R E A R V I E W M I R R O R S
Fold-back of door mirrors
When the vehicle is parked, the door mirrors can be folded back either manually or electrically.
Electric fold-back
From the central position, one press towards the rear on control 1folds the rear view mirrors back.
To return them to the initial position, press again on control 1 towards the rear.
Automatic fold-back on lock-ing
Automatic fold-back operates when you lock the doors.
The opposite movement will take place on unlocking, unless fold-back has been requested using control 1 before switching off the ignition.Note: Automatic fold-back of the rear view mirrors can be deac-tivated. Contact a CITROËN dealer.
In reverse gear: adjustment of the indexed positions for the passenger’s and driver’s rear view mirrors
With the engine running:1. Select the (driver's or passen-ger's) rear view mirror using control 1.2. Engage reverse gear, the mir-ror glass automatically posi-tions itself to improve your vision of the pavement.3. Adjust the mirror to your prefer-ence using control 2.
These adjustments are automati-cally memorised.
The rear view mirrors resume their original position:20 seconds after reverse gear is disengaged.
Once the vehicle reaches a speed of over 10 km/h (6 mph).
Deactivation of the driver's and passenger's indexed rear view mirrors function
To deactivate the function, move control 1 to the central position.Note: this action cancels the indexing of the rear view mirrors if in progress.