Page 17 of 44
PARTS CONTROL
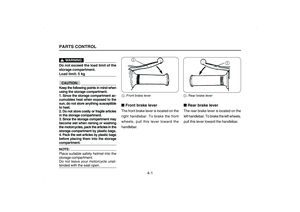
1 Front brake lever4-1
2 Rear brake lever4-1
Page 18 of 44

1. Front brake lever
WARNING
Do not exceed the load limit of the
storage compartment.Load limit: 5 kgCAUTION:
Keep the following points in mind when
using the storage compartment.
1. Since the storage compartment ac-
cumulates heat when exposed to the
sun, do not store anything susceptible
to heat.
2. Do not store costly or fragile articles
in the storage compartment.
3. Since the storage compartment may
become wet when raining or washing
the motorcycles, pack the articles in the
storage compartment by plastic bags.
4. Pack the wet articles by plastic bags
before placing them into the storagecompartment.NOTE: Place suitable safety helmet into the
storage compartment.
Do not leave your motorcycle unat-tended with the seat open.
1. Rear brake lever
■ ■■ ■
■Front brake leverThe front brake lever is located on the
right handlebar. To brake the front
wheels, pull this lever toward the
handlebar.
■ ■■ ■
■Rear brake leverThe rear brake lever is located on the
left handlebar. To brake the left wheels,
pull this lever toward the handlebar.
PARTS CONTROL
4-1
1
1
Page 19 of 44
RUNNING AND OPERATION
1 Start the engine5-1
2 Shut-down the engine and park the motorcycle5-2
3 Engine exhaust5-3
Page 20 of 44

NOTE: If the engine fails to start, release the
start switch, wait for a few seconds,
then try again. Do not crank the en-
gine for more than 5 seconds on any
single attempt preserve battery charge.
If the engine cannot be started by start-
ing motor, try tramping on the kick-
starter.
If the engine still fails to start after the
start switch has be pressed for 4-5
times, turn the throttle grip for 1/8-1/4
of a circle and then press the startswitch again.
■ ■■ ■
■Start the engineNOTE: ·Check the engine before starting.·Check the fuel level.·The motorcycle should be supported
by center-stand.·The side-stand should be in horizon-
tal position.·Operate on the left side of themotorcycle.
ON
1.Turn the key of main switch to posi-
tion ON.
2.Release the throttle grip, press the
start switch to start the engine while
holding the front or rear brake lever.RUNNING AND OPERATION
3.Before starting off, allow the engine
to warm up for 1-3 minutes, which will
maximize the engine's service life.
Never accelerate the motorcycle rap-
idly when the engine is still cold,
otherwise, the accelerating ability will
be reduced.
5-1
1/8
1/4
Page 21 of 44

WARNING
1.Never start the engine in a closed
environment. The exhaust fumes are
poisonous which may cause loss of
consciousness and death within a
short time. Operate the motorcycle
always with adequate ventilation.
2.Make sure that the side-stand has
been back to its original position be-
fore riding; otherwise, serious acci-
dent may occur when turning.
3.After warming the engine, hold the
fixed bracket by right hand and push
the motorcycle off the center-stand.
4.Sit astride the seat and adjust the
rear view mirrors.
5.Check the oncoming traffic; switch
on the turn signal before starting off.
RUNNING AND OPERATION
6.Turn the throttle grip on the right
handlebar slowly to take off, switchoff the turn signal.■ ■■ ■
■Shut-down the engine and
park the motorcycleWhen stopping, turn the main switch
to position OFF.
WARNING
Since the exhaust pipe of muffle
may become extremely hot, you
should park the motorcycle in a
place where pedestrians or children
are unlikely to come in contact with
the vehicle. Do not park on a slope
or soft ground, otherwise the mo-torcycle may overturn.
5-2
Page 22 of 44

OPERATION AND IMPORTANT RIDING POINTS■ ■■ ■
■Engine exhaustWe take the environmental protection
into consideration maturely, our mo-
torcycles are equipped with AIS sys-
tem and agent catalyzing device in the
exhaust pipe, and can meet the re-
quirement of Europe II emission
standard.
Massive incomplete combusted gas
mixture will re-combust when flowing
into the hot agent catalyzing device,
thus causes exhaust pipe overheat-
ing and shortens the service life of
catalyzing device. To prevent this kind
of situation and other damages,
please read the following list carefully.
CAUTION:
. Only use unleaded fuels (#93 un-
leaded petrol). The leaded petrol will
cause the catalyzing device be-
come contaminated and rendered
useless.. When riding, do not turn off the
main switch. Otherwise, it will pro-
duce massive incomplete com-
busted gases.. If the ignition or fuel system is
out of condition, the agent cata-
lyzing device will overheat.. Be careful when the motorcycle
rides for a period of time, the out-
side of exhaust pipe will be very hot.. Do not splash or overfill the fuel
to the exhaust pipe when re-fueling.
It may burn when the petrol drippedto hot exhaust pipe.
5-3
WARNING
Do not ride or park your motorcycle
over inflammable material (like
mow or something else) to avoidfire hazard.
Page 23 of 44
PRE-OPERATION CHECKS
1 Pre-operation checks6-1
2 Brake lever free travel6-2
3 Brake fluid6-2
4 Engine oil level6-2
5 Petrol level6-3
6 Throttle grip6-3
7 Tyre6-3
8 Lights and signal light6-3
9 Switches6-3
Page 24 of 44

Before riding the motorcycle, you should check the following items:PRE-OPERATION CHECKS■ ■■ ■
■Pre-operation checksNOTE:
Carry out the pre-operation checks every time you ride the motorcycle. It takes only a little of time to inspect the items
listed above, but the value of consequent safety is much more than the time cost.
If you find any of the items listed above is not qualified or can not run well, clean up hazards before riding. Seek
help from your YAMAHA agency if necessary.
Front brake (disk brake)
(drum brake)
Rear brake
Throttle grip
Engine oil
Tires and tyre casing
The steel wires
Brake lever pivot
Center/side stand shaft
Tightness
Fuel tank
Lights and signal lights
ItemDescription
Action, free gap, brake fluid level and leakage, refuel if necessary
Action, free gap, adjust if necessary
Action, free gap, adjust if necessary
Operation, lubricate and adjust if necessary
Oil level, refuel if necessary
Tyre pressure, wear and deflection
Action, lubricate if necessary
Action, lubricate if necessary
Check the tightness of the bolts and nuts which connect the parts, tighten if necessary
Oil level, refuel if necessary
Action, repair if necessary
WARNING
6-1
Action, lubricate if necessary