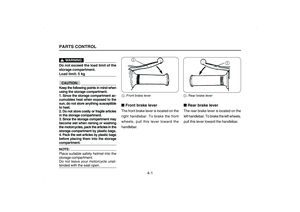
Page 33 of 44
Make sure that no foreign material
falls into gear box when refueling
or discharging gear oil. Prevent the
gear oil from adhering to the tyre.
4.Reinstall the refuel plug and check
the leakage of gear oil.
3.Reinstall the air filter cover and tight
the screws to prevent the un-filtered
air flowing into the engine.
MAINTENANCE
■ ■■ ■
■Gear oil1.Park the vehicle on a flat place, re-
move refuel plug and drain bolt to dis-
charge the gear oil.
2.Tight the drain bolt to 2.3kgm.
3.Refuel gear oil.Total capacity of gear oilWhile exchanging
Gear oil type150cc
130cc
YAHAMA special gear oil
YAHAMA special four-stroke engine oil
■ ■■ ■
■Air filter1.Loose the screws and remove the air
filter cover.
2.Take out the filter element, clean or
replace if necessary.
WARNING
7-5
refuel plug
drain bolt
Page 34 of 44
■ ■■ ■
■Adjust mixing ratio1.Open the rubber cover which locates
under seat. 1. Remove the crankcase cover.
2. Take out the filter to clean.
■ ■■ ■
■Crankcase filterMAINTENANCE
WARNING
Use the specified solvent to clean
the parts, never use petrol or sol-
vent with low flash point which willcause fire or explosion.CAUTION:
Do not twist the filter element toavoid of damages.
3. Apply suitable engine oil (SAE 10W-
30) to the filter element after drying.
4.Install the filter element, crankcase
cover and kick-starter back.CAUTION:
To avoid fast wearing of the parts
in belt chamber, you should main-
tain the filter element in the belt
chamber as per time and mileagelisted in the Consumer Manual.2.Adjust the screw.
NOTE:
The mixing ratio pre-set should beoperated by local agency.
7-6
mixing ratio
adjustment
screw
Page 35 of 44

CAUTION:
Before the motorcycle leaving factory,
we have already set the carburetor to
the standard position. Change the set-
ting at random will affect the engine
performance and increase the dis-charge of exhaust gas.■ ■■ ■
■Adjust throttle gripNOTE: Adjust idle speed before adjusting thefree gap of throttle grip.
1.Loose the fixing nut.
2.Turn the adjustor till the clearance
meets specification.
3.Fasten the fixing nut and recheck
the clearance whether meets the stan-
dard clearance. idle speed
adjusting
screw
MAINTENANCE
■ ■■ ■
■Adjust idle speedNOTE: Warm the engine before adjusting theidle speed.
1.Remove the small lid which locates
under the seat.
2.Turn the idle speed adjusting screw.
Turn clockwiseTurn counter-
clockwise
Idle speed
specificationSpeed up
Speed down
1700rpm 50rpm
Clearance: 0.7mm - 0.8mm
Model: C7ER
Clearance specified: 3 - 5mm
Adjusting direction of throttle grip clearance1. Remove the ignition plug to check
the clearance and model.■ ■■ ■
■Check ignition plug
7-7
vehicle idling adjustment
position3-5mm
Page 36 of 44

1.Hold the brake lever, check whether
the wear indicator 1 reaches wear
margin 2.
2.If the indicator points to the wear
margin, ask your agency to replace the
brake block.
WAR")
Front brake (drum brake)
1.Hold the brake lever, check whether
the wear indicator 1 reaches wear
margin 2.
2.If the indicator points to the wear
margin, ask your agency to replace the
brake block.
WARNING
1.Use the specified brake fluid,
otherwise, the rubber seal ring will
distort and cause leakage, thus ren-
der brake failure.
2.Refuel the same model of brake
fluid. Mix different brake fluid will
cause hazard chemical reaction
and render brake failure.
3.Avoid water going into the main
cylinder when refueling, it will de-
crease the boiling point of the brakeMAINTENANCE■ ■■ ■
■Check front/rear brakeFront brake (dish brake)
Hold the front brake lever, if the wear
indicator of brake block touches the
brake disc, ask your agency to replace
the brake block.
Brake fluid: YAHAMA brake fluid
DOT #3 or DOT #4. fluid and arise air bind.
4.The brake fluid will erode the
varnish surface and plastic
components, clean the fluid imme-
diately if splashed.
5.If you cannot refuel the brake fluid
to the standard level, seek assis-
tance from your agency.Rear brake
1.Hold the brake lever, check whether
the wear indicator reaches wear margin.
1. wear indicator 2. wear margin2.If the indicator points to the wear
margin, ask your agency to replace the
brake block.
7-8
wear indicator
brake disc
1
2
21
Page 37 of 44

MAINTENANCE
■ ■■ ■
■Check front forkThe motorcycle shall be securely
supported when being checked, so
that it would not fall over.1.Visual examination
Check the inner tubes for scratches,
damages or oil leakage.
2.Action examination
Pull the motorcycle to a flat place.
a.Hold the handlebar and keep the
motorcycle upright, grasp the front and
rear brake lever to avoid slipping when
checking.
b.Actuate the handlebar up and right
for several times to check the action
of front fork.
CAUTION:
If you find any damage, oil leakage
or malfunction, ask your agency tocheck it.■ ■■ ■
■Check steering systemWorn or loose steering bearings may
cause danger. Place a stand under the
engine to raise the front wheel off
ground. Hold the lower ends of the
front fork and move them forward and
backward. If any free play can be felt,
ask your agency to check it.
WARNING
Make sure that the motorcycle
stands steadily when checking thesteering system to avoid hazard.Fuse specification: 15A
■ ■■ ■
■Replace fuse1.Remove the cover of accumulator.
2.Remove the negative terminal (-) and
positive terminal (+), then you can
take out the fuse.
3.Replace the blown fuse.CAUTION:
Do not use fuses of a higher amper-
age rating than recommended to
avoid extensive damages to the elec-
trical system, which may result infire.
WARNING
7-9
Page 38 of 44
 and
positive terminal (+), and you can take
off the battery.
3.Clean the connector.
Use steel brush to clean the rust and
dirt on the connector, after coa")
MAINTENANCE2.Remove the negative terminal (-) and
positive terminal (+), and you can take
off the battery.
3.Clean the connector.
Use steel brush to clean the rust and
dirt on the connector, after coating thin
grease to the connector, assemble the
parts reversely.CAUTION:
1.The accumulator equipped is free
of maintenance (do not need to add
water), you have to use the sealed
charger (constant voltage/current
value or constant voltage value)
Electrolyte is poisonous and dan-
gerous and will cause severe burn
injury. It contains strong acid;
avoid any contact with skin, eyes
or clothing. In case of contact, the
procedure is as per following:
External: Flush with water. Internal:
Drink large amount of boiled water
or milk, and drink milk of magnesia,
eggs mixture or vegetable oil, and
promptly consult for medical atten-
tion immediately.
Eyes: Flush with water for 15 min-
utes and seek prompt medical
attention. Batteries may produce
explosive gases. Therefore, keep
fire source (sparks, flames,
cigarettes, etc.) away from batter-
ies and provide sufficient ventila-
tion when charging or using the
battery in an enclosed space. Take
care of your eyes while working
around the battery.
Anyway, keep children away frombattery.
■ ■■ ■
■Accumulator·Disassembly of the accumulator
1.Remove the battery cover.
CAUTION:
1 11 1
1 Never attempt to remove the cov-
ers on the accumulator.
2 22 2
2 If the motorcycle will not be used
for more than 15 days, you should
charge the battery before riding.
3 33 3
3 If the motorcycle is always ser-
viced in low speed and short
distance, and will be started
frequently, you should check the
battery regularly and charge it ifnecessary. specified for the accumulator,
otherwise, it will shorten the service
lift of accumulator.
2.Before using the battery for the
first time, you should charge it for
about 1-2 hours to extend the ser-vice life.
WARNING
7-10
accumulator
connector
Page 39 of 44
TROUBLE SHOOTING
1 Engine cannot start8-1
2 Shut-down suddenly while running8-1
3 Lights failure8-1
Page 40 of 44
?
3.While pressin")
TROUBLE SHOOTING■ ■■ ■
■Engine cannot start1.Whether the main switch locates on
position ON?
2.Is fuel enough? Whether the needle
points within the fuel range (above E
line)?
3.While pressing start switch, do you
hold rear brake lever?
4.While pressing start switch, do you
turn throttle grip? (See references listed
in page 10)
If you have already confirmed the 1-4
procedures, and the motorcycle still
cannot start:
5.Locate the main switch on position
ON, press horn switch, the horn does
not operate means there is possible
fuse failure.
6.If the fuse is good, use kick-starter
to start the engine and seek help from
your agency.
8-1
■ ■■ ■
■Shut-down suddenly while
runningCheck the oil level.
Refuel as soon as possible if the fuel
is not enough.■ ■■ ■
■Lights failureCheck as per following:
1.Whether the main switch locates on
position ON?
2.After starting the engine, check
whether the front headlight and rear
light is on?
3.Can the switches operate well?
4.Press horn switch, does the horn
operate?
The horn operates well means bulb
failure; the horn does not operate
means that there is possible fuse
failure.
The troubles other than listed
above or if you have any
questions, please consult your
agency.