Page 9 of 44
MOTORCYCLE INFORMATION
■ ■■ ■
■Engine models and serial
numberThe model and serial number will be
engraved in the left part of the gear
box.
NOTE: Always remember the engine model
and serial number of your motorcycle,
so that, when ordering parts from our
specified maintenance stations, youwill get your parts sooner.
Engine models and serial number
Name plate
■ ■■ ■
■Identification codeThe identification code will be stamped
in the lower place of the front storage
compartment.
Identification code
The name plate will be stuck to the
right side of frame under the foot board
by rivet.■ ■■ ■
■Name plate
2-1
Page 10 of 44

MOTORCYCLE INFORMATIONS■ ■■ ■
■Engine running-inThe distance between 0 and 1,000 km
is most important to your engine.
Keeping this fact in mind, please read
the following material carefully and
carry out as per instructions.
Since the engine is brand new, vari-
ous parts of the engine will wear and
polish themselves to the proper oper-
ating clearances. At the same time,
overloading the throttle or any other
conditions that might result in engine
overheating must be avoided in 0 -
1,000 km.
1. 0 - 150 km
Avoid prolonged operation above 1/3
throttle. After operating for an hour,
stop the engine and let it cool for five
to ten minutes. Vary the engine speed
from time to time and do no operatethe engine at full throttle.
2. 150 - 500 km
Avoid prolonged operation above 1/2
throttle.
3. 500 - 1,000 km
Avoid prolonged operation above 3/4
throttle.
CAUTION:
After 500 km of operation, replace
the engine oil and gear oil, and clean
the oil filter (bottom part). Replacethe engine oil every 1,500 km.
4. 1,000 km and beyond
Avoid prolonged full-throttle operation.
Vary the engine speed from time to
time.
2-2
Page 11 of 44
PARTS LIST AND OPERATION
1 Parts list3-1
2 Panel3-2
3 Switch operation3-3
4 Handlebar switches3-4
5 Fuel tank cap3-5
6 Front storage compartment3-5
7 Storage compartment3-5
Page 12 of 44
Parts list of ZY125T-3 motorcyclePARTS LIST AND OPERATION
3-1
rearview mirror
storage
compartment
taillight
exhaust piperear wheel
accu-
mulatorfuse
front turn signalfront brake leverfront headlight
front wheeldish brake
handlebar switch
odometerrear brake lever
main switch
rear luggage carrier
rear light/stoplightrear vibration damperair filterkick-startercrankcase filter
front vibration
damper
side-standcenter-standfront stor-
age com-
partment
Page 13 of 44
1 Turn signal indicator light (Green)This indicator light comes on when the
turn signals are being used.2 High beam indicator light (Blue)This indicator light comes on when the
high beam of the headlight is being on.3 Odometer:The meter shows the distance the motor-
cycle ran.4 Fuel gaugeThe fuel gauge indicates the amount of
fuel left in the fuel tank. The needles move
NOTE: Refuel the fuel tank before emptying.
In case that the main switch is "ON",
the needle shows the quantity left;
when the main switch is "OFF", theneedle locates under "E" line.
PARTS LIST AND OPERATION
■ ■■ ■
■Panel
1
from "F" (full) to "E" (empty) as the fuel
level decreases. When the needle
reaches the refuel line (E line), please
refuel as soon as possible.
3-2
23 4
1
Page 14 of 44

1.Turn the switch to
position "ON", the
electric system will
be powered and the
engine can be
started.
2.The key can not be
removed.
1.Turn the switch to
position "OFF",
power off the elec-
tric system and the
engine will be
stopped.
2.The key can be
removed.
ON
OFF
LOCK
1.Power off the
engine, and turn the
key counterclockwise
to position "OPEN",
unlock the seat lock ;2.When the steering
system and the cen-
ter-stand are
locked, turn the key
counterclockwise to
position "OPEN",
unlock the seat lock;
3.The key can not
be removed.
1.Turn on electric door lock
2.Turn off electric door lock
4.
Lock the steering system and center-stand3.Open the rider seat
NOTE:
When you do not operate the
motorcycle, you should turn the key
to position "OFF" or "LOCK", and re-move the key.
1.Turn the handlebar, push the key in-
ward and turn to position LOCK
2.Remove the key(1.)If you do not ride the motorcycle, you can
turn the handlebar to left till the end of
travel, and lock the handlebar as per
following instructions to prevent your
motorcycle from being stolen:NOTE: When you lock the handlebar, you
should lock it when turning, do not push
the key inward to lock the handlebar
by force, it will cause inner core
broken.
When operating motorcycle, you
should not turn the key to positionLOCK.
OPEN
■ ■■ ■
■Switch operation
1.Push the key inward
and turn counterclock-
wise to position "LOCK",
lock the steering system
and center-stand ;2.If the center-stand is
not in position, you
cannot lock it. Once the
center-stand is in
position, it will be
locked automatically.
3.The key can be
removed.
PARTS LIST AND OPERATION
(2.)
3-3
Page 15 of 44
left handlebar
switches
3 Horn switch
Press this switch to sound the horn.
2 Start switch
To start the engine, press this switch
while holding the front or rear brake
lever.
■ ■■ ■
■Handlebar switches■ ■■ ■
■Left handlebar switchesWhen the light switch in the right
handlebar is positioned to
High beam lights
Low beam lights
■ ■■ ■
■Right handlebar switches1 Light switch
Headlight off.
Position light, rear light, in-
strument light on.
Position light, headlight, rear
light, instrument light on.
right handlebar switches
2 Turn signal switch
Turn the switch to right (R/ ) means
turn right, and turn it to left (L/ )
means turn left. When you release the
switch, it will move back to center
position. To cancel the signal, just
push the switch inward when it's in
center position.
PARTS LIST AND OPERATION
1 Dimmer switch
3-4
1
2
31
2
Page 16 of 44
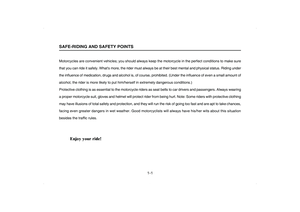
WARNING
Do not exceed the load limit of 3 kgfor the front storage compartment.
■ ■■ ■
■Storage compartmentThe storage compartment locates
under seat, which can hold a full-cov-
ered helmet. When storing helmet,
place it upright, and the front side
should face the motorcycle head
(shown in the drawing above).
PARTS LIST AND OPERATION■ ■■ ■
■Fuel tank capThe fuel tank cap locates under the
rider seat, open the seat and you can
see the cap.
1. If you wish to remove the fuel tank
cap, turn it counterclockwise.
2. If you wish to fasten the fuel tank
cap, table the flange in the cap to the
groove in the fuel tank, and turn
clockwise.
3. Gasoline
Make sure that there is enough fuel in
the tank; fill the tank till the fuel reaches
the bottom of filler tube as per
illustration.
Fuel tank capacity: 5.4L
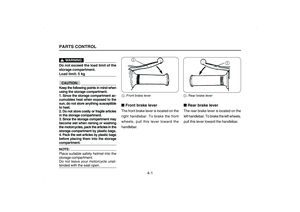
■ ■■ ■
■Front storage compartment
3-5
Fuel tank cap
2
1


This indicator light comes on when the
turn signals are being used.2 High beam indicator light (Blue)This indicator light comes on when the
high beam of the headli")

