Page 1396 of 2000
DS–42DRIVE SHAFT – FRONT DRIVE SHAFT ASSEMBLY (for 4WD)
DS
REMOVAL
(2006/01- )
1. REMOVE FRONT WHEEL
2. DRAIN AUTOMATIC TRANSAXLE FLUID
(a) Drain the automatic transaxle fluid for U140F (see
page AX-147).
(b) Drain the automatic transaxle fluid for U241E (see
page AX-146).
(c) Drain the automatic transaxle fluid for U151F (see
page AX-173).
3. REMOVE FRONT AXLE HUB NUT (See page AH-8)
4. DISCONNECT FRONT SPEED SENSOR LH (See page
BC-191)
5. DISCONNECT FRONT SPEED SENSOR RH
HINT:
Use the same procedures described for the LH side.
6. DISCONNECT FRONT DISC BRAKE CYLINDER
ASSEMBLY LH (See page BR-40)
7. DISCONNECT FRONT DISC BRAKE CYLINDER
ASSEMBLY RH
HINT:
Use the same procedures described for the LH side.
8. DISCONNECT FRONT STABILIZER LINK ASSEMBLY
LH (See page SP-30)
9. DISCONNECT FRONT STABILIZER LINK ASSEMBLY
RH
10. DISCONNECT FRONT SUSPENSION LOWER NO. 1
ARM SUB-ASSEMBLY LH (See page SP-22)
11. DISCONNECT FRONT SUSPENSION LOWER NO. 1
ARM SUB-ASSEMBLY RH
HINT:
Use the same procedures described for the LH side.
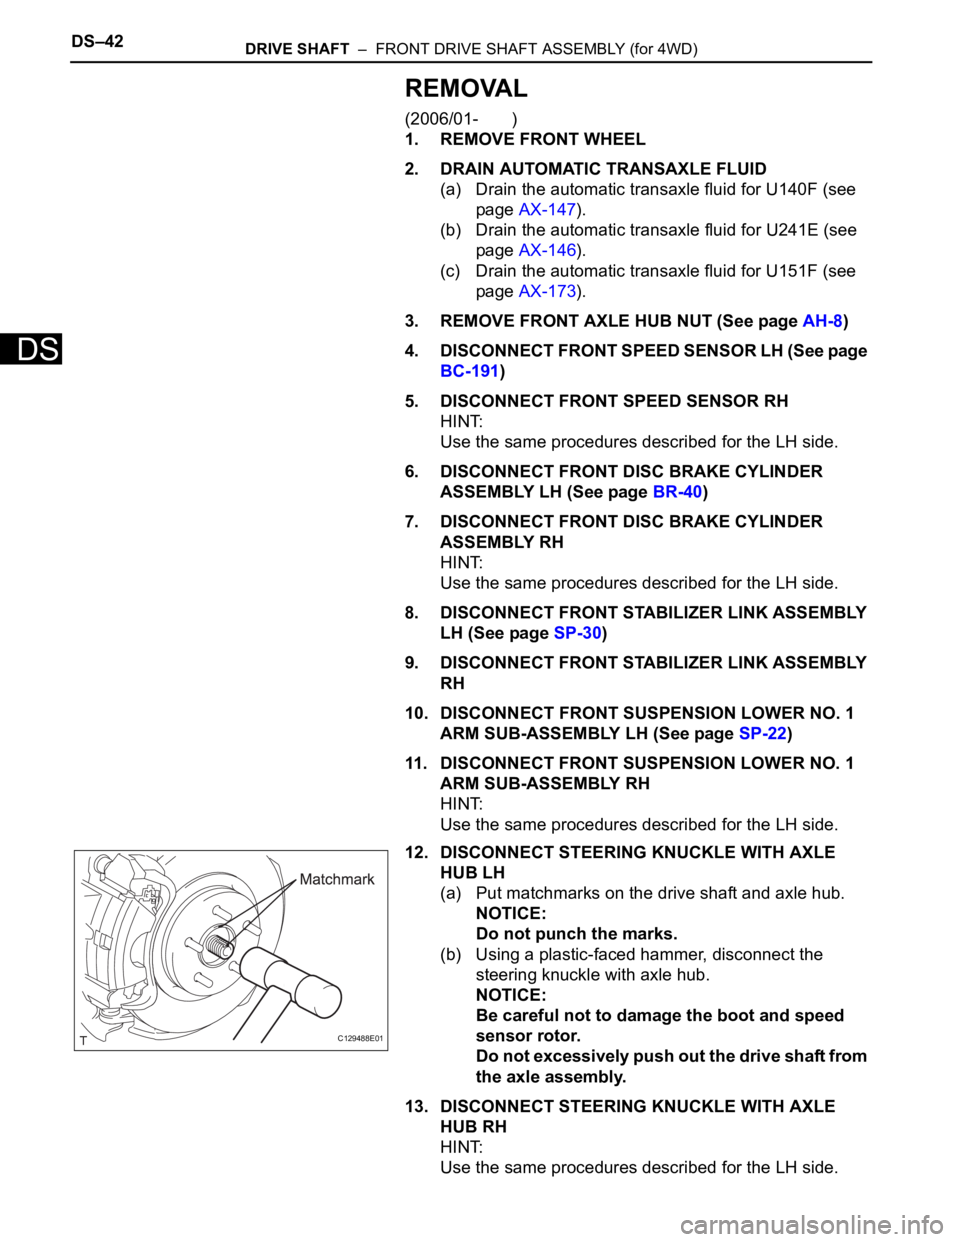
12. DISCONNECT STEERING KNUCKLE WITH AXLE
HUB LH
(a) Put matchmarks on the drive shaft and axle hub.
NOTICE:
Do not punch the marks.
(b) Using a plastic-faced hammer, disconnect the
steering knuckle with axle hub.
NOTICE:
Be careful not to damage the boot and speed
sensor rotor.
Do not excessively push out the drive shaft from
the axle assembly.
13. DISCONNECT STEERING KNUCKLE WITH AXLE
HUB RH
HINT:
Use the same procedures described for the LH side.
C129488E01
Page 1419 of 2000
DRIVE SHAFT – FRONT DRIVE SHAFT ASSEMBLY (for 4WD)DS–65
DS
INSTALLATION
(2005/11-2006/01)
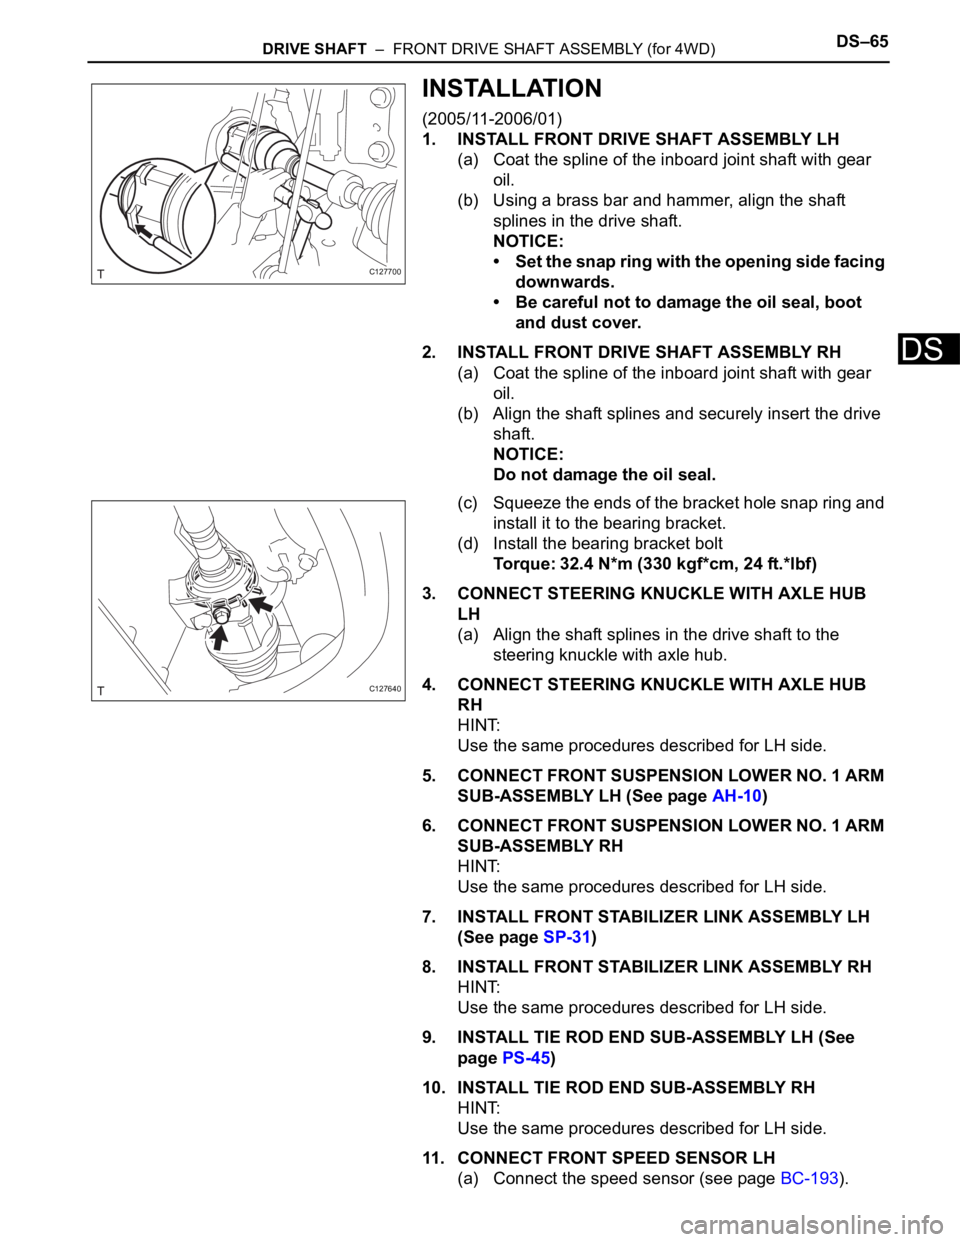
1. INSTALL FRONT DRIVE SHAFT ASSEMBLY LH
(a) Coat the spline of the inboard joint shaft with gear
oil.
(b) Using a brass bar and hammer, align the shaft
splines in the drive shaft.
NOTICE:
• Set the snap ring with the opening side facing
downwards.
• Be careful not to damage the oil seal, boot
and dust cover.
2. INSTALL FRONT DRIVE SHAFT ASSEMBLY RH
(a) Coat the spline of the inboard joint shaft with gear
oil.
(b) Align the shaft splines and securely insert the drive
shaft.
NOTICE:
Do not damage the oil seal.
(c) Squeeze the ends of the bracket hole snap ring and
install it to the bearing bracket.
(d) Install the bearing bracket bolt
Torque: 32.4 N*m (330 kgf*cm, 24 ft.*lbf)
3. CONNECT STEERING KNUCKLE WITH AXLE HUB
LH
(a) Align the shaft splines in the drive shaft to the
steering knuckle with axle hub.
4. CONNECT STEERING KNUCKLE WITH AXLE HUB
RH
HINT:
Use the same procedures described for LH side.
5. CONNECT FRONT SUSPENSION LOWER NO. 1 ARM
SUB-ASSEMBLY LH (See page AH-10)
6. CONNECT FRONT SUSPENSION LOWER NO. 1 ARM
SUB-ASSEMBLY RH
HINT:
Use the same procedures described for LH side.
7. INSTALL FRONT STABILIZER LINK ASSEMBLY LH
(See page SP-31)
8. INSTALL FRONT STABILIZER LINK ASSEMBLY RH
HINT:
Use the same procedures described for LH side.
9. INSTALL TIE ROD END SUB-ASSEMBLY LH (See
page PS-45)
10. INSTALL TIE ROD END SUB-ASSEMBLY RH
HINT:
Use the same procedures described for LH side.
11. CONNECT FRONT SPEED SENSOR LH
(a) Connect the speed sensor (see page BC-193).
C127700
C127640
Page 1421 of 2000
DRIVE SHAFT – FRONT DRIVE SHAFT ASSEMBLY (for 4WD)DS–67
DS
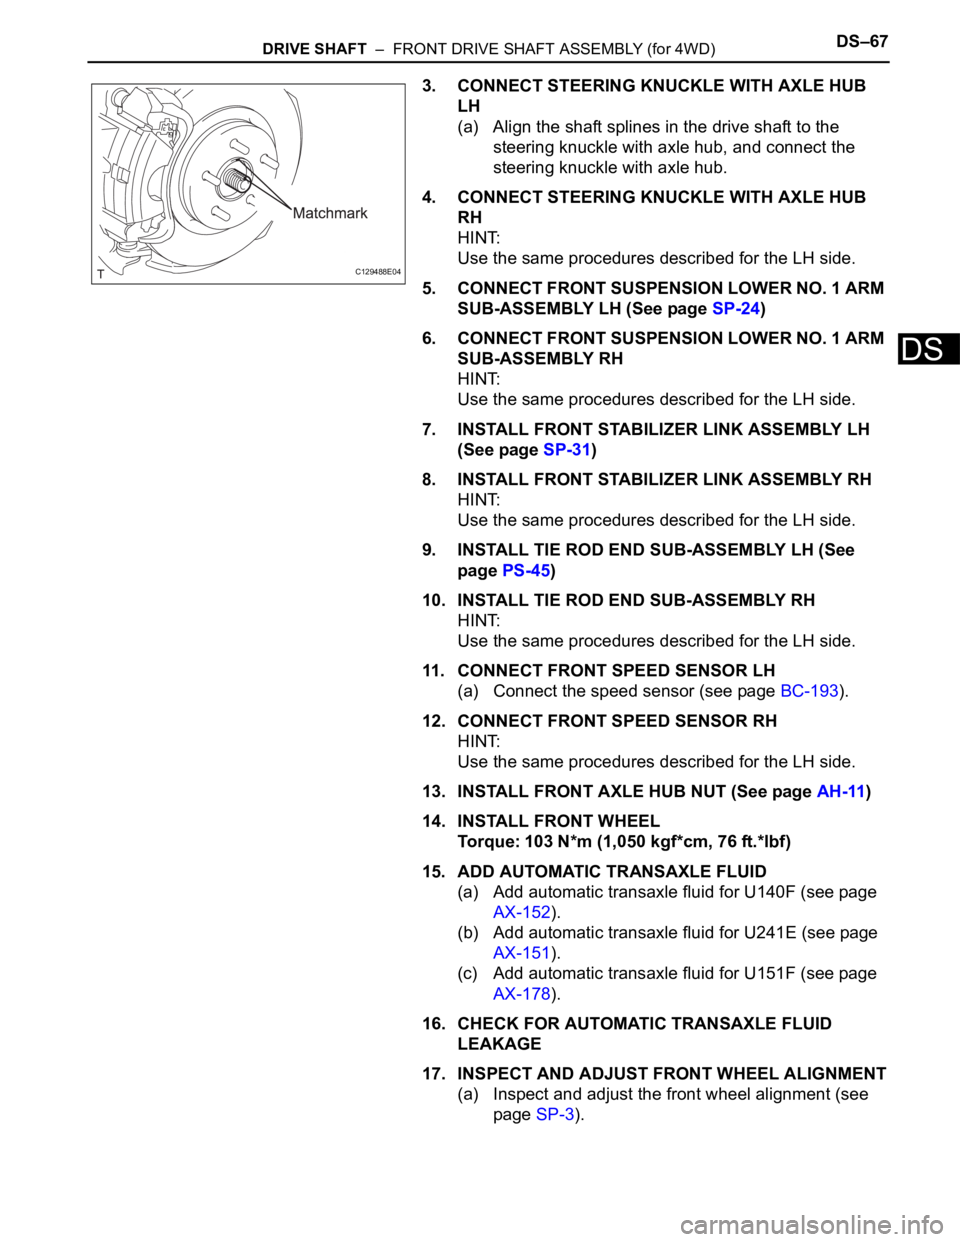
3. CONNECT STEERING KNUCKLE WITH AXLE HUB
LH
(a) Align the shaft splines in the drive shaft to the
steering knuckle with axle hub, and connect the
steering knuckle with axle hub.
4. CONNECT STEERING KNUCKLE WITH AXLE HUB
RH
HINT:
Use the same procedures described for the LH side.
5. CONNECT FRONT SUSPENSION LOWER NO. 1 ARM
SUB-ASSEMBLY LH (See page SP-24)
6. CONNECT FRONT SUSPENSION LOWER NO. 1 ARM
SUB-ASSEMBLY RH
HINT:
Use the same procedures described for the LH side.
7. INSTALL FRONT STABILIZER LINK ASSEMBLY LH
(See page SP-31)
8. INSTALL FRONT STABILIZER LINK ASSEMBLY RH
HINT:
Use the same procedures described for the LH side.
9. INSTALL TIE ROD END SUB-ASSEMBLY LH (See
page PS-45)
10. INSTALL TIE ROD END SUB-ASSEMBLY RH
HINT:
Use the same procedures described for the LH side.
11. CONNECT FRONT SPEED SENSOR LH
(a) Connect the speed sensor (see page BC-193).
12. CONNECT FRONT SPEED SENSOR RH
HINT:
Use the same procedures described for the LH side.
13. INSTALL FRONT AXLE HUB NUT (See page AH-11)
14. INSTALL FRONT WHEEL
Torque: 103 N*m (1,050 kgf*cm, 76 ft.*lbf)
15. ADD AUTOMATIC TRANSAXLE FLUID
(a) Add automatic transaxle fluid for U140F (see page
AX-152).
(b) Add automatic transaxle fluid for U241E (see page
AX-151).
(c) Add automatic transaxle fluid for U151F (see page
AX-178).
16. CHECK FOR AUTOMATIC TRANSAXLE FLUID
LEAKAGE
17. INSPECT AND ADJUST FRONT WHEEL ALIGNMENT
(a) Inspect and adjust the front wheel alignment (see
page SP-3).
C129488E04
Page 1450 of 2000
AXLE – FRONT AXLE HUBAH–9
AH
REMOVAL
(2006/01- )
HINT:
• Use the same procedures for the RH side and LH side.
• The procedures listed below are the LH side.
1. REMOVE FRONT WHEEL
2. DRAIN AUTOMATIC TRANSAXLE FLUID
(a) Drain the automatic transaxle fluid for U140F (see
page AX-147).
(b) Drain the automatic transaxle fluid for U241E (see
page AX-146).
(c) Drain the automatic transaxle fluid for U151E (see
page AX-172).
(d) Drain the automatic transaxle fluid for U151F (see
page AX-173).
3. DISCONNECT CABLE FROM NEGATIVE BATTERY
TERMINAL
CAUTION:
Wait at least 90 seconds after disconnecting the
cable from the negative (-) battery terminal to
prevent airbag and seat belt pretensioner activation.
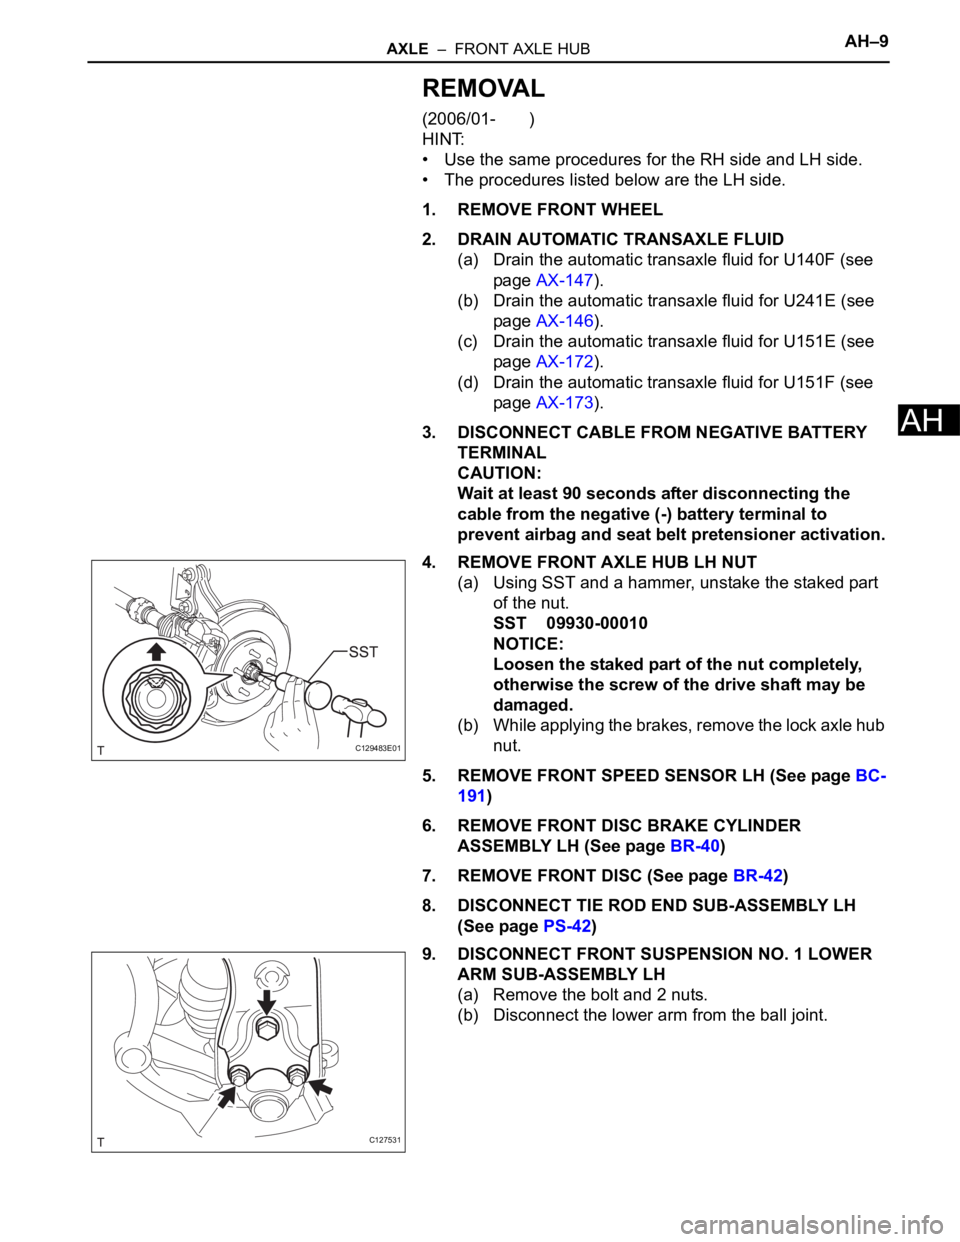
4. REMOVE FRONT AXLE HUB LH NUT
(a) Using SST and a hammer, unstake the staked part
of the nut.
SST 09930-00010
NOTICE:
Loosen the staked part of the nut completely,
otherwise the screw of the drive shaft may be
damaged.
(b) While applying the brakes, remove the lock axle hub
nut.
5. REMOVE FRONT SPEED SENSOR LH (See page BC-
191)
6. REMOVE FRONT DISC BRAKE CYLINDER
ASSEMBLY LH (See page BR-40)
7. REMOVE FRONT DISC (See page BR-42)
8. DISCONNECT TIE ROD END SUB-ASSEMBLY LH
(See page PS-42)
9. DISCONNECT FRONT SUSPENSION NO. 1 LOWER
ARM SUB-ASSEMBLY LH
(a) Remove the bolt and 2 nuts.
(b) Disconnect the lower arm from the ball joint.
C129483E01
C127531
Page 1452 of 2000
AXLE – FRONT AXLE HUBAH–11
AH
INSTALLATION
(2005/11-2006/01)
HINT:
• Use the same procedures for the RH side and LH side.
• The procedures listed below are for the LH side.
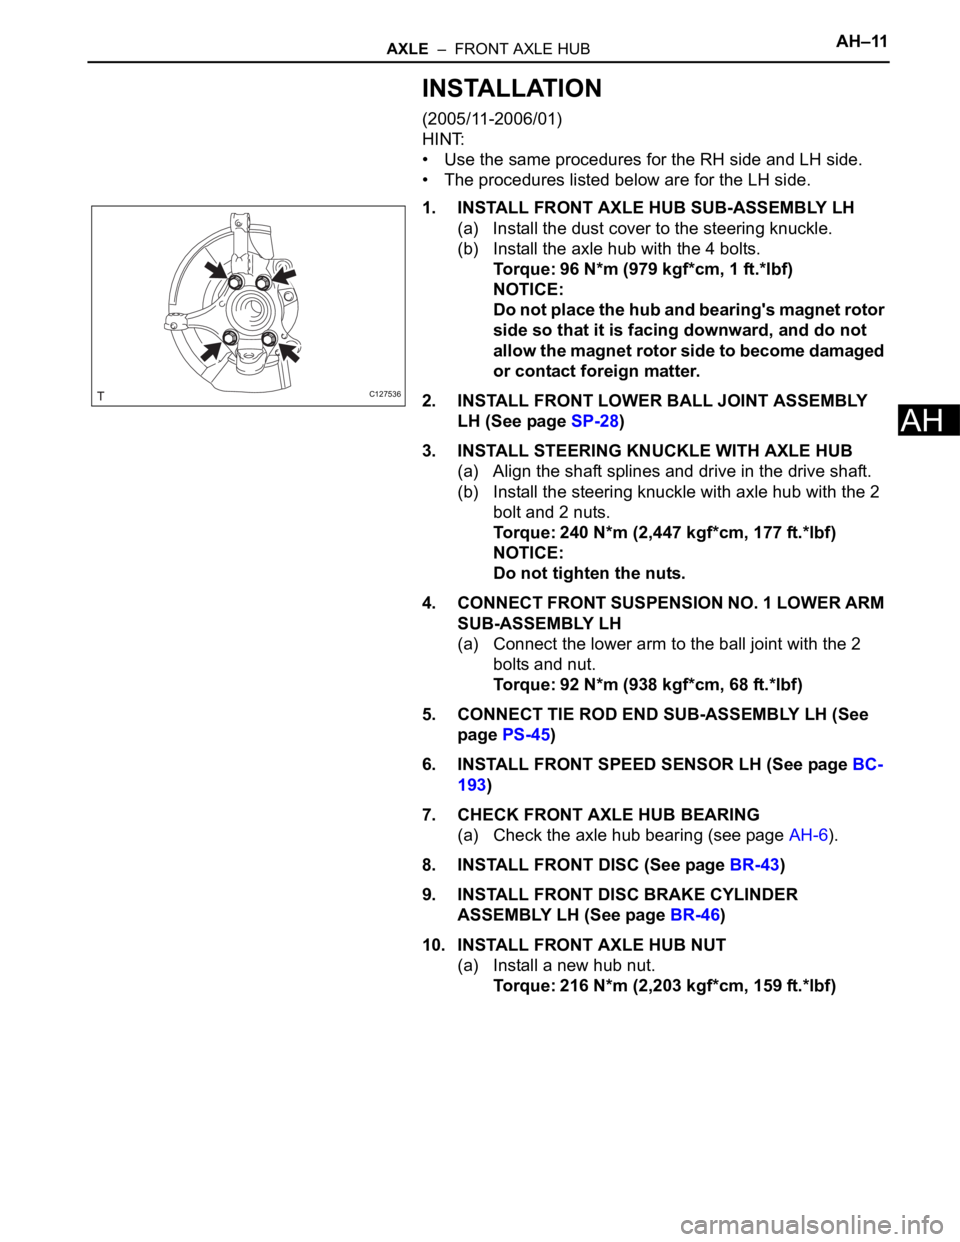
1. INSTALL FRONT AXLE HUB SUB-ASSEMBLY LH
(a) Install the dust cover to the steering knuckle.
(b) Install the axle hub with the 4 bolts.
Torque: 96 N*m (979 kgf*cm, 1 ft.*lbf)
NOTICE:
Do not place the hub and bearing's magnet rotor
side so that it is facing downward, and do not
allow the magnet rotor side to become damaged
or contact foreign matter.
2. INSTALL FRONT LOWER BALL JOINT ASSEMBLY
LH (See page SP-28)
3. INSTALL STEERING KNUCKLE WITH AXLE HUB
(a) Align the shaft splines and drive in the drive shaft.
(b) Install the steering knuckle with axle hub with the 2
bolt and 2 nuts.
Torque: 240 N*m (2,447 kgf*cm, 177 ft.*lbf)
NOTICE:
Do not tighten the nuts.
4. CONNECT FRONT SUSPENSION NO. 1 LOWER ARM
SUB-ASSEMBLY LH
(a) Connect the lower arm to the ball joint with the 2
bolts and nut.
Torque: 92 N*m (938 kgf*cm, 68 ft.*lbf)
5. CONNECT TIE ROD END SUB-ASSEMBLY LH (See
page PS-45)
6. INSTALL FRONT SPEED SENSOR LH (See page BC-
193)
7. CHECK FRONT AXLE HUB BEARING
(a) Check the axle hub bearing (see page AH-6).
8. INSTALL FRONT DISC (See page BR-43)
9. INSTALL FRONT DISC BRAKE CYLINDER
ASSEMBLY LH (See page BR-46)
10. INSTALL FRONT AXLE HUB NUT
(a) Install a new hub nut.
Torque: 216 N*m (2,203 kgf*cm, 159 ft.*lbf)
C127536
Page 1454 of 2000
AXLE – FRONT AXLE HUBAH–13
AH
INSTALLATION
(2006/01- )
HINT:
• Use the same procedures for the RH side and LH side.
• The procedures listed below are the LH side.
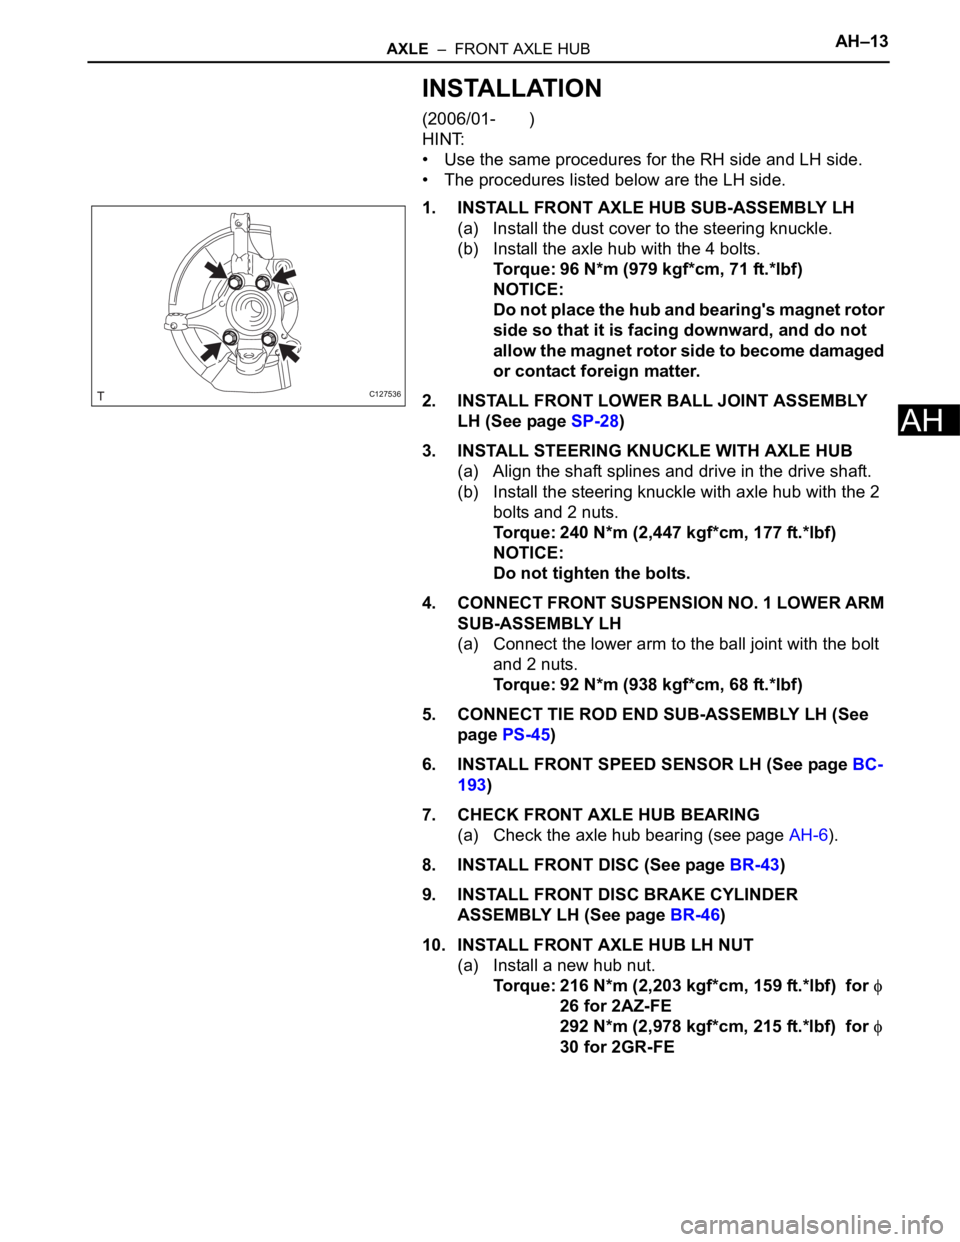
1. INSTALL FRONT AXLE HUB SUB-ASSEMBLY LH
(a) Install the dust cover to the steering knuckle.
(b) Install the axle hub with the 4 bolts.
Torque: 96 N*m (979 kgf*cm, 71 ft.*lbf)
NOTICE:
Do not place the hub and bearing's magnet rotor
side so that it is facing downward, and do not
allow the magnet rotor side to become damaged
or contact foreign matter.
2. INSTALL FRONT LOWER BALL JOINT ASSEMBLY
LH (See page SP-28)
3. INSTALL STEERING KNUCKLE WITH AXLE HUB
(a) Align the shaft splines and drive in the drive shaft.
(b) Install the steering knuckle with axle hub with the 2
bolts and 2 nuts.
Torque: 240 N*m (2,447 kgf*cm, 177 ft.*lbf)
NOTICE:
Do not tighten the bolts.
4. CONNECT FRONT SUSPENSION NO. 1 LOWER ARM
SUB-ASSEMBLY LH
(a) Connect the lower arm to the ball joint with the bolt
and 2 nuts.
Torque: 92 N*m (938 kgf*cm, 68 ft.*lbf)
5. CONNECT TIE ROD END SUB-ASSEMBLY LH (See
page PS-45)
6. INSTALL FRONT SPEED SENSOR LH (See page BC-
193)
7. CHECK FRONT AXLE HUB BEARING
(a) Check the axle hub bearing (see page AH-6).
8. INSTALL FRONT DISC (See page BR-43)
9. INSTALL FRONT DISC BRAKE CYLINDER
ASSEMBLY LH (See page BR-46)
10. INSTALL FRONT AXLE HUB LH NUT
(a) Install a new hub nut.
Torque: 216 N*m (2,203 kgf*cm, 159 ft.*lbf) for
26 for 2AZ-FE
292 N*m (2,978 kgf*cm, 215 ft.*lbf) for
30 for 2GR-FE
C127536
Page 1459 of 2000
AXLE – REAR AXLE HUB AND BEARINGAH–19
AH
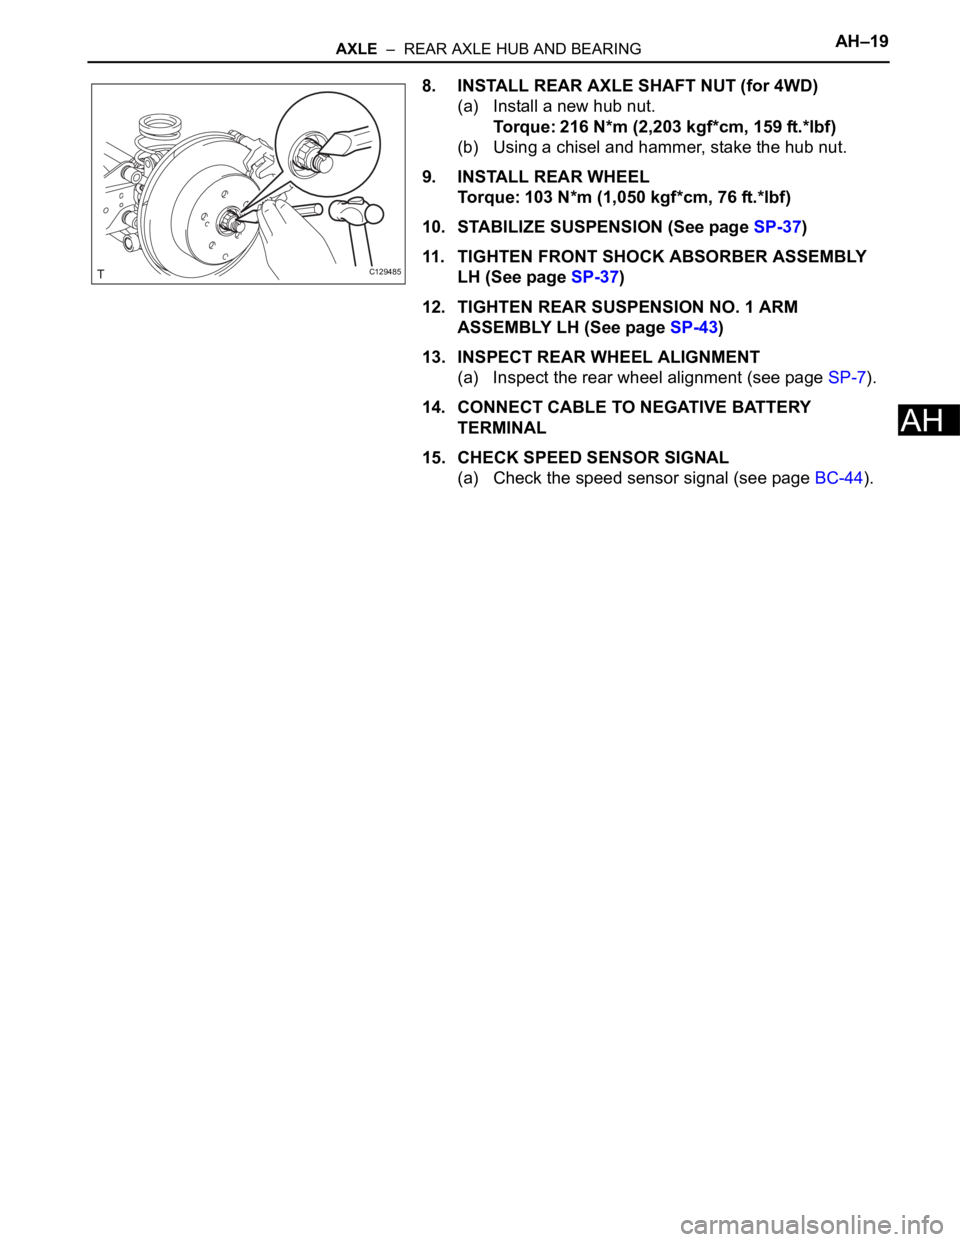
8. INSTALL REAR AXLE SHAFT NUT (for 4WD)
(a) Install a new hub nut.
Torque: 216 N*m (2,203 kgf*cm, 159 ft.*lbf)
(b) Using a chisel and hammer, stake the hub nut.
9. INSTALL REAR WHEEL
Torque: 103 N*m (1,050 kgf*cm, 76 ft.*lbf)
10. STABILIZE SUSPENSION (See page SP-37)
11. TIGHTEN FRONT SHOCK ABSORBER ASSEMBLY
LH (See page SP-37)
12. TIGHTEN REAR SUSPENSION NO. 1 ARM
ASSEMBLY LH (See page SP-43)
13. INSPECT REAR WHEEL ALIGNMENT
(a) Inspect the rear wheel alignment (see page SP-7).
14. CONNECT CABLE TO NEGATIVE BATTERY
TERMINAL
15. CHECK SPEED SENSOR SIGNAL
(a) Check the speed sensor signal (see page BC-44).
C129485
Page 1460 of 2000
SP–14SUSPENSION – FRONT SHOCK ABSORBER WITH COIL SPRING
SP
INSTALLATION
HINT:
• Use the same procedures for the RH side and LH side.
• The procedures listed below are for the LH side.
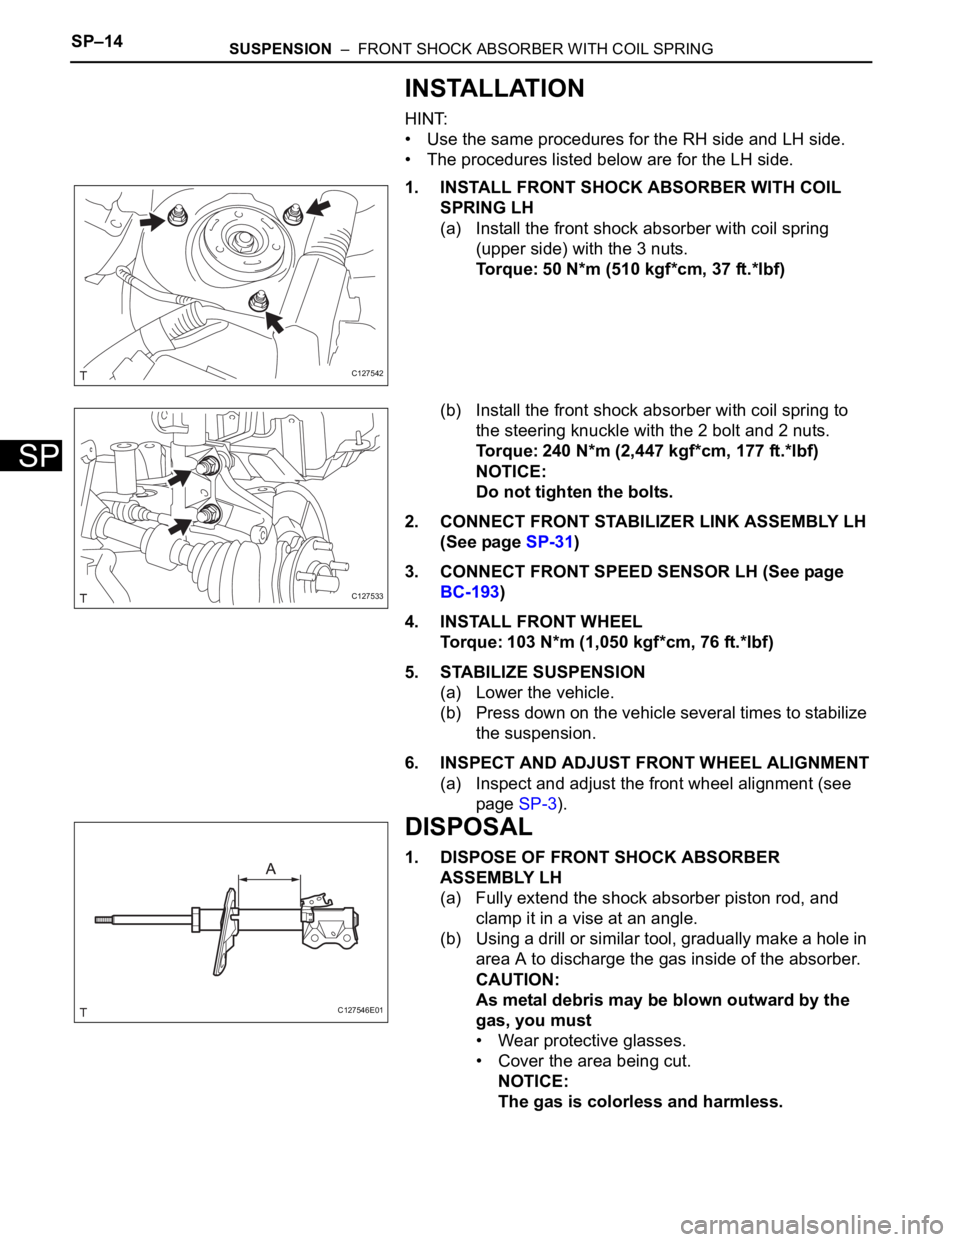
1. INSTALL FRONT SHOCK ABSORBER WITH COIL
SPRING LH
(a) Install the front shock absorber with coil spring
(upper side) with the 3 nuts.
Torque: 50 N*m (510 kgf*cm, 37 ft.*lbf)
(b) Install the front shock absorber with coil spring to
the steering knuckle with the 2 bolt and 2 nuts.
Torque: 240 N*m (2,447 kgf*cm, 177 ft.*lbf)
NOTICE:
Do not tighten the bolts.
2. CONNECT FRONT STABILIZER LINK ASSEMBLY LH
(See page SP-31)
3. CONNECT FRONT SPEED SENSOR LH (See page
BC-193)
4. INSTALL FRONT WHEEL
Torque: 103 N*m (1,050 kgf*cm, 76 ft.*lbf)
5. STABILIZE SUSPENSION
(a) Lower the vehicle.
(b) Press down on the vehicle several times to stabilize
the suspension.
6. INSPECT AND ADJUST FRONT WHEEL ALIGNMENT
(a) Inspect and adjust the front wheel alignment (see
page SP-3).
DISPOSAL
1. DISPOSE OF FRONT SHOCK ABSORBER
ASSEMBLY LH
(a) Fully extend the shock absorber piston rod, and
clamp it in a vise at an angle.
(b) Using a drill or similar tool, gradually make a hole in
area A to discharge the gas inside of the absorber.
CAUTION:
As metal debris may be blown outward by the
gas, you must
• Wear protective glasses.
• Cover the area being cut.
NOTICE:
The gas is colorless and harmless.
C127542
C127533
C127546E01