Page 768 of 2000
2GR-FE ENGINE MECHANICAL – ENGINE UNITEM–131
EM
REPAIR
1. REPAIR INTAKE VALVE SEAT
NOTICE:
Keep the lip free from foreign matter.
(a) If the seating is too high on the valve face, use 30
and 45
cutters to correct the seat.
(b) If the seating is too low on the valve face, use 60
and 45
cutters to correct the seat.
(c) Hand-lap the valve and valve seat with an abrasive
compound.
(d) Check the valve seating position.
2. REPAIR EXHAUST VALVE SEAT
NOTICE:
Keep the lip free from foreign matter.
(a) If the seating is too high on the valve face, use 30
and 45
cutters to correct the seat.
(b) If the seating is too low on the valve face, use 45
and 75
cutters to correct the seat.
(c) Hand-lap the valve and valve seat with an abrasive
compound.
(d) Check the valve seating position.
A132153E01
A132003E02
A132153E01
A132003E01
Page 801 of 2000

2GR-FE FUEL – FUEL SYSTEMFU–9
FU
ON-VEHICLE INSPECTION
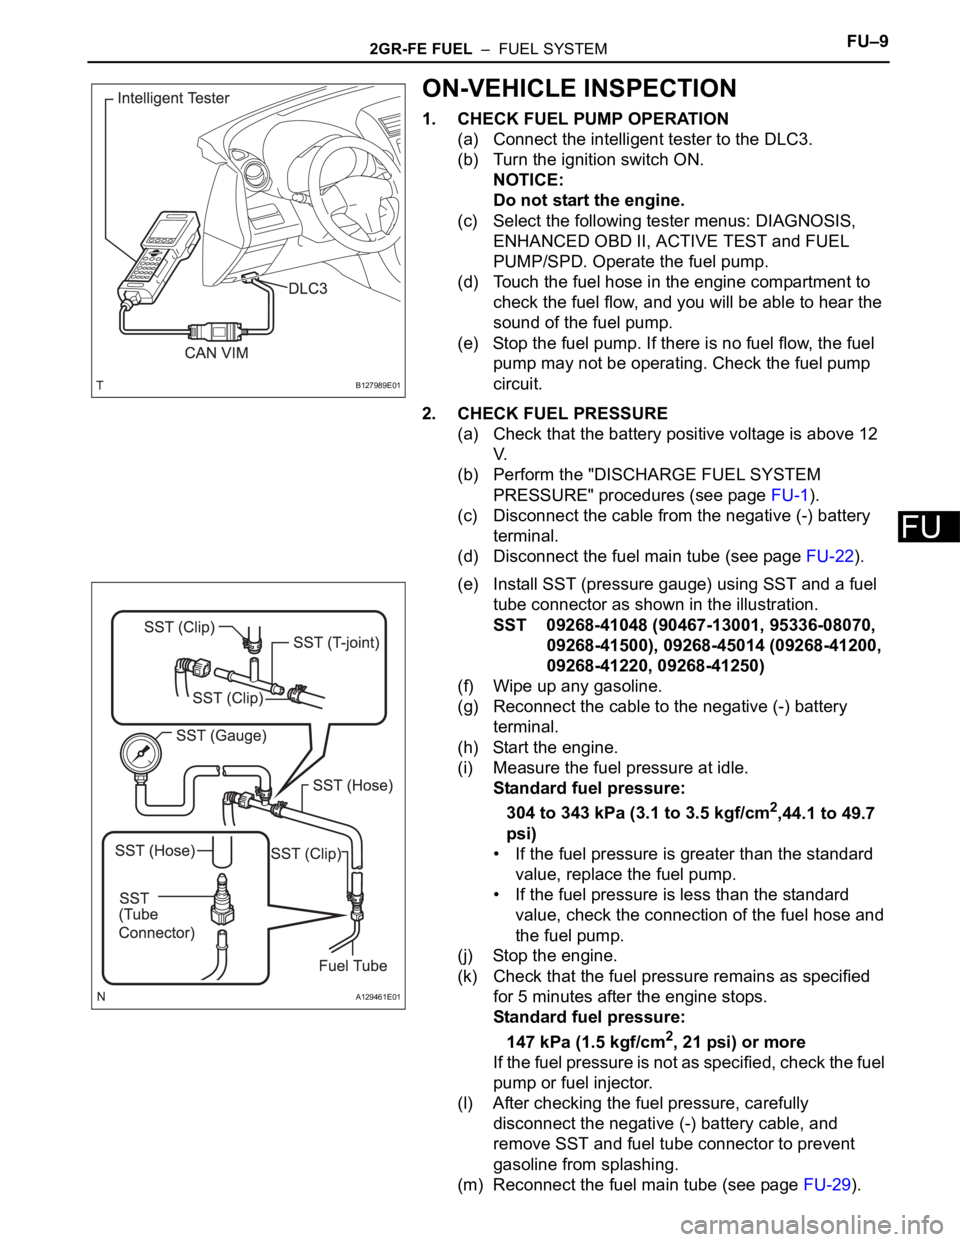
1. CHECK FUEL PUMP OPERATION
(a) Connect the intelligent tester to the DLC3.
(b) Turn the ignition switch ON.
NOTICE:
Do not start the engine.
(c) Select the following tester menus: DIAGNOSIS,
ENHANCED OBD II, ACTIVE TEST and FUEL
PUMP/SPD. Operate the fuel pump.
(d) Touch the fuel hose in the engine compartment to
check the fuel flow, and you will be able to hear the
sound of the fuel pump.
(e) Stop the fuel pump. If there is no fuel flow, the fuel
pump may not be operating. Check the fuel pump
circuit.
2. CHECK FUEL PRESSURE
(a) Check that the battery positive voltage is above 12
V.
(b) Perform the "DISCHARGE FUEL SYSTEM
PRESSURE" procedures (see page FU-1).
(c) Disconnect the cable from the negative (-) battery
terminal.
(d) Disconnect the fuel main tube (see page FU-22).
(e) Install SST (pressure gauge) using SST and a fuel
tube connector as shown in the illustration.
SST 09268-41048 (90467-13001, 95336-08070,
09268-41500), 09268-45014 (09268-41200,
09268-41220, 09268-41250)
(f) Wipe up any gasoline.
(g) Reconnect the cable to the negative (-) battery
terminal.
(h) Start the engine.
(i) Measure the fuel pressure at idle.
Standard fuel pressure:
304 to 343 kPa (3.1 to 3.5 kgf/cm
2,44.1 to 49.7
psi)
• If the fuel pressure is greater than the standard
value, replace the fuel pump.
• If the fuel pressure is less than the standard
value, check the connection of the fuel hose and
the fuel pump.
(j) Stop the engine.
(k) Check that the fuel pressure remains as specified
for 5 minutes after the engine stops.
Standard fuel pressure:
147 kPa (1.5 kgf/cm
2, 21 psi) or more
If the fuel pressure is not as specified, check the fuel
pump or fuel injector.
(l) After checking the fuel pressure, carefully
disconnect the negative (-) battery cable, and
remove SST and fuel tube connector to prevent
gasoline from splashing.
(m) Reconnect the fuel main tube (see page FU-29).
B127989E01
A129461E01
Page 802 of 2000
FU–102GR-FE FUEL – FUEL SYSTEM
FU
(n) Check for fuel leaks.
Page 803 of 2000

2GR-FE FUEL – FUEL INJECTORFU–13
FU
REMOVAL
CAUTION:
Do not allow fuel to spray when removing the pipe
between the high pressure side fuel pump and the fuel
injector. The fuel in the pipe is highly pressurized.
1. DISCHARGE FUEL SYSTEM PRESSURE
CAUTION:
• The "DISCHARGE FUEL SYSTEM PRESSURE"
procedures must be performed before
disconnecting any part of the fuel system.
• After performing the "DISCHARGE FUEL SYSTEM
PRESSURE" procedures, pressure will remain in
the fuel line. When disconnecting the fuel line,
place a cloth or equivalent over fittings to reduce
the risk of fuel spray.
(a) Remove the console box (see page IP-16).
(b) Start the engine. After the engine has stopped, turn
the ignition switch OFF.
HINT:
DTC P0171/P0172 (system too lean) may be set.
(c) Check that the engine does not start.
(d) Remove the fuel tank cap, and let the air out of the
fuel tank.
(e) Connect the connector.
(f) Install the console box (see page IP-23).
2. DISCONNECT CABLE FROM NEGATIVE BATTERY
TERMINAL
CAUTION:
Wait at least 90 seconds after disconnecting the
cable from the negative (-) battery terminal to
prevent airbag and seat belt pretensioner activation.
3. REMOVE ENGINE ASSEMBLY
(a) Remove the engine (see page EM-21).
4. REMOVE INTAKE AIR SURGE TANK ASSEMBLY
(See page EM-27)
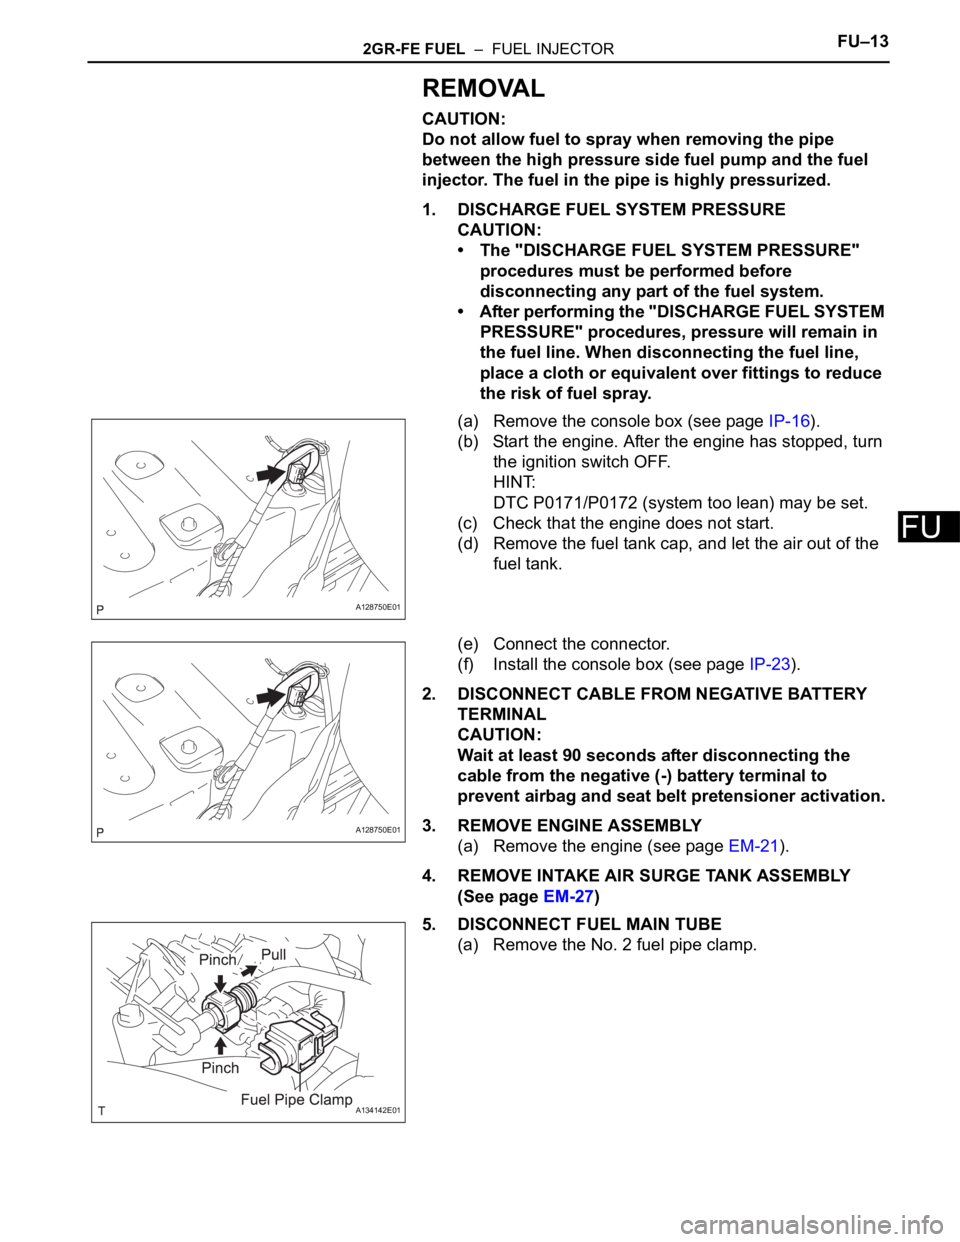
5. DISCONNECT FUEL MAIN TUBE
(a) Remove the No. 2 fuel pipe clamp.
A128750E01
A128750E01
A134142E01
Page 804 of 2000
FU–142GR-FE FUEL – FUEL INJECTOR
FU
(b) Pinch the tube connector and then pull out the fuel
pipe.
NOTICE:
• Check for foreign matter in the fuel tube
around the fuel tube's connector. Clean it if
necessary. Foreign matter can affect the O-
ring's ability to seal the connector and fuel
main pipe.
• Do not use any tools to separate the
connector and pipe.
• Do not forcefully bend or twist the hose.
• Keep the connector and pipe free from
foreign matter.
• If the connector and pipe are stuck together,
pinch the connector and turn it carefully to
disconnect it.
• Put the connector in a plastic bag to prevent
damage and contamination.
6. REMOVE FUEL INJECTOR ASSEMBLY
(a) Disconnect the 6 injector connectors.
(b) Remove the 5 bolts and fuel delivery pipe together
with the 6 injectors.
NOTICE:
Be careful not to drop the fuel injectors when
removing the fuel delivery pipe.
(c) Remove the 6 insulators from the intake manifold.
A110596E01
A134143
A134144
A134145
Page 805 of 2000
2GR-FE FUEL – FUEL INJECTORFU–15
FU
(d) Pull out the 6 fuel injectors from the fuel delivery
pipe.
(e) Remove the O-ring from each fuel injector.
A134146
Page 806 of 2000

FU–162GR-FE FUEL – FUEL INJECTOR
FU
INSPECTION
1. INSPECT FUEL INJECTOR ASSEMBLY
(a) Inspect injector resistance.
(1) Measure the resistance between the terminals.
Standard resistance:
11.6 to 12.4
at 20C (68F)
If the result is not as specified, replace the
injector.
(b) Inspect the injection volume.
CAUTION:
This test involves high-pressure fuel and
electricity. Take every precaution regarding safe
handling of both the fuel and the electricity.
Perform this test in a safe area, and avoid any
sparks or flames. Do not smoke.
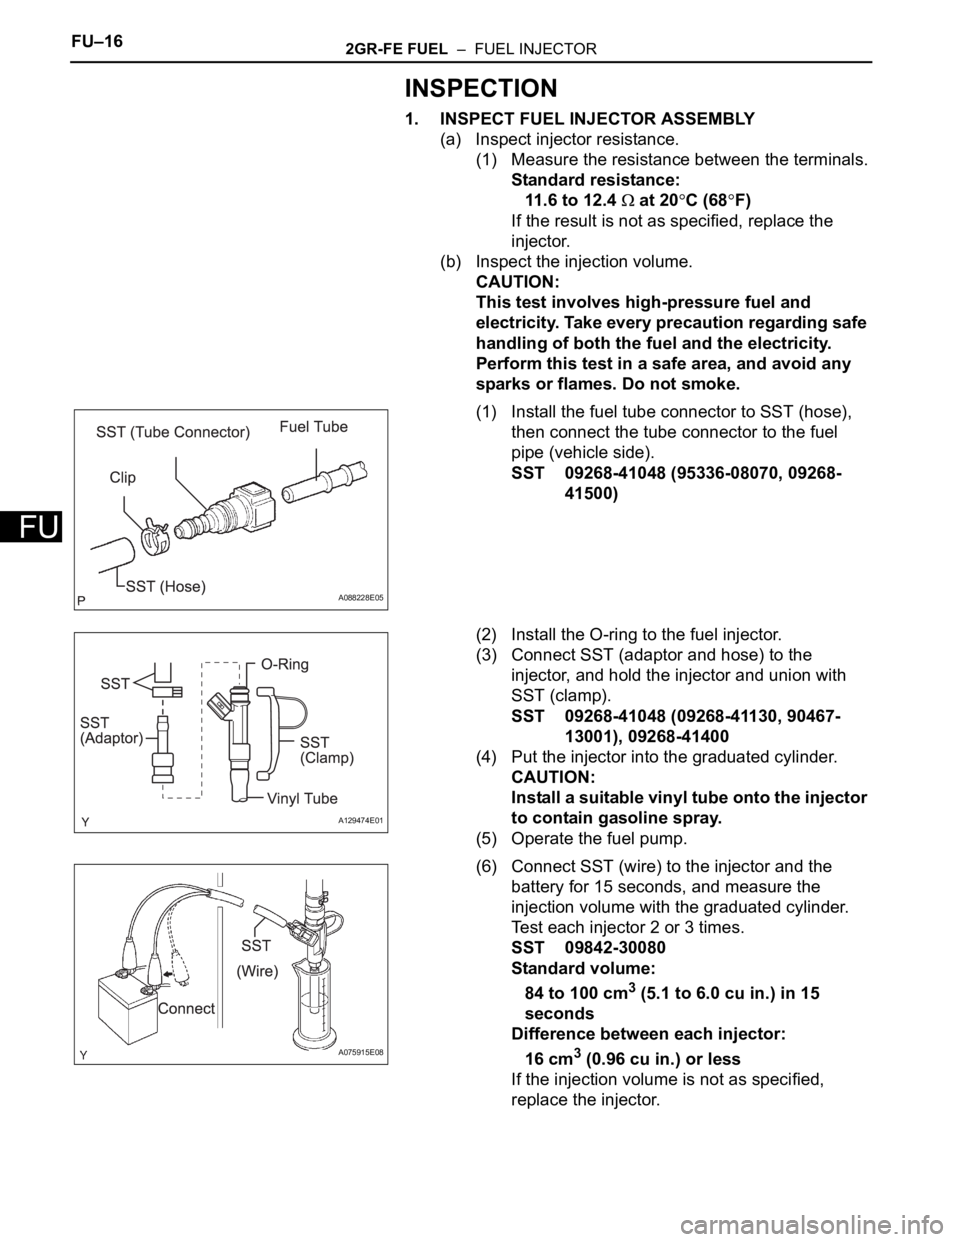
(1) Install the fuel tube connector to SST (hose),
then connect the tube connector to the fuel
pipe (vehicle side).
SST 09268-41048 (95336-08070, 09268-
41500)
(2) Install the O-ring to the fuel injector.
(3) Connect SST (adaptor and hose) to the
injector, and hold the injector and union with
SST (clamp).
SST 09268-41048 (09268-41130, 90467-
13001), 09268-41400
(4) Put the injector into the graduated cylinder.
CAUTION:
Install a suitable vinyl tube onto the injector
to contain gasoline spray.
(5) Operate the fuel pump.
(6) Connect SST (wire) to the injector and the
battery for 15 seconds, and measure the
injection volume with the graduated cylinder.
Test each injector 2 or 3 times.
SST 09842-30080
Standard volume:
84 to 100 cm
3 (5.1 to 6.0 cu in.) in 15
seconds
Difference between each injector:
16 cm
3 (0.96 cu in.) or less
If the injection volume is not as specified,
replace the injector.
A088228E05
A129474E01
A075915E08
Page 807 of 2000

2GR-FE FUEL – FUEL INJECTORFU–17
FU
(c) Check for leakage.
(1) In the condition above, disconnect the tester
probes of SST (wire) from the battery and
check for fuel leakage from the injector.
Fuel drop:
1 drop or less in 16 minutes
INSTALLATION
1. INSTALL FUEL INJECTOR ASSEMBLY
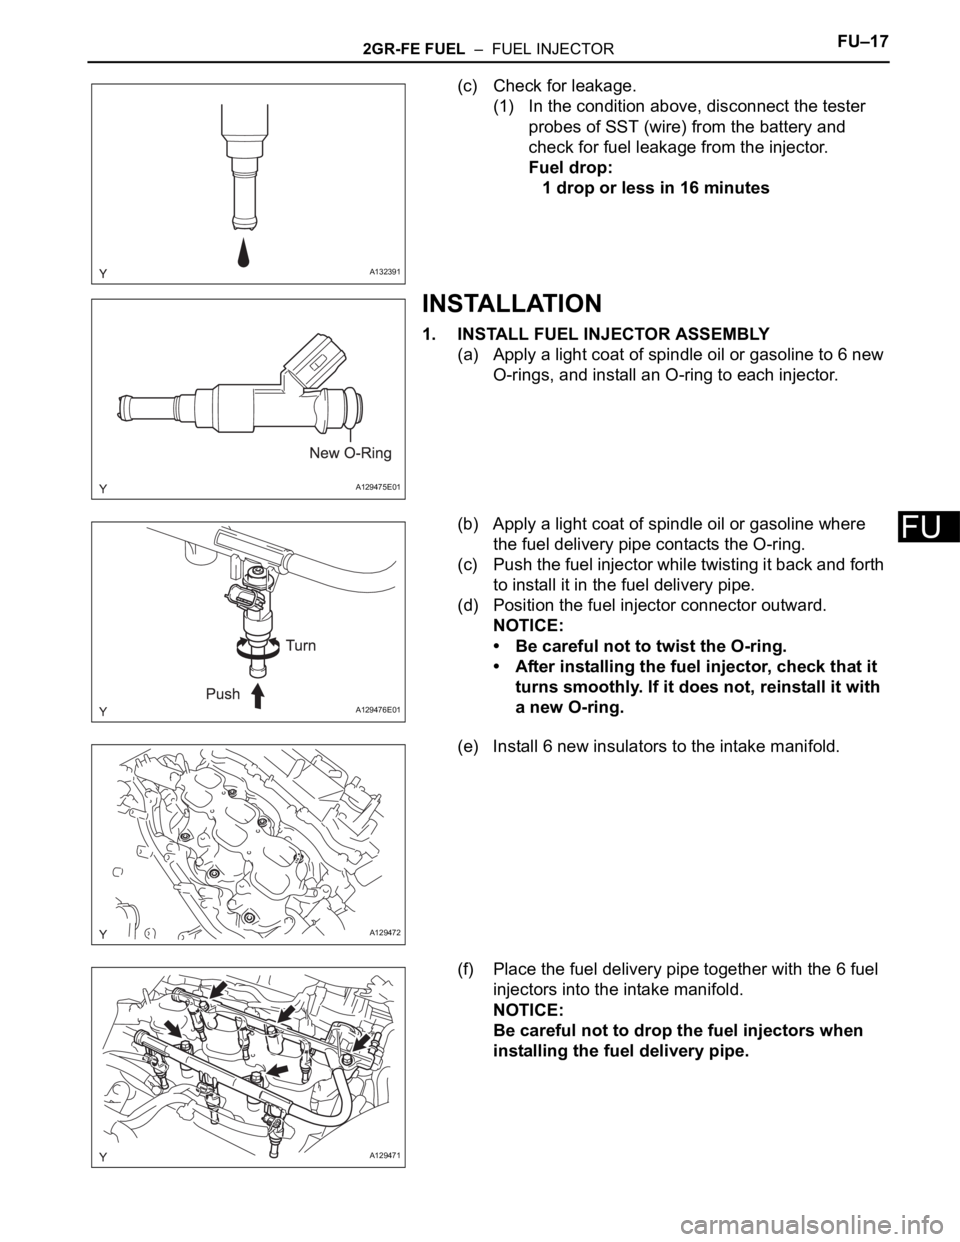
(a) Apply a light coat of spindle oil or gasoline to 6 new
O-rings, and install an O-ring to each injector.
(b) Apply a light coat of spindle oil or gasoline where
the fuel delivery pipe contacts the O-ring.
(c) Push the fuel injector while twisting it back and forth
to install it in the fuel delivery pipe.
(d) Position the fuel injector connector outward.
NOTICE:
• Be careful not to twist the O-ring.
• After installing the fuel injector, check that it
turns smoothly. If it does not, reinstall it with
a new O-ring.
(e) Install 6 new insulators to the intake manifold.
(f) Place the fuel delivery pipe together with the 6 fuel
injectors into the intake manifold.
NOTICE:
Be careful not to drop the fuel injectors when
installing the fuel delivery pipe.
A132391
A129475E01
A129476E01
A129472
A129471