2006 TOYOTA RAV4 check engine
[x] Cancel search: check enginePage 182 of 2000
MAINTENANCE – UNDER HOODMA–7
MA
GENERAL MAINTENANCE
(2006/01- )
1. GENERAL NOTES
• Maintenance requirements vary depending on the
country.
• Check the maintenance schedule in the owner's
manual supplement.
• Following the maintenance schedule is mandatory.
• Determine the appropriate time to service the vehicle
using either miles driven or time elapsed, whichever
reaches the specification first.
• Maintain similar intervals between periodic
maintenance, unless otherwise noted.
• Failing to check each vehicle part could lead to poor
engine performance and increase exhaust emissions.
2. WINDSHIELD WASHER FLUID
(a) Check that there is sufficient fluid in the tank.
3. ENGINE COOLANT LEVEL
(a) Check that the coolant level is between the "FULL"
and "LOW" lines on the see-through reservoir.
4. RADIATOR AND HOSES
(a) Check that the front of the radiator is clean and not
blocked by leaves, dirt or bugs.
(b) Check the hoses for cracks, kinks, rot or loose
connections.
5. BATTERY ELECTROLYTE LEVEL
(a) Check that the electrolyte level of all the battery
cells is between the upper and lower level lines on
the case.
HINT:
If the electrolyte level is difficult to see, lightly shake
the vehicle.
6. BRAKE FLUID LEVEL
(a) Check that the brake fluid levels are near the upper
level lines on the see-through reservoirs.
7. ENGINE DRIVE BELT
(a) Check the drive belt for fraying, cracks, wear or
oiliness.
8. ENGINE OIL LEVEL
(a) Check the level on the dipstick with the engine
stopped.
9. AUTOMATIC TRANSAXLE FLUID LEVEL
10. EXHAUST SYSTEM
(a) Check for unusual exhaust sounds or abnormal
exhaust fumes. Inspect the cause and repair it.
Type See procedures
U151E See page AX-126
U151F See page AX-126
Page 202 of 2000
2GR-FE ENGINE MECHANICAL – ENGINE ASSEMBLYEM–27
EM
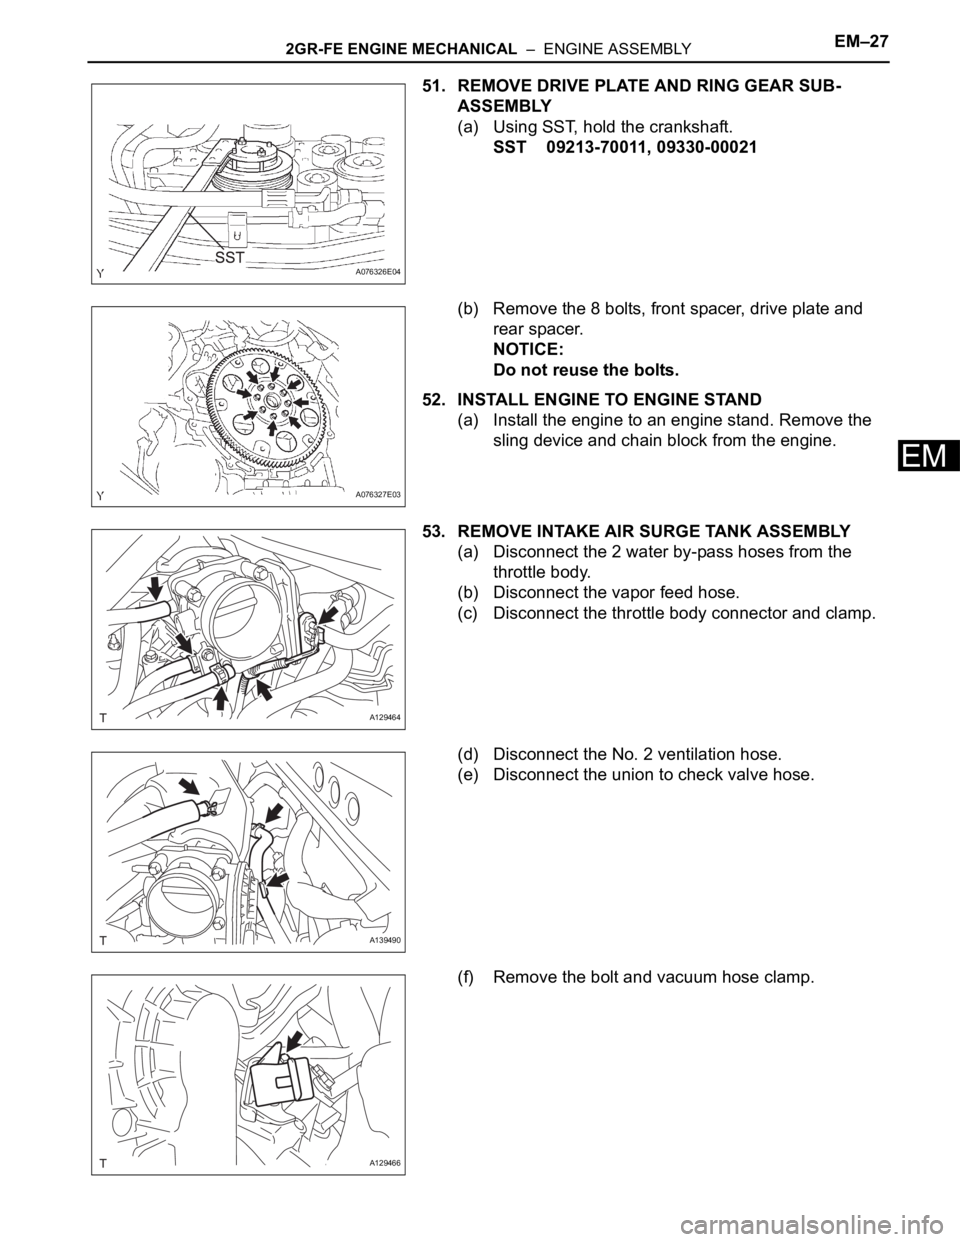
51. REMOVE DRIVE PLATE AND RING GEAR SUB-
ASSEMBLY
(a) Using SST, hold the crankshaft.
SST 09213-70011, 09330-00021
(b) Remove the 8 bolts, front spacer, drive plate and
rear spacer.
NOTICE:
Do not reuse the bolts.
52. INSTALL ENGINE TO ENGINE STAND
(a) Install the engine to an engine stand. Remove the
sling device and chain block from the engine.
53. REMOVE INTAKE AIR SURGE TANK ASSEMBLY
(a) Disconnect the 2 water by-pass hoses from the
throttle body.
(b) Disconnect the vapor feed hose.
(c) Disconnect the throttle body connector and clamp.
(d) Disconnect the No. 2 ventilation hose.
(e) Disconnect the union to check valve hose.
(f) Remove the bolt and vacuum hose clamp.
A076326E04
A076327E03
A129464
A139490
A129466
Page 208 of 2000
FU–62AZ-FE FUEL – FUEL SYSTEM
FU
ON-VEHICLE INSPECTION
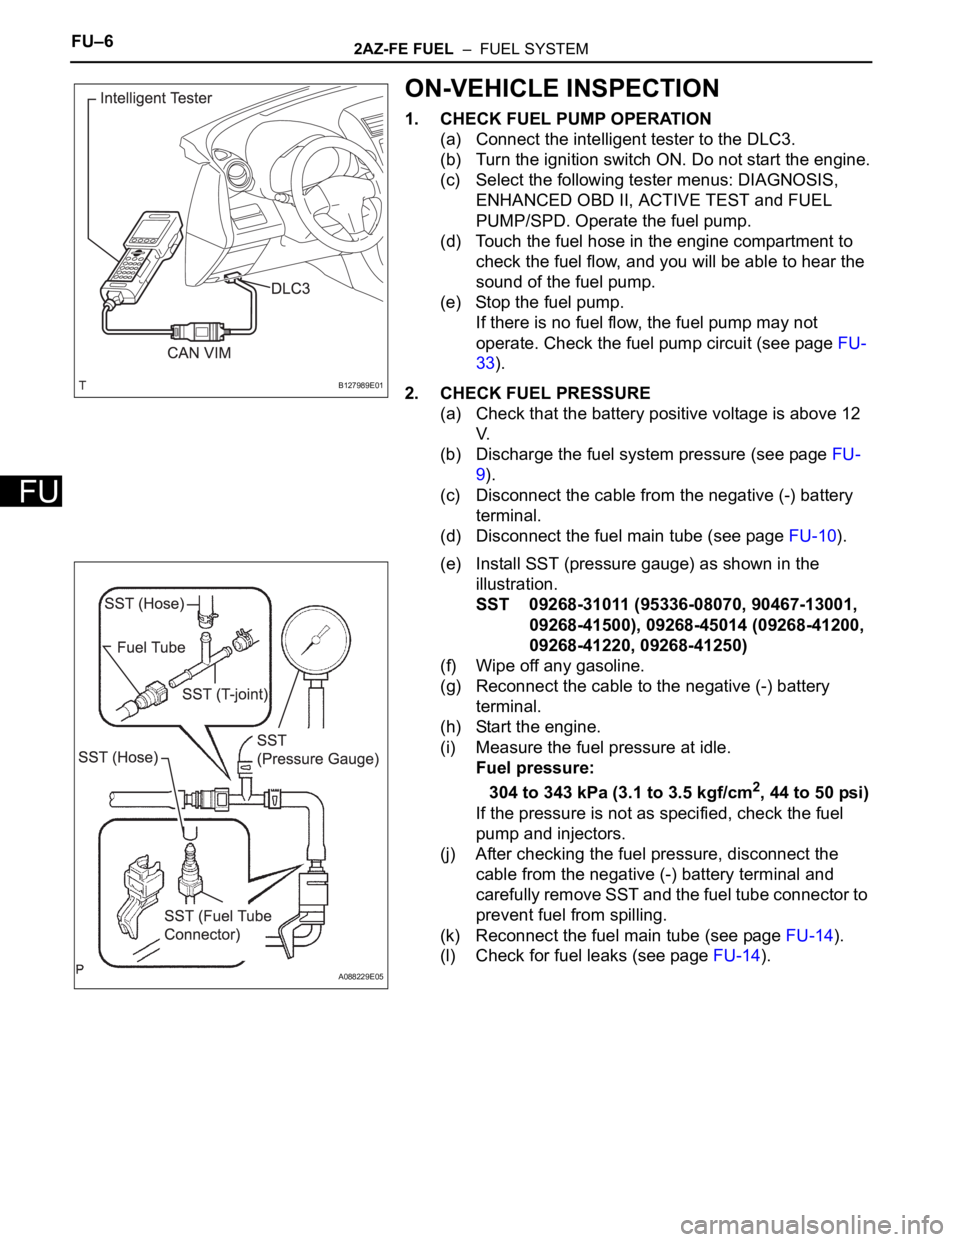
1. CHECK FUEL PUMP OPERATION
(a) Connect the intelligent tester to the DLC3.
(b) Turn the ignition switch ON. Do not start the engine.
(c) Select the following tester menus: DIAGNOSIS,
ENHANCED OBD II, ACTIVE TEST and FUEL
PUMP/SPD. Operate the fuel pump.
(d) Touch the fuel hose in the engine compartment to
check the fuel flow, and you will be able to hear the
sound of the fuel pump.
(e) Stop the fuel pump.
If there is no fuel flow, the fuel pump may not
operate. Check the fuel pump circuit (see page FU-
33).
2. CHECK FUEL PRESSURE
(a) Check that the battery positive voltage is above 12
V.
(b) Discharge the fuel system pressure (see page FU-
9).
(c) Disconnect the cable from the negative (-) battery
terminal.
(d) Disconnect the fuel main tube (see page FU-10).
(e) Install SST (pressure gauge) as shown in the
illustration.
SST 09268-31011 (95336-08070, 90467-13001,
09268-41500), 09268-45014 (09268-41200,
09268-41220, 09268-41250)
(f) Wipe off any gasoline.
(g) Reconnect the cable to the negative (-) battery
terminal.
(h) Start the engine.
(i) Measure the fuel pressure at idle.
Fuel pressure:
304 to 343 kPa (3.1 to 3.5 kgf/cm
2, 44 to 50 psi)
If the pressure is not as specified, check the fuel
pump and injectors.
(j) After checking the fuel pressure, disconnect the
cable from the negative (-) battery terminal and
carefully remove SST and the fuel tube connector to
prevent fuel from spilling.
(k) Reconnect the fuel main tube (see page FU-14).
(l) Check for fuel leaks (see page FU-14).
B127989E01
A088229E05
Page 215 of 2000
IN–38INTRODUCTION – HOW TO TROUBLESHOOT ECU CONTROLLED SYSTEMS
IN
ELECTRONIC CIRCUIT INSPECTION
PROCEDURE
1. BASIC INSPECTION
(a) WHEN MEASURING RESISTANCE OF
ELECTRONIC PARTS
(1) Unless otherwise stated, all resistance
measurements should be made at an ambient
temperature of 20
C (68F). Resistance
measurements may be inaccurate if measured
at high temperatures, i.e. immediately after the
vehicle has been running. Measurements should
be made after the engine has cooled down.
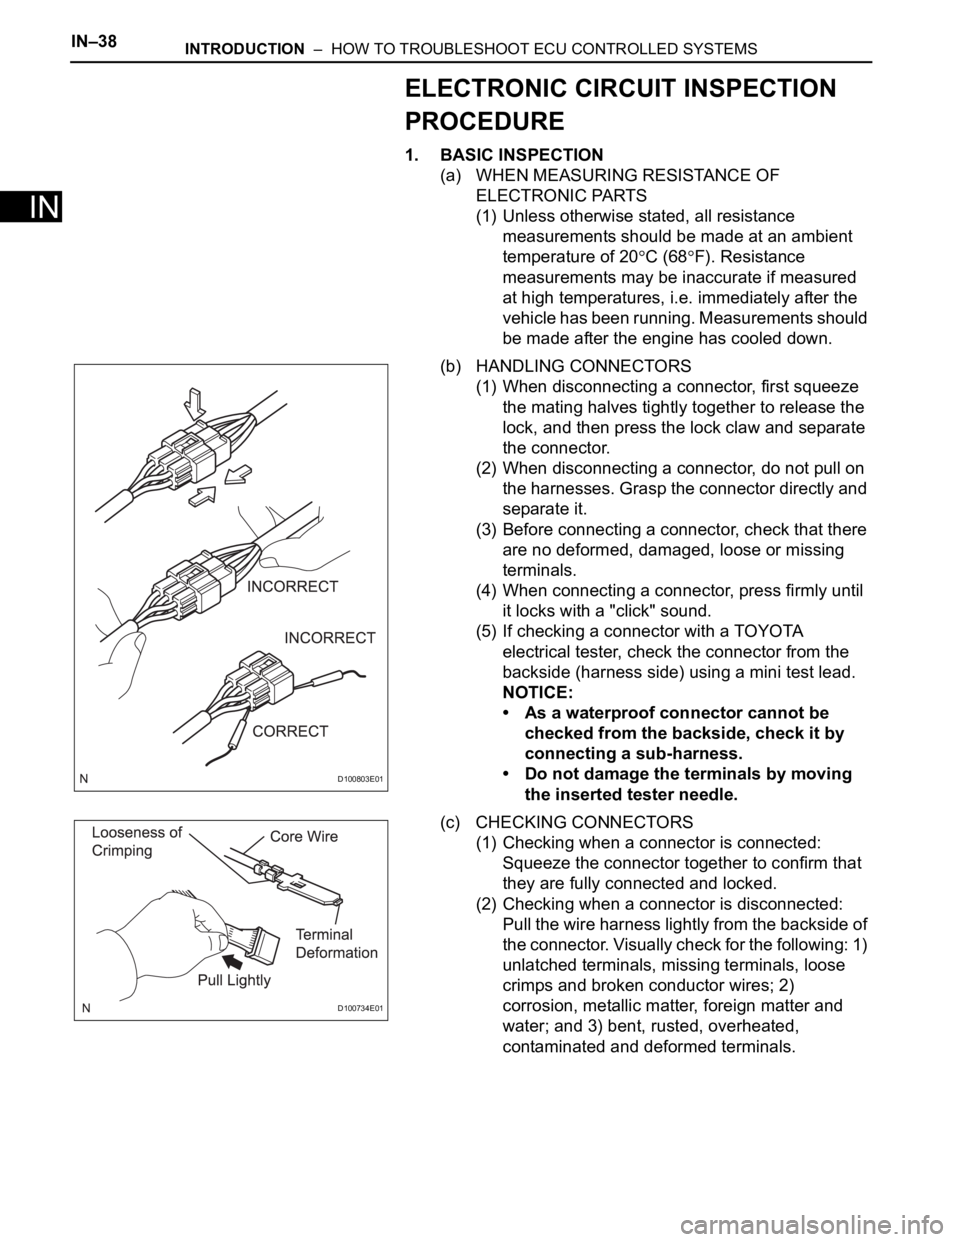
(b) HANDLING CONNECTORS
(1) When disconnecting a connector, first squeeze
the mating halves tightly together to release the
lock, and then press the lock claw and separate
the connector.
(2) When disconnecting a connector, do not pull on
the harnesses. Grasp the connector directly and
separate it.
(3) Before connecting a connector, check that there
are no deformed, damaged, loose or missing
terminals.
(4) When connecting a connector, press firmly until
it locks with a "click" sound.
(5) If checking a connector with a TOYOTA
electrical tester, check the connector from the
backside (harness side) using a mini test lead.
NOTICE:
• As a waterproof connector cannot be
checked from the backside, check it by
connecting a sub-harness.
• Do not damage the terminals by moving
the inserted tester needle.
(c) CHECKING CONNECTORS
(1) Checking when a connector is connected:
Squeeze the connector together to confirm that
they are fully connected and locked.
(2) Checking when a connector is disconnected:
Pull the wire harness lightly from the backside of
the connector. Visually check for the following: 1)
unlatched terminals, missing terminals, loose
crimps and broken conductor wires; 2)
corrosion, metallic matter, foreign matter and
water; and 3) bent, rusted, overheated,
contaminated and deformed terminals.
D100803E01
D100734E01
Page 218 of 2000
INTRODUCTION – HOW TO TROUBLESHOOT ECU CONTROLLED SYSTEMSIN–41
IN
3. CHECK FOR SHORT CIRCUIT
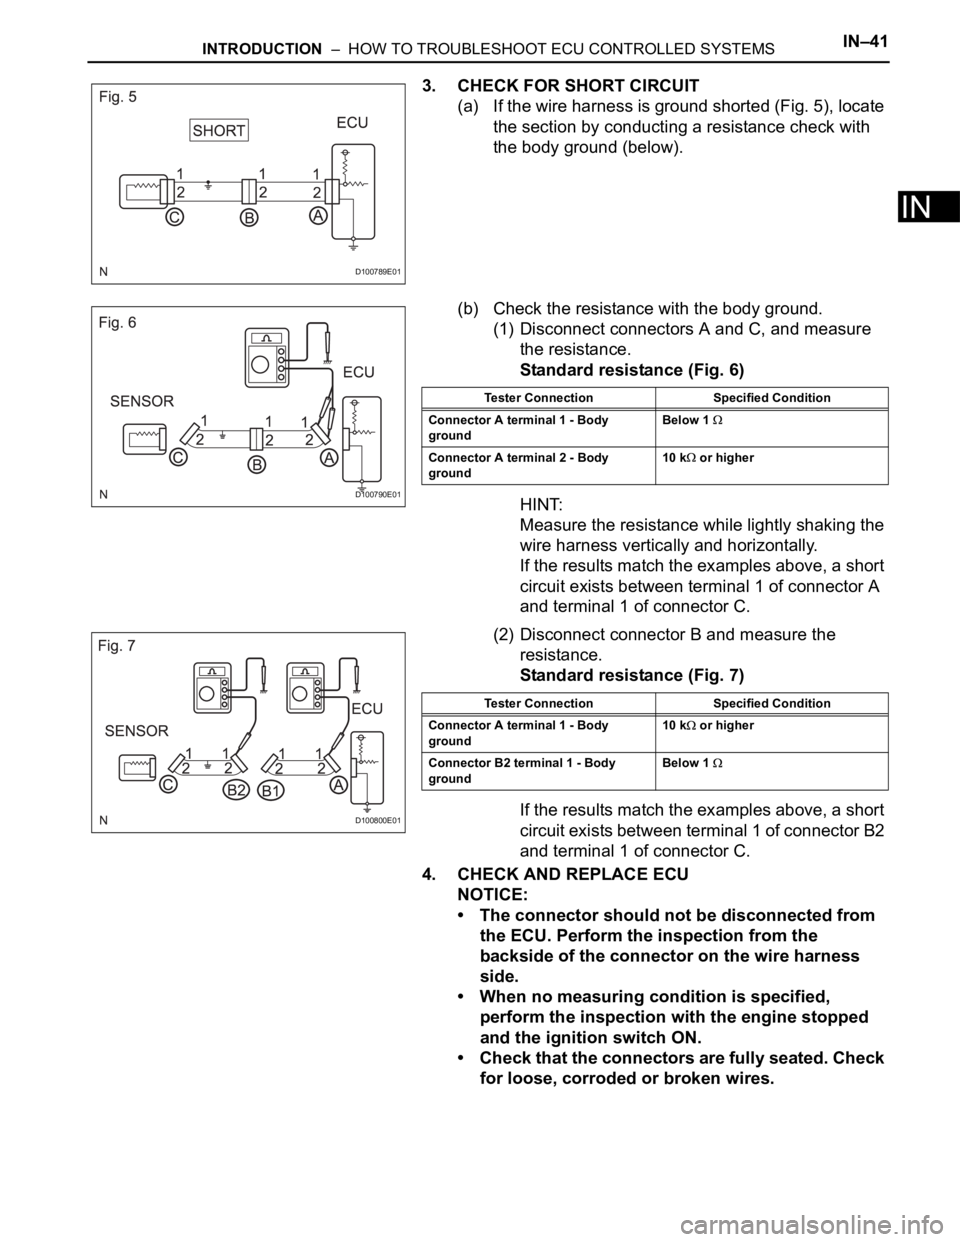
(a) If the wire harness is ground shorted (Fig. 5), locate
the section by conducting a resistance check with
the body ground (below).
(b) Check the resistance with the body ground.
(1) Disconnect connectors A and C, and measure
the resistance.
Standard resistance (Fig. 6)
HINT:
Measure the resistance while lightly shaking the
wire harness vertically and horizontally.
If the results match the examples above, a short
circuit exists between terminal 1 of connector A
and terminal 1 of connector C.
(2) Disconnect connector B and measure the
resistance.
Standard resistance (Fig. 7)
If the results match the examples above, a short
circuit exists between terminal 1 of connector B2
and terminal 1 of connector C.
4. CHECK AND REPLACE ECU
NOTICE:
• The connector should not be disconnected from
the ECU. Perform the inspection from the
backside of the connector on the wire harness
side.
• When no measuring condition is specified,
perform the inspection with the engine stopped
and the ignition switch ON.
• Check that the connectors are fully seated. Check
for loose, corroded or broken wires.
D100789E01
D100790E01
Tester Connection Specified Condition
Connector A terminal 1 - Body
groundBelow 1
Connector A terminal 2 - Body
ground10 k or higher
D100800E01
Tester Connection Specified Condition
Connector A terminal 1 - Body
ground10 k
or higher
Connector B2 terminal 1 - Body
ground Below 1
Page 221 of 2000

INTRODUCTION – TERMSIN–49
IN
IAT Intake Air Temperature Intake or Inlet Air Temperature
ICM Ignition Control Module -
IFI Indirect Fuel Injection Indirect Injection (IDL)
IFS Inertia Fuel-Shutoff -
ISC Idle Speed Control -
KS Knock Sensor Knock Sensor
MAF Mass Airflow Air Flow Meter
MAP Manifold Absolute Pressure Manifold Pressure Intake Vacuum
MC Mixture ControlElectric Bleed Air Control Valve (EBCV)
Mixture Control Valve (MCV)
Electric Air Control Valve (EACV)
MDP Manifold Differential Pressure -
MFI Multiport Fuel Injection Electronic Fuel Injection (EFI)
MIL Malfunction Indicator Lamp Check Engine Lamp
MST Manifold Surface Temperature -
MVZ Manifold Vacuum Zone -
NVRAM Non-Volatile Random Access Memory -
O2S Oxygen Sensor Oxygen Sensor, O2 Sensor (O2S)
OBD On-Board Diagnostic On-Board Diagnostic System (OBD)
OC Oxidation Catalytic Converter Oxidation Catalyst Converter (OC), CCo
OL Open Loop Open Loop
PAIR Pulsed Secondary Air Injection Air Suction (AS)
PCM Powertrain Control Module -
PNP Park/Neutral Position -
PROM Programmable Read Only Memory -
PSP Power Steering Pressure -
PTOX Periodic Trap OxidizerDiesel Particulate Filter (DPF)
Diesel Particulate Trap (DPT)
RAM Random Access Memory Random Access Memory (RAM)
RM Relay Module -
ROM Read Only Memory Read Only Memory (ROM)
RPM Engine Speed Engine Speed
SC Supercharger Supercharger
SCB Supercharger Bypass E-ABV
SFI Sequential Multiport Fuel Injection Electronic Fuel Injection (EFI), Sequential Injection
SPL Smoke Puff Limiter -
SRI Service Reminder Indicator -
SRT System Readiness Test -
ST Scan Tool -
TB Throttle Body Throttle Body
TBI Throttle Body Fuel InjectionSingle Point Injection
Central Fuel Injection (Ci)
TC Turbocharger Turbocharger
TCC Torque Converter Clutch Torque Converter
TCM Transmission Control Module Transmission ECU, ECT ECU
TP Throttle Position Throttle Position
TR Transmission Range -
TVV Thermal Vacuum ValveBimetallic Vacuum Switching Valve (BVSV)
Thermostatic Vacuum Switching Valve (TVSV) SAE
ABBREVIATIONSSAE TERMS TOYOTA TERMS ( )-ABBREVIATIONS
Page 227 of 2000
2AZ-FE EMISSION CONTROL – EMISSION CONTROL SYSTEMEC–7
EC
ON-VEHICLE INSPECTION
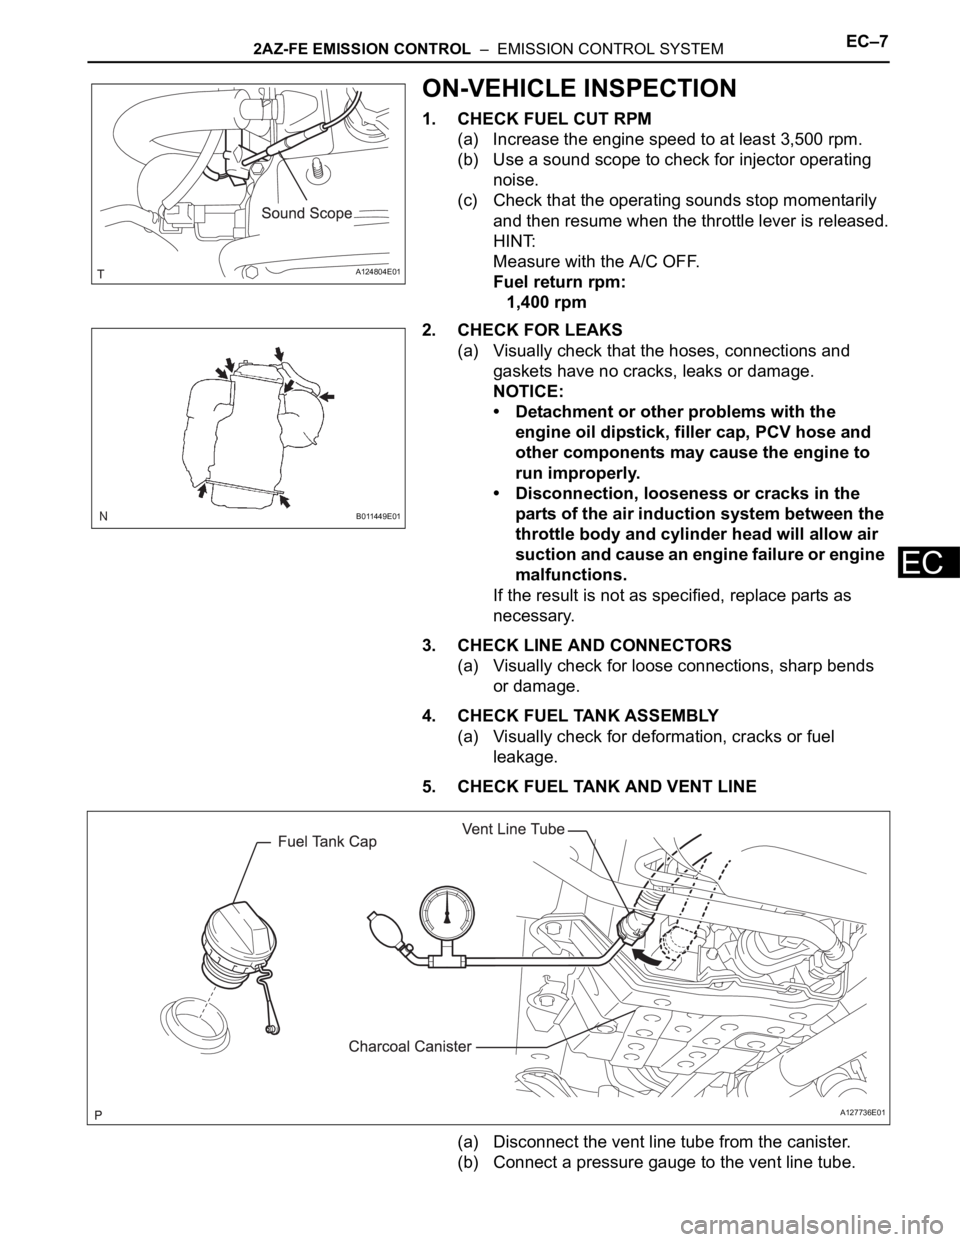
1. CHECK FUEL CUT RPM
(a) Increase the engine speed to at least 3,500 rpm.
(b) Use a sound scope to check for injector operating
noise.
(c) Check that the operating sounds stop momentarily
and then resume when the throttle lever is released.
HINT:
Measure with the A/C OFF.
Fuel return rpm:
1,400 rpm
2. CHECK FOR LEAKS
(a) Visually check that the hoses, connections and
gaskets have no cracks, leaks or damage.
NOTICE:
• Detachment or other problems with the
engine oil dipstick, filler cap, PCV hose and
other components may cause the engine to
run improperly.
• Disconnection, looseness or cracks in the
parts of the air induction system between the
throttle body and cylinder head will allow air
suction and cause an engine failure or engine
malfunctions.
If the result is not as specified, replace parts as
necessary.
3. CHECK LINE AND CONNECTORS
(a) Visually check for loose connections, sharp bends
or damage.
4. CHECK FUEL TANK ASSEMBLY
(a) Visually check for deformation, cracks or fuel
leakage.
5. CHECK FUEL TANK AND VENT LINE
(a) Disconnect the vent line tube from the canister.
(b) Connect a pressure gauge to the vent line tube.
A124804E01
B011449E01
A127736E01
Page 240 of 2000
CO–42AZ-FE COOLING – COOLING FAN SYSTEM
CO
ON-VEHICLE INSPECTION
HINT:
It is normal for the cooling fan to sometimes rotate when the
ignition switch is turned from ACC to ON.
1. CHECK COOLING FAN OPERATION AT LOW
TEMPERATURES (Below 94
C (201F))
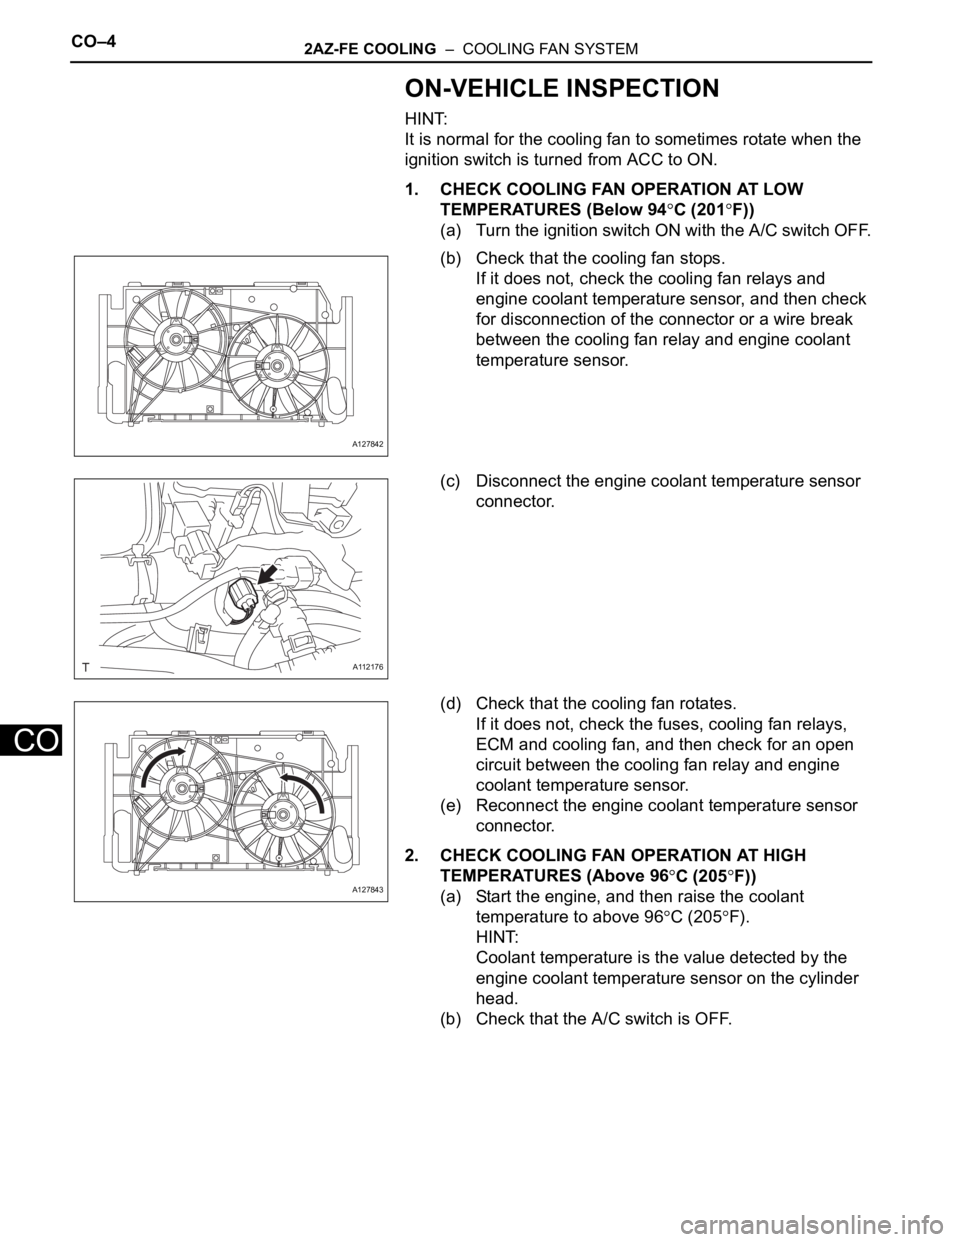
(a) Turn the ignition switch ON with the A/C switch OFF.
(b) Check that the cooling fan stops.
If it does not, check the cooling fan relays and
engine coolant temperature sensor, and then check
for disconnection of the connector or a wire break
between the cooling fan relay and engine coolant
temperature sensor.
(c) Disconnect the engine coolant temperature sensor
connector.
(d) Check that the cooling fan rotates.
If it does not, check the fuses, cooling fan relays,
ECM and cooling fan, and then check for an open
circuit between the cooling fan relay and engine
coolant temperature sensor.
(e) Reconnect the engine coolant temperature sensor
connector.
2. CHECK COOLING FAN OPERATION AT HIGH
TEMPERATURES (Above 96
C (205F))
(a) Start the engine, and then raise the coolant
temperature to above 96
C (205F).
HINT:
Coolant temperature is the value detected by the
engine coolant temperature sensor on the cylinder
head.
(b) Check that the A/C switch is OFF.
A127842
A112176
A127843