2006 SUZUKI SX4 seat
[x] Cancel search: seatPage 407 of 1556

Downloaded from www.Manualslib.com manuals search engine Starting System: 1I-2
Condition Possible cause Correction / Reference Item
Motor not running (No
operating sound of
magnetic switch)Transmission range sensor is not in P or
N, or not adjusted (A/T model)Shift in P or N, or adjust sensor. (A/T model)
Battery run downRecharge battery.
Battery voltage too low due to battery
deteriorationReplace battery.
Poor contact in battery terminal
connectionRetighten or replace.
Loose grounding cable connectionRetighten.
Fuse set loose or blown offTighten or replace.
Poor contacting action of ignition switch
and magnetic switchReplace.
Lead wire coupler loose in placeRetighten.
Open-circuit between ignition switch and
magnetic switchRepair.
Open-circuit in pull-in coilReplace magnetic switch.
Brushes are seating poorly or worn
downRepair or replace.
Poor sliding of plunger and/or pinionRepair.
Faulty starting motor control relay“Main Relay, Fuel Pump Relay, Starting Motor
Control Relay, Throttle Actuator Control Relay
and Radiator Cooling Fan Relay Inspection in
Section 1C”.
Faulty ECM and its circuit“Inspection of ECM and Its Circuits in Section
1A”.
Motor not running
(Operating sound of
magnetic switch heard)Battery run downRecharge battery.
Battery voltage too low due to battery
deteriorationReplace battery.
Loose battery cable connectionsRetighten.
Burnt main contact point, or poor
contacting action of magnetic switchReplace magnetic switch.
Brushes are seating poorly or worn
downRepair or replace.
Weakened brush springReplace.
Burnt commutatorReplace armature.
Layer short-circuit of armatureReplace.
Crankshaft rotation obstructedRepair.
Starting motor running
but too slow (small
torque) (If battery and
wiring are satisfactory,
inspect starting motor)Insufficient contact of magnetic switch
main contactsReplace magnetic switch.
Layer short-circuit of armatureReplace.
Disconnected, burnt or worn
commutatorRepair commutator or replace armature.
Worn brushesReplace brush.
Weakened brush springsReplace spring.
Burnt or abnormally worn end bushReplace bush.
Starting motor running,
but not cranking engineWorn pinion tipReplace over-running clutch.
Poor sliding of over-running clutchRepair.
Over-running clutch slippingReplace over-running clutch.
Worn teeth of ring gearReplace flywheel (M/T model) or drive plate (A/
T model).
NoiseAbnormally worn bushReplace bush.
Worn pinion or worn teeth of ring gearReplace over-running clutch, flywheel (M/T
model) or drive plate (A/T model).
Poor sliding of pinion (failure in return
movement)Repair or replace.
Worn internal or planetary gear teethReplace.
Lack of oil in each partLubricate.
Page 433 of 1556

Downloaded from www.Manualslib.com manuals search engine Table of Contents 2- i
2
Section 2
CONTENTS
Suspension
Precautions ................................................. 2-1
Precautions............................................................. 2-1
Precautions on Suspension .................................. 2-1
Suspension General Diagnosis.............. 2A-1
Diagnostic Information and Procedures ............ 2A-1
Suspension, Wheels and Tires Symptom
Diagnosis .......................................................... 2A-1
Specifications....................................................... 2A-3
Wheel Alignment Specifications .......................... 2A-3
Front Suspension .................................... 2B-1
General Description ............................................. 2B-1
Front Suspension Construction ........................... 2B-1
Front Wheel Alignment Construction .................. 2B-2
Repair Instructions .............................................. 2B-2
Front Wheel Alignment Inspection and
Adjustment ........................................................ 2B-2
Front Strut Assembly Components ..................... 2B-4
Front Strut Assembly Removal and
Installation ......................................................... 2B-5
Front Strut Assembly Disassembly and
Reassembly ...................................................... 2B-7
Front Strut Assembly Check ............................... 2B-8
Front Wheel Hub and Steering Knuckle
Components...................................................... 2B-9
Front Wheel Hub, Steering Knuckle and
Wheel Bearing Removal and Installation .......... 2B-9
Front Wheel Hub, Disc, Bolt and Bearing
Check .............................................................. 2B-14
Suspension Control Arm / Bushing Removal
and Installation ................................................ 2B-14
Suspension Control Arm / Bushing
Disassembly and Assembly ............................ 2B-15
Suspension Control Arm / Steering Knuckle
Check .............................................................. 2B-16
Suspension Control Arm Bushing Check .......... 2B-16
Suspension Control Arm Joint Check ............... 2B-16
Front Suspension Frame, Stabilizer Bar and/
or Bushing Components ................................. 2B-17
Front Suspension Frame, Stabilizer Bar and/
or Bushing Removal and Installation .............. 2B-18
Front Suspension Frame Check ....................... 2B-20
Front Stabilizer Bar, Bushing and/or Joint
Check .............................................................. 2B-20Front Suspension Fasteners Check .................. 2B-20
Specifications .....................................................2B-21
Tightening Torque Specifications ...................... 2B-21
Special Tools and Equipment ...........................2B-22
Recommended Service Material ....................... 2B-22
Special Tool ...................................................... 2B-22
Rear Suspension ..................................... 2C-1
Repair Instructions ..............................................2C-1
Rear Suspension Components ...........................2C-1
Rear Shock Absorber Removal and
Installation .........................................................2C-2
Rear Shock Absorber Inspection ........................2C-3
Rear Shock Absorber Bush Inspection ...............2C-3
Rear Coil Spring Removal and Installation .........2C-4
Spring Upper Seat / Spring Lower Seat
Inspection ..........................................................2C-5
Rear Axle Removal and Installation ....................2C-6
Rear Axle and Coil Spring Inspection .................2C-7
Rear Axle Bush Inspection ..................................2C-7
Rear Wheel Disc, Bolt and Bearing Inspection ....2C-7
Rear Wheel Hub Assembly Removal and
Installation .........................................................2C-8
Specifications .....................................................2C-10
Tightening Torque Specifications ......................2C-10
Wheels and Tires ..................................... 2D-1
General Description .............................................2D-1
Tires Description .................................................2D-1
Wheels Description .............................................2D-2
Irregular and/or Premature Wear Description .....2D-3
Wear Indicators Description ................................2D-3
Radial Tire Waddle Description...........................2D-3
Radial Tire Lead / Pull Description ......................2D-4
Balancing Wheels Description ............................2D-4
Repair Instructions ..............................................2D-5
Wheel Discs Inspection .......................................2D-5
Wheel Balance Inspection and Adjustment.........2D-5
Tire Rotation........................................................2D-5
Wheel (with Tire) Removal and Installation.........2D-6
Tire Mounting and Dismounting ..........................2D-6
Tire Repair ..........................................................2D-6
Specifications .......................................................2D-7
Wheels and Tires Specifications .........................2D-7
Tightening Torque Specifications ........................2D-7
Page 441 of 1556

Downloaded from www.Manualslib.com manuals search engine Front Suspension: 2B-4
Front Strut Assembly ComponentsS6RW0D2206002
1
2 3 4 5 7
6 8 910 11
121314
15
(a)
(b)
(c)
(a)
I7RW01220003-03
1. Front strut 6. Coil spring upper seat 11. Strut nut : 50 N⋅m (5.0 kgf-m, 36.5 lb-ft)
2. Coil spring 7. Strut bearing 12. Strut bracket bolt
: Insert from vehicle front side.:55 N⋅m (5.5 kgf-m, 40.0 lb-ft)
3. Bump stopper 8. Strut support 13. Strut bracket nut : 140 N⋅m (14.0 kgf-m, 101.5 lb-ft)
4. Strut dust cover 9. Strut support lower nut 14. Stabilizer joint nut : Do not reuse.
5. Coil spring seat 10. Rebound stopper 15. Stabilizer joint
Page 444 of 1556

Downloaded from www.Manualslib.com manuals search engine 2B-7 Front Suspension:
Front Strut Assembly Disassembly and
Reassembly
S6RW0D2206004
Disassembly
1) Attach special tool (A) to coil spring as shown. Turn
special tool bolts alternately until coil spring tension
is released. Rotate the strut around its axis to
confirm that the coil spring is released or not.
Special tool
(A): 09943–25010
2) While keeping coil spring compressed with special
tools, remove strut support lower nut with hexagon
wrench as shown figure.
3) Disassemble front strut assembly.Reassembly
For assembly, reverse disassembly procedure, noting
the following instructions.
1) Compress coil spring with special tool (A) until total
length becomes about 280 mm (11.0 in.) as shown.
Length
“a”: 280 mm (11.0 in.)
2) Install compressed coil spring to strut, and place coil
spring end (2) onto spring lower seat (1) as shown.
NOTE
End of coil spring must not interfere with
step of spring lower seat.
(A)
I5RW0A220007-01
I5RW0A220008-01
U: Upper side (small dia.)
L: Lower side (large dia.)
“a”
UL
I5RW0A220009-01
I4RS0A220011-01
Page 445 of 1556

Downloaded from www.Manualslib.com manuals search engine Front Suspension: 2B-8
3) Install bump stopper and strut dust cover onto strut
rod. For installing direction, refer to the figure in
“Front Strut Assembly Components”.
4) Pull strut rod as far up as possible and use care not
to allow it to retract into strut.
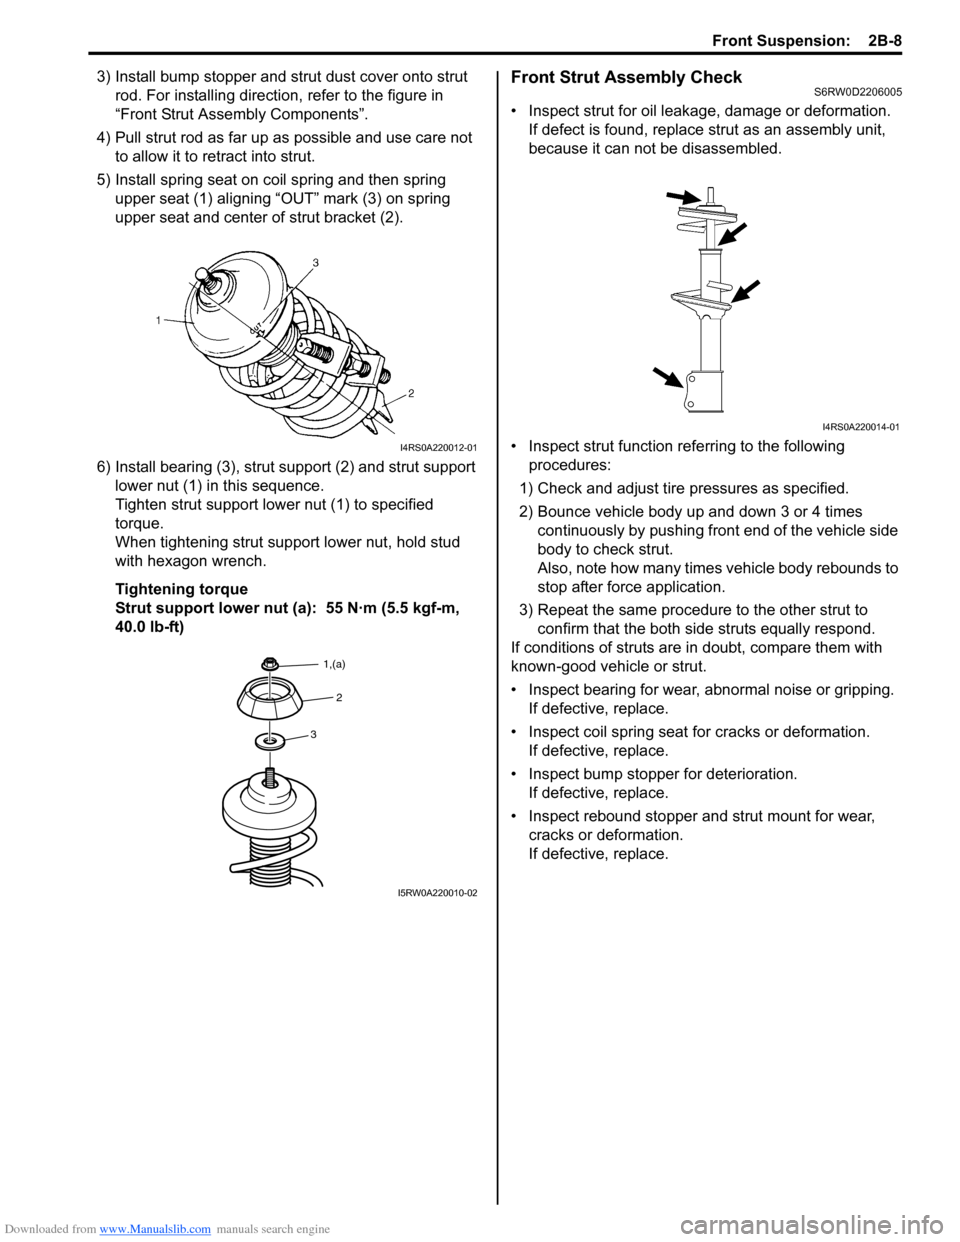
5) Install spring seat on coil spring and then spring
upper seat (1) aligning “OUT” mark (3) on spring
upper seat and center of strut bracket (2).
6) Install bearing (3), strut support (2) and strut support
lower nut (1) in this sequence.
Tighten strut support lower nut (1) to specified
torque.
When tightening strut support lower nut, hold stud
with hexagon wrench.
Tightening torque
Strut support lower nut (a): 55 N·m (5.5 kgf-m,
40.0 lb-ft)Front Strut Assembly CheckS6RW0D2206005
• Inspect strut for oil leakage, damage or deformation.
If defect is found, replace strut as an assembly unit,
because it can not be disassembled.
• Inspect strut function referring to the following
procedures:
1) Check and adjust tire pressures as specified.
2) Bounce vehicle body up and down 3 or 4 times
continuously by pushing front end of the vehicle side
body to check strut.
Also, note how many times vehicle body rebounds to
stop after force application.
3) Repeat the same procedure to the other strut to
confirm that the both side struts equally respond.
If conditions of struts are in doubt, compare them with
known-good vehicle or strut.
• Inspect bearing for wear, abnormal noise or gripping.
If defective, replace.
• Inspect coil spring seat for cracks or deformation.
If defective, replace.
• Inspect bump stopper for deterioration.
If defective, replace.
• Inspect rebound stopper and strut mount for wear,
cracks or deformation.
If defective, replace.
I4RS0A220012-01
3
2
1,(a)
I5RW0A220010-02
I4RS0A220014-01
Page 460 of 1556

Downloaded from www.Manualslib.com manuals search engine 2C-1 Rear Suspension:
Suspension
Rear Suspension
Repair Instructions
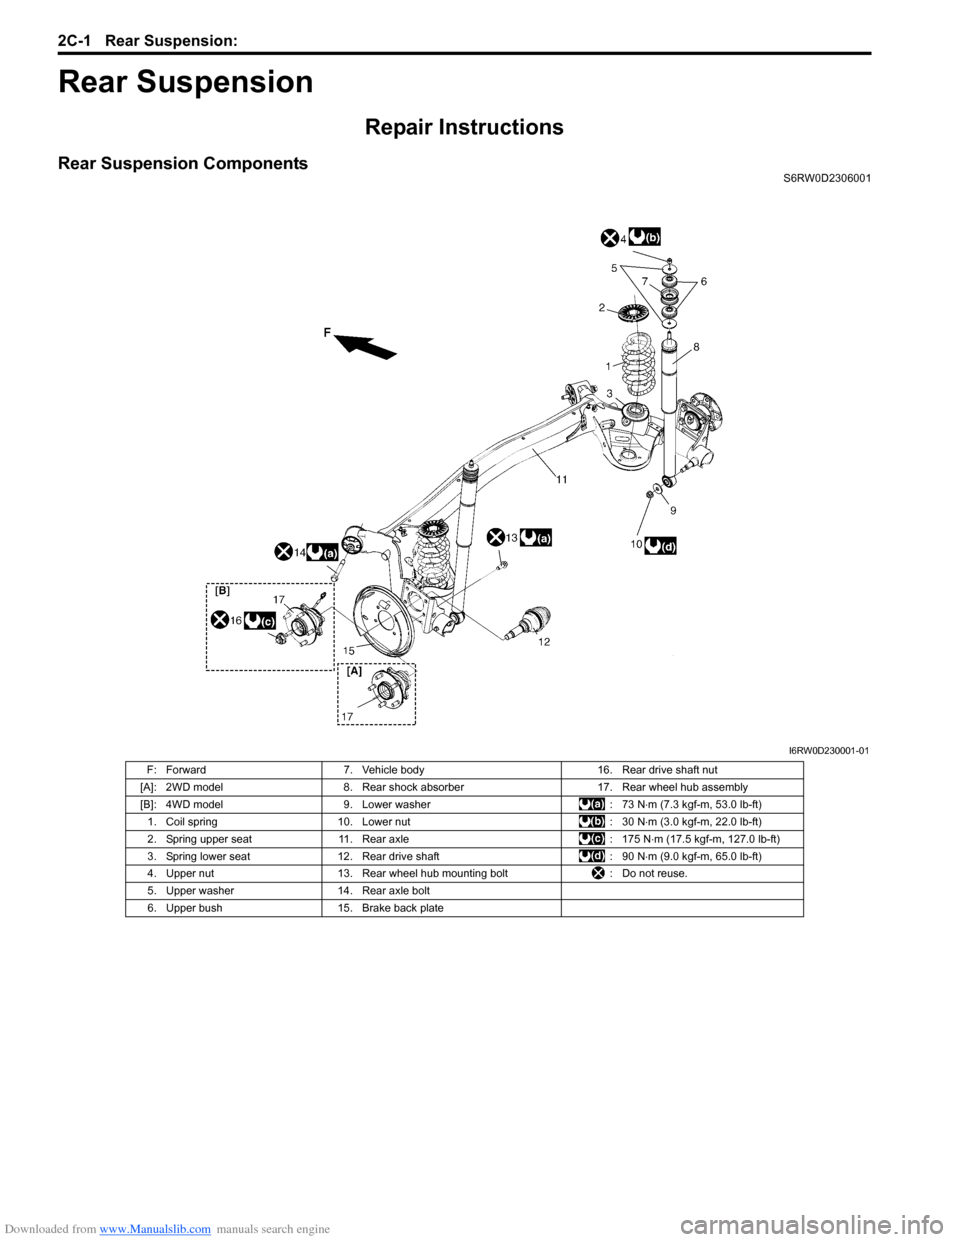
Rear Suspension ComponentsS6RW0D2306001
I6RW0D230001-01
F: Forward 7. Vehicle body 16. Rear drive shaft nut
[A]: 2WD model 8. Rear shock absorber 17. Rear wheel hub assembly
[B]: 4WD model 9. Lower washer : 73 N⋅m (7.3 kgf-m, 53.0 lb-ft)
1. Coil spring 10. Lower nut : 30 N⋅m (3.0 kgf-m, 22.0 lb-ft)
2. Spring upper seat 11. Rear axle : 175 N⋅m (17.5 kgf-m, 127.0 lb-ft)
3. Spring lower seat 12. Rear drive shaft : 90 N⋅m (9.0 kgf-m, 65.0 lb-ft)
4. Upper nut 13. Rear wheel hub mounting bolt : Do not reuse.
5. Upper washer 14. Rear axle bolt
6. Upper bush 15. Brake back plate
Page 463 of 1556

Downloaded from www.Manualslib.com manuals search engine Rear Suspension: 2C-4
Rear Coil Spring Removal and InstallationS6RW0D2306005
CAUTION!
Removal and Installation both coil springs
(right and left) at the same time to avoid rear
axle twisting and other damage.
Removal
1) Hoist vehicle and remove rear wheels.
2) Dismount rear differential (4WD model) referring to
“Rear Differential Dismounting and Remounting in
Section 3B”.
3) Remove rear fender lining (1) and then loosen rear
axle bolt (2) a little.
CAUTION!
Do not reuse rear axle bolt. Otherwise, bolt
may loosen.
4) Support both ends of rear axle (1) by using two floor
jacks (2).5) Detach each lower end (2) of shock absorbers (1)
(right and left) from rear axle.
6) Lower rear axle gradually as far down as the coil
spring can be removed.
CAUTION!
Be careful not to lower rear axle down too
much.
It may cause damage to brake flexible hose,
wheel speed sensor lead wire and parking
brake cable.
7) Remove coil spring (3).
8) Remove spring upper seat (1) from vehicle body and
lower seat (2) from rear axle.
2
1
I5RW0A230008-01
1
2
2
I5RW0A230009-01
1
2
3
I5RW0A230010-01
1
2
I5RW0A230011-01
Page 464 of 1556

Downloaded from www.Manualslib.com manuals search engine 2C-5 Rear Suspension:
Installation
1) Install spring upper seat (1) to vehicle body and
lower seat (2) to rear axle.
CAUTION!
For proper installing direction of spring
upper seat (1) and spring lower seat (2), refer
to the figure.
2) Install coil spring (3) on spring lower seat (2) of rear
axle and place coil spring end (4) onto spring lower
seat (2) as shown in figure.
3) Jack up rear axle and then install shock absorbers
(1) lower end to rear axle.
Install washers and tighten shock absorber lower
nuts (2) temporarily at this step.4) Remove floor jacks from rear axle.
5) Remount rear differential (4WD model) referring to
“Rear Differential Dismounting and Remounting in
Section 3B”.
6) Install wheel and tighten wheel nuts to specified
torque.
Tightening torque
Wheel nut: 85 N·m (8.5 kgf-m, 61.5 lb-ft)
7) Lower hoist and bounce vehicle up and down
several times to stabilize suspension.
8) Tighten absorber lower nuts and rear axle bolts to
specified torque.
NOTE
When tightening these nuts and bolts, be
sure that vehicle is not on hoist and in
unloaded condition.
Tightening torque
Rear shock absorber lower nut: 90 N·m (9.0 kgf-
m, 65.0 lb-ft)
Rear axle bolt: 73 N·m (7.3 kgf-m, 53.0 lb-ft)
9) Install rear fender lining.
Spring Upper Seat / Spring Lower Seat
Inspection
S6RW0D2306006
Inspect for cracks, deformation or damage.
Replace any defective part.[A]: Left side F: Vehicle forward
[B]: Right side “a”: 10 mm max
U: Up ward
I7RW01230004-02
1
2I4RS0A230012-01
I4RS0A230015-01