2006 SUZUKI SX4 ESP
[x] Cancel search: ESPPage 256 of 1556

Downloaded from www.Manualslib.com manuals search engine 1A-206 Engine General Information and Diagnosis:
Troubleshooting
NOTE
• Before performed trouble shooting, be sure to read the “Precautions of ECM Circuit Inspection”.
• When measuring circuit voltage, resistance and/or pulse signal at ECM connector, connect the
special tool to ECM and/or the ECM connectors referring to “Inspection of ECM and Its Circuits”.
• When A/C evaporator outlet air temp. is below 2.5 °C (36.5 °F), A/C remains OFF (“E01-47” terminal
voltage becomes 10 – 14 V). This condition is not abnormal.
Step Action Yes No
1Reception data check from BCM
1) Connect scan tool to DLC with ignition switch turned
OFF.
2) Turn ON ignition switch.
3) Check DTC for CAN-DTC.
Is there CAN-DTC?Go to “Troubleshooting
for CAN-DTC”.Go to Step 2.
2A/C switch signal circuit check
1) Start engine and select “Data List” mode on scan tool.
2) Check A/C switch signal under following conditions
respectively.
A/C switch signal
Engine running, A/C switch OFF: OFF
Engine running, A/C switch ON and blower speed
selector turned 1st position or more: ON
Is check result satisfactory?Go to Step 3. Check A/C switch
circuit.
3DTC check of ECT sensor circuit
1) Check ECM for DTC of ECT sensor circuit.
Is there DTC P0116, DTC P0117 or DTC P0118?Go to applicable DTC
diag. flow.Go to Step 4.
4A/C condenser cooling fan control system check
Is A/C condenser cooling fan started when A/C and blower
speed selector switch are turned ON with engine running?Go to Step 10. Go to Step 5.
5A/C condenser cooling fan control circuit check
1) Check DTC with scan tool.
Is DTC P0481 displayed?Go to “DTC P0481:
Cooling Fan 2 (A/C
Condenser Fan) Control
Circuit”.Go to Step 6.
Page 258 of 1556

Downloaded from www.Manualslib.com manuals search engine 1A-208 Engine General Information and Diagnosis:
11A/C compressor relay circuit check
1) Measure voltage between “E01-47” wire terminal of
ECM connector and vehicle body ground under following
conditions respectively.
Voltage between “E01-47” terminal of ECM
connector and ground
While engine running and A/C switch turned OFF: 10
– 14 V
While engine running, A/C and blower speed
selector switch turned ON: 0 – 1 V
Is check result satisfactory?Go to Step 12. Go to Step 13.
12A/C compressor relay check
1) Check A/C compressor relay referring to “Compressor
Relay Inspection in Section 7B”.
Is it in good condition?A/C compressor drive
circuit malfunction.Replace A/C
compressor relay.
13A/C compressor relay circuit check
1) Remove A/C compressor relay with ignition switch
turned OFF.
2) Turn ON ignition switch, measure voltage between “BLK/
WHT” wire terminal of A/C compressor relay connector
and vehicle body ground.
Is voltage 10 –14 V?Go to Step 14. “BLK/WHT” wire is open
circuit.
14A/C compressor relay check
1) Check A/C compressor relay referring to “Compressor
Relay Inspection in Section 7B”.
Is it in good condition?“GRY” wire is open
circuit. If OK, substitute
a known-good ECM and
recheck.Replace A/C
compressor relay. Step Action Yes No
Page 260 of 1556

Downloaded from www.Manualslib.com manuals search engine 1A-210 Engine General Information and Diagnosis:
Troubleshooting
NOTE
• Before performed trouble shooting, be sure to read the “Precautions of ECM Circuit Inspection”.
• When measuring circuit voltage, resistance and/or pulse signal at ECM connector, connect the
special tool to ECM and/or the ECM connectors referring to “Inspection of ECM and Its Circuits”.
Step Action Yes No
1DTC check
1) Connect scan tool to DLC with ignition switch turned
OFF.
2) Turn ON ignition switch and check DTC.
Is there DTC U0073 and/or U0140?Go to applicable DTC
diag. flow.Go to Step 2.
2Electric load signal circuit check
1) Start engine and select “Data List” mode on scan tool.
2) Check electric load signal under following conditions
respectively.
Blower fan signal (Manual A/C model)
Blower speed selector turned OFF, 1st or 2nd
position: OFF
Blower speed selector turned to 3rd position or
more: ON
Blower fan signal (Automatic A/C model)
Blower speed selector OFF or 1st position: OFF
Blower speed selector turned to 3rd position or
more: ON
Radiator fan signal
Engine coolant temperature is lower than 100 °C
(212 °F): OFF
Engine coolant temperature is higher than 100 °C
(212 °F): ON
Electric load signal
Engine running, rear defogger switch, small light or
headlight switch OFF: OFF
Engine running, rear defogger switch, small light or
headlight switch ON: ON
Is check result satisfactory?Electric load signal
circuit is in good
condition.Check defective signal
circuit.
Page 261 of 1556

Downloaded from www.Manualslib.com manuals search engine Engine General Information and Diagnosis: 1A-211
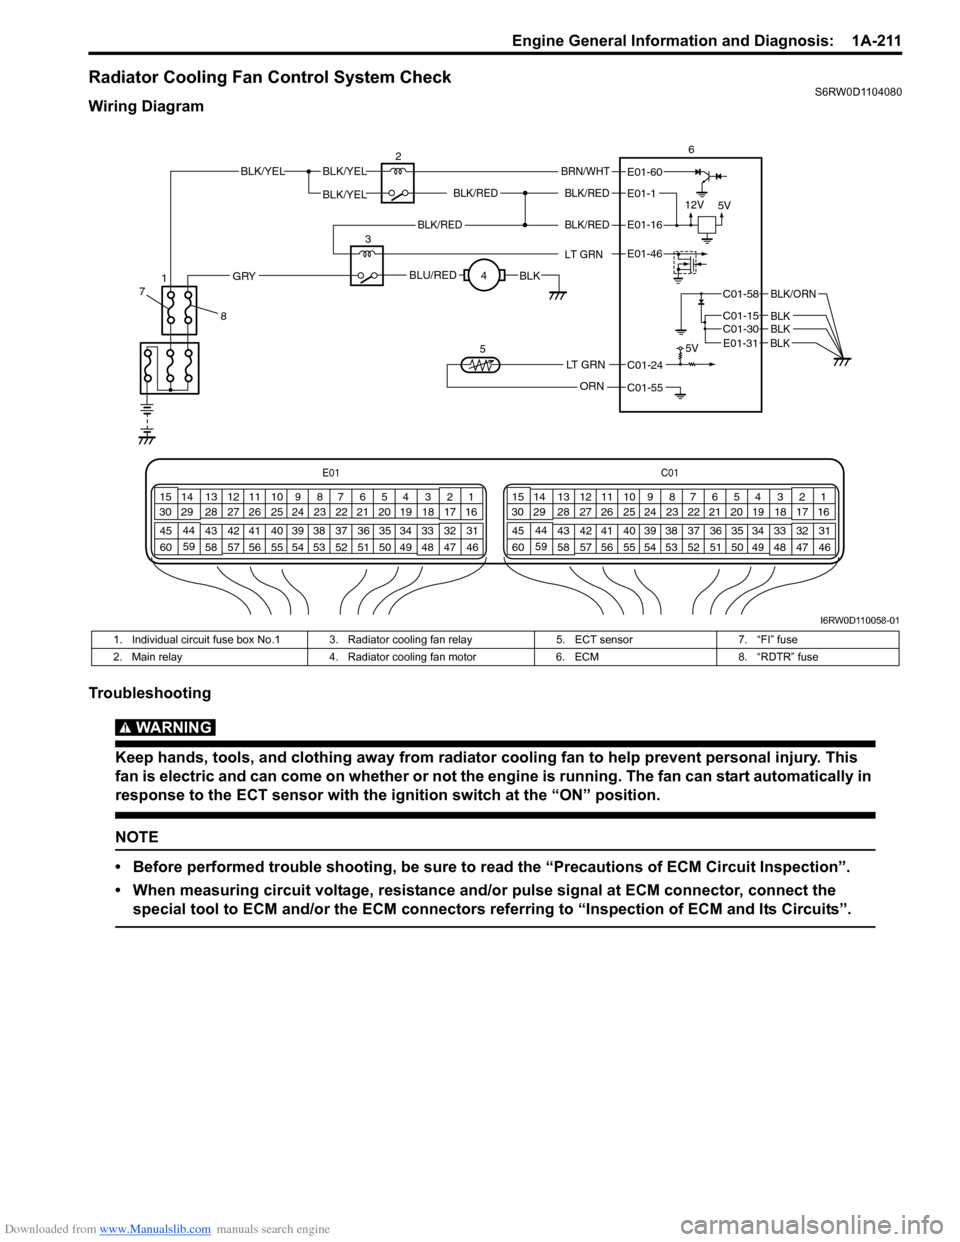
Radiator Cooling Fan Control System CheckS6RW0D1104080
Wiring Diagram
Troubleshooting
WARNING!
Keep hands, tools, and clothing away from radiator cooling fan to help prevent personal injury. This
fan is electric and can come on whether or not the engine is running. The fan can start automatically in
response to the ECT sensor with the ignition switch at the “ON” position.
NOTE
• Before performed trouble shooting, be sure to read the “Precautions of ECM Circuit Inspection”.
• When measuring circuit voltage, resistance and/or pulse signal at ECM connector, connect the
special tool to ECM and/or the ECM connectors referring to “Inspection of ECM and Its Circuits”.
E01C01
3 4
18 19 5 6 7 10 11
17 20
47 46 49 50 51 21 22
5216 259
24 14
29
55 57 54 53 59
60 582
26 27 28 15
30
56 4832 31 34 35 36 37 40 42 39 38 44
45 43 41 331 12 13
238 3 4
18 19 5 6 7 10 11
17 20
47 46 49 50 51 21 22
5216 259
24 14
29
55 57 54 53 59
60 582
26 27 28 15
30
56 4832 31 34 35 36 37 40 42 39 38 44
45 43 41 331 12 13
238
BLK/REDBLK/RED
BLK/YELBLK/YEL
BLK/YEL
BRN/WHT
12V
5V5V
26
E01-1
E01-60
C01-58
C01-15 C01-30
BLK/ORN
BLKBLK
BLK/RED
LT GRN
BLK/REDE01-16
E01-46
BLU/REDBLKGRY
LT GRN
ORN
C01-24
C01-55 3
4
5
E01-31 BLK
8 71
I6RW0D110058-01
1. Individual circuit fuse box No.1 3. Radiator cooling fan relay 5. ECT sensor 7. “FI” fuse
2. Main relay 4. Radiator cooling fan motor 6. ECM 8. “RDTR” fuse
Page 262 of 1556

Downloaded from www.Manualslib.com manuals search engine 1A-212 Engine General Information and Diagnosis:
Repair Instructions
Idle Speed and IAC Throttle Valve Opening
Inspection
S6RW0D1106001
Before idle speed check, make sure of the following.
• Lead wires and hoses of electronic fuel injection and
engine and emission control systems are connected
securely.
• Valve lash is checked according to maintenance
schedule.
• Ignition timing is within specification.
• All accessories (wipers, heater, lights, A/C, etc.) are
out of service.
• Air cleaner has been properly installed and is in good
condition.
• No abnormal air drawn in from air intake system.After all items are confirmed, check idle speed and IAC
throttle opening as follows.NOTE
Before starting engine, place transmission
gear shift lever in “Neutral”, and set parking
brake and block drive wheels.
Step Action Yes No
1Is there DTC(s) of ECT sensor circuit (DTC P0116 / P0117 /
P0118) and/or radiator cooling fan circuit (DTC P0480)?Go to corresponding
DTC flow.Go to Step 2.
2Radiator cooling fan control circuit check
1) Connect scan tool to DLC with ignition switch turned
OFF.
2) Start engine and select “Data List” on scan tool.
3) Warm up engine until coolant temp. is 100 °C, 212 °F or
higher and A/C switch turns OFF (if equipped with A/C).
(If engine coolant temp. dose not rise, check engine
cooling system or ECT sensor.)
Is radiator cooling fan started when engine coolant temp.
reached above temp.?Radiator cooling fan
control system is in
good condition.Perform from Step 2 to
Step 7 in DTC P0480
diag. flow. If OK, Go to
Ste p 3.
3Radiator cooling fan control check
1) Disconnect radiator cooling fan motor connector with
ignition switch turned OFF.
2) Run engine when ECT is over 100 °C, 212 °F.
3) Measure voltage between vehicle body ground and
“BLU/RED” wire terminal of disconnected radiator
cooling fan motor connector.
Is voltage 10 – 14 V?Go to Step 4. “BLU/RED” wire is open
or high resistance
circuit.
4Check radiator cooling fan wire circuit check
1) Turn ignition switch to OFF position.
2) Measure resistance between “BLK” wire terminal of
disconnected radiator cooling fan motor connector and
vehicle body ground.
Is resistance below 1
Ω?Go to Step 5. “BLK” wire is open or
high resistance circuit.
5Radiator cooling fan check
1) Check radiator cooling fan referring to “Radiator Cooling
Fan Assembly On-Vehicle Inspection in Section 1F”.
Is it in good condition?Substitute a known-
good ECM and recheck.Faulty radiator cooling
fan.
Page 278 of 1556

Downloaded from www.Manualslib.com manuals search engine 1C-10 Engine Electrical Devices:
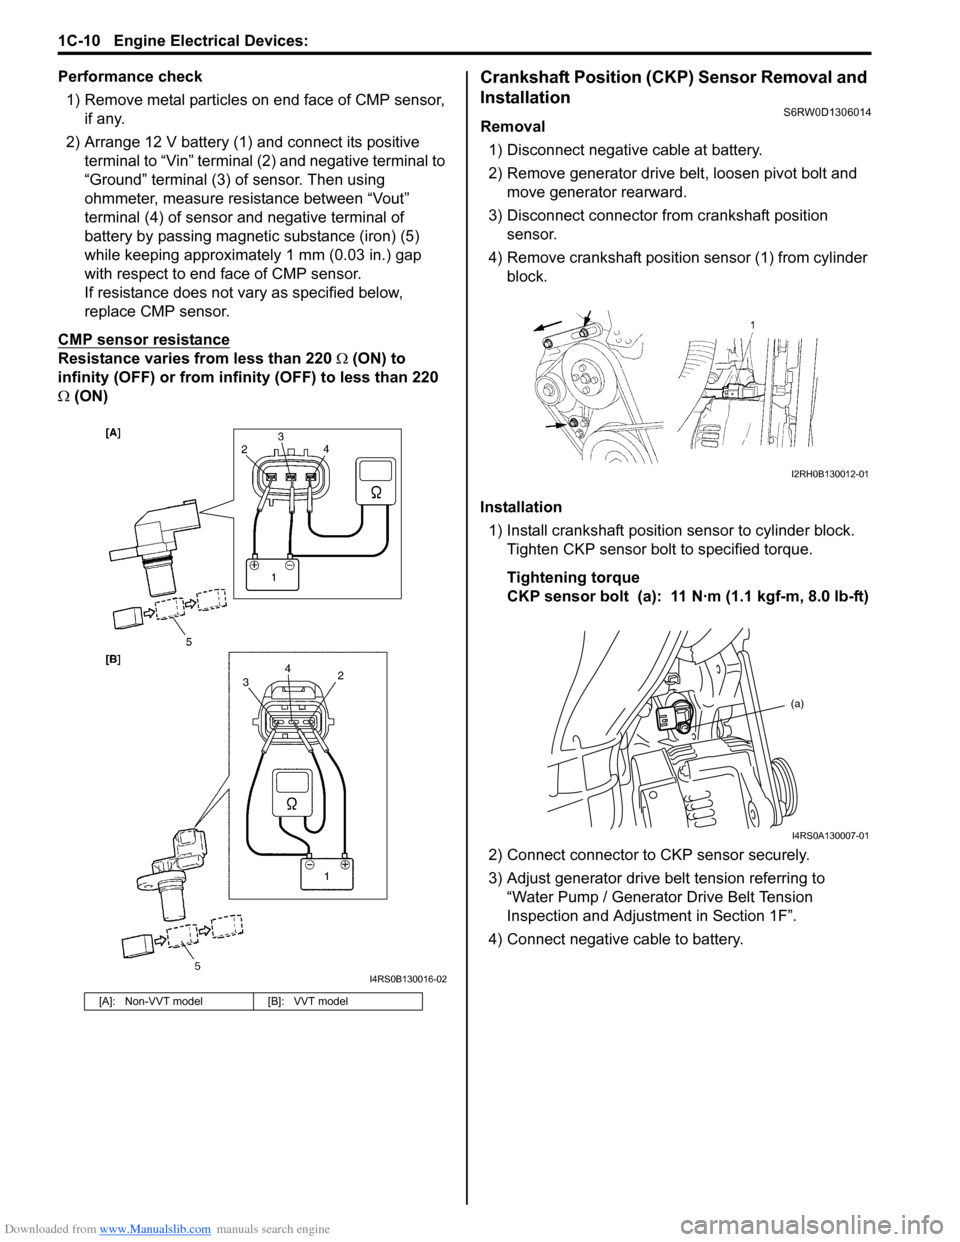
Performance check
1) Remove metal particles on end face of CMP sensor,
if any.
2) Arrange 12 V battery (1) and connect its positive
terminal to “Vin” terminal (2) and negative terminal to
“Ground” terminal (3) of sensor. Then using
ohmmeter, measure resistance between “Vout”
terminal (4) of sensor and negative terminal of
battery by passing magnetic substance (iron) (5)
while keeping approximately 1 mm (0.03 in.) gap
with respect to end face of CMP sensor.
If resistance does not vary as specified below,
replace CMP sensor.
CMP sensor resistance
Resistance varies from less than 220 Ω (ON) to
infinity (OFF) or from infinity (OFF) to less than 220
Ω (ON)
Crankshaft Position (CKP) Sensor Removal and
Installation
S6RW0D1306014
Removal
1) Disconnect negative cable at battery.
2) Remove generator drive belt, loosen pivot bolt and
move generator rearward.
3) Disconnect connector from crankshaft position
sensor.
4) Remove crankshaft position sensor (1) from cylinder
block.
Installation
1) Install crankshaft position sensor to cylinder block.
Tighten CKP sensor bolt to specified torque.
Tightening torque
CKP sensor bolt (a): 11 N·m (1.1 kgf-m, 8.0 lb-ft)
2) Connect connector to CKP sensor securely.
3) Adjust generator drive belt tension referring to
“Water Pump / Generator Drive Belt Tension
Inspection and Adjustment in Section 1F”.
4) Connect negative cable to battery.
[A]: Non-VVT model [B]: VVT model
I4RS0B130016-02
I2RH0B130012-01
(a)
I4RS0A130007-01
Page 279 of 1556

Downloaded from www.Manualslib.com manuals search engine Engine Electrical Devices: 1C-11
Crankshaft Position (CKP) Sensor InspectionS6RW0D1306015
Visual check
• Check that O-ring is free from damage.
• Check that end face of sensor and signal pulley tooth
are free from any metal particles and damage.
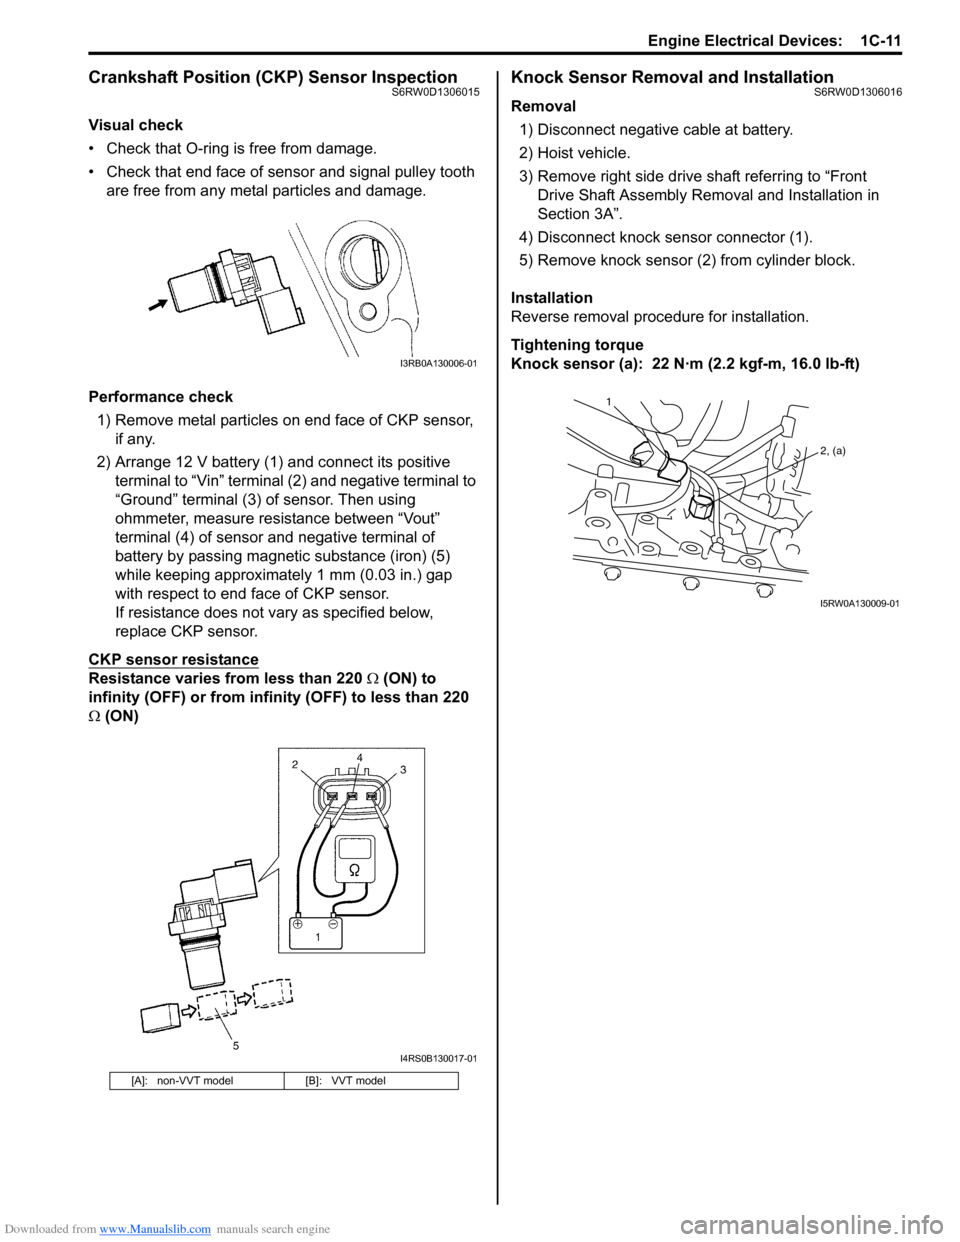
Performance check
1) Remove metal particles on end face of CKP sensor,
if any.
2) Arrange 12 V battery (1) and connect its positive
terminal to “Vin” terminal (2) and negative terminal to
“Ground” terminal (3) of sensor. Then using
ohmmeter, measure resistance between “Vout”
terminal (4) of sensor and negative terminal of
battery by passing magnetic substance (iron) (5)
while keeping approximately 1 mm (0.03 in.) gap
with respect to end face of CKP sensor.
If resistance does not vary as specified below,
replace CKP sensor.
CKP sensor resistance
Resistance varies from less than 220 Ω (ON) to
infinity (OFF) or from infinity (OFF) to less than 220
Ω (ON)
Knock Sensor Removal and InstallationS6RW0D1306016
Removal
1) Disconnect negative cable at battery.
2) Hoist vehicle.
3) Remove right side drive shaft referring to “Front
Drive Shaft Assembly Removal and Installation in
Section 3A”.
4) Disconnect knock sensor connector (1).
5) Remove knock sensor (2) from cylinder block.
Installation
Reverse removal procedure for installation.
Tightening torque
Knock sensor (a): 22 N·m (2.2 kgf-m, 16.0 lb-ft)
[A]: non-VVT model [B]: VVT model
I3RB0A130006-01
I4RS0B130017-01
1
2, (a)
I5RW0A130009-01
Page 285 of 1556

Downloaded from www.Manualslib.com manuals search engine Engine Mechanical: 1D-3
Camshaft Position Control (VVT Variable Valve Timing) System DescriptionS6RW0D1401002
System Description
The VVT system is an electronic control system which continuously vary and optimize the intake valve timing in
response to the engine operating condition.
The optimized intake valve timing produce such an air intake with high efficiency that both the higher power generation
and lower fuel consumption can be attained in the whole engine speed range from low to high. In the area of the
average engine load, low emission of nitrogen oxides (NOx) and high fuel efficiency can also be attained by making
the valve opening overlap between the intake and exhaust valves longer.
For the brief of the system operation, the intake valve timing is varied by the cam timing sprocket (1) which varies the
rotational phase between the intake camshaft (3) and sprocket. The rotor (2) in the cam timing sprocket is actuated by
switching or adjusting the hydraulic pressure applied to the chambers for the timing advancing (7) and/or retarding (6).
To switch or adjust the hydraulic pressure appropriately, ECM operates the oil control valve (12) with detecting the
engine speed, intake air value, throttle opening, engine coolant temperature and camshaft position (angle).
1
4
5
10
8
9
2
7
6
12
11
3
60˚ (variable angle)
Most retarded timing Most advanced timing
Exhaust valveIntake valve
Crank angle
Overlap of valves
Valve lift
I5RW0C140002-01
4. Oil passage to chamber for timing retarding 8. Oil filter 10. Oil pan
5. Oil passage to chamber for timing advancing 9. Oil pump 11. Control signal from ECM