2006 SKODA ROOMSTER technical data
[x] Cancel search: technical dataPage 22 of 274

Instruments and Indicator/Warning Lights21
Using the systemSafetyDriving TipsGeneral MaintenanceBreakdown assistanceTechnical Data
Average fuel consumption
The average fuel consumption since the memory was last erased is
shown in the display in litres/100 km ⇒page 18. This information can help
you to adapt your style of driving to the fuel consumption you wish to
achieve.
If you wish to determine the average fuel consumption over a certain
period of time you must first erase the memory at the start of the new
measurement using the button ⇒page 19, fig. 6 . A zero appears in
the display for the first 300 m you drive after erasing the memory.
The indicated value will be updated every 5 seconds while you are driving.
Note
The amount of fuel consumed will not be indicated.
Driving time
The driving time which has elapsed since the memory was last erased,
appears in the display ⇒page 18. If you wish to calculate the driving time
from a particular time of day you must first erase the memory at this
moment in time by pressing the button ⇒page 19, fig. 6 .
The maximum time indicated in both switch positions is 99 hours and 59
minutes. The indicator is set back to null if this period is exceeded.
Distance driven
The distance driven since the memory was last erased appears in the
display ⇒page 18. If you wish to calculate the distance driven from a particular time of day you must first erase the memory at this moment in
time by pressing the button
⇒page 19, fig. 6 .
The maximum distance indicated in both switch positions is 9999 km. The
indicator is set back to null if this period is exceeded.
Average speed
The average speed since the memory was last erased is shown in the
display in km/hour ⇒page 18. If you wish to determine the average speed
over a certain period of time you must first erase the memory at the start
of the new measurement using the button ⇒page 19, fig. 6 .
A zero appears in the display for the first 100 m you drive after erasing the
memory.AB
AB
AB
AB
NKO 20 A05.book Page 21 Wednesday, June 21, 2006 1:42 PM
Page 24 of 274

Instruments and Indicator/Warning Lights23
Using the systemSafetyDriving TipsGeneral MaintenanceBreakdown assistanceTechnical Data
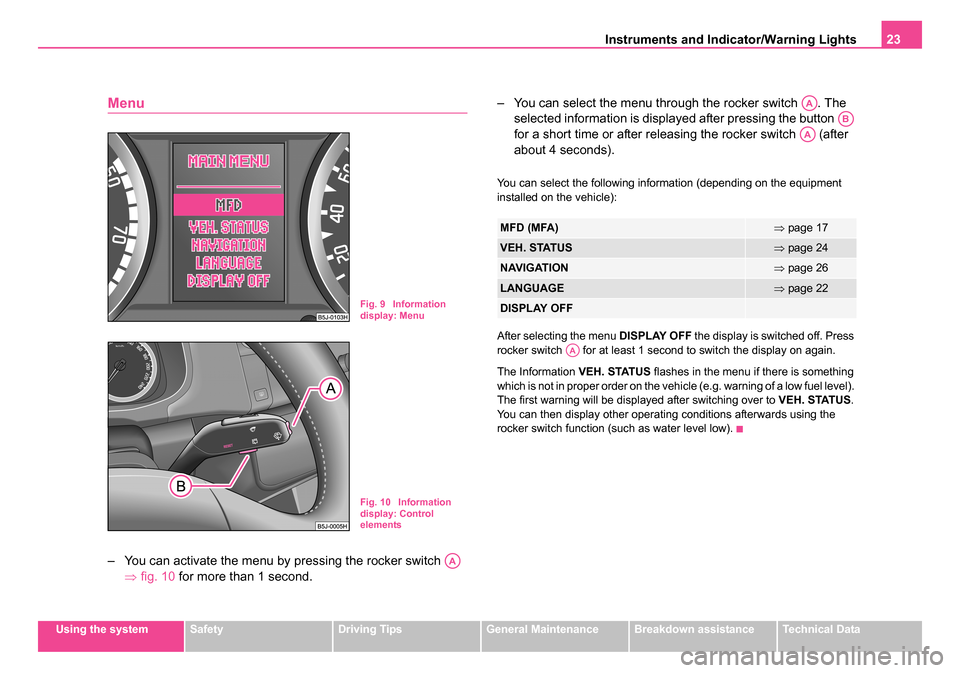
Menu
– You can activate the menu by pressing the rocker switch
⇒fig. 10 for more than 1 second. – You can select the menu through the rocker switch . The
selected information is displayed after pressing the button
for a short time or after releasing the rocker switch (after
about 4 seconds).
You can select the following information (depending on the equipment
installed on the vehicle):
After selecting the menu DISPLAY OFF the display is switched off. Press
rocker switch for at least 1 second to switch the display on again.
The Information VEH. STATUS flashes in the menu if there is something
which is not in proper order on the vehicle (e.g. warning of a low fuel level).
The first warning will be displayed after switching over to VEH. STATUS.
You can then display other operating conditions afterwards using the
rocker switch function (such as water level low).
Fig. 9 Information
display: Menu
Fig. 10 Information
display: Control
elements
AA
MFD (MFA)⇒ page 17
VEH. STATUS⇒page 24
NAVIGATION⇒page 26
LANGUAGE⇒page 22
DISPLAY OFF
AA
AB
AA
AA
NKO 20 A05.book Page 23 Wednesday, June 21, 2006 1:42 PM
Page 26 of 274

Instruments and Indicator/Warning Lights25
Using the systemSafetyDriving TipsGeneral MaintenanceBreakdown assistanceTechnical Data
The red symbols indicate
danger (priority 1) while the yellow symbols indi-
cate a warning (priortity 2). Information for the driver may also appear in
addition to the symbols ⇒page 27.
Investigate the displayed faults as soon as possible. If several operational
faults exist at the same time, the symbols will appear one after the other
and light up each for about 10 seconds.
The error messages are displayed and stored in the menu VEH. STATUS.
There is at least one error message to be read when the term VEH.
STATUS is flashing in the main menu. The display will show STATUS 1/2
(for example) if a number of error messages are displayed. This display
indicates that the first of a total of two error messages should be
displayed.
Actuate the rocker switch , to call up the individual error messages.
If a fault occurs, a warning signal will also sound in addition to the symbol
and text in the display:
•Priority 1 - three warning signals,
•Priority 2 - one warning signal.
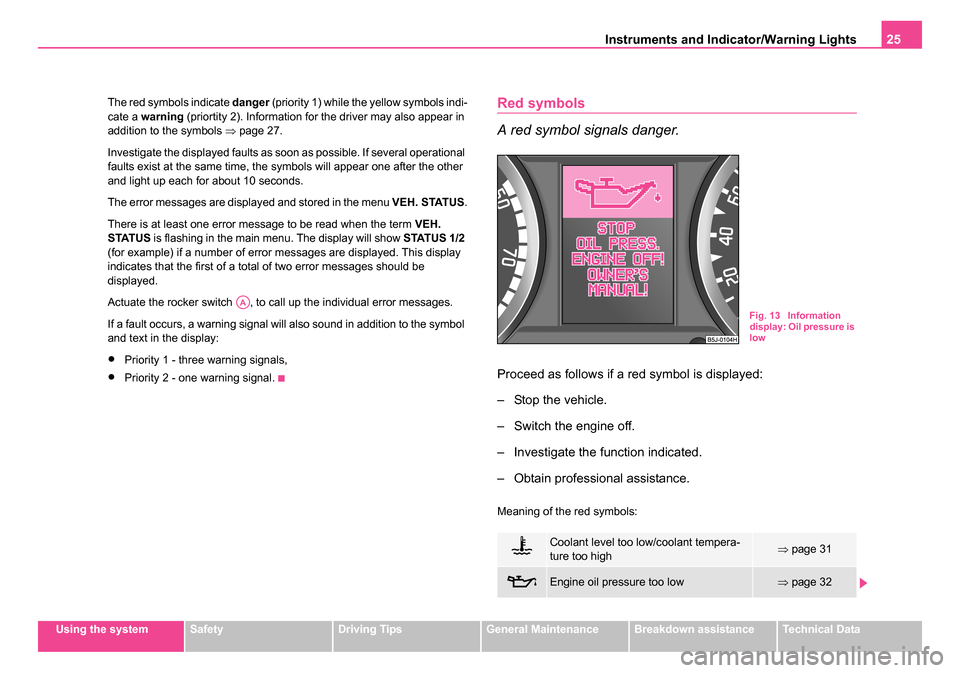
Red symbols
A red symbol signals danger.
Proceed as follows if a red symbol is displayed:
– Stop the vehicle.
– Switch the engine off.
– Investigate the function indicated.
– Obtain professional assistance.
Meaning of the red symbols:
AA
Coolant level too low/coolant tempera-
ture too high⇒ page 31
Engine oil pressure too low⇒page 32
Fig. 13 Information
display: Oil pressure is
low
NKO 20 A05.book Page 25 Wednesday, June 21, 2006 1:42 PM
Page 28 of 274

Instruments and Indicator/Warning Lights27
Using the systemSafetyDriving TipsGeneral MaintenanceBreakdown assistanceTechnical Data
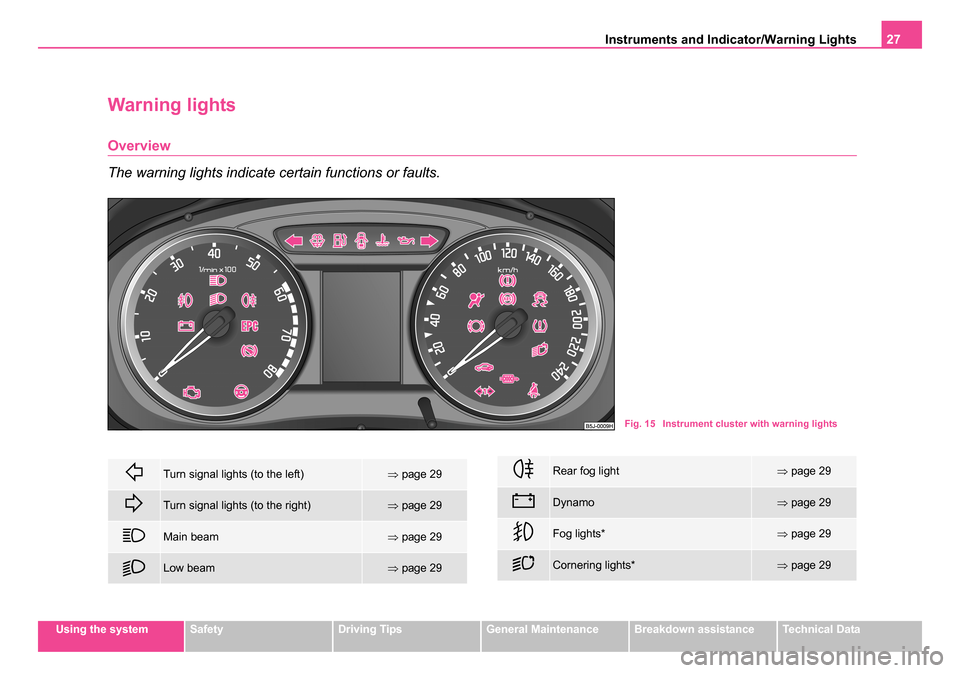
Warning lights
Overview
The warning lights indicate certain functions or faults.
Fig. 15 Instrument cluster with warning lights
Turn signal lights (to the left)⇒page 29
Turn signal lights (to the right)⇒page 29
Main beam⇒page 29
Low beam⇒page 29
Rear fog light⇒page 29
Dynamo⇒page 29
Fog lights*⇒page 29
Cornering lights*⇒page 29
NKO 20 A05.book Page 27 Wednesday, June 21, 2006 1:42 PM
Page 30 of 274

Instruments and Indicator/Warning Lights29
Using the systemSafetyDriving TipsGeneral MaintenanceBreakdown assistanceTechnical Data
Turn signal system
Either the left or right indicator light flashes depending on the posi-
tion of the turn signal lever.
The indicator light flashes at twice its normal rate if a turn signal light fails.
This does not apply when towing a trailer.
Switching off the hazard warning light system is switched on will cause all
of the turn signal lights as well as both indicator lights to flash.
Further information about the turn signal system ⇒page 59.
Main beam
The indicator light comes on when the main beam is selected or also
when the headlight flasher is operated.
Further information about the main beam ⇒page 59.
Low beam
The indicator light comes on when low beam is selected ⇒page 55.
Rear fog light
The warning light comes on when the rear fog lights are operating
⇒ page 57.
Alternator
The warning light comes on after the ignition has been switched on. It
should go out after the engine has started.
If the warning light does not go out after the engine has started, or comes
on when driving, drive to the nearest specialist garage. The vehicle battery
will be discharged in this case so switch off all non-essential electrical
components.
The following text will be displayed in the information display*:
ALTERNATOR WORKSHOP! (ALTERNATOR WORKSHOP!)
Caution
If the warning light comes on when driving and in addition the warning
light (cooling system fault) also comes on in display, you must then
stop the car immediately and switch the engine off - risk of engine
damage!
Fog lights*
The warning light comes on when the fog lights are operating
⇒ page 57.
Cornering lights*
If the warning light flashes for 1 minute while driving or after switching
on the ignition and a warning signal sounds, a fault is confirmed.
Further information ⇒page 56.
NKO 20 A05.book Page 29 Wednesday, June 21, 2006 1:42 PM
Page 32 of 274

Instruments and Indicator/Warning Lights31
Using the systemSafetyDriving TipsGeneral MaintenanceBreakdown assistanceTechnical Data
an emergency programme which enables you to drive to the nearest
specialist garage by adopting a gentle style of driving.
The following text will be displayed in the information display*:
ENGINE FAULT WORKSHOP!
Turn signal system for vehicles towing a trailer*
The indicator light on vehicles towing a trailer flashes together with the
respective indicator light for the turn signal system.
The indicator light
does not flash if a turn signal light on the trailer or
on the vehicle is not operating.
Coolant temperature/coolant level
The warning light comes on for a few seconds 1) when the ignition is
switched on.
The coolant temperature is too high or the coolant level too low if the
warning light
does not go out after the engine is started or flashes while
driving.
3 peeps sound as an additional warning signal.
In this case stop and switch the engine off and check the coolant level;
top up the coolant as necessary ⇒page 217, “Replenishing the coolant”.
Do not continue your journey if for some reason it is not possible under
the conditions prevailing to top up with coolant. Keep the engine switched off
and obtain professional assistance from a specialist garage,
otherwise it could lead to severe engine damage.
If the coolant is within the specified range, the increased temperature may
be caused by an operating problem at the coolant fan. Check the fuse for
the coolant fan, replace it if necessary ⇒page 253, “Fuse assignment at
battery”.
Do not continue driving if the warning light does not go off although the
fluid is at the correct level and also the fuse of the fan is in proper order.
Contact a specialist garage to obtain assistance.
Please also refer to the additional instructions ⇒page 215, “Cooling
system”.
The following text will be displayed in the information display*:
STOP CHECK COOLANT OWNER'S MANUAL!
WARNING
•If you must stop for technical reasons, then park the vehicle at
a safe distance from the traffic and switch off the engine and switch
on the hazard warning light system ⇒page 59, “Switch for hazard
warning lights ”.
•Pay attention to the following instructions ⇒page 210,
“Working in the engine compartment” before checking the coolant
fluid level and opening the bonnet.
•Take care when opening the coolant expansion bottle. If the
engine is hot, the cooling system is pressurized - risk of scalding.
It is best to allow the engine to cool down before removing the cap.
•Do not touch the coolant fan! The coolant fan may switch on
automatically even if the ignition is off.
1)The warning light on vehicles fitted with information display does not come on
after switching the ignition on, but only if the coolant temperature is to\
o high or the
coolant level is too low.
NKO 20 A05.book Page 31 Wednesday, June 21, 2006 1:42 PM
Page 34 of 274

Instruments and Indicator/Warning Lights33
Using the systemSafetyDriving TipsGeneral MaintenanceBreakdown assistanceTechnical Data
In this case have the engine inspected without delay by a specialist
garage.
The following text will be displayed in the information display*:
OIL SENSOR WORKSHOP! (OIL SENSOR WORKSHOP!)
WARNING
•If you must stop for technical reasons, then park the vehicle at
a safe distance from the traffic and switch off the engine and switch
on the hazard warning light system ⇒page 59.
•The red oil pressure light is not an oil level indicator! One
should therefore check the oil level at regular intervals, preferably
after every refueling stop.
•Pay attention to the following instructions ⇒page 210,
“Working in the engine compartmen t” before checking the coolant
fluid level and opening the bonnet.
Thickness of the brake pads*
If the warning light comes on, contact a specialist garage immediately
and have the brake pads on all of the wheels inspected.
A peep sounds as an additional warning signal.
The following text will be displayed in the information display*: CHECK BRAKE PAD
Open door*
The warning light comes on if one or several doors, the bonnet or tail-
gate is opened.
The warning light comes on even when the ignition is switched off. The
warning light goes out 5 minutes after switching off the ignition if one or
several doors, the bonnet or tailgate is opened. The warning light goes out
after closing the doors.
Windshield washer fluid level*
The warning light comes on when the ignition is switched on if there is
insufficient fluid in the windshield washer system. Top up with liquid
⇒ page 224.
A peep sounds as an additional warning signal.
The following text will be displayed in the information display*: REFILL WASHER LIQUID
Control system for exhaust
The warning light comes on after the ignition has been switched on.
If the warning light does not go out after starting the engine or it lights up
or flashes when driving, a fault exists in an exhaust relevant component.
The engine management system selects an emergency programme
which enables you to drive to the nearest specialist garage by adopting a
gentle style of driving.
NKO 20 A05.book Page 33 Wednesday, June 21, 2006 1:42 PM
Page 36 of 274

Instruments and Indicator/Warning Lights35
Using the systemSafetyDriving TipsGeneral MaintenanceBreakdown assistanceTechnical Data
Selector lever lock* (automatic gearbox)
If the warning light lights up, operate the brake pedal. This is neces-
sary, in order to be able to move the selector lever out of the position P or
N .
Electronic stability programme (ESP)*
The warning light comes on for a few seconds when the ignition is
switched on.
Components of the ESP system also include the Traction Control System
(TCS), Electronic Differential Lock (EDL), and the Antilock Brake System
ABS (ABS).
The warning light comes on when driving when a control cycle is acti-
vated.
The warning light will come on and remains on if the ESP is switched off
or if there is a fault in the system.
The fact that the ESP system operates together with the ABS means that
the ESP warning light will also come on if the ABS system is not operating
properly.
Further information on the ESP ⇒page 177, “Electronic stability
programme (ESP)*”.
Electronic Differential Lock (EDL)*
The EDL is a part of the ESP. A fault in the EDL is indicated by the ESP
warning light
in the instrument cluster. Have the vehicle inspected
immediately by your specialist garage. Further information on the EDL
⇒ page 179.
Antilock brake system (ABS)*
The warning light shows the functionality of the ABS.
The warning light comes on for a few seconds after the ignition has been
switched on or when starting the engine. The warning light goes out after
an automatic check sequence has been completed.
A fault in the ABS
The system is not functioning properly if the ABS warning light
does
not go out within a few seconds after switching on the ignition, does not
light up at all or lights up while driving. The vehicle will only be braked by
the normal brake system. Visit a specialist garage as quickly as possible
and adjust your style of driving in the meantime since you will not know
how great the damage is.
Three additional warning tones will sound if there is a major fault in the
ABS.
Further information about ABS ⇒page 181, “Antilock brake system
(ABS)*”.
A fault in the entire brake system
If the ABS warning light
comes on together with the brake system
warning light (handbrake must be released), there is a fault not only in
the ABS but also in another part of the brake system ⇒.
The following text will be displayed in the information display*: STOP BRAKE FAULT OWNER'S MANUAL!
WARNING
•If the brake system warning light comes on together with the
ABS warning light stop the vehicle immediately and check the
brake fluid level in the reservoir ⇒page 218, “Brake fluid”. If the
fluid level has dropped below the MIN marking, do not drive any
NKO 20 A05.book Page 35 Wednesday, June 21, 2006 1:42 PM