Page 169 of 387

Controls, Safety, Instruments
169
Comfort function on vehicles without
Porsche Entry & DriveOpening and closing the Panorama roof
system
fHold the vehicle key in the door lock in the
unlocking or locking position until the windows
and the Panorama roof system have reached
the desired position.Comfort function on vehicles with
Porsche Entry & DriveOpening and closing the Panorama roof
system
fHold the vehicle key in the door lock in the
unlocking or locking position until the windows
and the Panorama roof system have reached
the desired position.
Closing the Panorama roof system
fHold the button in the door handle when
locking the vehicle until the windows and the
Panorama roof system have reached the
desired position.
Force limiter for the Panorama roof
system All roof elements are equipped with a force limiter.
If the sliding roof or the sliding/lifting roof element
is obstructed during the closing or opening
process, the respective roof element opens or
closes again immediately.
Closing a roof element after triggering the
force limiter
1. Remove the obstruction.
2. Turn knob to position A again.Electric emergency closing function
Warning!
Risk of injury from the emergency closing
function for the Panorama roof system. The
force limiter is not available and the roof
elements will close with full force.
fTake care to ensure that nobody can be injured when the Panorama roof system is closing.
If the roof cannot be closed due to dirt, ice, or
similar substances:
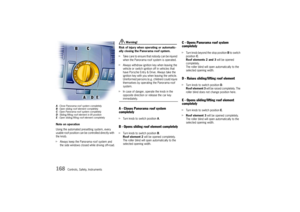
1. Turn knob to position A.
2. Hold the knob in position A until all roof
elements are completely closed.
Save final position of the Panorama roof
systemAfter disconnecting/reconnecting the vehicle
battery or if the vehicle battery is discharged, or
after emergency starting with jumper cables, the
final positions of the Panorama roof system are
lost.
Warning!
Risk of injury when closing the Panorama
roof system. The force limiter is not available
and the roof elements will close with full
force.
fTake care to ensure that nobody can be injured when the Panorama roof system is closing.
1. Switch ignition off.
2. Turn knob to position A.
3. Switch ignition on.
4. Hold knob in position A. The closing process
begins after around 5 seconds.
Hold the knob in position until the roller blind
and all roof elements are completely closed.
The process lasts approximately 20 seconds.
Note on operation
If the procedure is interrupted, saving the final
positions must be started from the beginning.
Page 170 of 387

170
Controls, Safety, Instruments
Roller blindA roller blind is integrated into the Panorama roof
system and can be adjusted by activating the
rocker switch in the roof console.
Opening/closing the roller blindThe rocker switch has a two-stage function:
– If the rocker switch is pressed to the first
stage, the roller blind opens or closes as long
as the rocker switch is being pressed.
– If the rocker switch is pressed completely, the
roller blind opens or closes to the final
position.
Opening the roller blind
fPress rocker switch to the rear F.
Closing the roller blind
fPress rocker switch to the front G.
Note
If the rocker switch is pressed completely while
the roof elements are moving, the roller blind
opens or closes to the final position after the roof
elements have reached the selected position.
Roller blind cleaning position1. Close Panorama roof system and roller blind
completely.
2. Turn knob to position C. The Panorama roof
system opens completely.
3. When the Panorama roof system has reached
the final position, hold the rocker switch G to
the front for longer than 3 seconds, until the
roller blind is completely closed.
4. Remove dirt (e.g., leaves).
5. Keep the rocker switch F pressed to the rear,
until the roller blind is completely closed.
6. Close sliding roof element.
Caution!
Risk of damage if the Panorama roof system
and roller blind are in the roller blind
cleaning position while driving.
fClose the Panorama roof system completely one time before driving off.
Page 171 of 387

Controls, Safety, Instruments
171
Emergency operation of the Panorama
roof systemUse emergency operation only under exceptional
circumstances if the electric emergency closing
function cannot be implemented and the end
position cannot be stored.
fBefore using emergency operation, please
check whether the fuse is defective. After the
fuse has been changed, the limit positions of
the panorama roof system will have to be
stored again.
Danger!
Danger of injury and risk of damage when
closing the roof.
fTake care to ensure that nobody can be injured
when the roof elements are activated.
fDo not operate the Panorama roof system with
the knob during and after emergency opera-tion..1. Remove key B from the lower storage tray
(underneath the rubber mat) in the center
console.2. Unclip cover.
3. Insert the key in opening H or I until it can be
felt and heard to engage.
This requires a somewhat greater effort.
H – Emergency operation for the sliding roof
element and the draft deflector
I – Emergency operation for the sliding/lifting
roof element
f f f
Page 172 of 387
172
Controls, Safety, Instruments 4. Hold the key in this position and turn.
To close the roof – turn clockwise
To open the roof – turn counter-clockwise
Note on operation
When using emergency closing for the sliding/
lifting roof element, make sure that the roof
element is completely closed (center position
between sliding and lifting roof position).
5. Remove the key and return it to the storage
tray.
6. Clip in cover.
To rule out malfunctions in the system, the final
positions of the Panorama roof system must be
saved again after emergency operation.
fPlease observe the chapter “SAVE FINAL
POSITION OF THE PANORAMA ROOF SYSTEM”
on Page 169.
Page 173 of 387

Controls, Safety, Instruments
173
Parking AidsParkAssistParkAssist provides a visual and acoustic indica-
tion to the driver of the distance between the
vehicle and a large obstacle.
ParkAssist is switched on automatically when the
ignition is switched on and remains active up to a
speed of approx. 9 mph (14 km/h).
ParkAssist is switched off automatically at high
speed. ParkAssist is switched on again auto-
matically when the speed drops below approx.
9 mph (14 km/h).
The selector lever position determines activation
levels for ParkAssist and the corresponding area
that is monitored.
Selector lever position:
–P – ParkAssist is not activated.
–R, N – ParkAssist is activated for the front and
rear areas.
–D, M – ParkAssist is activated for the front ar-
ea.
Danger!
Risk of serious personal injury or death.
ParkAssist cannot detect small objects such
as children and pets.
Even when using ParkAssist, the driver is still
responsible for taking due care when park-
ing and when assessing obstacles.
fMake sure that no persons especially small
children, animals or obstacles are within the maneuvering area.
Switching ParkAssist on and off
fSwitch ParkAssist on and off using button A in
the roof console.
When ParkAssist is switched off, the indicator
light in the button lights up.
Note on operation
It is a good idea to switch off ParkAssist when
driving off-road and on unpaved surfaces.
f f f
Page 174 of 387

174
Controls, Safety, Instruments
Front ultrasound sensorsSensors
Six ultrasound sensors in the front and rear bump-
ers measure the distance to the closest obstacle.
– Range of outer sensors
(front and rear):
approx. 24 in. (60 cm)
– Range of front middle sensors (arrow):
approx. 48 in. (120 cm)
Rear ultrasound sensors– Range of rear middle sensors (arrow)
(only in vehicles without spare wheel bracket):
approx. 59 in. (150 cm)
– Range of rear middle sensors
(only in vehicles with spare wheel bracket):
approx. 48 in. (120 cm)
Obstacles cannot be detected in the "blind" sensor
area (above and below the sensors).Maintenance note
fThe sensors must always be kept free of dust,
ice and snow in order to ensure that they are
fully functional.
fDo not damage sensors by abrasion or
scratching.
fMaintain sufficient distance when cleaning with
steam-jet units.
The sensors will be damaged if the pressure is
too high.
Note on operation
The rear ultrasound sensors may not function
correctly if tires that have not been recommended
by Porsche are fitted on the spare wheel bracket.
If the spare wheel bracket is open, this may impair
the function of the rear ultrasound sensors.
In vehicles that have air suspension with level
control and height adjustment, the system may
not recognise obstacles near the ground at terrain
level or special terrain level.
Page 175 of 387

Controls, Safety, Instruments
175
A- Front display – left monitoring area
B- Front display – right monitoring areaWarning indicators, signal tones, distances
The warning indicator for the front area is located
on the dashboard.
The warning indicator for the rear area is located
in the rooflining at the rear of the loadspace.
The warning indicators for the various monitoring
areas (left and right) are subdivided respectively
into one green, 4 yellow and 2 red light segments.
C- Rear display – right monitoring area
D- Rear display – left monitoring areaIf ParkAssist is activated, the green light seg-
ments of the active warning indicators are lit up
continuously.
If the vehicle approaches an obstacle that has
been detected by the sensors, one or more of the
yellow or red light segments lights up, depending
on the distance to the obstacle.If the first yellow light segment lights up, the ob-
stacle is still 48 in. (120 cm) (to the front) or 48 in.
to 59 in. (120 to 150 cm) (to the rear) away.
A brief signal tone sounds when reversing.
An intermittent tone sounds when the distance
becomes less than approx. 24 in. (60 cm). The
fourth yellow light segment lights up.
A continuous tone sounds when the distance be-
comes less than approx. 10 in. (25 cm) (on vehi-
cles with trailer coupling: approx. 14 in. or
(35 cm)). The second red light segment lights
up.
If the obstacle is approached even closer, the sys-
tem may not be able to recognize the obstacle any
longer.
fSet the radio volume so that the signal tones
are not drowned out.
You can have the volume of the signal tones ad-
justed to your own requirements at your author-
ized Porsche dealer.
Note on operation
If the obstacle is approached even closer after the
continuous tone sounds and the second red light
segment lights up, the system may not be able to
recognize the obstacle any longer.
Page 176 of 387

176
Controls, Safety, Instruments Limits of ultrasonic measurement
– ParkAssist cannot detect sound-absorbing ob-
stacles (e.g. powder snow),
– Sound-reflecting obstacles (e.g. glass surfac-
es, flat painted surfaces),
– And very thin obstacles.
Other ultrasound sources (e.g. pneumatic brakes
of other vehicles, jackhammers) can interfere with
detection of obstacles.
Fault indication without warning tone
All red light segments of the active warning indica-
tors light up when there is a temporary fault in
ParkAssist.
Note
Correct operation is no longer ensured if there is
a temporary fault (e.g. caused by ice formation or
heavy soiling on the sensors).
The system detects the temporary fault.
All light segments light up until a speed of
9 mph (14 km/h) is reached.
ParkAssist is ready for operation again when the
interference has been eliminated.Fault indication with warning tone
In the event of a long-lasting fault in ParkAssist,
the red light segments of the active warning indi-
cators light up and a continuous tone sounds for
three seconds after a transmission range has
been selected.
Possible causes
– Defect or system fault.
fSwitch ParkAssist off.
When ParkAssist is switched off, the indicator
light in the button lights up.
fPlease have the fault remedied at an author-
ized Porsche dealer.Driving with a trailer
The ParkAssist rear monitoring area is switched
off when the trailer’s power supply is plugged in.