Page 2226 of 2896
LT-18
HEADLAMP (FOR USA)
Revision: June 20062007 Versa
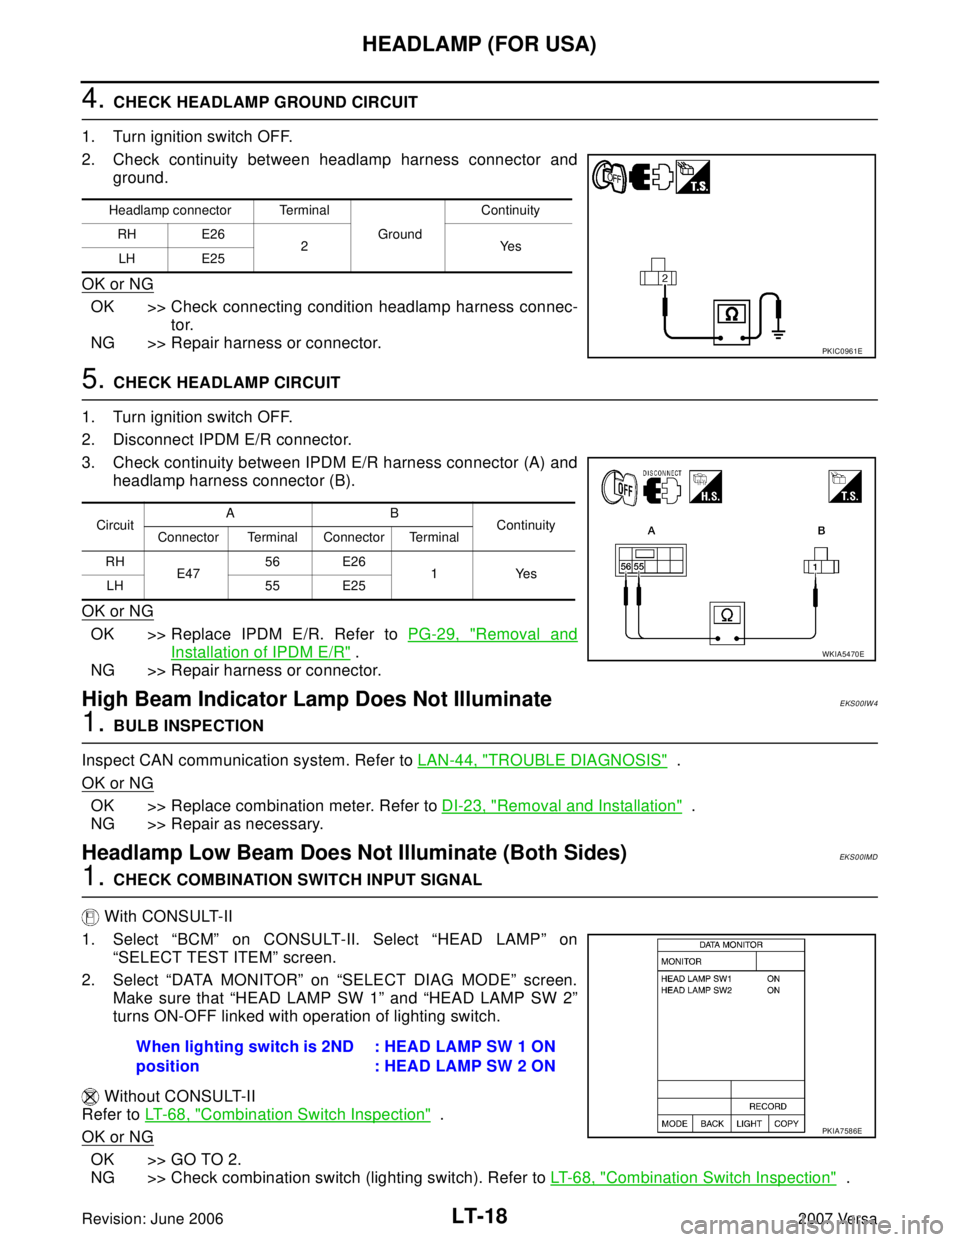
4. CHECK HEADLAMP GROUND CIRCUIT
1. Turn ignition switch OFF.
2. Check continuity between headlamp harness connector and
ground.
OK or NG
OK >> Check connecting condition headlamp harness connec-
tor.
NG >> Repair harness or connector.
5. CHECK HEADLAMP CIRCUIT
1. Turn ignition switch OFF.
2. Disconnect IPDM E/R connector.
3. Check continuity between IPDM E/R harness connector (A) and
headlamp harness connector (B).
OK or NG
OK >> Replace IPDM E/R. Refer to PG-29, "Removal and
Installation of IPDM E/R" .
NG >> Repair harness or connector.
High Beam Indicator Lamp Does Not IlluminateEKS00IW4
1. BULB INSPECTION
Inspect CAN communication system. Refer to LAN-44, "
TROUBLE DIAGNOSIS" .
OK or NG
OK >> Replace combination meter. Refer to DI-23, "Removal and Installation" .
NG >> Repair as necessary.
Headlamp Low Beam Does Not Illuminate (Both Sides)EKS00IMD
1. CHECK COMBINATION SWITCH INPUT SIGNAL
With CONSULT-II
1. Select “BCM” on CONSULT-II. Select “HEAD LAMP” on
“SELECT TEST ITEM” screen.
2. Select “DATA MONITOR” on “SELECT DIAG MODE” screen.
Make sure that “HEAD LAMP SW 1” and “HEAD LAMP SW 2”
turns ON-OFF linked with operation of lighting switch.
Without CONSULT-II
Refer to LT- 6 8 , "
Combination Switch Inspection" .
OK or NG
OK >> GO TO 2.
NG >> Check combination switch (lighting switch). Refer to LT- 6 8 , "
Combination Switch Inspection" .
Headlamp connector Terminal
Ground Continuity
RH E26
2Yes
LH E25
PKIC0961E
CircuitAB
Continuity
Connector Terminal Connector Terminal
RH
E47 56 E26
1Yes
LH 55 E25
WKIA5470E
When lighting switch is 2ND
position: HEAD LAMP SW 1 ON
: HEAD LAMP SW 2 ON
PKIA7586E
Page 2228 of 2896
LT-20
HEADLAMP (FOR USA)
Revision: June 20062007 Versa
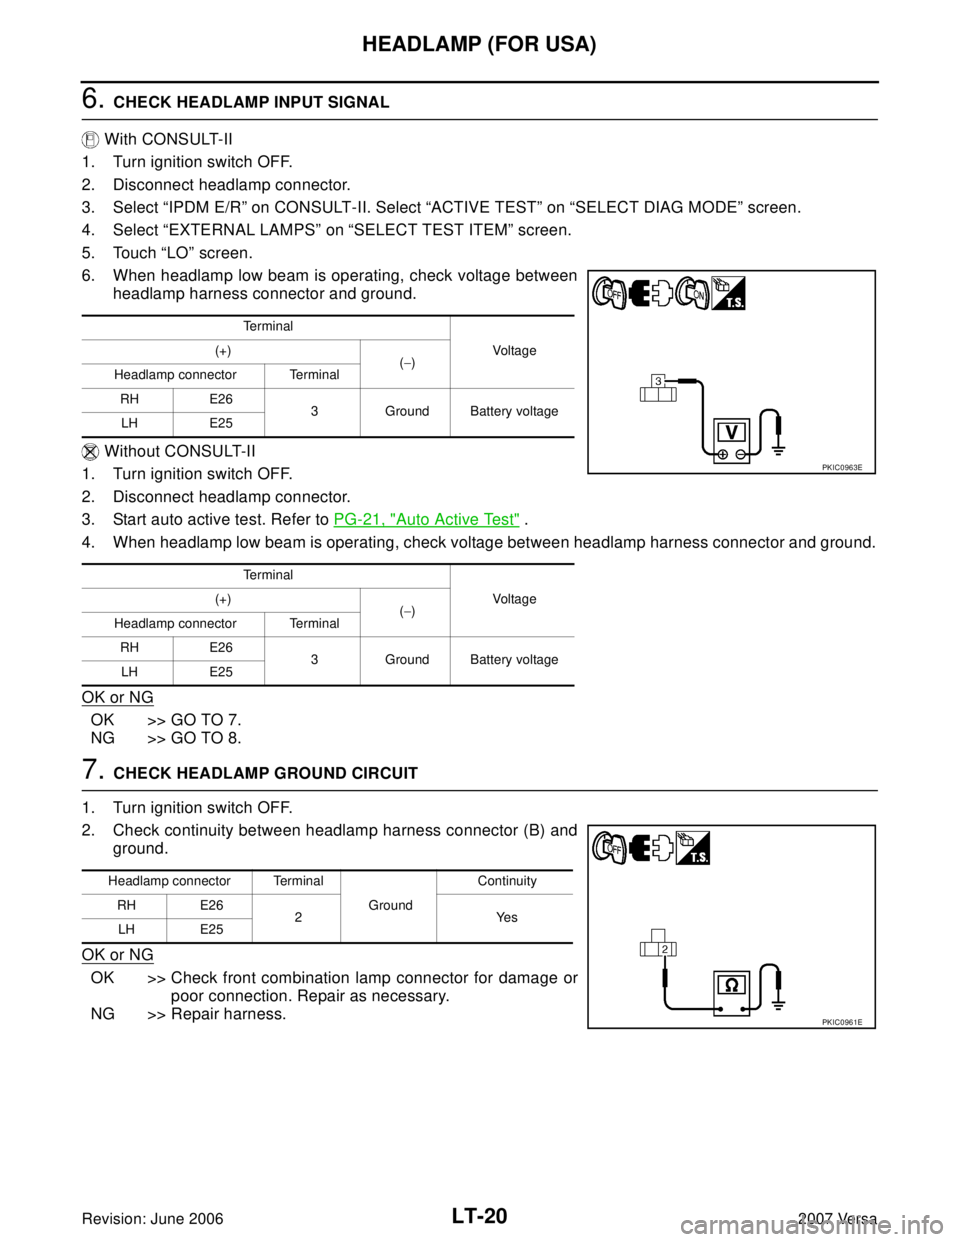
6. CHECK HEADLAMP INPUT SIGNAL
With CONSULT-II
1. Turn ignition switch OFF.
2. Disconnect headlamp connector.
3. Select “IPDM E/R” on CONSULT-II. Select “ACTIVE TEST” on “SELECT DIAG MODE” screen.
4. Select “EXTERNAL LAMPS” on “SELECT TEST ITEM” screen.
5. Touch “LO” screen.
6. When headlamp low beam is operating, check voltage between
headlamp harness connector and ground.
Without CONSULT-II
1. Turn ignition switch OFF.
2. Disconnect headlamp connector.
3. Start auto active test. Refer to PG-21, "
Auto Active Test" .
4. When headlamp low beam is operating, check voltage between headlamp harness connector and ground.
OK or NG
OK >> GO TO 7.
NG >> GO TO 8.
7. CHECK HEADLAMP GROUND CIRCUIT
1. Turn ignition switch OFF.
2. Check continuity between headlamp harness connector (B) and
ground.
OK or NG
OK >> Check front combination lamp connector for damage or
poor connection. Repair as necessary.
NG >> Repair harness.
Te r m i n a l
Voltage (+)
(−)
Headlamp connector Terminal
RH E26
3 Ground Battery voltage
LH E25
Te r m i n a l
Voltage (+)
(−)
Headlamp connector Terminal
RH E26
3 Ground Battery voltage
LH E25
PKIC0963E
Headlamp connector Terminal
Ground Continuity
RH E26
2Yes
LH E25
PKIC0961E
Page 2229 of 2896
HEADLAMP (FOR USA)
LT-21
C
D
E
F
G
H
I
J
L
MA
B
LT
Revision: June 20062007 Versa
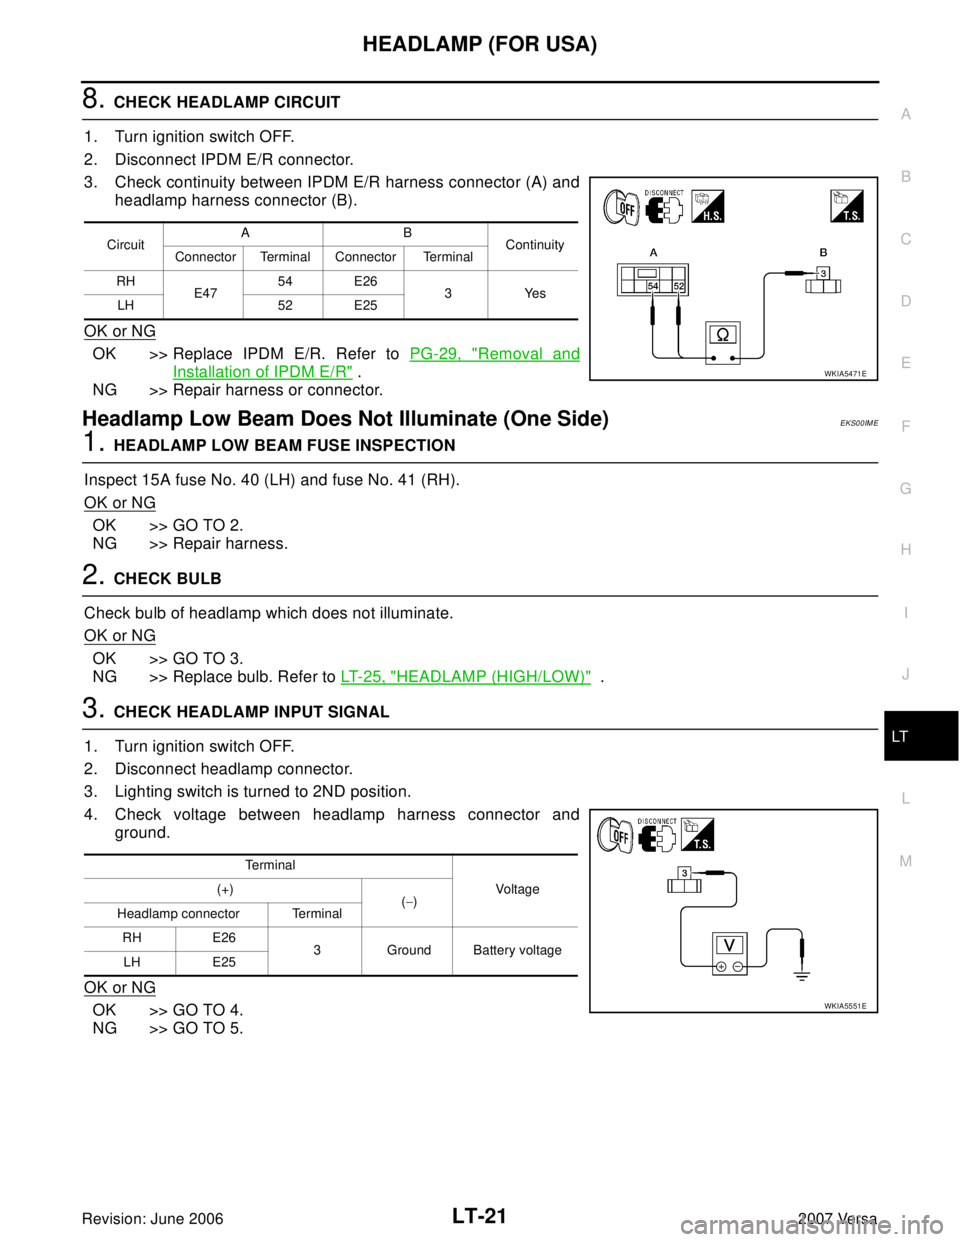
8. CHECK HEADLAMP CIRCUIT
1. Turn ignition switch OFF.
2. Disconnect IPDM E/R connector.
3. Check continuity between IPDM E/R harness connector (A) and
headlamp harness connector (B).
OK or NG
OK >> Replace IPDM E/R. Refer to PG-29, "Removal and
Installation of IPDM E/R" .
NG >> Repair harness or connector.
Headlamp Low Beam Does Not Illuminate (One Side)EKS00IME
1. HEADLAMP LOW BEAM FUSE INSPECTION
Inspect 15A fuse No. 40 (LH) and fuse No. 41 (RH).
OK or NG
OK >> GO TO 2.
NG >> Repair harness.
2. CHECK BULB
Check bulb of headlamp which does not illuminate.
OK or NG
OK >> GO TO 3.
NG >> Replace bulb. Refer to LT-25, "
HEADLAMP (HIGH/LOW)" .
3. CHECK HEADLAMP INPUT SIGNAL
1. Turn ignition switch OFF.
2. Disconnect headlamp connector.
3. Lighting switch is turned to 2ND position.
4. Check voltage between headlamp harness connector and
ground.
OK or NG
OK >> GO TO 4.
NG >> GO TO 5.
CircuitAB
Continuity
Connector Terminal Connector Terminal
RH
E4754 E26
3Yes
LH 52 E25
WKIA5471E
Te r m i n a l
Vo ltag e (+)
(−)
Headlamp connector Terminal
RH E26
3 Ground Battery voltage
LH E25
WKIA5551E
Page 2230 of 2896
LT-22
HEADLAMP (FOR USA)
Revision: June 20062007 Versa
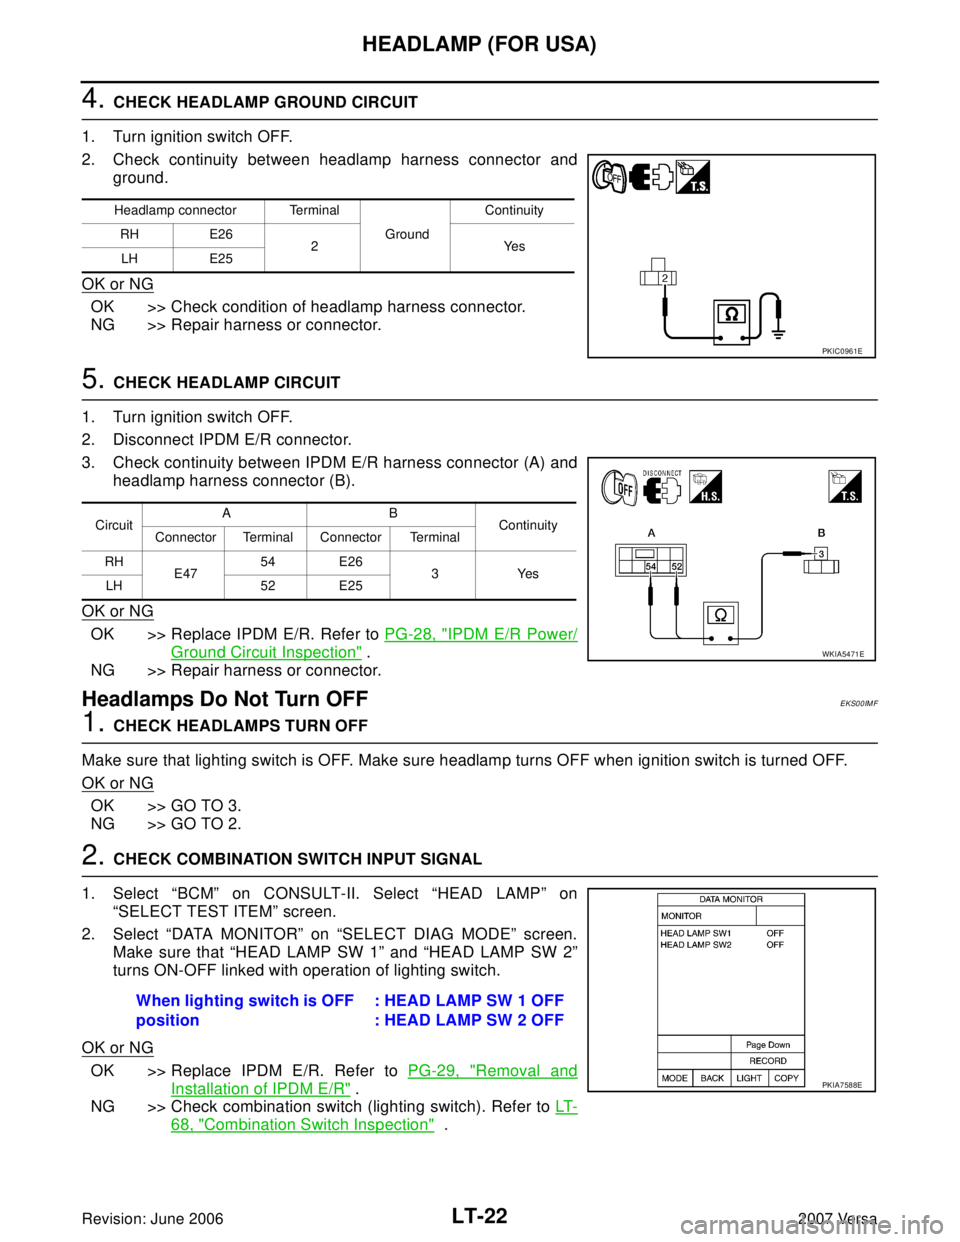
4. CHECK HEADLAMP GROUND CIRCUIT
1. Turn ignition switch OFF.
2. Check continuity between headlamp harness connector and
ground.
OK or NG
OK >> Check condition of headlamp harness connector.
NG >> Repair harness or connector.
5. CHECK HEADLAMP CIRCUIT
1. Turn ignition switch OFF.
2. Disconnect IPDM E/R connector.
3. Check continuity between IPDM E/R harness connector (A) and
headlamp harness connector (B).
OK or NG
OK >> Replace IPDM E/R. Refer to PG-28, "IPDM E/R Power/
Ground Circuit Inspection" .
NG >> Repair harness or connector.
Headlamps Do Not Turn OFFEKS00IMF
1. CHECK HEADLAMPS TURN OFF
Make sure that lighting switch is OFF. Make sure headlamp turns OFF when ignition switch is turned OFF.
OK or NG
OK >> GO TO 3.
NG >> GO TO 2.
2. CHECK COMBINATION SWITCH INPUT SIGNAL
1. Select “BCM” on CONSULT-II. Select “HEAD LAMP” on
“SELECT TEST ITEM” screen.
2. Select “DATA MONITOR” on “SELECT DIAG MODE” screen.
Make sure that “HEAD LAMP SW 1” and “HEAD LAMP SW 2”
turns ON-OFF linked with operation of lighting switch.
OK or NG
OK >> Replace IPDM E/R. Refer to PG-29, "Removal and
Installation of IPDM E/R" .
NG >> Check combination switch (lighting switch). Refer to LT-
68, "Combination Switch Inspection" .
Headlamp connector Terminal
Ground Continuity
RH E26
2Yes
LH E25
PKIC0961E
CircuitAB
Continuity
Connector Terminal Connector Terminal
RH
E4754 E26
3Yes
LH 52 E25
WKIA5471E
When lighting switch is OFF
position: HEAD LAMP SW 1 OFF
: HEAD LAMP SW 2 OFF
PKIA7588E
Page 2233 of 2896
HEADLAMP (FOR USA)
LT-25
C
D
E
F
G
H
I
J
L
MA
B
LT
Revision: June 20062007 Versa
Bulb ReplacementEKS00IMH
CAUTION:
After installing bulb, be sure to install plastic cap and bulb socket securely to ensure watertightness.
HEADLAMP (HIGH/LOW)
1. Turn lighting switch OFF.
2. Remove the headlamp. Refer to LT- 2 5 , "
Removal and Installation" .
3. Remove back cover.
4. Unlock retaining spring and remove bulb from headlamp.
PARKING (CLEARANCE) LAMP
1. Turn lighting switch OFF.
2. Remove the headlamp. Refer to LT- 2 5 , "
Removal and Installation" .
3. Turn bulb socket counterclockwise and unlock it.
4. Remove bulb from its socket.
FRONT TURN SIGNAL LAMP
1. Turn lighting switch OFF.
2. Remove the headlamp. Refer to LT- 2 5 , "
Removal and Installation" .
3. Turn bulb socket counterclockwise and unlock it.
4. Remove bulb from its socket.
Removal and InstallationEKS00IMI
REMOVAL
1. Disconnect the negative battery terminal.
2. Remove front bumper fascia. Refer to EI-14, "
FRONT BUMPER" .
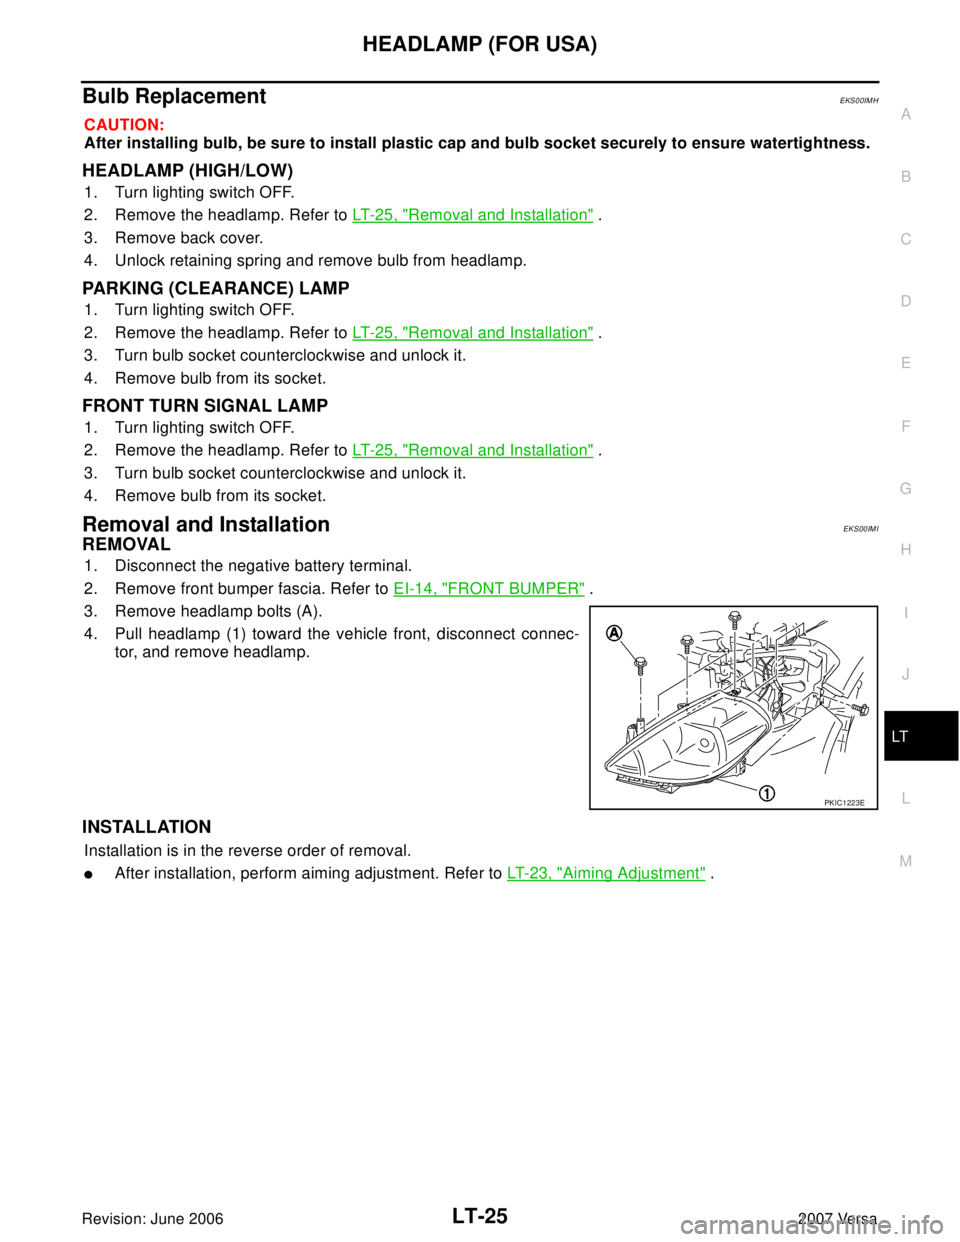
3. Remove headlamp bolts (A).
4. Pull headlamp (1) toward the vehicle front, disconnect connec-
tor, and remove headlamp.
INSTALLATION
Installation is in the reverse order of removal.
�After installation, perform aiming adjustment. Refer to LT-23, "Aiming Adjustment" .
PKIC1223E
Page 2234 of 2896
LT-26
HEADLAMP (FOR USA)
Revision: June 20062007 Versa
Disassembly and AssemblyEKS00IMJ
DISASSEMBLY
1. Remove back cover.
2. Unlock retaining spring and remove bulb (High/Low).
3. Turn parking (clearance) lamp bulb socket counterclockwise and unlock it.
4. Remove parking (clearance) lamp bulb from its socket.
5. Turn front turn signal lamp bulb socket counterclockwise and unlock it.
6. Remove front turn signal lamp bulb from its socket.
7. Remove the bumper stay.
ASSEMBLY
Assembly is in the reverse order of disassembly.
CAUTION:
�After installing bulb, be sure to install plastic cap securely to insure water tight seal.
1. Retaining spring 2. Parking (clearance) lamp bulb 3. Parking (clearance) lamp bulb socket
4. Halogen bulb (High/Low) 5. Back cover 6. Front turn signal lamp bulb socket
7. Front turn signal lamp bulb 8. Headlamp housing assembly 9. Bumper stay
A. Screw
WKIA5418E
Page 2237 of 2896
HEADLAMP (FOR CANADA) - DAYTIME LIGHT SYSTEM -
LT-29
C
D
E
F
G
H
I
J
L
MA
B
LT
Revision: June 20062007 Versa
�to front combination lamp RH terminal 2 via
�daytime light relay 1 terminals 3 and 4
�through grounds E15 and E24.
With power and ground supplied, the high beam headlamps illuminate.
The BCM sends a signal to the combination meter requesting the high beam indicator lamp to turn ON.
Daytime Light System Operation
With the lighting switch in the OFF or 1ST position (parking lamps ON), the BCM receives inputs requesting
the headlights off. If the parking brake is released and the engine is running, the BCM then sends a signal, via
the CAN communication lines, requesting the IPDM E/R to activate the daytime light system. The CPU located
in the IPDM E/R controls the daytime light relay 1 coil, which when energized, directs power
�from daytime light relay 1 terminal 3
�to front combination lamp RH terminal 2,
�through front combination lamp RH high beam terminal 1
�to IPDM E/R terminal 56,
�through 10A fuse (No. 34, located in IPDM E/R) and
�through both de-energized headlamp high relays
�to 10A fuse (No. 35, located in IPDM E/R),
�through IPDM E/R terminal 55
�to front combination lamp LH terminal high beam 1.
Ground is supplied
�to front combination lamp LH terminal 2
�through grounds E15 and E24,
�to daytime light relay 1 terminal 1
�through IPDM E/R terminal 6.
With power and ground supplied, high beam headlamps illuminate at reduced intensity.
COMBINATION SWITCH READING FUNCTION
Refer to BCS-3, "COMBINATION SWITCH READING FUNCTION" .
EXTERIOR LAMP BATTERY SAVER CONTROL
Refer to LT- 7 6 , "EXTERIOR LAMP BATTERY SAVER CONTROL" .
CAN Communication System DescriptionEKS00ICF
Refer to LAN-4, "CAN Communication System" .
Page 2244 of 2896
LT-36
HEADLAMP (FOR CANADA) - DAYTIME LIGHT SYSTEM -
Revision: June 20062007 Versa
2. CHECK DAYTIME LIGHT RELAY 1 POWER SUPPLY CIRCUIT
1. Turn ignition switch OFF.
2. Remove daytime light relay 1.
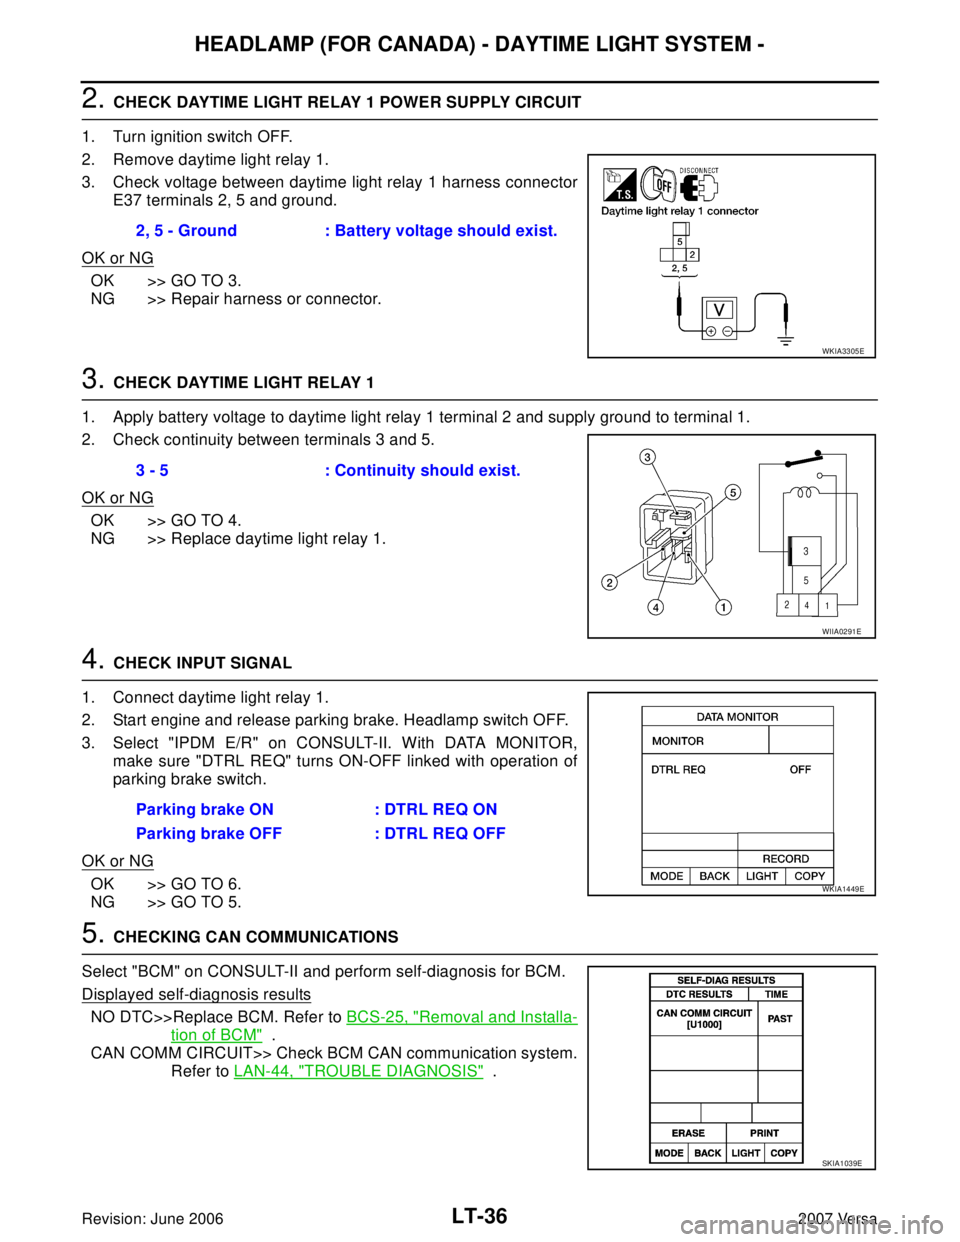
3. Check voltage between daytime light relay 1 harness connector
E37 terminals 2, 5 and ground.
OK or NG
OK >> GO TO 3.
NG >> Repair harness or connector.
3. CHECK DAYTIME LIGHT RELAY 1
1. Apply battery voltage to daytime light relay 1 terminal 2 and supply ground to terminal 1.
2. Check continuity between terminals 3 and 5.
OK or NG
OK >> GO TO 4.
NG >> Replace daytime light relay 1.
4. CHECK INPUT SIGNAL
1. Connect daytime light relay 1.
2. Start engine and release parking brake. Headlamp switch OFF.
3. Select "IPDM E/R" on CONSULT-II. With DATA MONITOR,
make sure "DTRL REQ" turns ON-OFF linked with operation of
parking brake switch.
OK or NG
OK >> GO TO 6.
NG >> GO TO 5.
5. CHECKING CAN COMMUNICATIONS
Select "BCM" on CONSULT-II and perform self-diagnosis for BCM.
Displayed self-diagnosis results
NO DTC>>Replace BCM. Refer to BCS-25, "Removal and Installa-
tion of BCM" .
CAN COMM CIRCUIT>> Check BCM CAN communication system.
Refer to LAN-44, "
TROUBLE DIAGNOSIS" . 2, 5 - Ground : Battery voltage should exist.
WKIA3305E
3 - 5 : Continuity should exist.
WIIA0291E
Parking brake ON : DTRL REQ ON
Parking brake OFF : DTRL REQ OFF
WKIA1449E
SKIA1039E