Page 1126 of 1226
REMOVAL (HARDTOP)
V1Remove front seat. Refer to ``SEAT'' in BT section for details.
V2Remove adjuster cover.
V3Remove lap outer cover. Refer to ``Side and Floor Trim'' in BT section for details.
V4Slide ¯oor anchor cover.
V5Remove ¯oor anchor bolt.
V6Remove shoulder anchor bolt.
V7Remove luggage side upper and lower ®nisher. Refer to ``Side and Floor Trim'' in BT section for details.
V8Remove the bolt securing seat belt pre-tensioner retractor, then remove seat belt and seat belt pre-ten-
sioner retractor.
V9Remove bolts securing seat belt adjuster, then remove seat belt adjuster.
SRS447
SEAT BELTS
Front Seat Belt (Cont'd)
RS-4
Page 1127 of 1226
Rear Seat Belt
REMOVAL (WAGON)
V1Remove rear and 3rd seats. Refer to ``SEAT'' in BT section for details.
V2Slide anchor cover.
V3Remove anchor bolt.
V4Remove luggage upper and lower ®nishers. Refer to ``Side and Floor Trim'' in BT section for details.
V5Remove shoulder anchor bolt.
V6Remove the bolt and anchor bolt securing seat belt retractor, then remove seat belt and seat belt retrac-
tor.
SRS448
SEAT BELTS
RS-5
Page 1128 of 1226
REMOVAL (HARDTOP)
V1Fold the rear seat forward.
V2Slide anchor cover.
V3Remove shoulder anchor cover.
V4Remove anchor bolt.
V5Remove shoulder anchor bolt.
V6Remove luggage upper and lower ®nishers. Refer to ``Side and Floor Trim'' in BT section for details.
V7Remove anchor bolt securing seat belt retractor, then remove seat belt and seat belt retractor.
SRS449
SEAT BELTS
Rear Seat Belt (Cont'd)
RS-6
Page 1129 of 1226
3rd Seat Belt
REMOVAL (WAGON)
V1Remove rear and 3rd seats. Refer to ``SEAT'' in BT section for details.
V2Slide anchor cover.
V3Remove anchor bolt.
V4Remove luggage upper and lower ®nishers. Refer to ``Side and Floor Trim'' in BT section for details.
V5Remove shoulder anchor bolt.
V6Remove anchor bolt securing seat belt retractor, then remove seat belt and seat belt retractor.
SRS450
SEAT BELTS
RS-7
Page 1136 of 1226

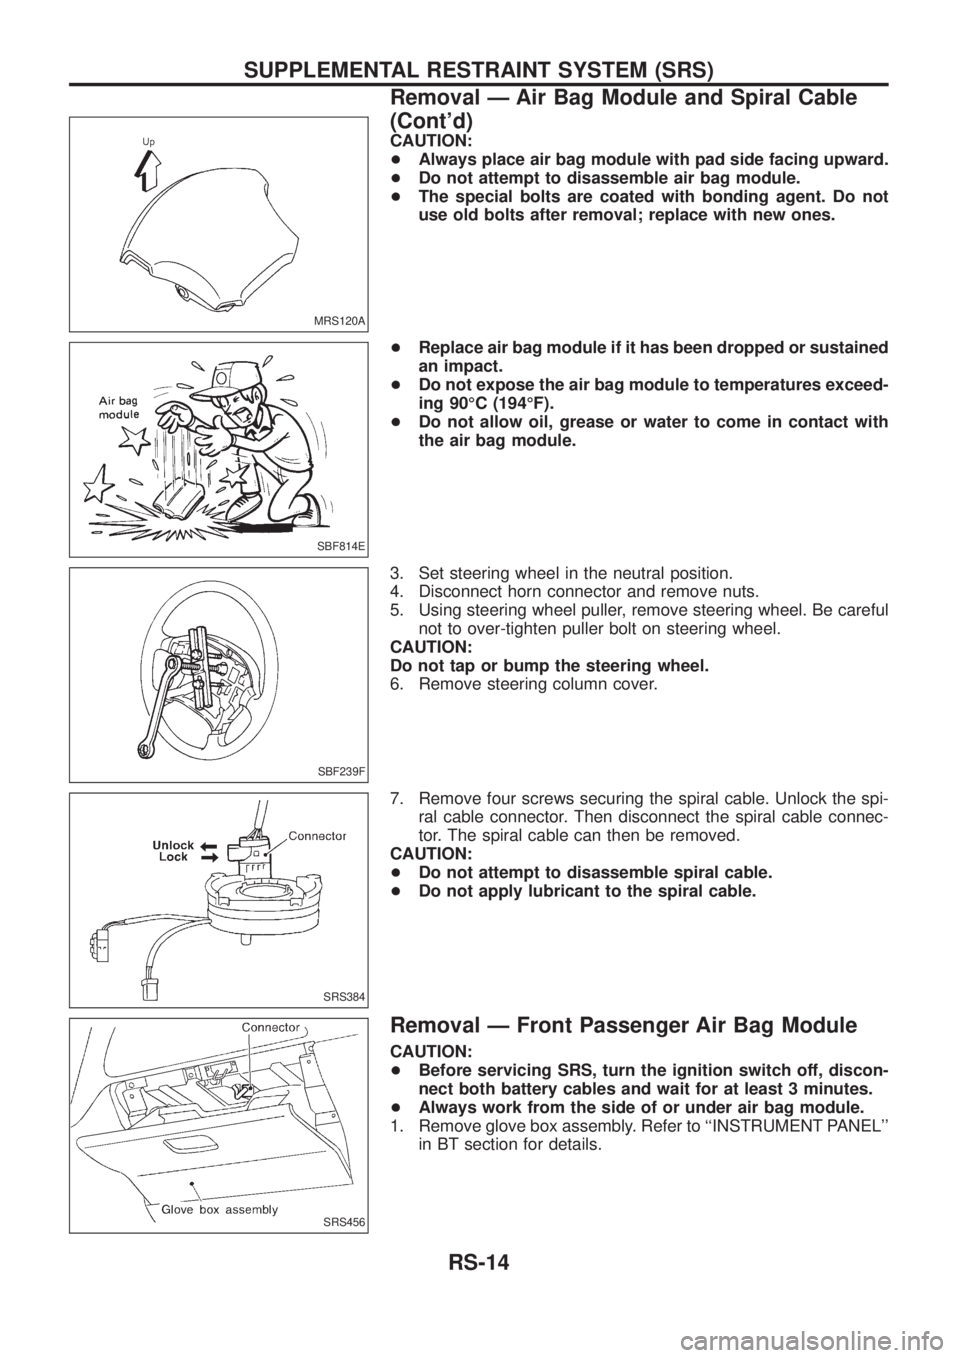
CAUTION:
+Always place air bag module with pad side facing upward.
+Do not attempt to disassemble air bag module.
+The special bolts are coated with bonding agent. Do not
use old bolts after removal; replace with new ones.
+Replace air bag module if it has been dropped or sustained
an impact.
+Do not expose the air bag module to temperatures exceed-
ing 90ÉC (194ÉF).
+Do not allow oil, grease or water to come in contact with
the air bag module.
3. Set steering wheel in the neutral position.
4. Disconnect horn connector and remove nuts.
5. Using steering wheel puller, remove steering wheel. Be careful
not to over-tighten puller bolt on steering wheel.
CAUTION:
Do not tap or bump the steering wheel.
6. Remove steering column cover.
7. Remove four screws securing the spiral cable. Unlock the spi-
ral cable connector. Then disconnect the spiral cable connec-
tor. The spiral cable can then be removed.
CAUTION:
+Do not attempt to disassemble spiral cable.
+Do not apply lubricant to the spiral cable.
Removal Ð Front Passenger Air Bag Module
CAUTION:
+Before servicing SRS, turn the ignition switch off, discon-
nect both battery cables and wait for at least 3 minutes.
+Always work from the side of or under air bag module.
1. Remove glove box assembly. Refer to ``INSTRUMENT PANEL''
in BT section for details.
MRS120A
SBF814E
SBF239F
SRS384
SRS456
SUPPLEMENTAL RESTRAINT SYSTEM (SRS)
Removal Ð Air Bag Module and Spiral Cable
(Cont'd)
RS-14
Page 1137 of 1226

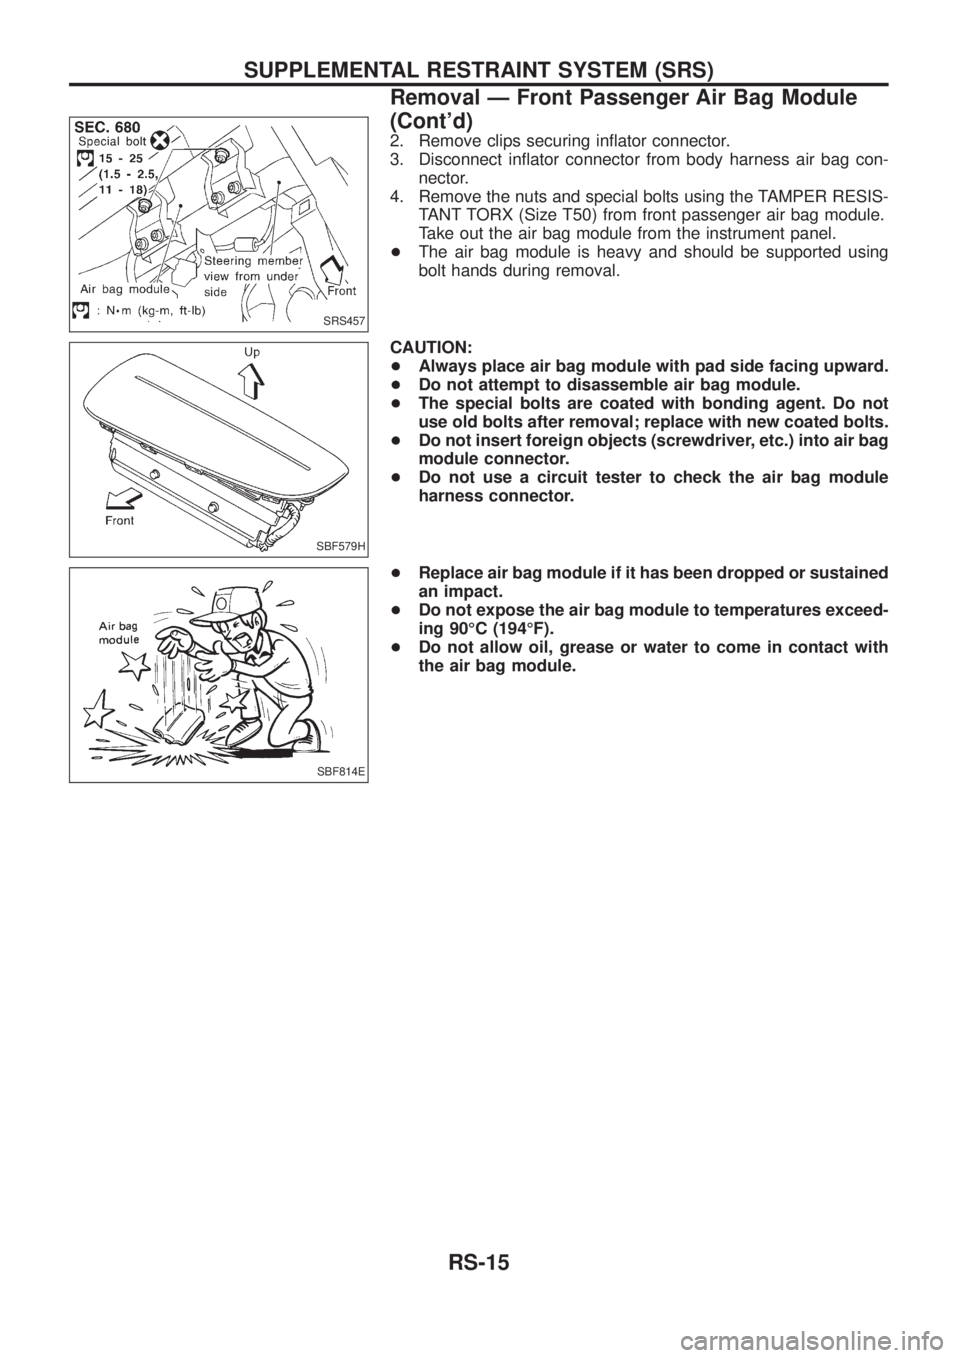
2. Remove clips securing in¯ator connector.
3. Disconnect in¯ator connector from body harness air bag con-
nector.
4. Remove the nuts and special bolts using the TAMPER RESIS-
TANT TORX (Size T50) from front passenger air bag module.
Take out the air bag module from the instrument panel.
+The air bag module is heavy and should be supported using
bolt hands during removal.
CAUTION:
+Always place air bag module with pad side facing upward.
+Do not attempt to disassemble air bag module.
+The special bolts are coated with bonding agent. Do not
use old bolts after removal; replace with new coated bolts.
+Do not insert foreign objects (screwdriver, etc.) into air bag
module connector.
+Do not use a circuit tester to check the air bag module
harness connector.
+Replace air bag module if it has been dropped or sustained
an impact.
+Do not expose the air bag module to temperatures exceed-
ing 90ÉC (194ÉF).
+Do not allow oil, grease or water to come in contact with
the air bag module.
SRS457
SBF579H
SBF814E
SUPPLEMENTAL RESTRAINT SYSTEM (SRS)
Removal Ð Front Passenger Air Bag Module
(Cont'd)
RS-15
Page 1140 of 1226

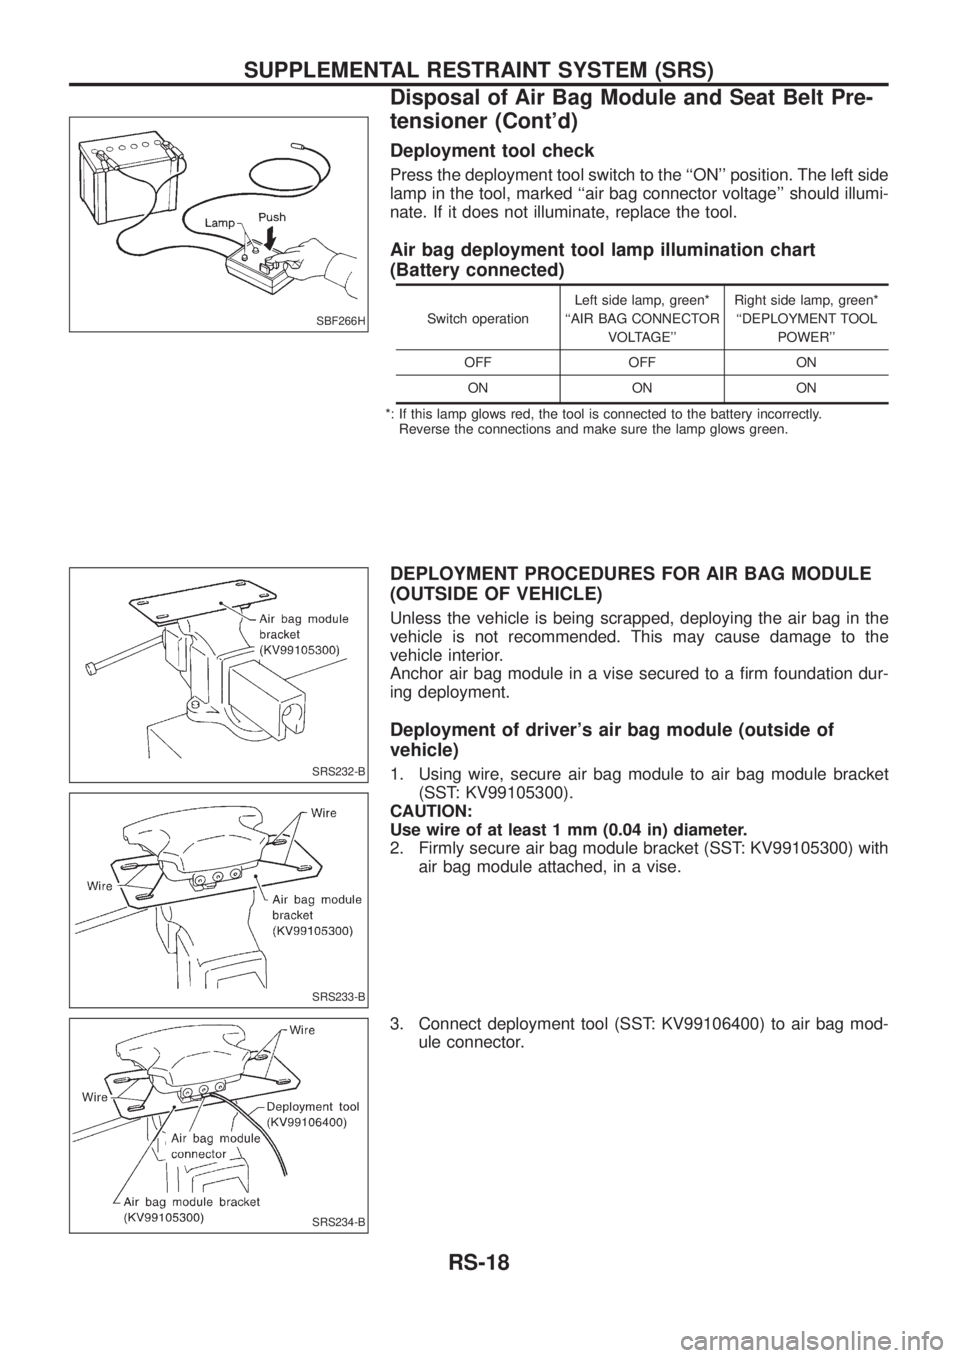
Deployment tool check
Press the deployment tool switch to the ``ON'' position. The left side
lamp in the tool, marked ``air bag connector voltage'' should illumi-
nate. If it does not illuminate, replace the tool.
Air bag deployment tool lamp illumination chart
(Battery connected)
Switch operationLeft side lamp, green*
``AIR BAG CONNECTOR
VOLTAGE''Right side lamp, green*
``DEPLOYMENT TOOL
POWER''
OFF OFF ON
ON ON ON
*: If this lamp glows red, the tool is connected to the battery incorrectly.
Reverse the connections and make sure the lamp glows green.
DEPLOYMENT PROCEDURES FOR AIR BAG MODULE
(OUTSIDE OF VEHICLE)
Unless the vehicle is being scrapped, deploying the air bag in the
vehicle is not recommended. This may cause damage to the
vehicle interior.
Anchor air bag module in a vise secured to a ®rm foundation dur-
ing deployment.
Deployment of driver's air bag module (outside of
vehicle)
1. Using wire, secure air bag module to air bag module bracket
(SST: KV99105300).
CAUTION:
Use wire of at least 1 mm (0.04 in) diameter.
2. Firmly secure air bag module bracket (SST: KV99105300) with
air bag module attached, in a vise.
3. Connect deployment tool (SST: KV99106400) to air bag mod-
ule connector.
SBF266H
SRS232-B
SRS233-B
SRS234-B
SUPPLEMENTAL RESTRAINT SYSTEM (SRS)
Disposal of Air Bag Module and Seat Belt Pre-
tensioner (Cont'd)
RS-18
Page 1141 of 1226

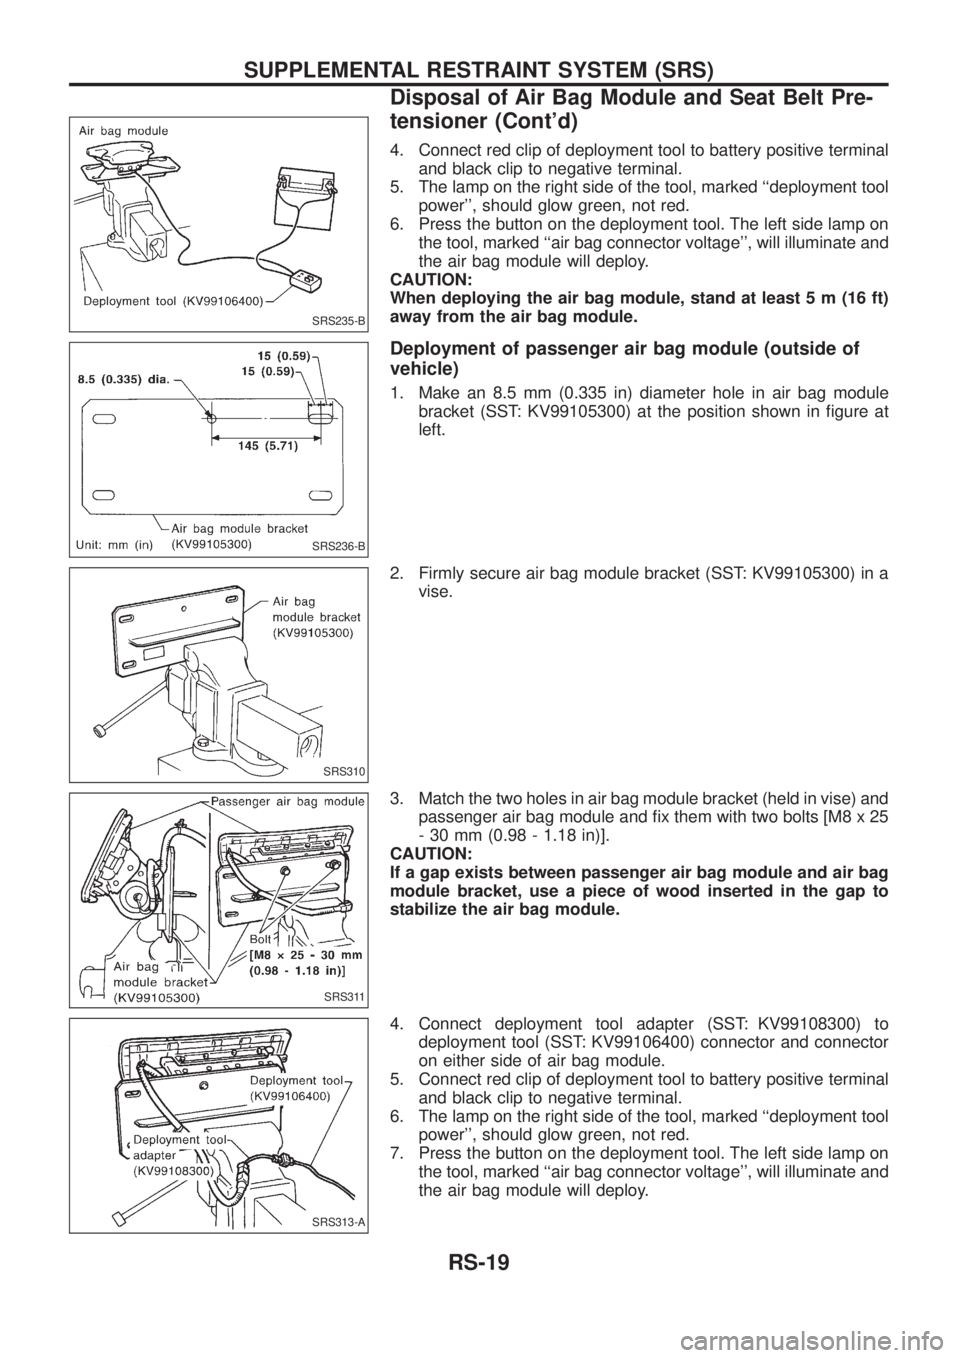
4. Connect red clip of deployment tool to battery positive terminal
and black clip to negative terminal.
5. The lamp on the right side of the tool, marked ``deployment tool
power'', should glow green, not red.
6. Press the button on the deployment tool. The left side lamp on
the tool, marked ``air bag connector voltage'', will illuminate and
the air bag module will deploy.
CAUTION:
When deploying the air bag module, stand at least 5 m (16 ft)
away from the air bag module.
Deployment of passenger air bag module (outside of
vehicle)
1. Make an 8.5 mm (0.335 in) diameter hole in air bag module
bracket (SST: KV99105300) at the position shown in ®gure at
left.
2. Firmly secure air bag module bracket (SST: KV99105300) in a
vise.
3. Match the two holes in air bag module bracket (held in vise) and
passenger air bag module and ®x them with two bolts [M8 x 25
- 30 mm (0.98 - 1.18 in)].
CAUTION:
If a gap exists between passenger air bag module and air bag
module bracket, use a piece of wood inserted in the gap to
stabilize the air bag module.
4. Connect deployment tool adapter (SST: KV99108300) to
deployment tool (SST: KV99106400) connector and connector
on either side of air bag module.
5. Connect red clip of deployment tool to battery positive terminal
and black clip to negative terminal.
6. The lamp on the right side of the tool, marked ``deployment tool
power'', should glow green, not red.
7. Press the button on the deployment tool. The left side lamp on
the tool, marked ``air bag connector voltage'', will illuminate and
the air bag module will deploy.
SRS235-B
SRS236-B
SRS310
SRS311
SRS313-A
SUPPLEMENTAL RESTRAINT SYSTEM (SRS)
Disposal of Air Bag Module and Seat Belt Pre-
tensioner (Cont'd)
RS-19