2006 MERCEDES-BENZ SPRINTER Windshield
[x] Cancel search: WindshieldPage 1954 of 2305
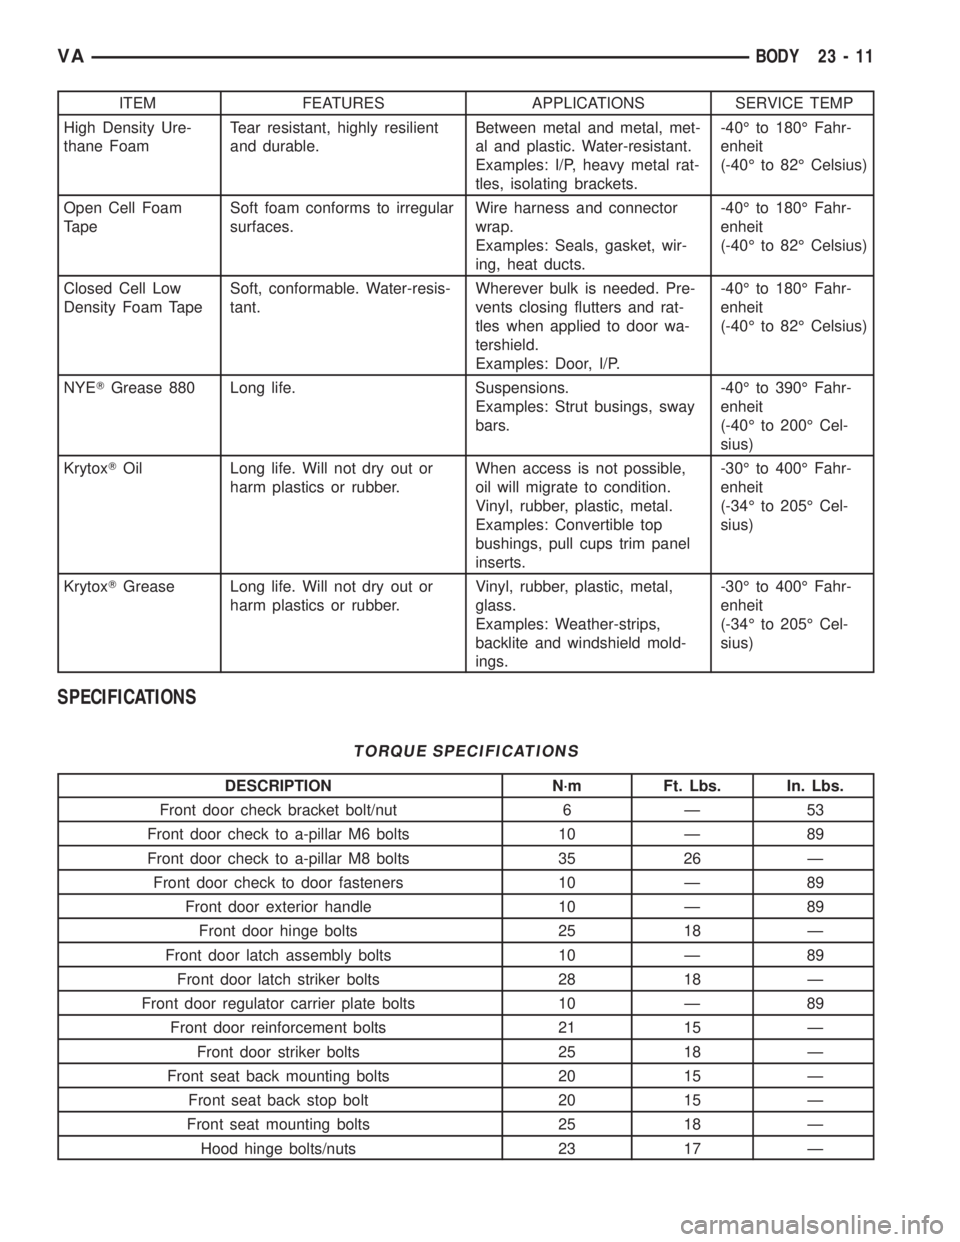
ITEM FEATURES APPLICATIONS SERVICE TEMP
High Density Ure-
thane FoamTear resistant, highly resilient
and durable.Between metal and metal, met-
al and plastic. Water-resistant.
Examples: I/P, heavy metal rat-
tles, isolating brackets.-40É to 180É Fahr-
enheit
(-40É to 82É Celsius)
Open Cell Foam
TapeSoft foam conforms to irregular
surfaces.Wire harness and connector
wrap.
Examples: Seals, gasket, wir-
ing, heat ducts.-40É to 180É Fahr-
enheit
(-40É to 82É Celsius)
Closed Cell Low
Density Foam TapeSoft, conformable. Water-resis-
tant.Wherever bulk is needed. Pre-
vents closing flutters and rat-
tles when applied to door wa-
tershield.
Examples: Door, I/P.-40É to 180É Fahr-
enheit
(-40É to 82É Celsius)
NYETGrease 880 Long life. Suspensions.
Examples: Strut busings, sway
bars.-40É to 390É Fahr-
enheit
(-40É to 200É Cel-
sius)
KrytoxTOil Long life. Will not dry out or
harm plastics or rubber.When access is not possible,
oil will migrate to condition.
Vinyl, rubber, plastic, metal.
Examples: Convertible top
bushings, pull cups trim panel
inserts.-30É to 400É Fahr-
enheit
(-34É to 205É Cel-
sius)
KrytoxTGrease Long life. Will not dry out or
harm plastics or rubber.Vinyl, rubber, plastic, metal,
glass.
Examples: Weather-strips,
backlite and windshield mold-
ings.-30É to 400É Fahr-
enheit
(-34É to 205É Cel-
sius)
SPECIFICATIONS
TORQUE SPECIFICATIONS
DESCRIPTION N´m Ft. Lbs. In. Lbs.
Front door check bracket bolt/nut 6 Ð 53
Front door check to a-pillar M6 bolts 10 Ð 89
Front door check to a-pillar M8 bolts 35 26 Ð
Front door check to door fasteners 10 Ð 89
Front door exterior handle 10 Ð 89
Front door hinge bolts 25 18 Ð
Front door latch assembly bolts 10 Ð 89
Front door latch striker bolts 28 18 Ð
Front door regulator carrier plate bolts 10 Ð 89
Front door reinforcement bolts 21 15 Ð
Front door striker bolts 25 18 Ð
Front seat back mounting bolts 20 15 Ð
Front seat back stop bolt 20 15 Ð
Front seat mounting bolts 25 18 Ð
Hood hinge bolts/nuts 23 17 Ð
VABODY 23 - 11
Page 2018 of 2305
INSTALLATION
Passenger Van
(1) Position trim panels and seat push-pin fasten-
ers fully.
(2) Install d-pillar trim, if necessary. (Refer to 23 -
BODY/INTERIOR/D-PILLAR TRIM - INSTALLA-
TION)
(3) Install seats, if necessary. (Refer to 23 - BODY/
SEATS/SEAT - INSTALLATION)
Cargo Van
(1) Install paneling and replace rivets.
(2) Install tie down rings and bolts, if equipped.
REAR VIEW MIRROR
REMOVAL
(1) Slide mirror off support bracket.
INSTALLATION
INSTALLATION
(1) Install the support bracket if necessary. (Refer
to 23 - BODY/INTERIOR/REAR VIEW MIRROR -
INSTALLATION - SUPPORT BRACKET)
(2) Slide mirror onto support bracket fully.
INSTALLATION - REAR VIEW MIRROR SUP-
PORT BRACKET
(1) Mark the position for the mirror bracket on the
outside of the windshield glass with a wax pencil.
(2) Clean the bracket contact area on the glass.
Use a mild powdered cleanser on a cloth saturated
with isopropyl (rubbing) alcohol. Finally, clean the
glass with a paper towel dampened with alcohol.
(3) Sand the surface on the support bracket with
fine grit-sandpaper. Wipe the bracket surface clean
with a paper towel.
(4) Apply accelerator to the surface on the bracket
according to the following instructions:
(a) Crush the vial to saturate the felt applicator.
(b) Remove the paper sleeve.
(c) Apply accelerator to the contact surface on
the bracket.
(d) Allow the accelerator to dry for five minutes.
(e) Do not touch the bracket contact surface
after the accelerator has been applied.
(5) Apply adhesive accelerator to the bracket con-
tact surface on the windshield glass. Allow the accel-
erator to dry for one minute. Do not touch the glass
contact surface after the accelerator has been
applied.
(6) Install the bracket according to the following
instructions:(a) Apply one drop of adhesive at the center of
the bracket contact-surface on the windshield
glass.
(b) Apply an even coat of adhesive to the contact
surface on the bracket.
(c) Align the bracket with the marked position
on the windshield glass.
(d) Press and hold the bracket in place for at
least one minute.
NOTE: Verify that the mirror support bracket is cor-
rectly aligned, because the adhesive will cure rap-
idly.
(7) Allow the adhesive to cure for 8-10 minutes.
Remove any excess adhesive with an alcohol-damp-
ened cloth.
(8) Allow the adhesive to cure for an additional
8-10 minutes before installing the mirror.
STEPWELL SCUFF PADS
REMOVAL
(1) Remove screws and remove seat bracket if nec-
essary.
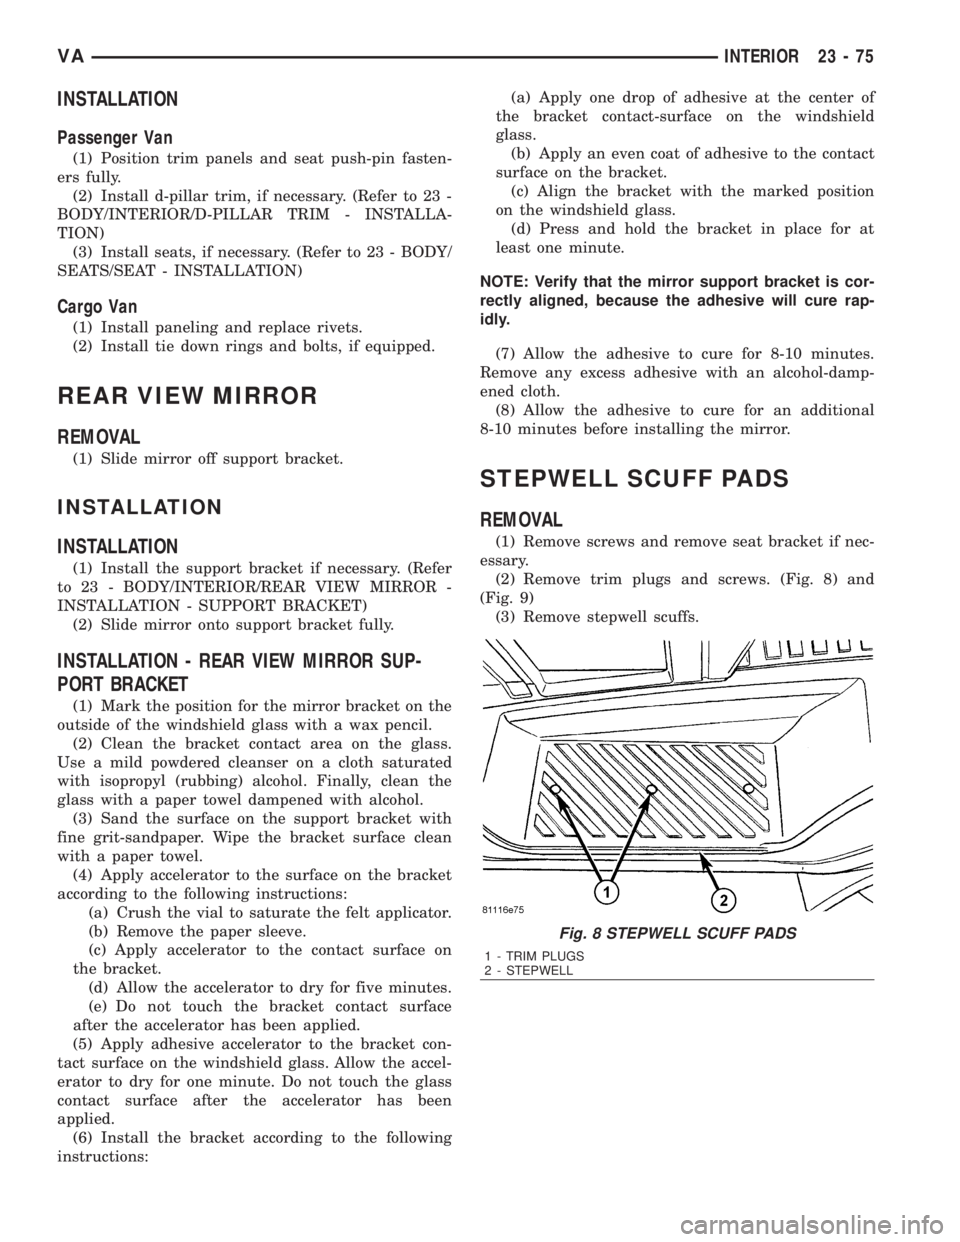
(2) Remove trim plugs and screws. (Fig. 8) and
(Fig. 9)
(3) Remove stepwell scuffs.
Fig. 8 STEPWELL SCUFF PADS
1 - TRIM PLUGS
2 - STEPWELL
VAINTERIOR 23 - 75
Page 2027 of 2305
STATIONARY GLASS
TABLE OF CONTENTS
page page
BACKLITE - BULKHEAD TRIM PANEL
REMOVAL.............................84
INSTALLATION.........................84
QUARTER WINDOW
REMOVAL.............................84
INSTALLATION.........................84WINDSHIELD
WARNING
WINDSHIELD SAFETY PRECAUTIONS.....85
REMOVAL.............................85
INSTALLATION.........................86
BACKLITE - BULKHEAD TRIM
PANEL
REMOVAL
(1) Position an assistant opposite side of the bulk-
head trim panel to receive the glass and weatherstrip
seal.
(2) Start at an upper corner and separate the seal
from the window opening. Push the glass and seal
outward from the window opening. Remove the glass
and seal.
(3) Remove seal from glass if necessary.
(4) Clean the window opening.
INSTALLATION
(1) Install the weatherstrip seal on the window
glass. Verify that the glass is seated in the groove
around the edge of the seal.
(2) Insert an installation cord in the weatherstrip
seal inner groove.
NOTE: Use mineral spirits as a lubricant to aid seal
installation in the window opening.
(3) Position the glass and seal in the trim panel
opening.
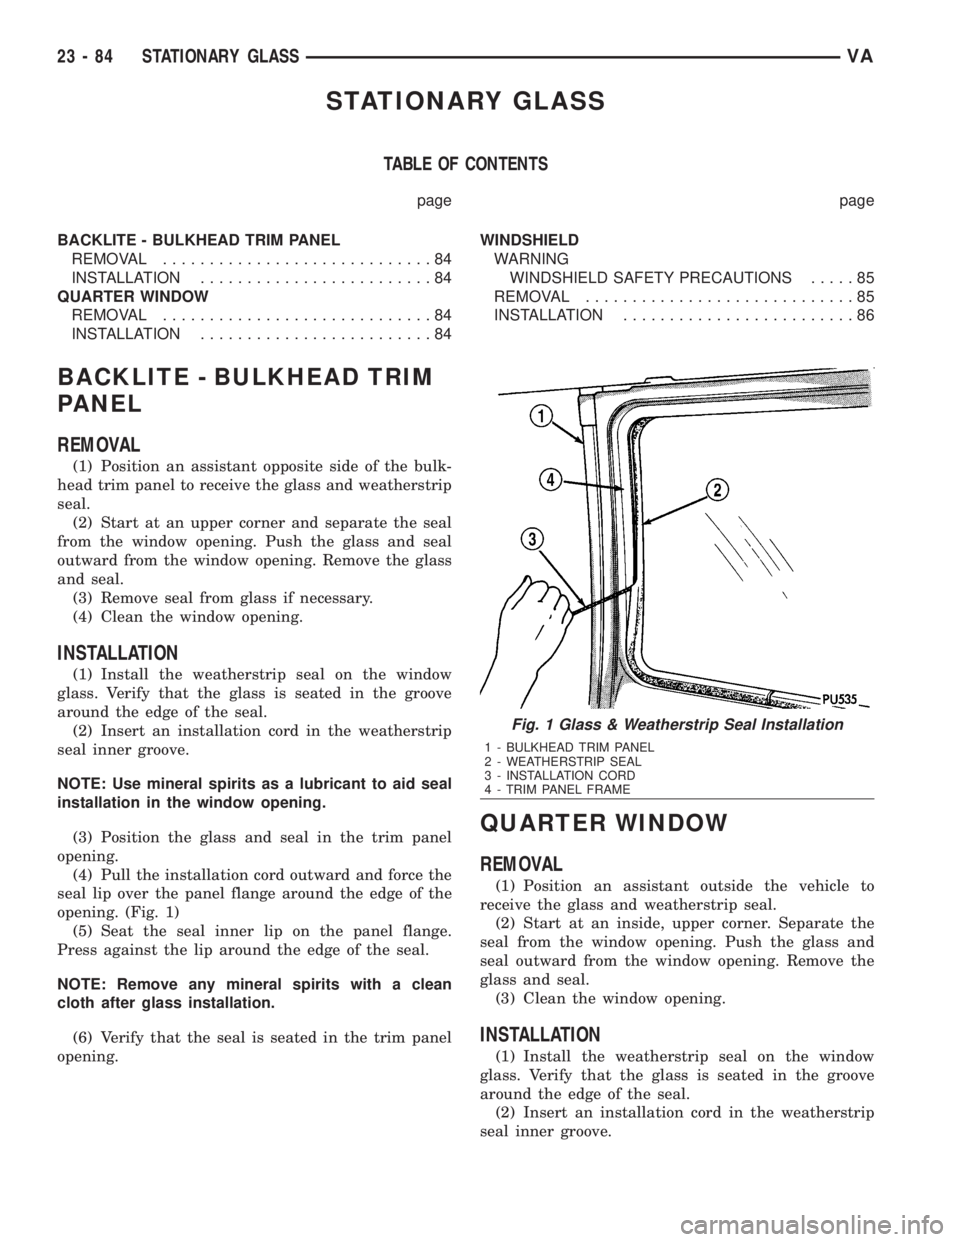
(4) Pull the installation cord outward and force the
seal lip over the panel flange around the edge of the
opening. (Fig. 1)
(5) Seat the seal inner lip on the panel flange.
Press against the lip around the edge of the seal.
NOTE: Remove any mineral spirits with a clean
cloth after glass installation.
(6) Verify that the seal is seated in the trim panel
opening.
QUARTER WINDOW
REMOVAL
(1) Position an assistant outside the vehicle to
receive the glass and weatherstrip seal.
(2) Start at an inside, upper corner. Separate the
seal from the window opening. Push the glass and
seal outward from the window opening. Remove the
glass and seal.
(3) Clean the window opening.
INSTALLATION
(1) Install the weatherstrip seal on the window
glass. Verify that the glass is seated in the groove
around the edge of the seal.
(2) Insert an installation cord in the weatherstrip
seal inner groove.
Fig. 1 Glass & Weatherstrip Seal Installation
1 - BULKHEAD TRIM PANEL
2 - WEATHERSTRIP SEAL
3 - INSTALLATION CORD
4 - TRIM PANEL FRAME
23 - 84 STATIONARY GLASSVA
Page 2028 of 2305
NOTE: Use mineral spirits as a lubricant to aid seal
installation in the window opening.
(3) Position the glass and seal in the window open-
ing.
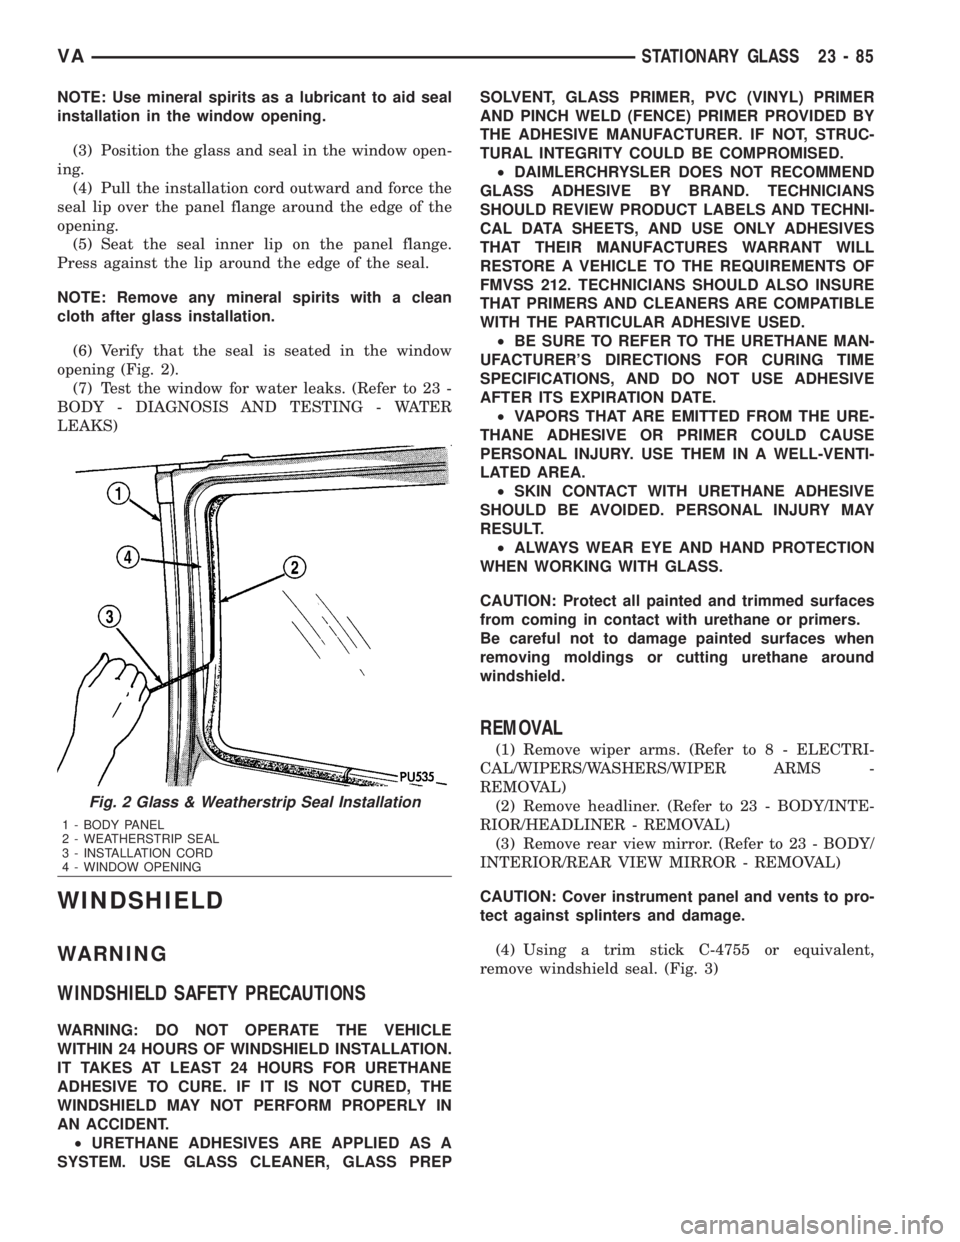
(4) Pull the installation cord outward and force the
seal lip over the panel flange around the edge of the
opening.
(5) Seat the seal inner lip on the panel flange.
Press against the lip around the edge of the seal.
NOTE: Remove any mineral spirits with a clean
cloth after glass installation.
(6) Verify that the seal is seated in the window
opening (Fig. 2).
(7) Test the window for water leaks. (Refer to 23 -
BODY - DIAGNOSIS AND TESTING - WATER
LEAKS)
WINDSHIELD
WARNING
WINDSHIELD SAFETY PRECAUTIONS
WARNING: DO NOT OPERATE THE VEHICLE
WITHIN 24 HOURS OF WINDSHIELD INSTALLATION.
IT TAKES AT LEAST 24 HOURS FOR URETHANE
ADHESIVE TO CURE. IF IT IS NOT CURED, THE
WINDSHIELD MAY NOT PERFORM PROPERLY IN
AN ACCIDENT.
²URETHANE ADHESIVES ARE APPLIED AS A
SYSTEM. USE GLASS CLEANER, GLASS PREPSOLVENT, GLASS PRIMER, PVC (VINYL) PRIMER
AND PINCH WELD (FENCE) PRIMER PROVIDED BY
THE ADHESIVE MANUFACTURER. IF NOT, STRUC-
TURAL INTEGRITY COULD BE COMPROMISED.
²DAIMLERCHRYSLER DOES NOT RECOMMEND
GLASS ADHESIVE BY BRAND. TECHNICIANS
SHOULD REVIEW PRODUCT LABELS AND TECHNI-
CAL DATA SHEETS, AND USE ONLY ADHESIVES
THAT THEIR MANUFACTURES WARRANT WILL
RESTORE A VEHICLE TO THE REQUIREMENTS OF
FMVSS 212. TECHNICIANS SHOULD ALSO INSURE
THAT PRIMERS AND CLEANERS ARE COMPATIBLE
WITH THE PARTICULAR ADHESIVE USED.
²BE SURE TO REFER TO THE URETHANE MAN-
UFACTURER'S DIRECTIONS FOR CURING TIME
SPECIFICATIONS, AND DO NOT USE ADHESIVE
AFTER ITS EXPIRATION DATE.
²VAPORS THAT ARE EMITTED FROM THE URE-
THANE ADHESIVE OR PRIMER COULD CAUSE
PERSONAL INJURY. USE THEM IN A WELL-VENTI-
LATED AREA.
²SKIN CONTACT WITH URETHANE ADHESIVE
SHOULD BE AVOIDED. PERSONAL INJURY MAY
RESULT.
²ALWAYS WEAR EYE AND HAND PROTECTION
WHEN WORKING WITH GLASS.
CAUTION: Protect all painted and trimmed surfaces
from coming in contact with urethane or primers.
Be careful not to damage painted surfaces when
removing moldings or cutting urethane around
windshield.
REMOVAL
(1) Remove wiper arms. (Refer to 8 - ELECTRI-
CAL/WIPERS/WASHERS/WIPER ARMS -
REMOVAL)
(2) Remove headliner. (Refer to 23 - BODY/INTE-
RIOR/HEADLINER - REMOVAL)
(3) Remove rear view mirror. (Refer to 23 - BODY/
INTERIOR/REAR VIEW MIRROR - REMOVAL)
CAUTION: Cover instrument panel and vents to pro-
tect against splinters and damage.
(4) Using a trim stick C-4755 or equivalent,
remove windshield seal. (Fig. 3)
Fig. 2 Glass & Weatherstrip Seal Installation
1 - BODY PANEL
2 - WEATHERSTRIP SEAL
3 - INSTALLATION CORD
4 - WINDOW OPENING
VASTATIONARY GLASS 23 - 85
Page 2029 of 2305
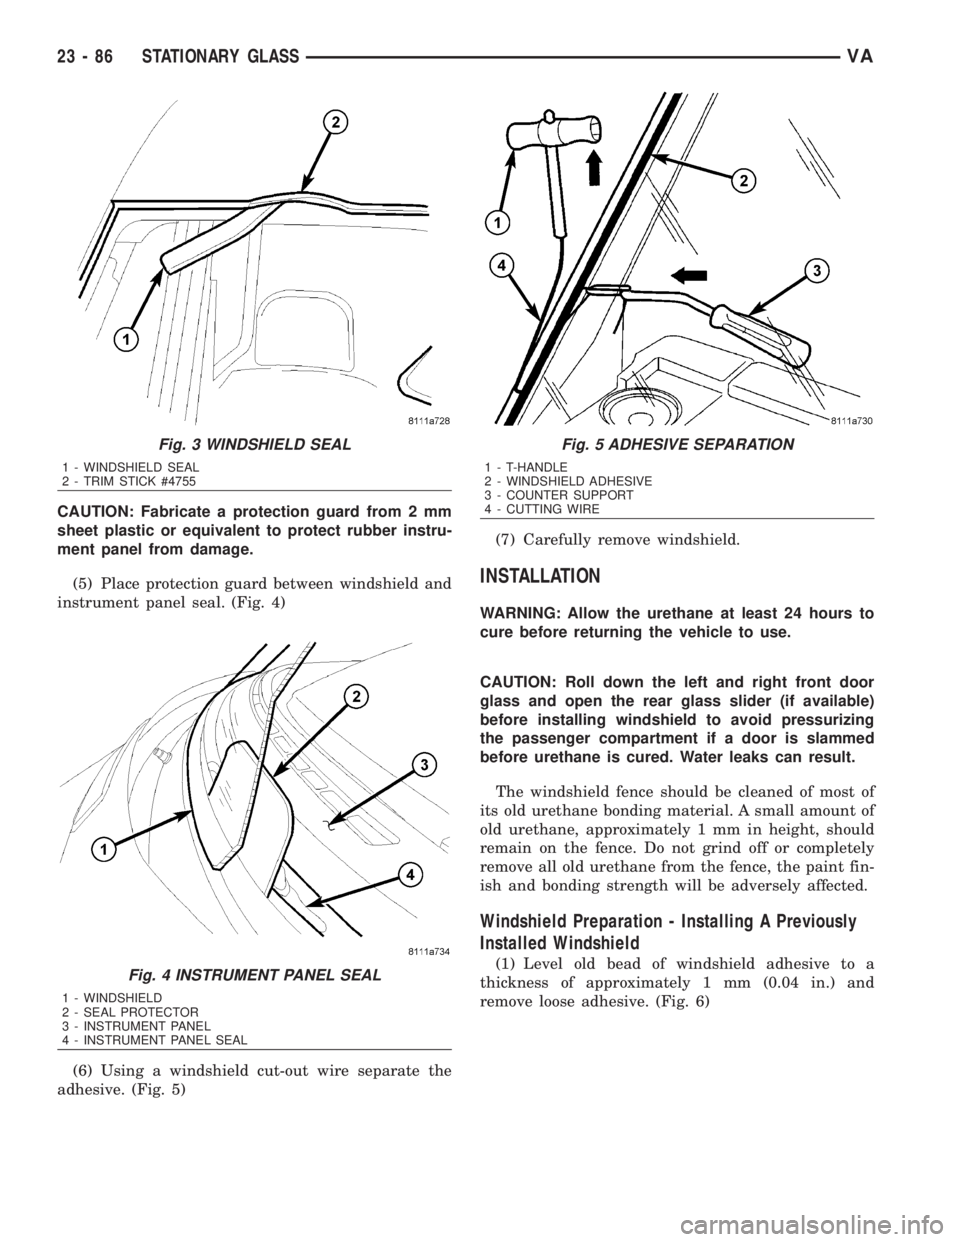
CAUTION: Fabricate a protection guard from 2 mm
sheet plastic or equivalent to protect rubber instru-
ment panel from damage.
(5) Place protection guard between windshield and
instrument panel seal. (Fig. 4)
(6) Using a windshield cut-out wire separate the
adhesive. (Fig. 5)(7) Carefully remove windshield.
INSTALLATION
WARNING: Allow the urethane at least 24 hours to
cure before returning the vehicle to use.
CAUTION: Roll down the left and right front door
glass and open the rear glass slider (if available)
before installing windshield to avoid pressurizing
the passenger compartment if a door is slammed
before urethane is cured. Water leaks can result.
The windshield fence should be cleaned of most of
its old urethane bonding material. A small amount of
old urethane, approximately 1 mm in height, should
remain on the fence. Do not grind off or completely
remove all old urethane from the fence, the paint fin-
ish and bonding strength will be adversely affected.
Windshield Preparation - Installing A Previously
Installed Windshield
(1) Level old bead of windshield adhesive to a
thickness of approximately 1 mm (0.04 in.) and
remove loose adhesive. (Fig. 6)
Fig. 3 WINDSHIELD SEAL
1 - WINDSHIELD SEAL
2 - TRIM STICK #4755
Fig. 4 INSTRUMENT PANEL SEAL
1 - WINDSHIELD
2 - SEAL PROTECTOR
3 - INSTRUMENT PANEL
4 - INSTRUMENT PANEL SEAL
Fig. 5 ADHESIVE SEPARATION
1 - T-HANDLE
2 - WINDSHIELD ADHESIVE
3 - COUNTER SUPPORT
4 - CUTTING WIRE
23 - 86 STATIONARY GLASSVA
Page 2030 of 2305
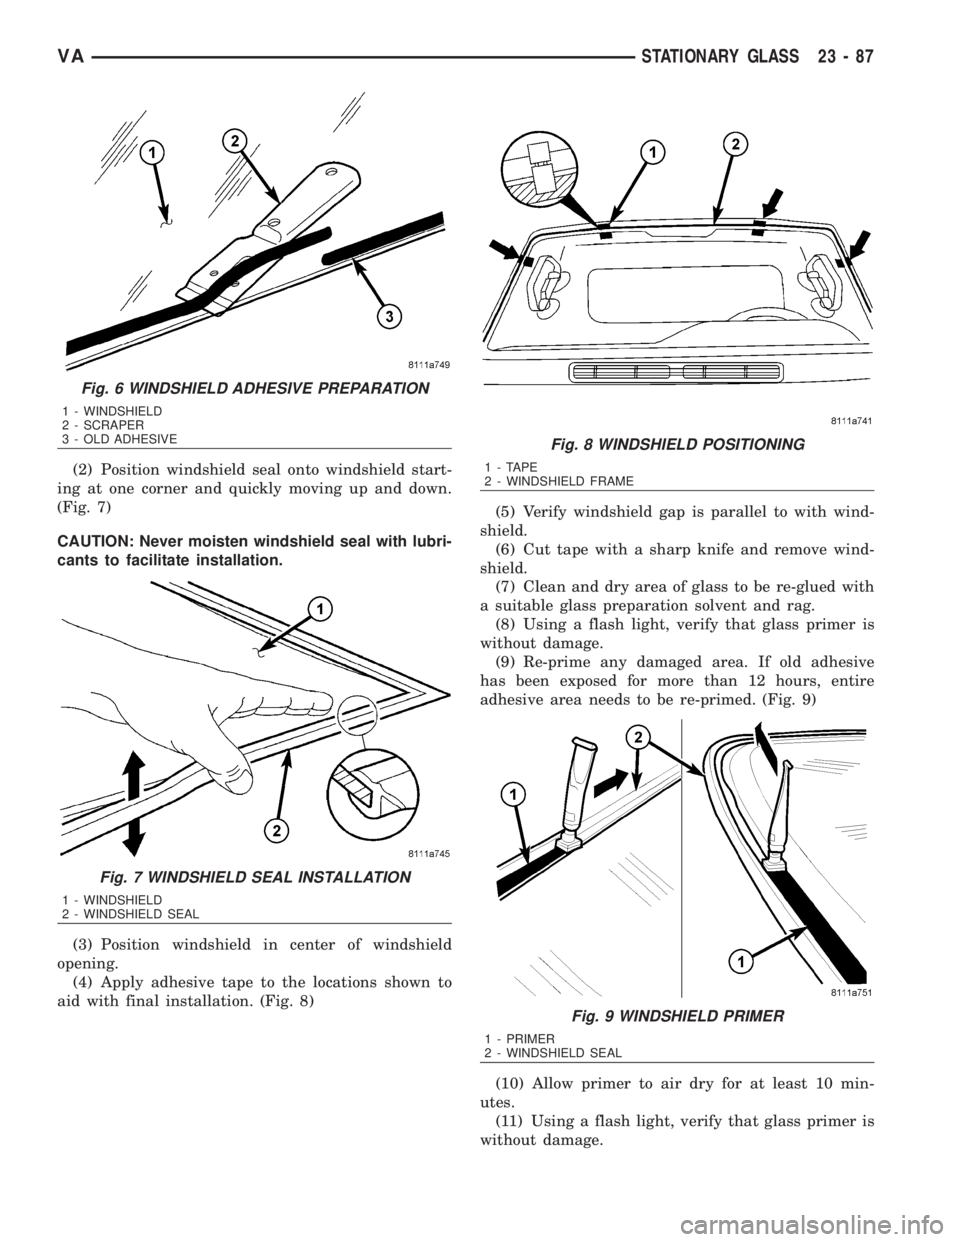
(2) Position windshield seal onto windshield start-
ing at one corner and quickly moving up and down.
(Fig. 7)
CAUTION: Never moisten windshield seal with lubri-
cants to facilitate installation.
(3) Position windshield in center of windshield
opening.
(4) Apply adhesive tape to the locations shown to
aid with final installation. (Fig. 8)(5) Verify windshield gap is parallel to with wind-
shield.
(6) Cut tape with a sharp knife and remove wind-
shield.
(7) Clean and dry area of glass to be re-glued with
a suitable glass preparation solvent and rag.
(8) Using a flash light, verify that glass primer is
without damage.
(9) Re-prime any damaged area. If old adhesive
has been exposed for more than 12 hours, entire
adhesive area needs to be re-primed. (Fig. 9)
(10) Allow primer to air dry for at least 10 min-
utes.
(11) Using a flash light, verify that glass primer is
without damage.
Fig. 6 WINDSHIELD ADHESIVE PREPARATION
1 - WINDSHIELD
2 - SCRAPER
3 - OLD ADHESIVE
Fig. 7 WINDSHIELD SEAL INSTALLATION
1 - WINDSHIELD
2 - WINDSHIELD SEAL
Fig. 8 WINDSHIELD POSITIONING
1 - TAPE
2 - WINDSHIELD FRAME
Fig. 9 WINDSHIELD PRIMER
1 - PRIMER
2 - WINDSHIELD SEAL
VASTATIONARY GLASS 23 - 87
Page 2031 of 2305
Windshield Preparation - Installing A New Wind-
shield
(1) Clean and check windshield for damage.
(2) Position windshield seal onto windshield start-
ing at one corner and quickly moving up and down.
(Fig. 7)
CAUTION: Never moisten windshield seal with lubri-
cants to facilitate installation.
(3) Position windshield in center of windshield
opening.
(4) Apply adhesive tape to the locations shown to
aid with final installation. (Fig. 8)
(5) Verify windshield gap is parallel to with wind-
shield.
(6) Cut tape with a sharp knife and remove wind-
shield.
(7) Clean and dry area of glass to be glued with a
suitable glass preparation solvent and rag.
(8) Apply primer to gluing surface at windshield
seal. (Fig. 9)
(9) Allow primer to air dry for at least 10 minutes.
(10) Using a flash light, verify that glass primer is
without damage.
Windshield Opening Preparation
(1) Clean and vacuum windshield opening.
(2) Level old bead of windshield opening adhesive
to a thickness of approximately 1 mm (0.04 in.) and
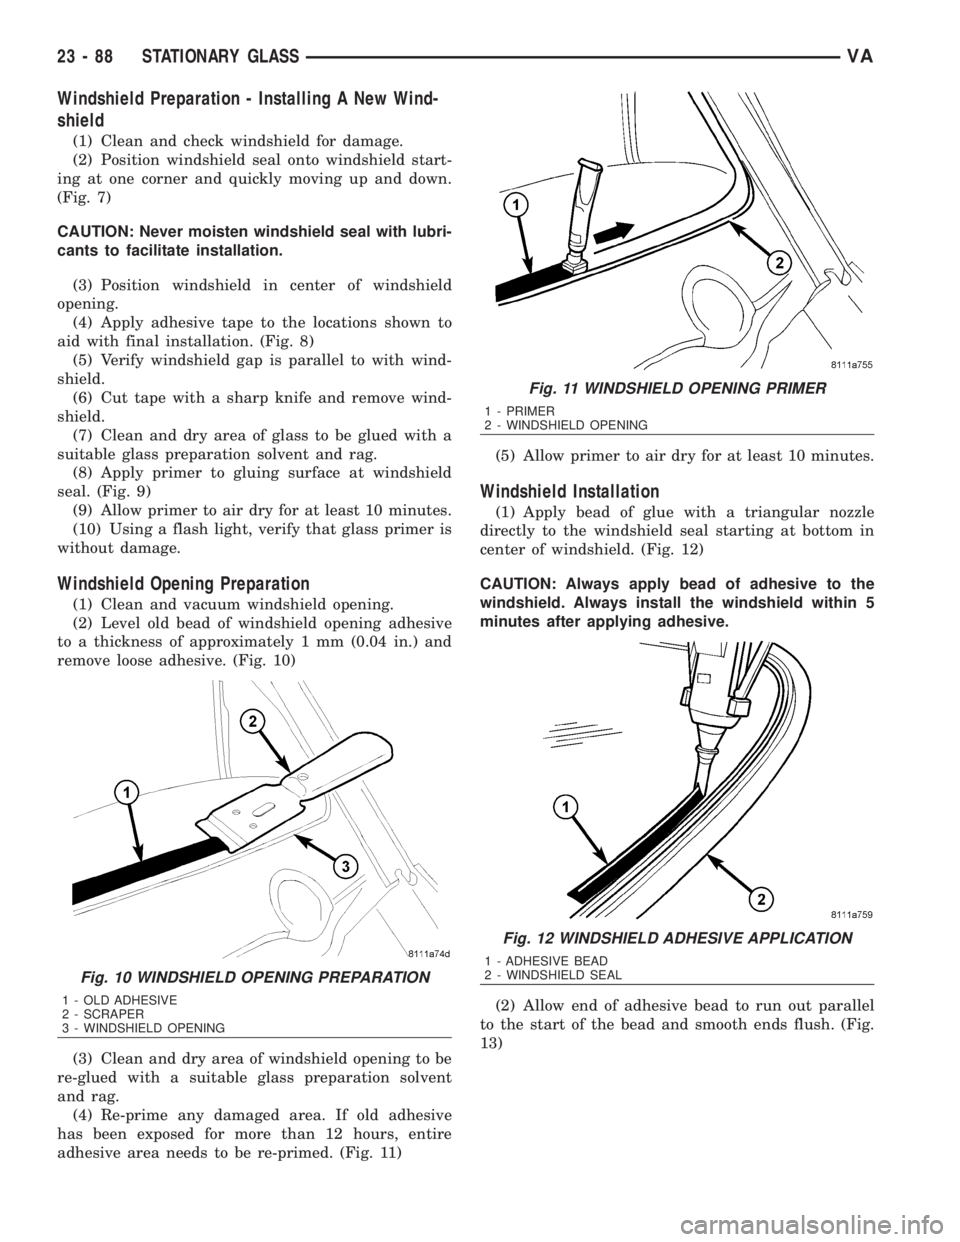
remove loose adhesive. (Fig. 10)
(3) Clean and dry area of windshield opening to be
re-glued with a suitable glass preparation solvent
and rag.
(4) Re-prime any damaged area. If old adhesive
has been exposed for more than 12 hours, entire
adhesive area needs to be re-primed. (Fig. 11)(5) Allow primer to air dry for at least 10 minutes.
Windshield Installation
(1) Apply bead of glue with a triangular nozzle
directly to the windshield seal starting at bottom in
center of windshield. (Fig. 12)
CAUTION: Always apply bead of adhesive to the
windshield. Always install the windshield within 5
minutes after applying adhesive.
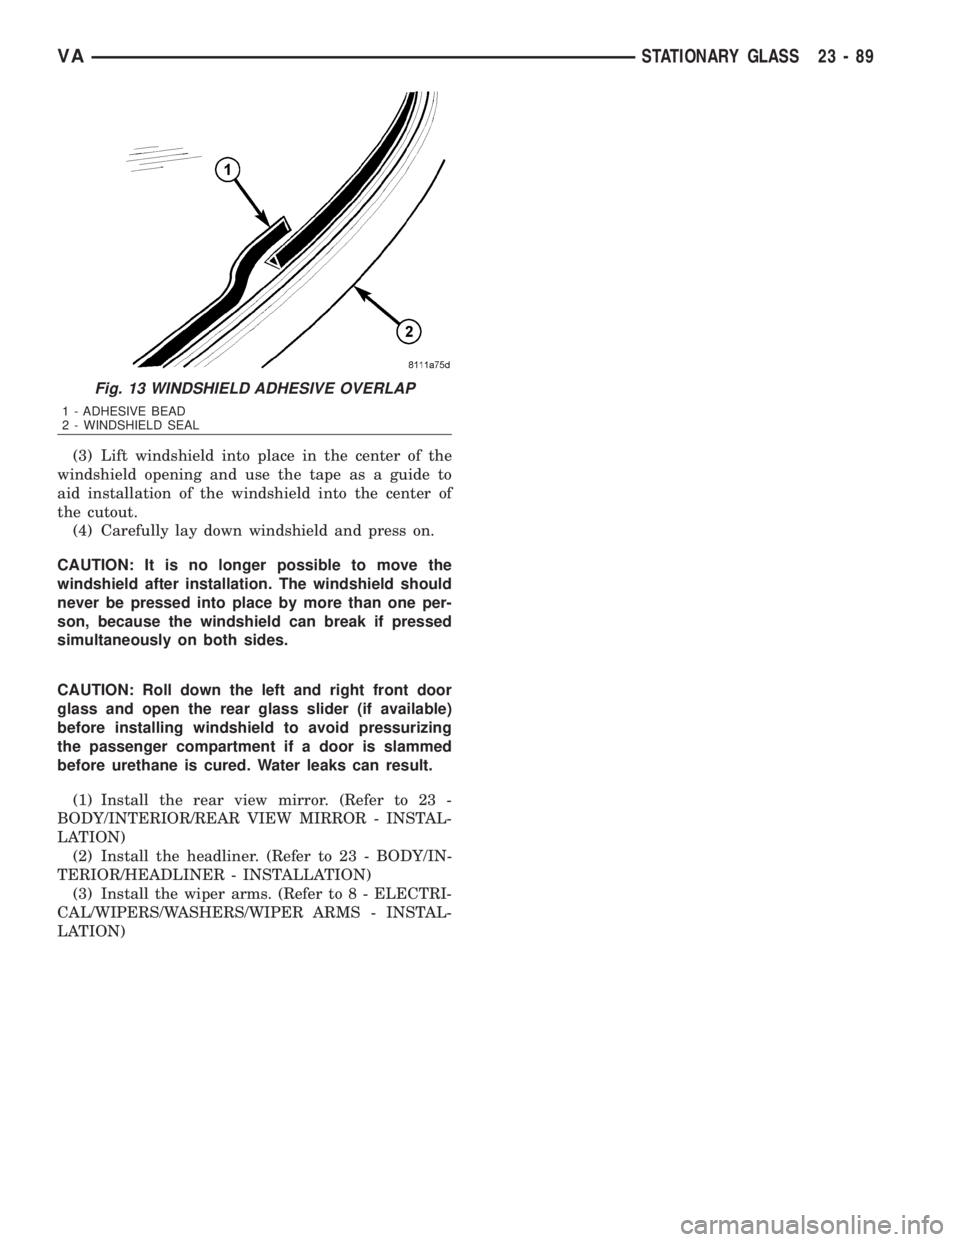
(2) Allow end of adhesive bead to run out parallel
to the start of the bead and smooth ends flush. (Fig.
13)
Fig. 10 WINDSHIELD OPENING PREPARATION
1 - OLD ADHESIVE
2 - SCRAPER
3 - WINDSHIELD OPENING
Fig. 11 WINDSHIELD OPENING PRIMER
1 - PRIMER
2 - WINDSHIELD OPENING
Fig. 12 WINDSHIELD ADHESIVE APPLICATION
1 - ADHESIVE BEAD
2 - WINDSHIELD SEAL
23 - 88 STATIONARY GLASSVA
Page 2032 of 2305
(3) Lift windshield into place in the center of the
windshield opening and use the tape as a guide to
aid installation of the windshield into the center of
the cutout.
(4) Carefully lay down windshield and press on.
CAUTION: It is no longer possible to move the
windshield after installation. The windshield should
never be pressed into place by more than one per-
son, because the windshield can break if pressed
simultaneously on both sides.
CAUTION: Roll down the left and right front door
glass and open the rear glass slider (if available)
before installing windshield to avoid pressurizing
the passenger compartment if a door is slammed
before urethane is cured. Water leaks can result.
(1) Install the rear view mirror. (Refer to 23 -
BODY/INTERIOR/REAR VIEW MIRROR - INSTAL-
LATION)
(2) Install the headliner. (Refer to 23 - BODY/IN-
TERIOR/HEADLINER - INSTALLATION)
(3) Install the wiper arms. (Refer to 8 - ELECTRI-
CAL/WIPERS/WASHERS/WIPER ARMS - INSTAL-
LATION)
Fig. 13 WINDSHIELD ADHESIVE OVERLAP
1 - ADHESIVE BEAD
2 - WINDSHIELD SEAL
VASTATIONARY GLASS 23 - 89