2006 MERCEDES-BENZ SPRINTER airbag disable
[x] Cancel search: airbag disablePage 967 of 2305
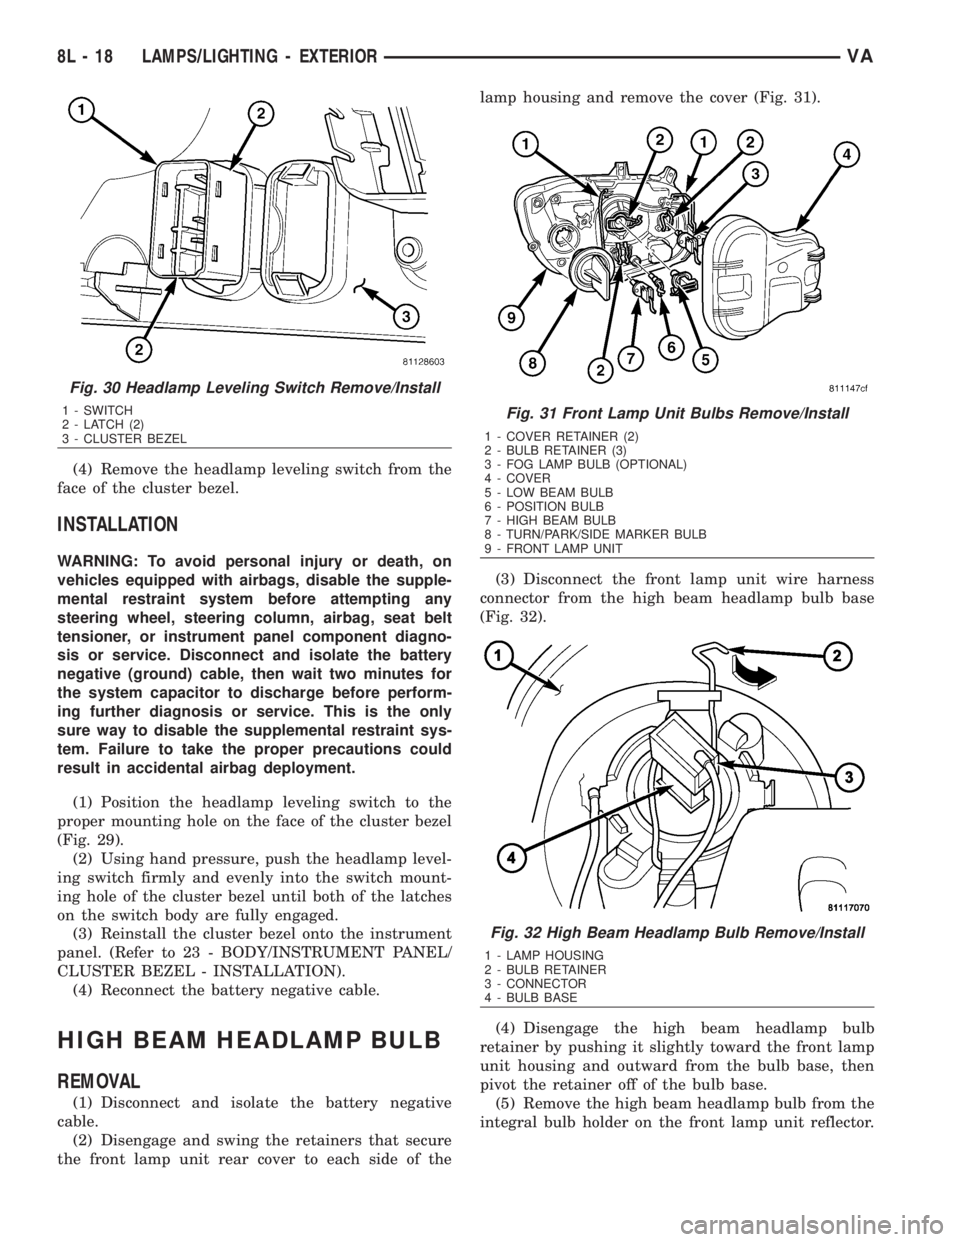
(4) Remove the headlamp leveling switch from the
face of the cluster bezel.
INSTALLATION
WARNING: To avoid personal injury or death, on
vehicles equipped with airbags, disable the supple-
mental restraint system before attempting any
steering wheel, steering column, airbag, seat belt
tensioner, or instrument panel component diagno-
sis or service. Disconnect and isolate the battery
negative (ground) cable, then wait two minutes for
the system capacitor to discharge before perform-
ing further diagnosis or service. This is the only
sure way to disable the supplemental restraint sys-
tem. Failure to take the proper precautions could
result in accidental airbag deployment.
(1) Position the headlamp leveling switch to the
proper mounting hole on the face of the cluster bezel
(Fig. 29).
(2) Using hand pressure, push the headlamp level-
ing switch firmly and evenly into the switch mount-
ing hole of the cluster bezel until both of the latches
on the switch body are fully engaged.
(3) Reinstall the cluster bezel onto the instrument
panel. (Refer to 23 - BODY/INSTRUMENT PANEL/
CLUSTER BEZEL - INSTALLATION).
(4) Reconnect the battery negative cable.
HIGH BEAM HEADLAMP BULB
REMOVAL
(1) Disconnect and isolate the battery negative
cable.
(2) Disengage and swing the retainers that secure
the front lamp unit rear cover to each side of thelamp housing and remove the cover (Fig. 31).
(3) Disconnect the front lamp unit wire harness
connector from the high beam headlamp bulb base
(Fig. 32).
(4) Disengage the high beam headlamp bulb
retainer by pushing it slightly toward the front lamp
unit housing and outward from the bulb base, then
pivot the retainer off of the bulb base.
(5) Remove the high beam headlamp bulb from the
integral bulb holder on the front lamp unit reflector.
Fig. 30 Headlamp Leveling Switch Remove/Install
1 - SWITCH
2 - LATCH (2)
3 - CLUSTER BEZELFig. 31 Front Lamp Unit Bulbs Remove/Install
1 - COVER RETAINER (2)
2 - BULB RETAINER (3)
3 - FOG LAMP BULB (OPTIONAL)
4 - COVER
5 - LOW BEAM BULB
6 - POSITION BULB
7 - HIGH BEAM BULB
8 - TURN/PARK/SIDE MARKER BULB
9 - FRONT LAMP UNIT
Fig. 32 High Beam Headlamp Bulb Remove/Install
1 - LAMP HOUSING
2 - BULB RETAINER
3 - CONNECTOR
4 - BULB BASE
8L - 18 LAMPS/LIGHTING - EXTERIORVA
Page 970 of 2305

MULTI - FUNCTION SWITCH
REMOVAL
WARNING: To avoid personal injury or death, on
vehicles equipped with airbags, disable the supple-
mental restraint system before attempting any
steering wheel, steering column, airbag, seat belt
tensioner, or instrument panel component diagno-
sis or service. Disconnect and isolate the battery
negative (ground) cable, then wait two minutes for
the system capacitor to discharge before perform-
ing further diagnosis or service. This is the only
sure way to disable the supplemental restraint sys-
tem. Failure to take the proper precautions could
result in accidental airbag deployment.
(1) Disconnect and isolate the battery negative
cable.
(2) Remove the fuse block from the underside of
the steering column. (Refer to 8 - ELECTRICAL/
POWER DISTRIBUTION/FUSE BLOCK -
REMOVAL).
(3) Remove the clockspring from the steering col-
umn. (Refer to 8 - ELECTRICAL/RESTRAINTS/
CLOCKSPRING - REMOVAL).
(4) If the vehicle is so equipped, remove the steer-
ing angle sensor from the steering column. (Refer to
5 - BRAKES/ELECTRICAL/STEERING ANGLE
SENSOR - REMOVAL).
(5) Remove the two screws that secure the upper
shroud to the top of the multi-function switch (Fig.
37).
(6) Remove the upper shroud from the top of the
multi-function switch.
(7) Remove the two screws that secure the multi-
function switch to the steering column.(8) Remove the multi-function switch from the
steering column.
(9) Remove the speed control switch from the back
of the multi-function switch. (Refer to 8 - ELECTRI-
CAL/SPEED CONTROL/SWITCH - REMOVAL).
INSTALLATION
WARNING: To avoid personal injury or death, on
vehicles equipped with airbags, disable the supple-
mental restraint system before attempting any
steering wheel, steering column, airbag, seat belt
tensioner, or instrument panel component diagno-
sis or service. Disconnect and isolate the battery
negative (ground) cable, then wait two minutes for
the system capacitor to discharge before perform-
ing further diagnosis or service. This is the only
sure way to disable the supplemental restraint sys-
tem. Failure to take the proper precautions could
result in accidental airbag deployment.
(1) Reinstall the speed control switch onto the
back of the multi-function switch. (Refer to 8 - ELEC-
TRICAL/SPEED CONTROL/SWITCH - INSTALLA-
TION).
(2) Position the multi-function switch onto the
steering column (Fig. 37).
(3) Install and tighten the two screws that secure
the multi-function switch to the steering column.
(4) Position the upper shroud onto the top of the
multi-function switch.
(5) Install and tighten the two screws that secure
the upper shroud to the top of the multi-function
switch.
(6) If the vehicle is so equipped, reinstall the steer-
ing angle sensor onto the steering column. (Refer to 5
- BRAKES/ELECTRICAL/STEERING ANGLE SEN-
SOR - INSTALLATION).
(7) Reinstall the clockspring onto the steering col-
umn. (Refer to 8 - ELECTRICAL/RESTRAINTS/
CLOCKSPRING - INSTALLATION).
(8) Reinstall the fuse block onto the underside of
the steering column. (Refer to 8 - ELECTRICAL/
POWER DISTRIBUTION/FUSE BLOCK - INSTAL-
LATION).
(9) Reconnect the battery negative cable.
PARK BRAKE SWITCH
REMOVAL
(1) Remove the trim cover from the park brake
lever (Fig. 38). (Refer to 5 - BRAKES/PARKING
BRAKE/LEVER - REMOVAL).
Fig. 37 Multi-Function Switch Remove/Install
1 - SCREW (2)
2 - UPPER SHROUD
3 - SWITCH
4 - SCREW (2)
VALAMPS/LIGHTING - EXTERIOR 8L - 21
Page 975 of 2305
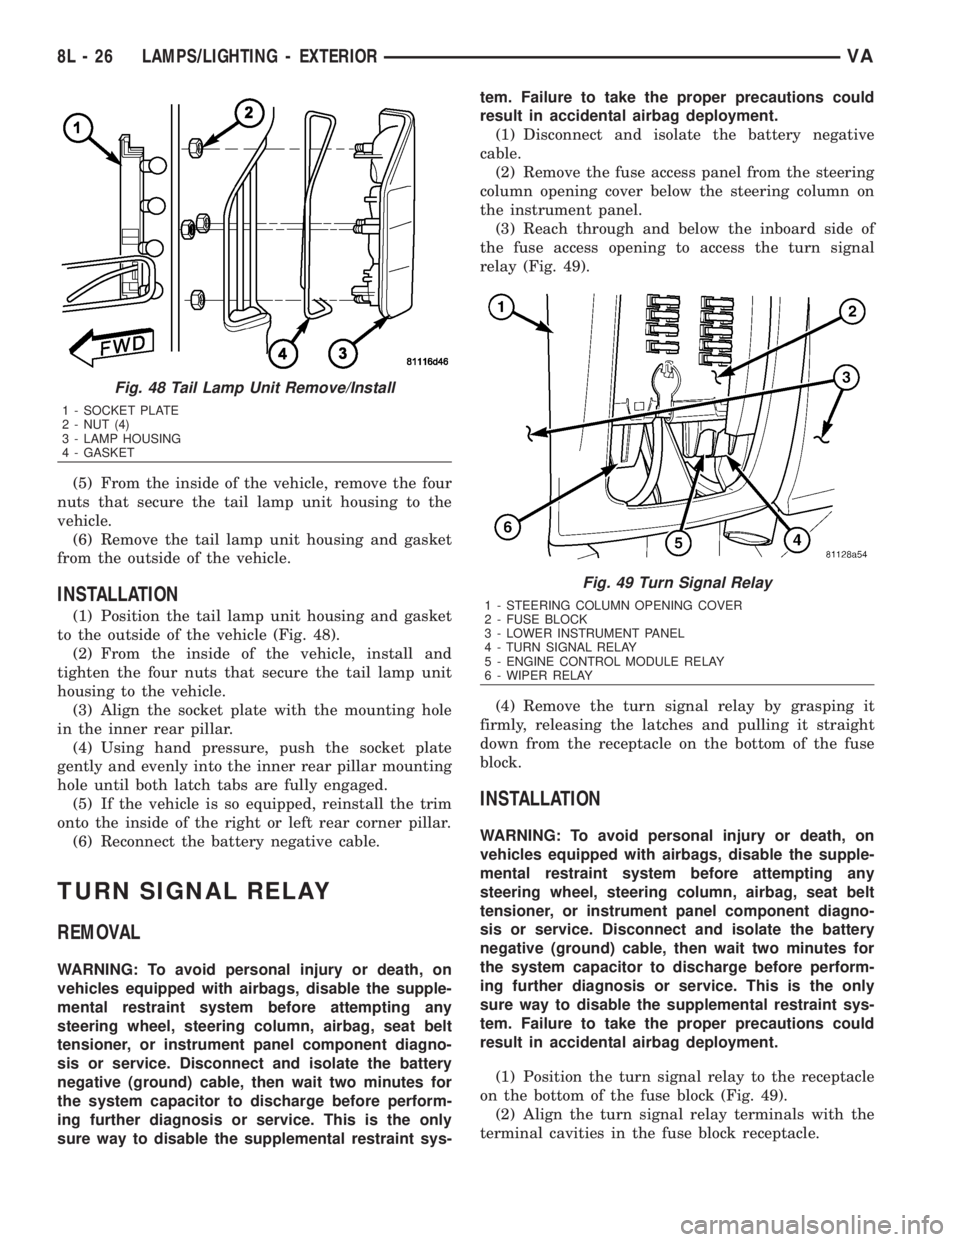
(5) From the inside of the vehicle, remove the four
nuts that secure the tail lamp unit housing to the
vehicle.
(6) Remove the tail lamp unit housing and gasket
from the outside of the vehicle.
INSTALLATION
(1) Position the tail lamp unit housing and gasket
to the outside of the vehicle (Fig. 48).
(2) From the inside of the vehicle, install and
tighten the four nuts that secure the tail lamp unit
housing to the vehicle.
(3) Align the socket plate with the mounting hole
in the inner rear pillar.
(4) Using hand pressure, push the socket plate
gently and evenly into the inner rear pillar mounting
hole until both latch tabs are fully engaged.
(5) If the vehicle is so equipped, reinstall the trim
onto the inside of the right or left rear corner pillar.
(6) Reconnect the battery negative cable.
TURN SIGNAL RELAY
REMOVAL
WARNING: To avoid personal injury or death, on
vehicles equipped with airbags, disable the supple-
mental restraint system before attempting any
steering wheel, steering column, airbag, seat belt
tensioner, or instrument panel component diagno-
sis or service. Disconnect and isolate the battery
negative (ground) cable, then wait two minutes for
the system capacitor to discharge before perform-
ing further diagnosis or service. This is the only
sure way to disable the supplemental restraint sys-tem. Failure to take the proper precautions could
result in accidental airbag deployment.
(1) Disconnect and isolate the battery negative
cable.
(2) Remove the fuse access panel from the steering
column opening cover below the steering column on
the instrument panel.
(3) Reach through and below the inboard side of
the fuse access opening to access the turn signal
relay (Fig. 49).
(4) Remove the turn signal relay by grasping it
firmly, releasing the latches and pulling it straight
down from the receptacle on the bottom of the fuse
block.
INSTALLATION
WARNING: To avoid personal injury or death, on
vehicles equipped with airbags, disable the supple-
mental restraint system before attempting any
steering wheel, steering column, airbag, seat belt
tensioner, or instrument panel component diagno-
sis or service. Disconnect and isolate the battery
negative (ground) cable, then wait two minutes for
the system capacitor to discharge before perform-
ing further diagnosis or service. This is the only
sure way to disable the supplemental restraint sys-
tem. Failure to take the proper precautions could
result in accidental airbag deployment.
(1) Position the turn signal relay to the receptacle
on the bottom of the fuse block (Fig. 49).
(2) Align the turn signal relay terminals with the
terminal cavities in the fuse block receptacle.
Fig. 48 Tail Lamp Unit Remove/Install
1 - SOCKET PLATE
2 - NUT (4)
3 - LAMP HOUSING
4 - GASKET
Fig. 49 Turn Signal Relay
1 - STEERING COLUMN OPENING COVER
2 - FUSE BLOCK
3 - LOWER INSTRUMENT PANEL
4 - TURN SIGNAL RELAY
5 - ENGINE CONTROL MODULE RELAY
6 - WIPER RELAY
8L - 26 LAMPS/LIGHTING - EXTERIORVA
Page 984 of 2305
(4) Remove the bulb from the bulb holder.
INSTALLATION
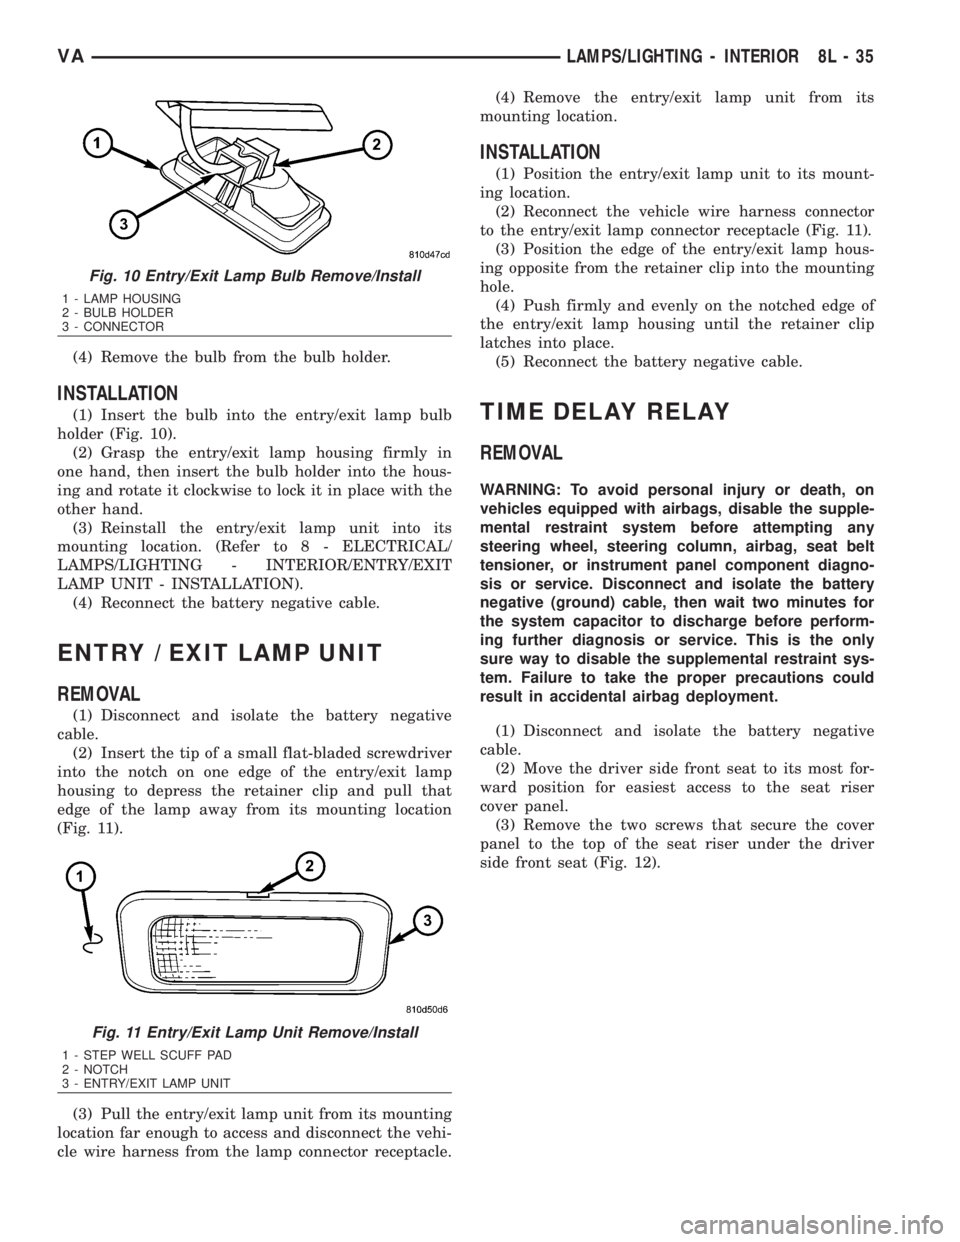
(1) Insert the bulb into the entry/exit lamp bulb
holder (Fig. 10).
(2) Grasp the entry/exit lamp housing firmly in
one hand, then insert the bulb holder into the hous-
ing and rotate it clockwise to lock it in place with the
other hand.
(3) Reinstall the entry/exit lamp unit into its
mounting location. (Refer to 8 - ELECTRICAL/
LAMPS/LIGHTING - INTERIOR/ENTRY/EXIT
LAMP UNIT - INSTALLATION).
(4) Reconnect the battery negative cable.
ENTRY / EXIT LAMP UNIT
REMOVAL
(1) Disconnect and isolate the battery negative
cable.
(2) Insert the tip of a small flat-bladed screwdriver
into the notch on one edge of the entry/exit lamp
housing to depress the retainer clip and pull that
edge of the lamp away from its mounting location
(Fig. 11).
(3) Pull the entry/exit lamp unit from its mounting
location far enough to access and disconnect the vehi-
cle wire harness from the lamp connector receptacle.(4) Remove the entry/exit lamp unit from its
mounting location.
INSTALLATION
(1) Position the entry/exit lamp unit to its mount-
ing location.
(2) Reconnect the vehicle wire harness connector
to the entry/exit lamp connector receptacle (Fig. 11).
(3) Position the edge of the entry/exit lamp hous-
ing opposite from the retainer clip into the mounting
hole.
(4) Push firmly and evenly on the notched edge of
the entry/exit lamp housing until the retainer clip
latches into place.
(5) Reconnect the battery negative cable.
TIME DELAY RELAY
REMOVAL
WARNING: To avoid personal injury or death, on
vehicles equipped with airbags, disable the supple-
mental restraint system before attempting any
steering wheel, steering column, airbag, seat belt
tensioner, or instrument panel component diagno-
sis or service. Disconnect and isolate the battery
negative (ground) cable, then wait two minutes for
the system capacitor to discharge before perform-
ing further diagnosis or service. This is the only
sure way to disable the supplemental restraint sys-
tem. Failure to take the proper precautions could
result in accidental airbag deployment.
(1) Disconnect and isolate the battery negative
cable.
(2) Move the driver side front seat to its most for-
ward position for easiest access to the seat riser
cover panel.
(3) Remove the two screws that secure the cover
panel to the top of the seat riser under the driver
side front seat (Fig. 12).
Fig. 10 Entry/Exit Lamp Bulb Remove/Install
1 - LAMP HOUSING
2 - BULB HOLDER
3 - CONNECTOR
Fig. 11 Entry/Exit Lamp Unit Remove/Install
1 - STEP WELL SCUFF PAD
2 - NOTCH
3 - ENTRY/EXIT LAMP UNIT
VALAMPS/LIGHTING - INTERIOR 8L - 35
Page 985 of 2305
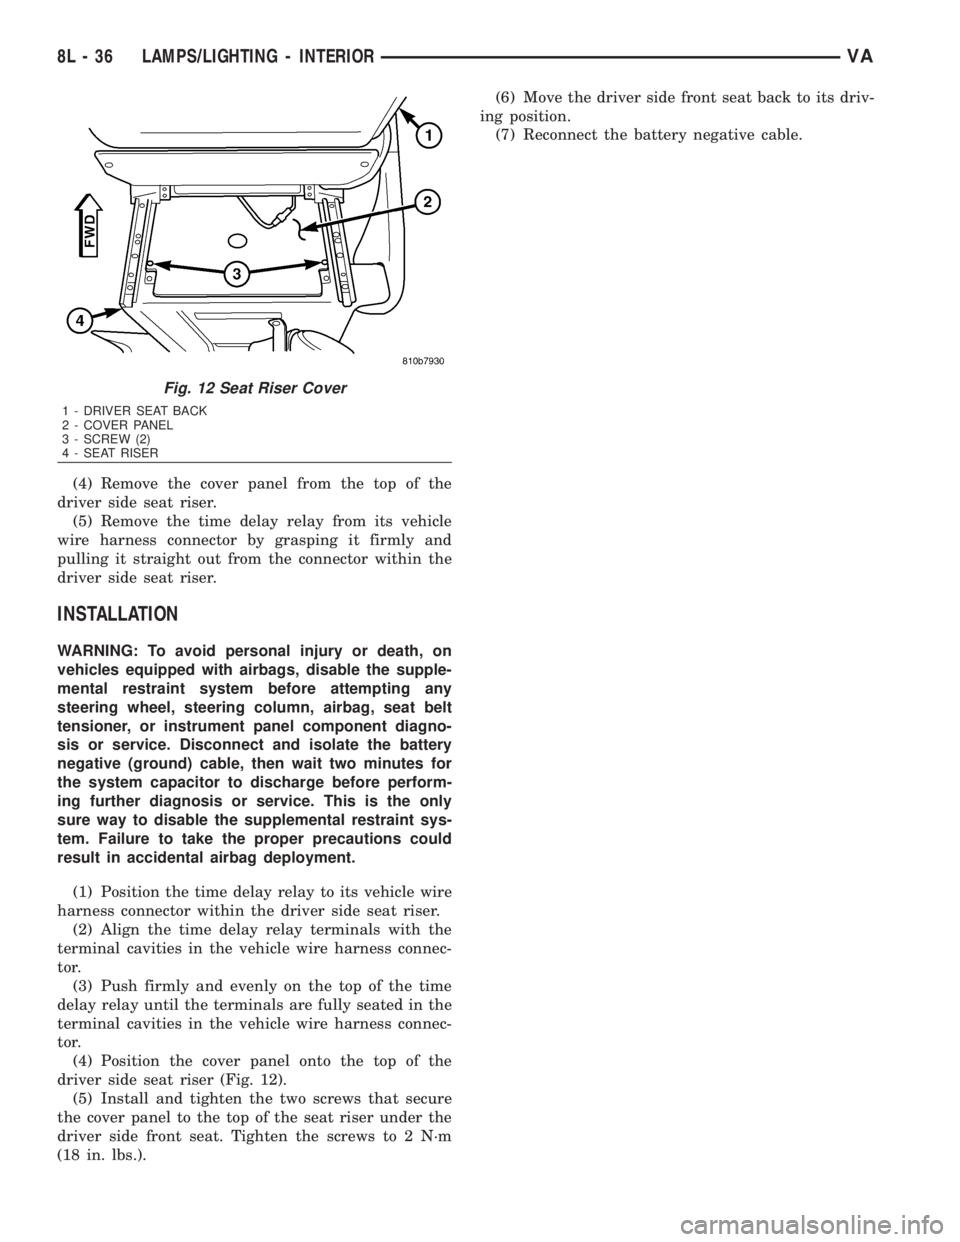
(4) Remove the cover panel from the top of the
driver side seat riser.
(5) Remove the time delay relay from its vehicle
wire harness connector by grasping it firmly and
pulling it straight out from the connector within the
driver side seat riser.
INSTALLATION
WARNING: To avoid personal injury or death, on
vehicles equipped with airbags, disable the supple-
mental restraint system before attempting any
steering wheel, steering column, airbag, seat belt
tensioner, or instrument panel component diagno-
sis or service. Disconnect and isolate the battery
negative (ground) cable, then wait two minutes for
the system capacitor to discharge before perform-
ing further diagnosis or service. This is the only
sure way to disable the supplemental restraint sys-
tem. Failure to take the proper precautions could
result in accidental airbag deployment.
(1) Position the time delay relay to its vehicle wire
harness connector within the driver side seat riser.
(2) Align the time delay relay terminals with the
terminal cavities in the vehicle wire harness connec-
tor.
(3) Push firmly and evenly on the top of the time
delay relay until the terminals are fully seated in the
terminal cavities in the vehicle wire harness connec-
tor.
(4) Position the cover panel onto the top of the
driver side seat riser (Fig. 12).
(5) Install and tighten the two screws that secure
the cover panel to the top of the seat riser under the
driver side front seat. Tighten the screws to 2 N´m
(18 in. lbs.).(6) Move the driver side front seat back to its driv-
ing position.
(7) Reconnect the battery negative cable.
Fig. 12 Seat Riser Cover
1 - DRIVER SEAT BACK
2 - COVER PANEL
3 - SCREW (2)
4 - SEAT RISER
8L - 36 LAMPS/LIGHTING - INTERIORVA
Page 996 of 2305

WARNINGS - RESTRAINT SYSTEM
WARNING: To avoid personal injury or death, during
and following any seat belt service, carefully
inspect all seat belts, buckles, mounting hardware,
retractors, tether straps, and anchors for proper
installation, operation, or damage. Replace any belt
that is cut, frayed, or torn. Straighten any belt that
is twisted. Tighten any loose fasteners. Replace any
belt that has a damaged or inoperative buckle or
retractor. Replace any belt that has a bent or dam-
aged latch plate or anchor plate. Never attempt to
repair a seat belt component. Always replace dam-
aged or faulty seat belt components with the cor-
rect, new and unused replacement parts listed in
the DaimlerChrysler Mopar Parts Catalog.
WARNING: To avoid personal injury or death, on
vehicles equipped with airbags, disable the supple-
mental restraint system before attempting any
steering wheel, steering column, airbag, seat belt
tensioner, impact sensor, or instrument panel com-
ponent diagnosis or service. Disconnect and isolate
the battery negative (ground) cable, then wait two
minutes for the system capacitor to discharge
before performing further diagnosis or service. This
is the only sure way to disable the supplemental
restraint system. Failure to take the proper precau-
tions could result in accidental airbag deployment.
WARNING: To avoid personal injury or death on
vehicles equipped with airbags, before performing
any welding operations disconnect and isolate the
battery negative (ground) cable and disconnect all
wire harness connectors from the Airbag Control
Module (ACM). Failure to take the proper precau-
tions could result in accidental airbag deployment
and other possible damage to the supplemental
restraint system circuits and components.
WARNING: To avoid personal injury or death, do not
attempt to dismantle an airbag unit or tamper with
its inflator. Do not puncture, incinerate, or bring
into contact with electricity. Do not store at temper-
atures exceeding 93É C (200É F). An airbag inflator
unit may contain sodium azide and potassium
nitrate. These materials are poisonous and
extremely flammable. Contact with acid, water, or
heavy metals may produce harmful and irritating
gases (sodium hydroxide is formed in the presence
of moisture) or combustible compounds. An airbag
inflator unit may also contain a gas canister pres-
surized to over 2500 psi.WARNING: To avoid personal injury or death, when
handling a seat belt tensioner retractor, proper care
should be exercised to keep fingers out from under
the retractor cover and away from the seat belt
webbing where it exits from the retractor cover.
WARNING: To avoid personal injury or death,
replace all restraint system components only with
parts specified in the DaimlerChrysler Mopar Parts
Catalog. Substitute parts may appear interchange-
able, but internal differences may result in inferior
occupant protection.
WARNING: To avoid personal injury or death, the
fasteners, screws, and bolts originally used for the
restraint system components must never be
replaced with any substitutes. These fasteners have
special coatings and are specifically designed for
the restraint system. Any time a new fastener is
needed, replace it with the correct fasteners pro-
vided in the service package or specified in the
DaimlerChrysler Mopar Parts Catalog.
WARNING: To avoid personal injury or death, when
a steering column has an airbag unit attached,
never place the column on the floor or any other
surface with the steering wheel or airbag unit face
down.
DIAGNOSIS AND TESTING - SUPPLEMENTAL
RESTRAINT SYSTEM
Proper diagnosis and testing of the supplemental
restraint system components or the Airbag Control
Module (ACM), initialization of the ACM, as well as
the retrieval or erasure of a Diagnostic Trouble Code
(DTC) from the ACM requires the use of a DRBIIIt
scan tool. Refer to the appropriate diagnostic infor-
mation.
WARNING: To avoid personal injury or death, on
vehicles equipped with airbags, disable the supple-
mental restraint system before attempting any
steering wheel, steering column, airbag, seat belt
tensioner, impact sensor, or instrument panel com-
ponent diagnosis or service. Disconnect and isolate
the battery negative (ground) cable, then wait two
minutes for the system capacitor to discharge
before performing further diagnosis or service. This
is the only sure way to disable the supplemental
restraint system. Failure to take the proper precau-
tions could result in accidental airbag deployment.
VARESTRAINTS 8O - 5
Page 998 of 2305

(1) Begin the cleanup by using a vacuum cleaner
to remove any residual powder from the vehicle inte-
rior. Clean from outside the vehicle and work your
way inside, so that you avoid kneeling or sitting on a
non-cleaned area.
(2) Be certain to vacuum the heater and air condi-
tioning outlets as well (Fig. 4). Run the heater and
air conditioner blower on the lowest speed setting
and vacuum any powder expelled from the outlets.
CAUTION: All damaged, faulty, or non-deployed
supplemental restraints which are replaced on vehi-
cles are to be handled and disposed of properly. If
an airbag unit or seat belt tensioner unit is faulty or
damaged and non-deployed, refer to the Hazardous
Substance Control System for proper disposal. Be
certain to dispose of all non-deployed and deployed
supplemental restraints in a manner consistent with
state, provincial, local and federal regulations.
(3) Next, remove the deployed supplemental
restraints from the vehicle. Refer to the appropriate
service removal procedures.
(4) You may need to vacuum the interior of the
vehicle a second time to recover all of the powder.
STANDARD PROCEDURE - VERIFICATION TEST
The following procedure should be performed using
a diagnostic scan tool to verify proper supplemental
restraint system operation following the service or
replacement of any supplemental restraint system
component.
WARNING: To avoid personal injury or death, on
vehicles equipped with airbags, disable the supple-
mental restraint system before attempting any
steering wheel, steering column, airbag, seat belt
tensioner, impact sensor, or instrument panel com-
ponent diagnosis or service. Disconnect and isolate
the battery negative (ground) cable, then wait two
minutes for the system capacitor to dischargebefore performing further diagnosis or service. This
is the only sure way to disable the supplemental
restraint system. Failure to take the proper precau-
tions could result in accidental airbag deployment.
(1) During the following test, the battery negative
cable remains disconnected and isolated, as it was
during the supplemental restraint system component
removal and installation procedures.
(2) Be certain that the diagnostic scan tool con-
tains the latest version of the proper diagnostic soft-
ware. Connect the diagnostic to the 16-way Data
Link Connector (DLC). The DLC is located on the
dash panel beneath the driver side lower edge of the
instrument panel, outboard of the steering column
(Fig. 5).
(3) Turn the ignition switch to the On position and
exit the vehicle with the diagnostic scan tool.
(4) Check to be certain that nobody is in the vehi-
cle, then reconnect the battery negative cable.
(5) Using the diagnostic, read and record the
active (current) Diagnostic Trouble Code (DTC) data.
(6) Next, use the diagnostic to read and record any
stored (historical) DTC data.
(7) If any DTC is found in Step 5 or Step 6, refer
to the appropriate diagnostic information.
(8) Use the diagnostic to erase the stored DTC
data. If any problems remain, the stored DTC data
will not erase. Refer to the appropriate diagnostic
information to diagnose any stored DTC that will not
erase. If the stored DTC information is successfully
erased, go to Step 9.
(9) Turn the ignition switch to the Off position for
about fifteen seconds, and then back to the On posi-
tion. Observe the airbag indicator in the instrument
cluster. It should illuminate for four seconds, and
then go out. This indicates that the supplemental
Fig. 4 Vacuum Heater and A/C Outlets - Typical
Fig. 5 16-Way Data Link Connector
1 - BOTTOM OF INSTRUMENT PANEL
2 - CONNECTOR COVER
3 - 16-WAY DATA LINK CONNECTOR
4 - DASH PANEL
5 - INSIDE HOOD RELEASE LEVER
VARESTRAINTS 8O - 7
Page 1001 of 2305
REMOVAL
WARNING: To avoid personal injury or death, on
vehicles equipped with airbags, disable the supple-
mental restraint system before attempting any
steering wheel, steering column, airbag, seat belt
tensioner, impact sensor, or instrument panel com-
ponent diagnosis or service. Disconnect and isolate
the battery negative (ground) cable, then wait two
minutes for the system capacitor to discharge
before performing further diagnosis or service. This
is the only sure way to disable the supplemental
restraint system. Failure to take the proper precau-
tions could result in accidental airbag deployment.
WARNING: To avoid personal injury or death, never
strike or drop the airbag control module as it can
damage the impact sensor or affect its calibration.
The airbag control module contains the impact sen-
sor, which enables the system to deploy the supple-
mental restraints. If an airbag control module is
accidentally dropped during service, the module
must be scrapped and replaced with a new unit.
Failure to observe this warning could result in acci-
dental, incomplete, or improper supplemental
restraint deployment.
(1) Disconnect and isolate the battery negative
cable. Wait two minutes for the system capacitor to
discharge before further service.
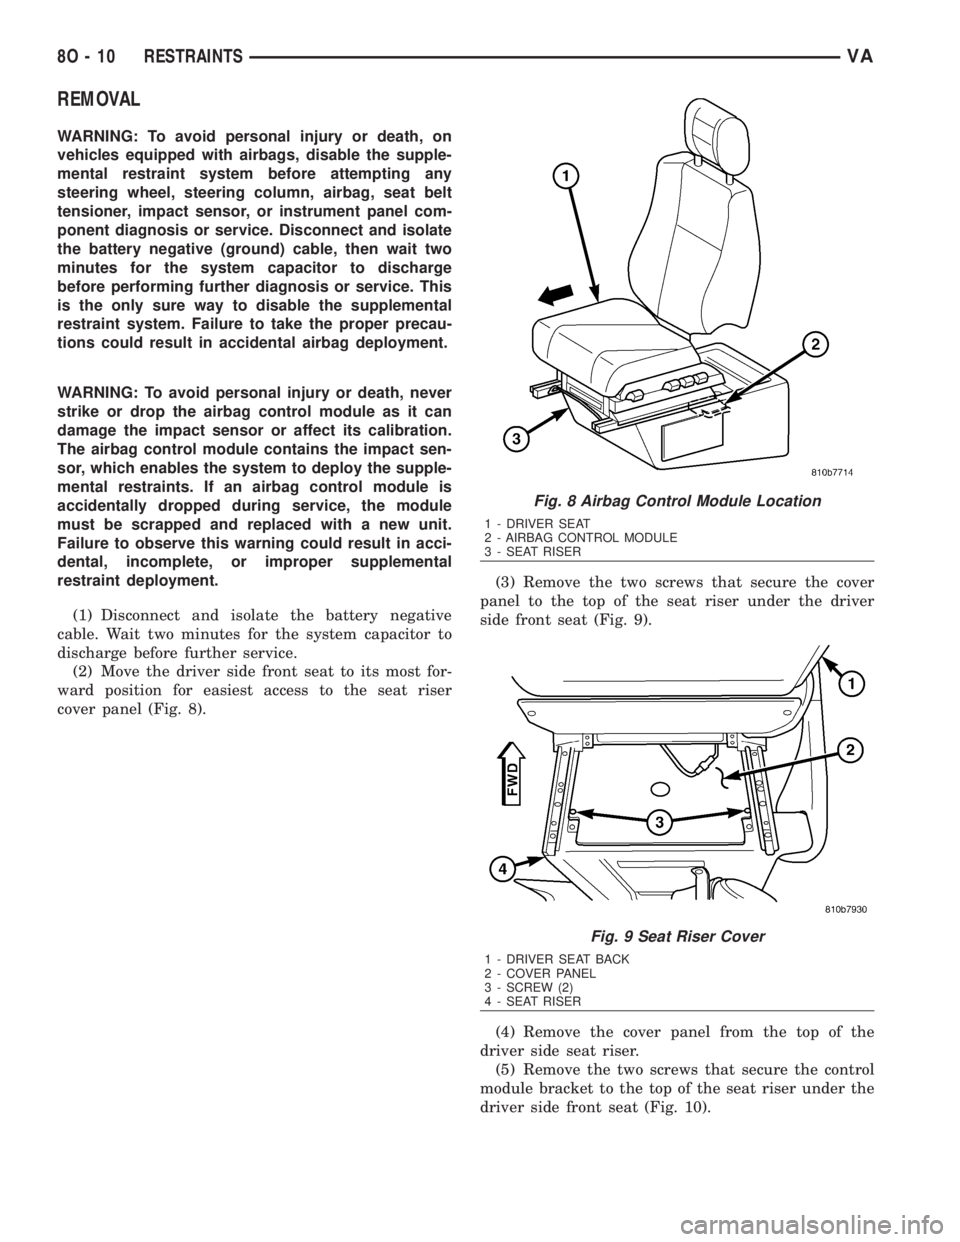
(2) Move the driver side front seat to its most for-
ward position for easiest access to the seat riser
cover panel (Fig. 8).(3) Remove the two screws that secure the cover
panel to the top of the seat riser under the driver
side front seat (Fig. 9).
(4) Remove the cover panel from the top of the
driver side seat riser.
(5) Remove the two screws that secure the control
module bracket to the top of the seat riser under the
driver side front seat (Fig. 10).
Fig. 8 Airbag Control Module Location
1 - DRIVER SEAT
2 - AIRBAG CONTROL MODULE
3 - SEAT RISER
Fig. 9 Seat Riser Cover
1 - DRIVER SEAT BACK
2 - COVER PANEL
3 - SCREW (2)
4 - SEAT RISER
8O - 10 RESTRAINTSVA