Page 141 of 561
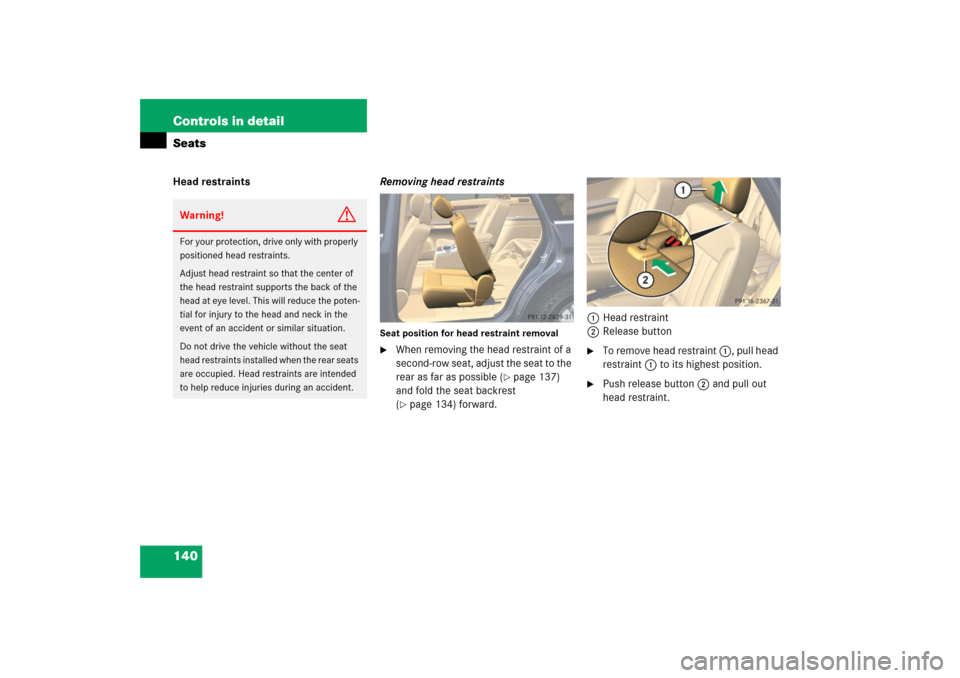
140 Controls in detailSeatsHead restraintsRemoving head restraints
Seat position for head restraint removal�
When removing the head restraint of a
second-row seat, adjust the seat to the
rear as far as possible (
�page 137)
and fold the seat backrest
(
�page 134) forward.1Head restraint
2Release button
�
To remove head restraint 1, pull head
restraint 1 to its highest position.
�
Push release button2 and pull out
head restraint.
Warning!
G
For your protection, drive only with properly
positioned head restraints.
Adjust head restraint so that the center of
the head restraint supports the back of the
head at eye level. This will reduce the poten-
tial for injury to the head and neck in the
event of an accident or similar situation.
Do not drive the vehicle without the seat
head restraints installed when the rear seats
are occupied. Head restraints are intended
to help reduce injuries during an accident.
Page 142 of 561

141 Controls in detailSeats
Installing head restraints�
Insert head restraint 1 into openings
on the seat backrest.
�
Push head restraint 1 down until it au-
dibly engages.
�
Push release button2 and adjust
head restraint 1 to the desired posi-
tion (
�page 139).Armrests
The second-row seat armrests can be fold-
ed up, when loading for example, and ad-
justed.
Folding up
�
Move the armrest into a vertical posi-
tion until it engages.
Adjusting
�
With the armrest folded up, disengage
the armrest by pushing it towards the
rear slightly.
�
Fold the armrest down to the lowest
and then to the desired position until it
engages.
�
To readjust the armrest to a higher
position, move armrest up to the
desired position until it engages.
Seat heating*
Front-seat heating
The switches for front-seat heating are lo-
cated in the center console. The red indica-
tor lamps in the switch come on to show
which heating level you have selected.
iOn the second-row seats, the guide bar
with the detent must be on the left.
iIf you wish to readjust the armrest to a
lower position, you must first fold up
the armrest again and repeat the steps
above.
Page 144 of 561
143 Controls in detailSeats
Switching off�
Press switch1 repeatedly until all
indicator lamps2 go out.Second-row seat heating
The switches for the second-row seats are
located in the rear center console.
1Seat heating switch
2Indicator lamps
�
Operate the seat heating for the
second-row seats as described in
“Front-seat heating” (
�page 141).
iIf one or more of the indicator
lamps2 on seat heating switch 1 are
flashing, there is insufficient voltage
due to too many electrical consumers
being switched on. The seat heating
switches off automatically.
The seat heating will switch back on
again automatically as soon as
sufficient voltage is available.
Page 145 of 561

144 Controls in detailMemory function*Prior to operating the vehicle, the driver
should check and adjust the seat height,
seat position fore and aft, and seat back-
rest angle if necessary, to ensure adequate
control, reach and comfort. The head re-
straint should also be adjusted for proper
height. See also the section on air bags
(�page 71) for proper seat positioning.
In addition, adjust the steering wheel to
ensure adequate control, reach, operation
and comfort. Both the interior and exterior
rear view mirrors should be adjusted for
adequate rear vision.
Fasten seat belts. Infants and small chil-
dren should be seated in a properly se-
cured restraint system that complies with
U.S. Federal Motor Vehicle Safety Stan-
dard 213 and 225 and Canadian Motor Ve-
hicle Safety Standards 213 and 210.2.With the memory function you can store up
to three different settings for each front
seat.
The following settings are saved for each
stored position on the entry side of the
driver’s seat:
�
Driver’s seat, head restraint height and
backrest position
�
Steering wheel position
�
Driver’s side exterior rear view mirror
position
�
Passenger-side exterior rear view
mirror position
The following are saved for each stored po-
sition on the entry side of the front passen-
ger seat:
�
Front passenger seat, head restraint
height and backrest position
Warning!
G
Do not activate the memory function while
driving. Activating the memory function
while driving could cause the driver to lose
control of the vehicle.
Page 146 of 561

145 Controls in detail
Memory function*
The memory button and stored position
buttons are located on the entry side of
each front seat base.
MMemory button
1, 2, 3Stored positions�
Switch on the ignition (
�page 38).
or
�
Open the respective door.
Storing positions into memory�
Adjust the seats, steering wheel and
exterior rear view mirrors to the de-
sired position (
�page 42).
�
Press memory buttonM.
�
Release memory button M and press
stored position 1, 2 or 3 within
3 seconds.
All settings are stored to the selected
position.
Recalling positions from memory�
Press and hold memory position
button1,2 or3 until the seat, steering
wheel and exterior rear view mirrors
have fully moved to the stored posi-
tions.!Do not operate the power seats using
memory button M if the seat backrest
is in an excessively reclined position.
Doing so could cause damage to front
or rear seats.
First move seat backrest to an upright
position.iReleasing the memory position button
stops movement to the stored posi-
tions immediately.
Page 147 of 561

146 Controls in detailMemory function*Storing exterior rear view mirror parking position
For easier parking, you can adjust the
passenger-side exterior rear view mirror so
that you can see the right rear wheel as
soon as you engage reverse gearR.
You can switch the parking position fea-
ture on and off in the control system.
For information on activating the parking
position feature, see “Setting parking posi-
tion for exterior rear view mirror*”
(�page 190).1Adjustment button
2Passenger-side exterior rear view mir-
ror
MMemory button
�
Stop the vehicle in a safe location.
�
Switch on the ignition (
�page 38).
�
Press button2 on the door control
panel.
The passenger-side exterior rear view
mirror is selected. The indicator lamp
on button2 comes on.
�
Adjust the passenger-side exterior rear
view mirror with button1 so that you
see the rear wheel and the road curb.
�
Press memory buttonM.
�
Within 3 seconds, press adjustment
button1 once more.
The parking position is stored if the
mirror does not move.iIf the mirror does move, repeat the
above steps. After the setting is stored,
you can move the mirror again.
Page 148 of 561

and “Turn signals” (
�page 58)")
147 Controls in detail
Lighting
�Lighting
For information on how to switch on the
headlamps and use the turn signals, see
“Switching on headlamps” (
�page 58)
and “Turn signals” (
�page 58).
Exterior lamp switch
The exterior lamp switch is located on the
dashboard to the left of the steering wheel.MOff
Daytime running lamp mode
(
�page 149)
UAutomatic headlamp mode
Daytime running lamp mode
(�page 148)
CParking lamps (also tail lamps,
license plate lamps, side marker
lamps, instrument panel lamps)
BLow beam headlamps (or high
beam headlamps when the
combination switch is pushed
forward) and parking lamps
ˆStanding lamps, right (turn left one
stop)
‚Standing lamps, left (turn left two
stops)
‡Indicator lamp for front fog lamps*
†Indicator lamp for rear fog lamp
iIf you drive in countries where vehicles
drive on the other side of the road than
the country in which the vehicle is reg-
istered, you must have the headlamps
modified for symmetrical low beams.
Relevant information can be obtained
at any authorized Mercedes-Benz Light
Truck Center.iVehicles equipped with active
Bi-Xenon* headlamps:
The active Bi-Xenon* headlamps moni-
tor the vehicles steering angle, then au-
tomatically shift their beams to either
side to better follow the curvature of
the road ahead, increasing usable illu-
mination over conventional headlamps.
Page 152 of 561
.
�
Pull out the exterior lamp switch to first
stop.
The front fog lamps switch on.
The green indicator l")
151 Controls in detail
Lighting
Front fog lamps*�
Switch on the low beam headlamps
(�page 58).
�
Pull out the exterior lamp switch to first
stop.
The front fog lamps switch on.
The green indicator lamp‡ in the
exterior lamp switch comes on
(�page 147).
�
Push in the exterior lamp switch.
The front fog lamps switch off.
The green indicator lamp‡ in the
exterior lamp switch goes out.Rear fog lamp (driver’s side only)
�
Pull out the exterior lamp switch to
second stop.
The rear fog lamp switches on.
The yellow indicator lamp† in the
exterior lamp switch comes on
(�page 147).
�
Push in the exterior lamp switch to first
stop.
The rear fog lamp switches off.
The yellow indicator lamp† in the
exterior lamp switch goes out.
The front fog lamps* remain lit.
Combination switch
The combination switch is located on the
left of the steering column.
1High beam
2High beam flasher
High beam�
Turn the exterior lamp switch to
positionB orU (
�page 147).
iIf so equipped, the front fog lamps* will
also switch on.
��